Making the clock
As before it is important to remember that if you make a thicker clock
face, it may interfere with the proper function of the clock hands. This
pattern is for my original visualisation of a lovely thick Aran clock,
but to achieve this I had to replace the clock mechanism in the IKEA clock
with one with a higher loft. The clock face is thick all over not just
towards the edges, so trimming the hands is not sufficient. If you do
change the mechanism like this then you have to carefully check how high
you can make the hands above the clock face while still being able to
fit the plastic cover over the face.
[Editor's note: Failing all else you could leave the cover off altogether,
exposing your knitted clock face to the elements.]
Materials
Clock movements and hands were purchased from eBay. I tried both the 15mm and the 20mm shaft sizes, and settled
on the latter.
Original clock came from IKEA.
Aran yarn was two different makes of left-overs - one for the face section
and one for the edging section. Take care to match the shades of cream
- there is a lot of variation in tone as well as thickness. The latter
is less important for this project, just make sure you don't change yarn
in the middle of one of the sections.
The clock face
Using 3¾mm needles and waste yarn, cast on 24 stitches, then,
leaving a 6 inch tail, start using the cream aran yarn, and knit one row.
Join in a circle and begin pattern as follows:
Row 1: (Twist 2; p1) 8 times. [Twist
2 by knitting through the second stitch on the left hand needle and then
knitting through the first stitch and slipping both stitches off the needle
together - effectively you have cabled over 2 stitches].
Row 2: (K2; p1) 8 times.
Row 3: (K1, increase knitwise by picking
up the loop before the next stitch and knitting into the back of it, k1;
p1) 8 times. [32sts]
Row 4: (K3; p1) 8 times.
Row 5: (K3; increase purlwise by picking
up the loop before the next stitch and purling into the back of it, p1,
increase purlwise). [48sts]
Row 6: (K3, p3) 8 times.
Row 7: (Cable and increase by slipping
one stitch onto a cable needle and leaving at back of work, k2, increase
knitwise using the loop before the stitch on the cable needle, knit one
stitch from cable needle; p3, increase purlwise) 8 times. [64sts]
Row 8: (K4; p4) 8 times.
Row 9: (K4; increase purlwise, p4,
increase purlwise) 8 times. [80sts]
Row 10: (K4, p6) 8 times.
Row 11: (K4; increase purlwise, p6,
increase purlwise) 8 times. [96sts]
Row 12: (K4, p8) 8 times.
Row 13: (Cable and increase by slipping
2 sts onto a cable needle and leaving at back of work, k2, increase knitwise
using the loop before the stitches on the cable needle, knit 2 sts from
cable needle; p8) 8 times. [104sts]
Row 14: (K5; increase purlwise, p8,
increase purlwise) 8 times. [120sts]
Row 15: (K5, p10) 8 times.
Row 16: (K5, increase purlwise, p4,
make bobble†, p5; k5, increase
purlwise, p10) 4 times. [128sts]
† To make bobble:
increase by (k1, p1, k1, p1, k1) into next stitch; turn the work and knit
the 5 sts; turn the work, slip 4 sts, k1, pass the 4 slipped sts over.
Row 17: (K5, p11) 8 times.
Row 18: (K5, p11, increase purlwise)
8 times. [136sts]
Row 19: (Cable and increase by slipping
2sts onto a cable needle and leaving at back of work, k3, increase knitwise
using the loop before the stitch on the cable needle, knit 2 sts from
cable needle; p12) 8 times. [144sts]
Row 20: (K6, p12) 8 times.
Row 21(cast off): (K2tog; k2tog, pass
first stitch on right hand needle over second st, k2tog, pass first stitch
on right hand needle over second st; cast off next 12 sts purlwise); repeat
across all 8 sections and fasten off.
Return to the centre. Carefully remove the waste yarn and pick up the
free stitches.
Thread the tail through the stitches and pull up. Fasten off.
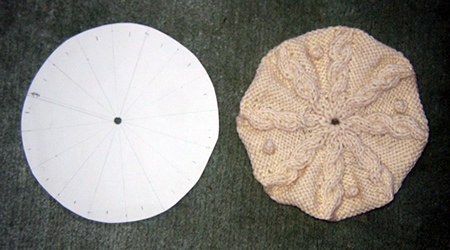
The face is not quite flat making the effect of the cables and bobbles
more overt. Sew in the ends and press lightly with a damp cloth, taking
care not to flatten the cables.

Using the plastic clock face cover as a guide, cut a circle from stiff
cardboard. and make a hole in the centre. Sew the knitted face to the
cardboard at the edge, which pulls it into shape.
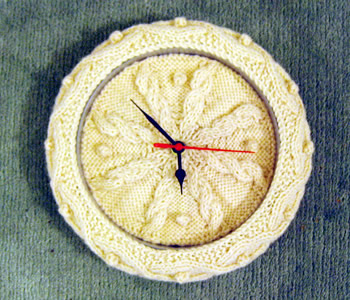
Put the clock face into the body, keeping the bobbles at the 12, 3, 6
and 9 positions.
Remove original plastic mechanism (it is held in place at the
back by plastic clips which are easily released) and push in the new mechanism;
secure in place with the washer and small ring bolt. I had to trim a plastic
loop from the back of my replacement mechanism to make it fit the housing
in the IKEA clock.
Knitted frame for the clock
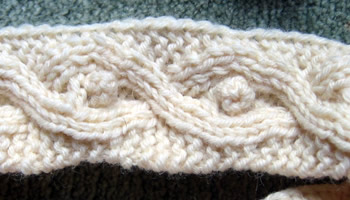
The clock frame consists of 12 ribbed cables each with a centre bobble.
It is designed to fit tightly, (so slightly stretched), aided by keeping
the edge stitches in garter stitch.
I cast on with waste yarn and then grafted the stitches together - this
is quite tricky, so you may want to finish by simply sewing the ends together.
Note that the right side rows always start with a slipped stitch, and
the alternate rows do not. This makes the right hand edge of the work
slightly tighter.

Cable abbreviations:
C3Lk = cable 3 to the left and knit: slip 3 sts on cable needle
and leave at front of work; k1, then k1, p1, k1 from cable needle.
C3Rp = cable 3 to the right and purl: slip 1 st on cable needle
and leave at back of work; k1, p1, k1, then purl one stitch from cable
needle.
C3Lp = cable 3 to the left and purl: slip 3 sts on cable needle
and leave at front of work; p1, then k1, p1, k1 from cable needle.
C3Rk = cable 3 to the right and knit: slip 1 st on cable needle
and leave at back of work; k1, p1, k1, then knit one stitch from cable
needle.
C7 = cable over 7 stitches: slip next 4 sts on to a cable needle
and leave at the back of the work; k1, p1, k1, then p1, k1, p1, k1, from
cable needle.
Make bobble: increase 4 sts by (k1, p1, k1, p1, k1) into next
stitch; turn the work and knit the 5 sts; turn the workand decrease the
4 sts just made by slipping 4 sts, k1, then pass the 4 slipped sts over.
Pattern:
Using 3¾mm needles, cast on 15 sts and begin the 16 row pattern:
Row 1: Slip1, k1; k1, p1, k1; p5;
k1, p1, k1; k2
Row 2 (and alternate rows): Knit the
knit stitches and purl the purl stitches.
Row 3: Slip1, k1; C3Lk; p3; C3Rk;
k2
Row 5: Slip1, k2; k1, p1, k1; p3;
k1, p1, k1; k3
Row 7: Slip1, k2; C3Lk; p1; C3Rk;
k3
Row 9: Slip1, k3; C7; k4
Row 11: Slip1, k2; C3Rp; p1; C3Lp;
k3
Row 13: Slip1, k2; k1, p1, k1; p3;
k1, p1, k1; k3
Row 15: Slip1, k1; C3Rp; p3; C3Lp;
k2
Row 17: Slip1, k1; k1, p1, k1; p2,
make bobble, p2; k1, p1, k1; k2
Row 18: K2; p1, k1, p1; k5; p1, k1,
p1; k2
Repeat rows 3-18 eleven times more. Cast off.
Join in a ring, either sewing or grafting.
Attach the knitted circle to the clock with the slipped stitch edge towards
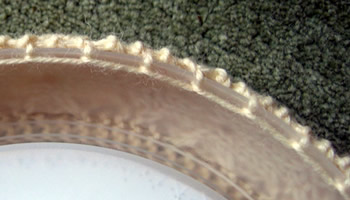
the clock face, and attach the other side to the rim of the clock; I drilled
holes around the plastic clock surround, (as before), about ¼ inch
from the edge.

|


