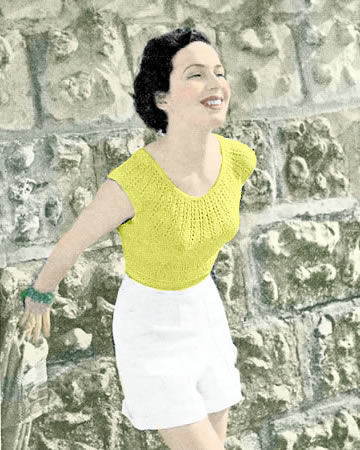
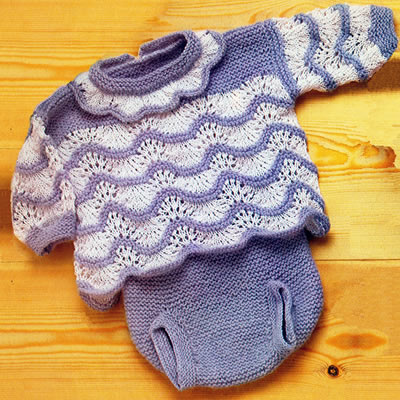
Old Shale Angel
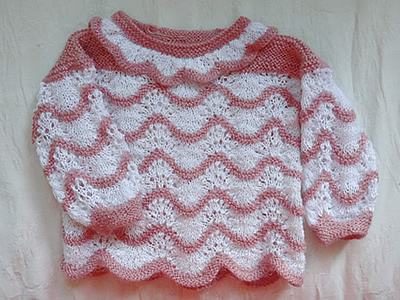
A really pretty top using the ubiquitous but nonetheless charming old shale (or old shell) stitch. Originally it was knitted in fine white cotton bands interspersed with a fine slightly fluffy yarn, giving it a summery feel. However - how charming it would be in red and white for a small person's party outfit at Christmas. I am not sure how I would arrange the colours for a winter version - I favour the dominant red colour for the plain garter stitch - but it might be interesting to have the white as the fluffy bands simulating fur trimming.
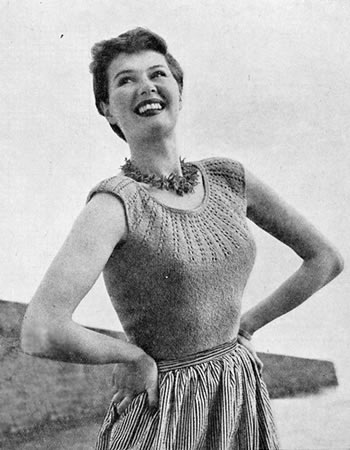
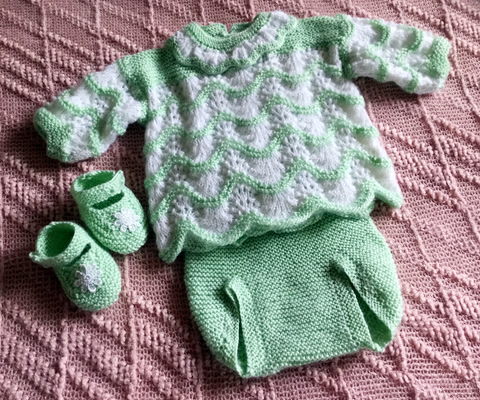
The pattern is for an entire outfit with pants, and some cute little cotton sandals (of dubious value...!).
Below we have simply lovely photo from Sandy in Shellharbour, Australia, showing the complete outfit. She has added a of a little pair of bootees of her own design rather than the "sandals" supplied in the pattern.
Such a pretty colour!
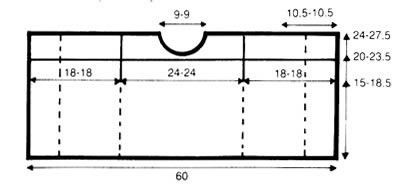
Instructions for Angel TopThe angel top is worked in a combination garter stitch (every row knitted) and a Wave pattern using "old shale" (or shell) stitch. When working the Wave pattern, carry the yarn not in use loosely up the side of the work. Angel Top - main sectionThis section is worked in one piece up to the armhole.
Using 3mm needles and pink yarn (A) , cast on 192 sts and knit one row. Continuing with yarn A begin Wave pattern as follows: 1st row (right side) : Knit. Join in white yarn (B), working 5th - 14th rows in white: 5th row: Sl 1; *
(k2tog) 3 times; (k1, yfwd) 6 times; k1; (k2tog) 3 times; repeat from
* to last stitch; k1. These 14 rows form the pattern, Repeat the pattern 3 (4) times more,
then work the 1st to 3rd rows again. Divide for armhole: Next row (wrong side): K57, increase in the next 2 sts, k74, increase in the next st, and leave these 137 sts on a stitch holder; increase in the next st, knit to end. Continue on these remaining 59 sts to make the Left Back. Work rows 5-14, break yarn B and continue in yarn A only. Next row: Knit Continue in garter stitch with yarn A until work measures 24 (27½) cm, or 9½ (10¾) inches, ending with a right side row. Cast off, placing a marker for the collar on the 26th stitch from the end. With right side facing, rejoin white yarn B to sts on stitch holder and pattern 78 (as 5th row of Wave pattern); turn and leave remaining sts on stitch holder. Continue in pattern on these 78 sts for Front and work rows 6-14. Next row: Knit Continue in garter stitch with yarn A until work measures 20 (23½) cm, or 7¾ (9¼) inches, ending with a right side row. Shape Neck: Next row (wrong side): K27 and leave on a stitch holder; cast off 6 sts; knit to end. Continue on remaining 27 sts for first side: 1st and every alternate row: Knit 2nd row (wrong side): cast off 3
sts, knit to end. Work a few rows on remaining 19 sts until Front matches Left Back to
shoulder.
With right side facing, rejoin white to 59 sts on stitch holder and pattern
59 (as 5th row of Wave pattern). Angel Top - sleevesWith 2½mm needles and yarn A, cast on 30 sts and work 10 rows in
garter stitch. Change to 3mm needles, join in white yarn B and beginning with 5th row of the Wave pattern, work in pattern until sleeve measures approximately 11 (14½) cm, or 4¼ (5¾) inches, ending with a 14th pattern row. Break off yarn B and continue in yarn A only.  Angel Top - collarWith 3mm needles and yarn A, cast on 120 sts and work 3 rows in garter
stitch. 1st row: Sl 1 , *
k1, yfwd, k4, k2tog, sl 1, k1, psso, K4, yfwd; repeat from *
to last 2 sts, k2. Rep these 2 rows twice more. 7th row: Sl 1 , *
k1, k2tog, k3, k2tog, k3, sl 1, k1, psso; rep from * to last 2 sts, k2.
[93 sts] Angel Top - neck bandWith 3mm needles and yarn A, cast on 60 sts and work 6 rows in garter
stitch. Making Up the Angel TopDo not press. |
Materials
|
Instructions for PantsThe pants are worked entirely in garter stitch (every row knitted) in one piece, starting at the front waist, working down to the crotch, and then up the back, ending at the back waist. 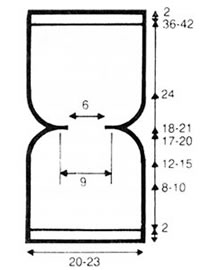 Begin at front and with 2½mm needles cast on 48(56)
sts and work 2cms, or ¾ inch, in k1/p1 rib. Divide for leg openings:Next row: Knit 13(17) and leave on a stitch holder; k22, turn, and leave remaining 13 (17) sts on a stitch holder. Continue on these centre 22 sts and work 9(10)
cms 3½(3¾) inches in garter
stitch,ending with a right side row. With wrong side facing, rejoin yarn to sts on first stitch holder and
knit to end. ** Begin shaping side by decreasing
1 st at the beginning of the next and following 6th(4th)
row. Decrease 1 st at the beginning of the next and following 4th row 2(1)
times. [8(13) sts] Decrease 1 st at the beginning of the next and following 1(2)
alternate rows. [6(10) sts] Cast off 2 sts at the beginning of the next and following 0(1)
alternate rows. [4(6) sts] With right side facing, rejoin yarn to sts on 2nd stitch holder and knit
to end. [13(17) sts] Shape Front SidesWorking right side of pants as left side from ** until 6(8) sts remain, ending at side edge. Continue shaping sides and join all 3 parts to close leg openings: Next row (wrong side): cast off 2
sts, k4(6) (including st left on needle
after cast-off), k22 from centre, then k4(6)
from left side. [30(34) sts] Next 2 rows: Cast off 2 sts, knit
to end. Shape Back2nd SIZE BOTH SIZES 1st SIZE BOTH SIZES Cast off in rib. Making Up the PantsLeg Borders: With right side facing and using set of 4 needles, knit up 46(51) sts round each leg opening and work in rounds. 1st round: Purl Join side seams. |
Materials
|
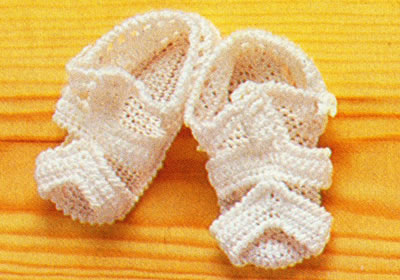
Instructions for SandalsWith 2mm hook make 20 chain foundation row. SOLE1st round: 1 dc in 2nd ch from hook, 1 dc in each of next 17ch, 3 dc in next ch, then back along other side of foundation: 1 ch: 1 dc in each of next 18 ch, 3 dc in next ch, sl st to join. Work 2 more rounds, working 3 dc in stitch at each end of sole as before. 4th round: 1 ch; (1 dc in each of next 19 sts, 3 dc in next st, 1 dc in each of 3 end sts, 3 dc in next st, 1 dc in next st) twice; sl st to join. 5th round: 1 ch; (1 dc in each of next 20 sts, 3 dc in next st, 1 dc in each of 5 end sts, 3 dc in next st, 1 dc in each of next 2 sts) twice; sl st to join. [66 sts] Work 1 round dc on these 66 sts to complete sole and fasten off. With right side facing, mark 33 sts round one end of sole and work back of sandal working back and forth in rows: 1st row: Rejoin yarn. 3 ch; miss
1 st; 1 tr in next st; (1 ch, miss 1 st, 1 tr in next st) 15 times, turn.
Fasten Off. Crab StitchCrab stitch is worked exactly as you do double crochet - but from right to left instead of left to right (assuming you are right handed and normally crochet from left to right). It seems very awkward but just force yourself to do it; push the hook through the stitch to the right of your needle, pull through a loop, then yoh and pull through both loops on hook. It creates a very attractive twisted ribbed edge. There a is you tube extract inserted at end of this item - or go search the web for "crab stitch" for a variety of explanations. TOEMake 18 ch. STRAPS for TOP of SANDALMake 26 ch and work Foundation Row as for Toe. [25 sts] 2nd and 3rd rows: 1 ch, 1 dc in each
stitch to end. Miss 11 sts and rejoin yarn to next stitch 1 ch, 1 dc in each of next 2 stitches. [3 sts] Work 3cms (1¼ inches) in dc on these 3 sts, then continue in crab
stitch round all edges, making a buttonhole at each side of 3 dc strip,
To Make a Buttonhole2 ch, miss 2 rows, 1 dc in next row. ANKLE STRAPMake 17 ch. TO MAKE UPSew Toe and Sandal Straps in place on sole, (see photo). |
Materials
|
Notes on English Crochet Stitches
- Double crochet:
- draw a loop through next stitch, draw a loop through both loops on hook. [American single].
- Half treble*:
- pass yarn round hook, draw a loop through next stitch, draw a loop through all 3 loops on hook. [American double]
- Treble:
- pass yarn round hook, draw a loop through next stitch, draw a loop through first 2 loops on hook, then draw another loop through 2 remaining loops.
- Double treble*:
- pass yarn twice round hook, draw a loop through next stitch, draw a loop through first 2 loops on hook, draw a loop through next 2 loops, then another through last 2 loops.
- Triple treble*:
- pass yarn three times round hook, draw a loop through next stitch, draw a loop through first 2 loops on hook, draw a loop through next 2 loops, another through next 2 loops, then another through last 2 loops.
* not used in this pattern.
Crab Stitch
Here is a You Tube item showing how to do crab stitch - a picture painting a thousand words and so on.