Pop Socks
More....
Please note:
Patterns are for
Personal Use Only
You may freely circulate patterns with the Copyright Statement Preserved.
See terms of use.
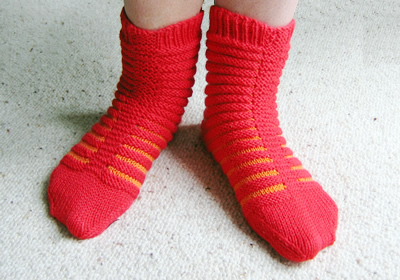
These socks are made using 2 needles, with one main colour and 4 contrasts. Of course, you can have as many contrasts as you like, and it would be good for using up lots of bright leftovers yarns; however it's always good to have a consistent main colour to tie it all together.
Alternatively you could easily substitute a suitably cheerful self-striping yarn either for the contrast stripes, or used plain throughout, allowing it to do its thing.
whatever you choose, complete the look with clogs*.
Just the thing to jazz up your jeans. Make them with or without toes — and the brighter the better!
* note: if you knit separate toes, it might be a bit overcrowded in clogs...
Instructions.The socks are worked on two needles. Right Leg** Using No 11 needles and colour A, cast on 80 stitches. Join in colour B. Beginning with a knit row, continue in stocking stitch,
(1 row knit, 1 row purl), working in striped sequence of 4 rows B, 2 rows
A, 4 rows C, 2 rows A, 4 rows D, 2 rows A, 4 rows E and 2 rows A throughout.
Shape leg:Next row: k1, sl1, k1, psso; knit to the last 3 stitches k2tog, k1. Keeping striped sequence correct. Continue in this way, decreasing 1
stitch at each end of every following 6th row until 60 stitches remain. Divide for heel and instep With right side of work facing, slip the first 15 stitches on to a stitch
holder for the heel. InstepWork 6½ inches (16½cm) in the striped sequence for the instep, ending with 2 rows in colour A (wrong side row). Editor's note: Now you need to decide if you want "normal" socks, or socks with separate toes - useful for bar-toe sandals! - and if you are knitting toes then you leave the stitches on a stitch holder at this point while you continue to knit the heel. Shape instep top without toes ("normal" sock) Next row: Using colour A throughout,
k1,sl1, psso; knit to the last 3 stitches, k2tog, k1. Version including toesBreak off yarn and leave the stitches on a holder while you continue with the instructions to shape the heel. Shape heelEditor's note: heel shaping instructions for both versions of sock, with or without toes. Slip the 30 stitches you previously left on holders on to the needle,
placing the outside edges together in the middle. Using colour A and with right side of work facing, shape the heel, working short rows as follows: 1st row (right side facing): sl1
knitwise, k28. Turn. Continue in this way, working one stitch less on every row until you have worked the row: "sl1 purlwise, p13. Turn." has been completed, leaving 8 stitches unworked at each side. Next row: sl1 knitwise, k13. Pick
up the loop lying between Shape sole top without toes ("normal" sock)Shape the top by working exactly the same as for the instep shaping. ** Version including toesHaving completed the heel, return to the instep stitches that you left on a holder. Big toe:
Next row: Using colour A, knit across
instep stitches, then knit 10 stitches from the sole. Turn, and cast on
2 stitches. Using A throughout, and working on these 24 stitches, work 16 rows in stocking stitch. Shape top: Second toeWith right side of work facing, using the right hand needle and colour
B, pick up 3 stitches at the base of the big toe. K5 stitches. Turn, and
cast on 2 stitches. Using B throughout, and working on these 17 stitches, work 14 rows in stocking stitch. Shape top: Third toeWith right side of work facing, using the right hand needle and colour
C, pick up 3 stitches at the base of the second toe. Using C throughout, and working on these 17 stitches, work 12 rows in
stocking stitch. Fourth toeWith right side of work facing, using the right hand needle and colour
D, pick up 3 stitches at the base of the third toe. K4 stitches. Turn,
and cast on 2 stitches. Using D throughout, and working on these 15 stitches, work 12 rows in stocking stitch. Shape top: Little toeWith right side of work facing, using the right hand needle and colour
E, pick up 3 stitches at the base of the fourth toe. Knit to end. Turn. Using E throughout, and working on these 15 stitches, work 10 rows in
stocking stitch. Left LegWork as for right leg from ** to
**. Version including toesSet the position of the toes for the left foot as follows: Big toe: Next row: Using colour A, knit across
the sole stitches, then knit 10 stitches from the instep. Turn, and cast
on 2 stitches. Complete the big, second, third, fourth, and little toes, as given for
the right leg. Making upOmitting ribbing, press parts lightly under a damp cloth with |
Materials3 x 25g balls of 4 ply yarn in main shade (A) and 1 ball in each of 4 contrast colours (B, C, D, and E). One pair of No 11 (3mm) needles. Tension30 sts x 40 rows to 4 inches over stocking stitch on No 11 (3mm) needles. Size mattersTo fit and "average" adult foot: 9/9½ inches (23/24cm).
Length from top of heel: 13½ inches (34½ cm). Abbreviationssl1: slip the next stitch k2tog or p2tog: work 2 sts together to decrease. A Word on the Wool.Original yarn was a superwash 4ply. These days there is a huge choice of wool for socks, but I would recommend some nylon content. Disclaimer (well...almost)In transposing any pattern it is always a risk that errors will be introduced, in spite of dedicated proof reading. If you have any problems with this pattern, please and I will try and assist. |
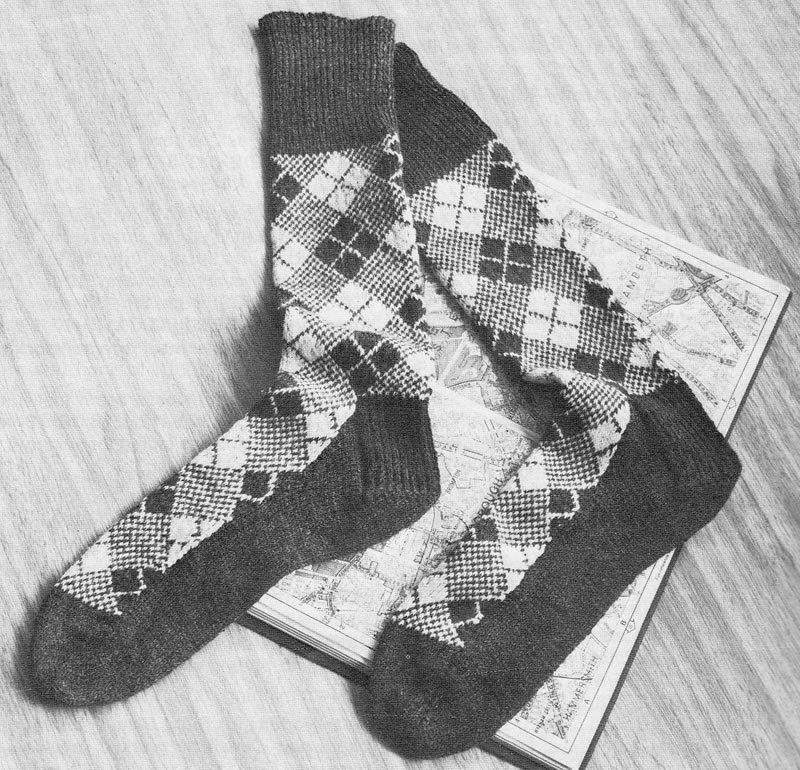
Socks created in two colours with the fair isle technique. Less common these days, now that we can create such exciting coloured socks with self-patterning yarns. Nonetheless quite satisfying since space dyed skeins cannot produce this lovely traditional Argyll pattern.
Instructions.Each sock is worked in three (attached) sections - leg, upper foot, and
lower foot - and mostly using only 2 needles, but these needles need to
be double points (that is, pointed at both ends). Leg and instepStarting at the top leg, using 2 needles and Main Shade (MS), cast on 78 stitches and work in k1/p1 rib for 4 inches, decreasing 1 stitch at the end of the last row : 77 stitches. Start with a knit row, working in stocking stitch in pattern from chart, joining in Contrast (C), reading odd rows knit from right to left and even rows purl from left to right, until 75 rows have been worked. 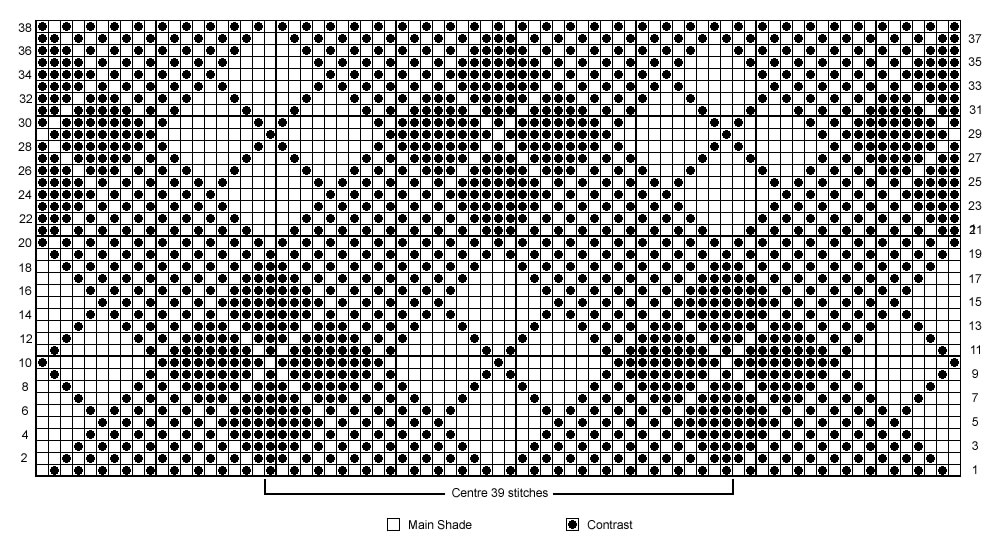
Next row: pattern 18, increase in
the next stitch, pattern to last 19 stitches, increase in the next stitch,
pattern to end : 79 stitches. Slip first and last 20 stitches on spare needles for heel. Continue in MS and stocking stitch (1 row knit one row purl), starting with a knit row, until foot is required length, allowing 2½ inches for toe shaping and ending with a purl row. Leave stitches on a spare needle. Heel and sole:Slip the 2 groups of 20 stitches on to one needle....
1st row: k19, k2tog, k19. Turn heel as follows: Continue in this way until all the stitches have been worked : 21 stitches. Next row: p21 stitches, then pick
up and purl 18 stitches down side of heel piece, turn. Continue straight until work matches the patterned instep piece, ending with a purl row. Toe:Next row: k18 and now (finally) arrange
the stitches on 3 needles for working the toe in the round as follows: Work in rounds shape toe as follows: Making upOmitting ribbing, press parts lightly on wrong side following instructions on the ball band. Sew seams down back of leg, and on each side of the sole, using a flat seam technique (not mattress stitch for example). Sew in all ends. Make a second sock to match. |
Materials3 x 25g balls of 3 ply yarn in main shade and 1 in lighter contrast. Set of four No 13 (2¼mm) needles, pointed at both ends.
Tension36 sts x 44 rows to 4 inches Size mattersLength from top to base of heel: 13½ inches (34 cm); AbbreviationsMS is main shade (Lovat Heather). sl1: slip the next stitch k2tog or p2tog: work 2 sts together to decrease. psso: pass the slipped stitch over, ("sl1, k1, psso" also known as "ssk") A Word on the Wool.Original yarn was Patons Nylox 3ply in colours Lovat Heather (2002) and Snow White (504). Disclaimer (well...almost)In transposing any pattern it is always a risk that errors will be introduced, in spite of dedicated proof reading. If you have any problems with this pattern, please and I will try and assist. |

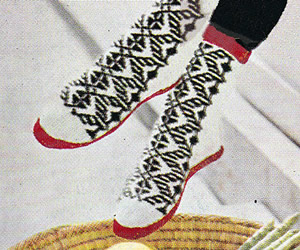
Sports wear.... skiing!
... even though my sporty friends tell me that even the items I think of from more recent years as acceptable ski-wear have very quickly dated on the slopes.
Anyway - to kick off in fifties style - "ankle-warm slipper boots".
InstructionsMake two socks alike. Main body:Using the pair of No 10 needles and red (R) yarn, cast on 51 stitches, and work as follows: 1st row: k2, *
p1, k1; repeat from * to last stitch,
k1 7th row: k2, (p1, k1) 5 times, p1,
(k3, increase in next stitch) 6 times, k1, (p1, k1) 5 times, p1, k2. [57
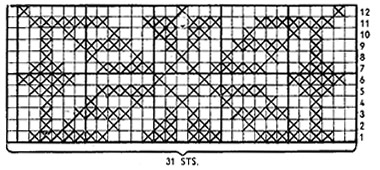
sts] Join in white (W) and purl 1 row. Now introduce black yarn B and work the fair-isle pattern over the centre
31 stitches, using stocking stitch and reading from the chart, and keeping
13 stitches on either side in rib as before.
Work rows 1 through 12 from the chart, 3 times in all, then 1st and 2nd rows again. Next row: Rib 13 and slip these stitches
on to a length of wool or a stitch holder for the time being, pattern
across the next 31 stitches, slip the remaining 13 stitches on a length
of wool as before. Next row: (k2, k2tog.) 7 times, k1,
k2tog. [23 sts] Adjust length of foot here: For size 5 foot work 2 rows straight in stocking stitch; Continue in stocking stitch, shaping toe by decreasing 1 stitch at each
end of the next and every knit row until 15 sts remain, then at each end
of every row until 9 stitches remain. To make heel:Slip the 26 stitches left on spare wool or stitch holders on to one needle
and with right side facing, join in W 1st row: k2, (p1, k1) 5 times, p2tog.,
(k1, p1) 5 times, k2. To shape instep, using needle with the 1 stitch remaining, pick
up and knit 10 stitches along the side of the heel. With right side facing, pick up and knit 11 stitches along the other
side of the heel and work to correspond. Making upPress the pattern parts lightly under a damp cloth. Stitch slipper firmly to sole. |
MaterialsOriginal pattern calls for double knitting yarn: 2 oz in white (W), 1 oz in black (B), and 1 oz in "lipstick" red (R). One pair of No 10 (3¼mm) needles Two 4 inch zip fasteners. A pair of slipper soles. Tension24 st and 32 rows to 4 inches (10cm). Size mattersTo fit UK women's size 5,6,7. Abbreviationssl1: slip one stitch by passing it between the needles without knitting it. psso: pass the slipped stitch over. k2tog or p2tog: work 2 sts together to decrease. Disclaimer
|
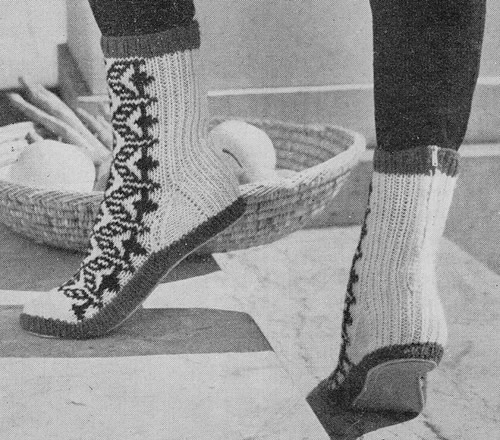
A slightly clearer picture of the boots, showing the snazzy back zip closing.
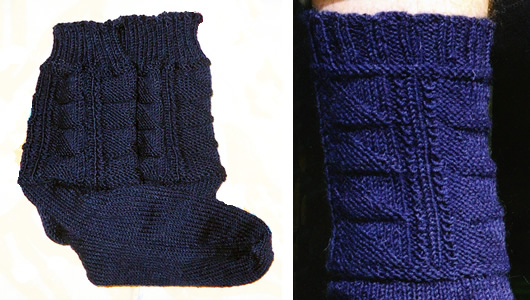
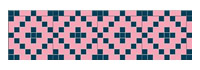
One of my earliest POMs was for a "flag dishcloth" as I really like this traditional Guernsey pattern. These are 5ply socks which reflect this design on the upper part of the sock - the feet are knitted plain. This is a nice wool weight if you want a slightly thicker sock, and no need to be limited to navy or cream (nice though that is), as 5ply is generally available in a good range of colours.
It can also be a good way to use up left over 5 ply, especially if you bought the wool for a guernsey in large cones.
Instructions (work 2 alike).Using No 11 needles, cast on 102sts. First Round: * K2tog, k1, p2tog, p1. Repeat from * to end. [68 sts] [Editor's note: Casting on 2 or 3 times the required stitches and then immediately decreasing on the first row provides a method of making sure you have a nice loose cast-on for the top of the sock. Otherwise chaps have a habit of yanking on their socks and right away breaking the first row of stitches, (ask me how I know...).] Work 2 rounds in k2, p2 rib, then change to No 12 needles and work 8 more rounds in rib. Next Round: Knit. Change to No 11 needles and knit 1 round. Flag PatternThis pattern is worked down the leg as far as the ankle. 1st Round: * (p1, k1) 3 times; p2,
k9; repeat from * to end. Repeat these 10 pattern rows 3 more times.
Next Round: Knit. Knit 3 rounds. Divide for heelNext Row: K14; turn. Divide the remaining stitches on to two needles and leave to pick up later for the instep. 2nd Row: Slip 1; k27. Repeat 2nd and 3rd rows, 12 times more. Turn HeelNext Row: K18, slip 1, k1, psso (pass the slipped stitch over), turn. Next Row: P9, p2tog, turn. Repeat the last 2 rows until all stitches are taken up and 10 sts remain,
and (right side of work facing) knit across the 10 sts, then, pick up
and knit 14 sts along side of heel. Shape instep:Knit one round on all stitches. Next round: 1st needle: knit
to the last 3sts, k2tog, k1. Repeat these two rounds until 56 stitches remain. Continue on these stitches until work measures 5½(6, 6½) inches, or desired length for foot. Shape Toe:1st round: 1st needle: knit
to the last 3sts, k2tog, k1. 2nd round: Knit. Repeat these 3 rounds until 28 sts remain. Making UpKnit stitches from 1st needle on to end of 3rd needle. |
Materials2 x 50g balls British Breeds Guersey 5ply One set of 4 number 12 (2¾mm) needles, (or 2½mm if necessary),
and, A stitch marker. Tension26sts and 32 rows to four inches on No 11 (3mm) needles. Size mattersTo fit men's shoe sizes: 10 (10½, 11). Abbreviationsk2tog/p2tog: knit/purl 2 sts together. SL 1: slip 1 stitch SL 1, k1, psso: slip 1, knit 1, pass the slipped stitch over; also known as "ssk" (slip, slip, knit). Disclaimer
|
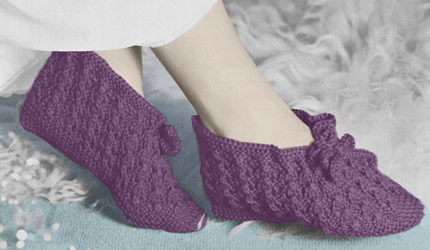
A lovely old-fashioned pair of knitted slippers. Make them using a luxury yarn in a striking colour for a quickly knitted Christmas gift.
InstructionsInstructions in 3 sizes, each size separated by forward slash (/). Both slippers are worked alike. Slipper (make 2)With No 11 needles, cast on 90/95/100
stitches and work 12 rows in garter stitch (that is: every row knitted). Change to pattern as follows: 1st row: k4, *
p2, k3; repeat from * to last 6 stitches,
p2, k4. 3rd row: k1, *
wfwd, slip 1, k2tog, psso, wrn, p2, *
to last 4 stitches, wfwd, slip 1, k2tog, psso, wrn, k1. Repeat these 4 rows 3 times more, then rows 1-3 inclusive again: 19 pattern rows. Work 5 rows in garter stitch. Cast off. Make a second slipper in the same way. To Make UpPress parts lightly on wrong side under a damp cloth. Fold foot pieces in half and join centre back and foot seams neatly with a flat seam. Thread ties through holes made in 19th row of the patterning. Press seams. Note: |
Materials
|
An extra Christmas gift just for you. Don't bother to thank me - it's priceless I think you'll agree.
Perfect if you are thinking of elf-themed fancy dress this Christmas - and I can recommend that you use any left-over felt to make a matching elfish pointy collar.
They miss out the key instruction at the end of the making up section .... "Do not wear".
Joking apart, this method of threading ribbon or fabric strips through a crocheted mesh base is a good technique for creating an interesting textured fabric to work with. I have seen it used to good effect making, for example, an evening clutch bag, using more luxurious starting materials.

Well - it's so much talked about I could not let it pass without a little commemoration could I?
Just make sure you make them for your own special baby - I am sure the Palace is exploding with little woolly items (and in one of the hottest month's on record...).
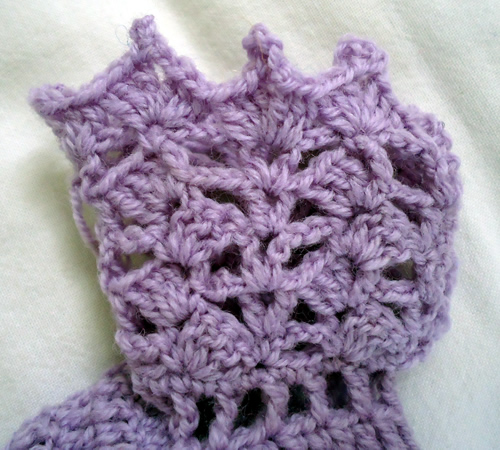
This crochet pattern is a staggered shell, which I found a little tricky to follow, so use the detail photo at the end for guidance as to what it should look like.
Instructions.Special pattern stitch: And a reminder of English crochet stitches: Double crochet: draw a loop through next stitch, draw a loop
through both loops on hook. [American single]. Bootees (make 2)Beginning at the sole: make 15(17;20;23)ch loosely. 1st round: Miss 3 ch, 3 tr in next
ch, 1 tr in each of next 1(1;2;2)
ch, 1 htr in next ch, 1 dc in each of next 2 ch, 1 htr in next ch, 1 tr
in each of next 2(3;3;4)
ch, 1 d tr in each of next 3(4;6;8)
ch, 9 dtr in last ch. 2nd round: 3 ch, "inc", 1 tr in next st, "inc", 1 tr in each of next 10(12;15;18) sts, ("inc", 1 tr in next st) 4 times, "inc", 1 tr in each of next 10(12;15;18) sts, ("inc", 1 tr in next st) twice, sl st in 3rd ch at beginning. You now have 46(50;56;62) tr, counting the initial 3 ch as 1 tr. 3rd round: Working into the back loops only (leaves a ridge to mark sole): 3 ch, 1 tr in each tr to end; sl st in 3rd ch at beginning. 4th round: 3 ch, 1 tr in each tr to end; sl st in 3rd ch at beg. Repeat the 4th round 0(0;1;1) time(s). Shape InstepYou are now going to work back and forth across the instep in rows. 1st row: 3 ch, 1 tr in each of next
28(30;33;36)
tr, miss next tr, sl st across next 2 tr. Turn. Repeat the 2nd row 4(4;4;6) times. Next row: Miss 2 sl st, 1 tr in each of next 10 tr, 1 tr in each tr to end; sl st in 3rd ch at beg of 1st row to rejoin the round. You now have 28(32;38;38) tr. Next round: 4 ch, miss 1(1;2;2) tr, 1 tr in next tr, * 1 ch, miss 1 tr, 1 tr in next tr, repeat from * to last 1(1;2;2) sts, miss last 1(1;2;2) sts, sl st in 3rd of 4 ch to join the round. You now have 14(16;18;18) holes. Next round: 1 ch, 1 dc in same place
as sl st, * 1 dc in next 1 ch sp,
1 dc in next tr, repeat from * to
last ch sp, 1 dc in 1 ch sp, 1 dc in same place as first dc, DO NOT
JOIN the round. Turn, and work in rows as follows: First size only: 1st row (wrong side): 1 ch, 2 dc in first dc, * 3 ch, miss 3 dc, (1 dc, 3 ch, 3 tr) in next dc, miss 2 dc, (1 dc, 1 ch, 1 dc) in next dc, repeat from * ending last repeat with 2 dc in last dc instead of (1 dc, 1 ch, 1 dc). 2nd, 3rd and 4th sizes: 1st row (wrong side): 1 ch, 2 dc in first dc, * 3 ch, miss 3 dc, (1 dc, 3 ch, 3 tr) in next dc, miss 2 dc, (1 dc, 1 ch, 1 dc) in next dc *; repeat from * to * (0;1;1) times; 3ch, miss (2;3;3) dc, (1 dc, 3 ch, 3 tr) in next dc, miss (2;3;3) dc, (1 dc, 1 ch, 1 dc) in next dc (3;1;1) times; repeat from * to * (1;2;2) times, ending last repeat with 2 dc in last dc instead of (1 dc, 1 ch, 1 dc). All sizes: You now have 4(5;5;5) patterns. 2nd row: (3 ch, 1 tr) in first dc, * 3 ch, (1 dc, 3 ch, 3 tr) in next 3 ch sp, miss next 3 ch sp, (1 tr, 1 ch, 1 tr) in next 1 ch sp, repeat from * ending last repeat with 2 tr in last dc instead of (1 tr, 1 ch, 1 tr). 3rd row: (3 ch, 1 tr) in first tr, * 3 ch, (1 dc, 3 ch, 3 tr) in next 3 ch sp, miss next 3 ch sp, (1 tr, 1 ch, 1 tr) in next 1 ch sp, repeat from * ending last repeat with 2 tr in top of turning ch instead of (1 tr, 1 ch, 1 tr). Repeat the 3rd row 1(1;3;3) times. Next row: (3 ch, 1 tr) in first tr, * 3 ch, 1 dc in next 3 ch sp, 3 ch, miss 1 sp, (1 tr, 1 ch, 1 tr) in next 1 ch sp, repeat from * ending last repeat with 2 tr in top of turning ch instead of (1 tr, 1 ch, 1 tr). Next row: (3 ch, 2 tr) in first tr, * miss 1 sp, (3 tr, "Picot", 3 tr) in next dc, miss 1 sp, (3 tr, "Picot", 3 tr) in next 1 ch sp, repeat from * to last pattern, miss 1 sp, (3 tr, "Picot", 3 tr) in next dc, miss 1 sp, 3 tr in top of turning ch, "Picot". Fasten off. Make UpUsing a flat seam, join back seam. |
Materials
|
Picture of pattern detail:
Well - it's so much talked about I could not let it pass without a little commemoration could I?
Just make sure you make them for your own special baby - I am sure the Palace is exploding with little woolly items (and in one of the hottest month's on record...).
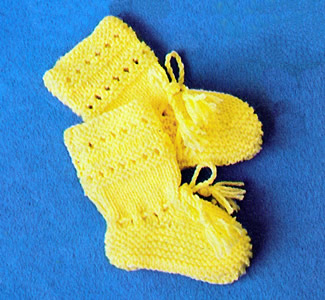
This is the knitted set which is fairly plain with a discreet eyelet pattern, and should be quite simple to make.
Bootees (make 2)With No 10 needles, cast on 33 sts. and knit 1 row. 1st - 4th rows: Knit. Repeat the last 2 rows 4 times more. Next row: as 5th row. Work 14 rows in stocking stitch on these 13 sts. Rejoin yarn to inside edge of 10 sts, then knit up 10 sts along side
of foot; knit across 13 sts on needle, knit up 10 sts from other side
of foot, finally knit across remaining 10 sts. [53 sts] Shape toe: 1st row: (k1, k2tog, k21, k2tog)
twice; k1. Cast off. Make UpPress lightly on wrong side. Join seam. |
Materials
|
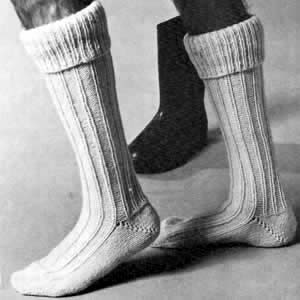
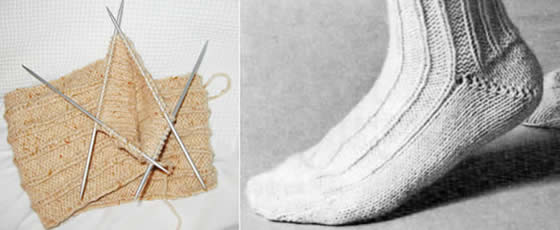
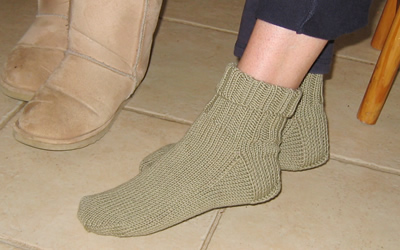
It may seem unseasonal to feature thick woolley socks in May but it's been the wettest April for many decades apparently, so it seemed appropriate.
This is a useful pattern for a couple of reasons. One is that it's knitted in Aran weight yarn - though you need several balls so not exactly good for using up scraps; the other is that they are perfect socks for Wellingtons (see the photo - try not to be frightened by the model's excessive yet manly body hair!).
They should be hard wearing as they are knitted to a firm tension, and I have knitted a couple of highly successful pairs in the past (now given away as gifts, so not illustrated).
Instructions.Cast on 60 sts, 20 on each of three needles. Next round: *
p3, k1, p1; repeat from * to end of
round. Shape ankle1st round: Pattern 10, p2tog; pattern
8, p2tog; pattern to end of round. [58 sts] Next round: Pattern 5, p2tog; pattern
16, p2tog; pattern to end of round. [56 sts] Slip the first 28 stitches on the first needle for the heel, and continue to work with these for the heel. Divide remaining stitches on two needles and leave for instep. Shape heel 1st row: k27, turn. Continue thus, working one stitch less on every row until the row ‘p10, turn’ has been worked. Next row: k10; pick up the loop which
lies immediately below the next stitch and knit it together with the next
stitch, turn. Continue thus working one stitch more on every row until all the stitches are worked onto one needle again. [28 sts] Next row: k14, thus completing heel. Slip the instep stitches back onto one needle again, so you have the
stitches distributed over the 3 needles 14/28/14, and you are ready to
start he next round. Shape toe 1st round (1st needle): knit to
the last 3 sts; k2tog, k1. Making upGraft or cast off the stitches from two needles together. |
Materials7 x 50g balls Aran weight yarn. One set of four No 9 (3¾mm) needles, pointed at both ends. Tension21sts x 29 rows to 4ins over stocking stitches. Size mattersLength of foot: 11 inches (adjustable). Abbreviationsk2tog: work 2 sts together to decrease. k2tog tbl: knit 2 together through back loops (also known as "ssk"; or slip1, knit1, pass the slipped stitch over). A Word
|
|
|
|
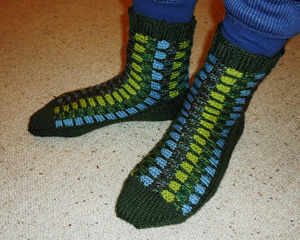
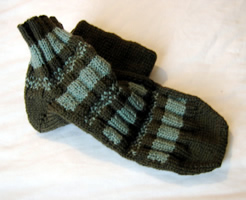
Father George: so fond of his bedsocks that they get worn out. [Since he is not bedridden I can only surmise he does not restrict their use to the bedroom!] Hence - by request - here are some more.
The patterned section of the sock is knitted sideways using a variation of a honeycomb stitch; it's an opportunity to use up really small amounts of double knitting yarn. I rotated 4 contrast colours but you could use a different colour for every set of rows; the key is to keep some consistency in the main colour.
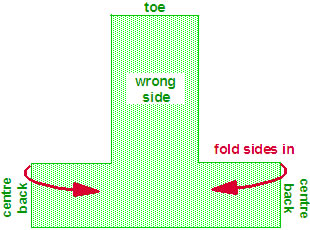
Instructions.The first section of these socks is knitted sideways making a "T"
shape where the upright of the "T" is the upper foot, and the
cross bar curls around the leg to form the cuff, meeting at the back seam. First section (knit 2)Starting at the back leg seam, with main shade (M) cast on 23 sts on 2 needles and knit one row. Commence pattern. Join in contrasts (C1, C2 etc): Repeat rows 1-10 using different contrasts, once more. Next row(wrong side facing): Cast
on 40 sts, and then work across them and all sts, as for 1st row of pattern. [63sts] Continue to work the pattern on these 63 sts, working rows 1-10 three
times, and then rows 1-4. Next row(wrong side facing): Using main shade, cast off 40 sts, and purl across remainder. [23sts] Continue to work the pattern on these 23 sts, working rows 6-10, then
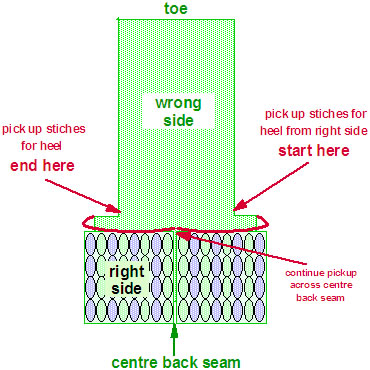
rows 1-10 once, times, and then rows 1-4. Second section (heel and sole).The remainder of the socks are worked entirely in the main shade. For the heel: with right side of the first section facing, oriented like an upside down "T" pick up 11 sts from each side of the instep:
Pick up and knit 11 sts from the left side first, ending at the cast on edge (which will be the centre back, and then turn the work over and bend round the second side, and pick up 11sts from the right side. The sock cuff now forms a circle with the back seams together, but not yet sewn.
Turn and purl 1 row across these 22 sts. Next row(right side facing): *
Sl1, k1, repeat from * to end. Repeat the last 2 rows 10 times more. Turn the heel: Next row: Sl1, k12, k2tog, k1. Turn. Continue to work short rows and decrease in this way until all sts have been incorporated. [14sts]. Next row(right side facing): Sl1,
k13, pick up and knit 13 sts down side of heel. Turn. Now work the instep decreases and sole: Next row: K1, sl1, k1, psso; knit
to last 3 sts, k2tog k1. Turn. Repeat the last 2 rows until 22 sts remain. Continue to work a further 50 rows to make the sole - upper and lower
foot sections should be about the same length. ToeNow we move to working in the round. Knit 11 sts on first double-pointed needle, 11sts on second, then with
right side facing, using third needle, pick up and knit 24 sts across
the toe edge of the first section. Next round: K1, sl1, k1, psso; knit to last 3 sts on third needle, k2tog k1. Complete the round by knitting the 11 sts on each of the first and second needles. [44 sts] Next round: K1, sl1, k1, psso; knit
to last 3 sts on third needle, k2tog k1; on first needle, k1, sl1, k1
psso; knit to end; on second needle, knit to last 3 sts, k2tog k1. Repeat the last 2 rounds until 16sts remain. Making upSew seams on each side of the sole, using a flat seam technique (not mattress stitch for example). Using double pointed needles and main shade, pick up 60-66 sts round top of sock and knit a k3/p3 rib for about 8 rows (or as long as you want), to form the welt. Cast off loosely. Sew in all ends. |
Materials2 x 50g balls of double knitting yarn, and a variety of left over DK colours. One pair and one set of four No 8 (4mm) needles, pointed at both ends. Tension22 stitches = 4ins Size mattersLength of foot, 9 inches (adjustable). AbbreviationsM is main shade (olive). sl1: slip the next stitch k2tog or p2tog: work 2 sts together to decrease. psso: pass the slipped stitch over, (also known as "ssk"; effectively you are "knitting 2 together through back loops") A Word
|
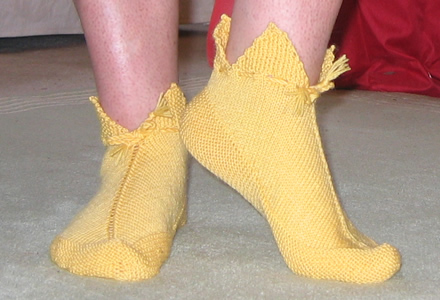
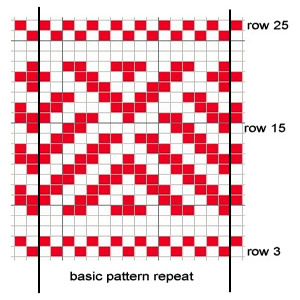
These socks were adapted from a wonderful elderly pattern, and were lots of fun to knit, (and wear!). They make me think of those dusty Jester colours though - mustard yellow, a dull brick red, a saddened teal...
Instructions.Cast on 128 stitches and start working in garter stitch - knit 4 rows. 5th row: increase in first stitch,
k62, increase in next stitch, increase in next stitch, K62, increase in
last stitch. Knit another 13 rows on these 148 stitches. Repeat 29th and 30th rows 14 times, thus completing 58th row. 59th row: K38, k2togtbl, k2tog, k40. Make slots for ribbon on next row thus: 2nd row (first point): P1, (k1, p1) 10 times. Continue in rib but decrease 1 stitch at each ent of the next row and
every alternate row until 3 sts. remain. With right side of work facing you. join wool to inner end of sts on
spare needle, then k1, (p1, k1) 10 times, turn, leaving the remaining
11 sts on the spare needle. Join underfoot and back seam. With right side of work facing you, join wool to inner end of sts on
spare needle. (k1, p1) 5 times, then knit last stitch on spare needle
together with first stitch on on the thread, after which (p1, k1) 5 times
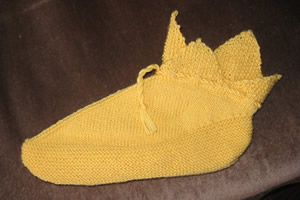
over remaining sts on thread. Make another sock in the same way. Run ribbon through slots at ankles. Cuff VariationYou can see from the photo below that I added another layer of points to my sock.I cast on 64 sts and worked 6 rows in rib. I then worked the points in moss stitch as given for the points on the main sock, but I decreased on every 3rd row instead of every alternate row to make the points longer. When I had finished I sewed the cuff to the inside of the sock matching the points on the second cuff to the gaps between the points on the sock. I attached the cuff just below the eyelet row.
|
Materials2 x 50g balls 4ply A pair each of No A yard of narrow ribbon. Tension32sts x 40 rows to 4 ins over stocking stitch. Size mattersFoot length about 9 inches, length down back about 5 inches. AbbreviationsIncrease: increase by knitting into front and back of the next
stitch. A word on the wool.The original socks were knitted in "Wendy Family Wool 4ply". I chose to use Cygnet yarn not only because it is a good (75/25) blend for socks but also I wanted the lovely bright "Jester" yellow - and I was surprised that in the vast array of available yarns in my local John Lewis, I could not find any true yellows in any weight of wool - obviously not fashionable currently. The "brights" seem to be limited to cotton blends, which in my experience are not good for socks. Disclaimer
|
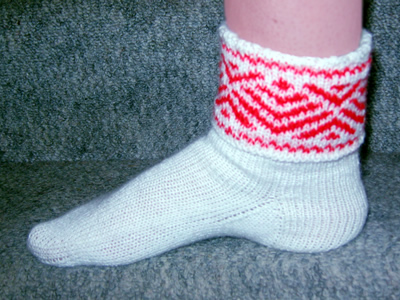
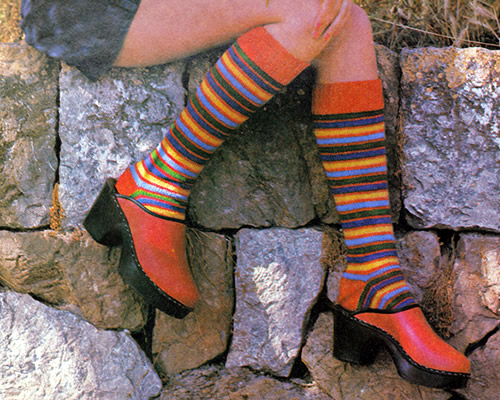
As the nail-biting tournament in South Africa dominates this month, here we have: 1940s sport socks.
I thought they were nicely in England's colours, but not exactly football socks -
I think they mean a nice decorous sport like tennis, don't you?
Red and white is the original colour scheme from the 1940s. (Possibly the original did not include quite such a Dayglo shade of red.) However, the pattern seems vaguely Scandinavian and wintery to me - I could see them perhaps in Christmas colours of a more muted red with green.
Meanwhile... Ingerland, Ingerland, Ingerland...
Instructions.Starting at top with the cuff, using the main colour, cast on
64 stitches on three needles (21,22, 21). 3rd Round: *
k1 contrast (C), k1 main (M); repeat from *
to end of round.
This completes the cuff. Break colour C and continue in main colour only.
Turn the work inside out to make a fold-over cuff and start to work the rounds in the opposite direction. Work in k2, p2 rib for 3 inches [Editor's note: about 30 rows.], decreasing 8 stitches in the last round only, by knitting together every 7th and 8th stitch. Next Round: k2tog, knit to last 2 stitches, k2tog. [54 stitches] Now work in stocking-stitch (knit every round) for 2 inches. HeelKnit 13 stitches of first needle on to third needle (this is the heel needle), then turn and purl back 26 stitches; divide the remaining 28 stitches equally onto the other two needles. Work back and forth over heel needles as follows: 1st Row: slip 1 stitch knitwise, knit
across remaining stitches. Next Row (right side facing): knit across first 16 stitches, k2tog; turn. Next Row: p7, p2tog; turn. Next Round: needle 1: knit across
heel needle, then pick up 14 stitches down left side of heel; needle 2:
knit across next two, needles (thus transferring these stitches on to
one needle); needle 3: pick up 14 stitches across other side of heel and
k4, from needle 1. Hereafter, work in rounds of stocking stitch but, on every other round, k2tog at end of first needle, and (s1, k1, psso) at beginning of third needle until 54 stitches remain. Work straight until piece measures 2 inches less than that required for overall foot length. [Editor's note: This was about 50 rows for my UK size 4 foot. (EU 37, US 6½.] ToeThere should be 13 stitches on first needle, 28 on the second needle, and 13 on the third needle. End of round is centre of sole. Work 1 round, decreasing at each end of second needle, then one round straight. Now there are 13 stitches on first needle, 26 on the second needle, and 13 on the third needle. Next Round: knit to within 3 stitches
of the end of the first needle, k2tog, k1; on second needle, k1, (s1,
k1, psso), knit to within last 3 stitches, then k2tog, k1; on third needle,
k1, (s1, k1, psso), knit to end of round. Repeat the last 2 rounds until 16 stitches remain. Graft the stitches together. Making upSew in all ends. Fold down cuff. |
Materials3ozs Patons Real Shetland Wool. A set of four No 11 needles, pointed at both ends. Tension30 stitches = 4ins Size mattersLength of foot, 9 inches (adjustable). AbbreviationsM is main shade (white). psso: pass the slipped stitch over, (also known as "ssk"; effectively you are "knitting 2 together through back loops"). A Word
|
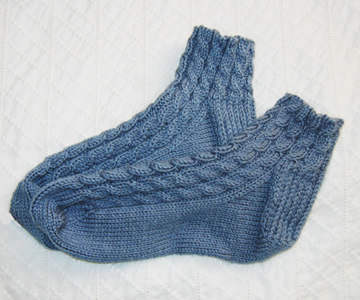
Father George recently handed back his bedsocks as they had holes in the heels. I dutifully mended them, but thought this a good excuse to give him another pair.
These socks are one size, but easily stretch to fit comfortably around a man's foot, as well as fitting round my own foot (small lady's), albeit loosely. If you want cosy house socks for a female foot then simply adjust the length. These are intentionally short at the ankle, but again you can easily knit them longer for the size you need.
InstructionsWith No. 9 needles, cast on 60 stitches loosely, and arrange over 3 needles. 1st round: *
K4, p2; repeat from * to end of round. These are the six basic pattern rounds. Repeat these six rounds twice more, (or as many times as you need to
lengthen the sock at the ankle), and then the first round once again. Divide for heel flap. Next Row: Knit the first 28 sts of the round on to one needle to work for the heel. Divide the remaining 32 sts across 2 needles, and leave to work the instep later. If you have worked the pattern correctly there will be a symmetrical set of complete cables across the 32 instep sts, starting and ending with p2. Return to your heel sts, and turn the work so that you can work back and forth across the heel sts using 2 needles. Next Row: Slip1 purlwise then purl
across the remaining 27 sts. [28 sts]. Repeat the last 2 rows 12 times more. Turn the heel. Work short rows as follows: Next Row: Slip1 purlwise then purl
across 15sts, p2tog, p1. Turn Continue working in this way until all the sts have been incorporated [16sts], ending with a knit row, and right side facing. Continuing to work onto the same needle (needle 1), pick up and knit
15 sts along side of heel. [Editor's note: I
am not one to encourage a sloppy attitude to knitting, but... Shape the instep: 1st round:
1st needle: knit to the last 3sts, k2tog, k1. Repeat these two rounds until 60sts remain (14 on the first needle, 32 on the second needle, 14 on the third needle). Continue on these sts, (continuing the cable pattern on the upper foot
as set), until you have completed 12 cable patterns from the very beginning
of the work, or until work measures 2 inches less than the desired foot
length. Shape toe: Continue in stocking stitch only (no more cables), as follows: knit the sts from Needle 1, then knit the first st from Needle 2 and put it on Needle 1. Knit 30 sts from Needle 2, then place the last st onto Needle 3. Knit across 15 sts on Needle 3. 1st round:
1st needle: knit to the last 3sts, k2tog, k1. Repeat these 2 rounds until 32 sts remain, ending with 1st round. Then repeat round 1 twice more [24 sts]. Making up. Knit the sts from needle one, break the thread leaving a long tail. Graft
the two sets of 12 sts together. Make a second sock to match. |
MaterialsAbout 1 x 50g skein (139 metres) Phildar
Oxygene, colour 38, Neptune. One set of 4 No. 9 (3½mm) double- pointed needles. Tension23 sts x 30 rows to 4 inches measured over stocking stitch on No 9 (3½mm) needles. Size mattersThe pattern as written should fit a foot of 11 inches in length. AbbreviationsC4B: "cable 4 back"; slip the next 2sts onto a cable
needle and leave at the back of the work, k2, then k2 from cable needle. psso: pass the slipped stitch over. Effectively you are "knitting
2 together through back loops" Disclaimer
|
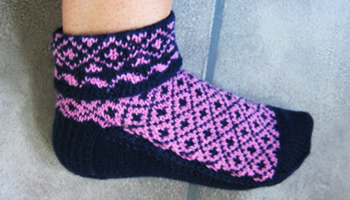
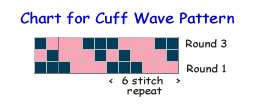
Early 1950s tennis socks originally knitted in crisp navy and white wool. I love cuffed socks but detect that some others (my sister) clearly do not. These have the design made specifically to fold down though - so there's no way out.
Instructions.The pattern works the instep and the sole separately on two needles to enable you to work the fair isle pattern across the instep only. It is not possible to achieve this in the round. However, you join the two together as you knit. Using No 12 needles with main shade (M), cast on 59 sts loosely and join in a round. Work 4 rounds in moss (also known as seed) stitch [every row k1 p1]. Next Round (increasing): K3; (m1, k8) 7 times. [66 sts] Cuff border:Change to No 11 needles and join in contrast (C) and work wave pattern border by repeating the 6 stitch pattern 10 times:
1st Round: *
k3 contrast (C), k3 navy (N); repeat from *
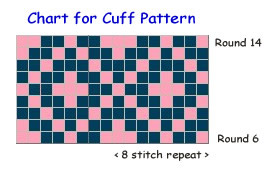
to end. Now continue with cuff diamond pattern, repeating the 8 stitch pattern 8 times across one round:
6th Round: *
k1(C), k2(N), k1(C), k2(N), k2(C); repeat from *
to end. Now break off C and continue with N only; change to No 12 needles and work 7 rounds knitting. Then turn the work so you are working the rounds in the other direction. This reverses the work to allow the cuff to fold over with the right side visible. Work 8 more rounds knitting; at the end of the first round knit into
the stitch below the first stitch of the round and knit it together with
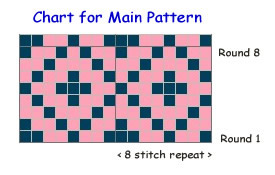
the last stitch of the round to avoid a small hole in the work. Join in C, working main diamond pattern, repeating the 8 stitch pattern 8 times:
1st Round: *
k1(N), k2(C), k1(N), k2(C), k2(N), ; repeat from *
to end. These 8 rows form the pattern. Continue with N only and divide for the heel, however do not break off C. Divide for heelNext Row: Using navy wool only, knit the next 31 stitches on to one needle to work for the heel. Divide the remaining 33 sts across 2 needles, and leave to work the instep later. If you have worked the pattern correctly there will be a symmetrical set of complete patterns across the 33 instep sts. Make sure that it looks like this (you will have just completed row 5, the middle row in the picture):
[ Editor's note: If it doesn't look like this... you can compensate by knitting more or fewer sts for the heel flap until you get to the pattern boundary. Then when you purl back on the row below, follow the instructions as set to get your 30 sts. You should have your instep sts set correctly as above. If you still haven't then there is likely a mistake in your fair isle pattern.] Return to your heel sts, and turn the work so that you can work back and forth across the heel sts using 2 needles. Next Row: Purl back across 15 sts,
p2 together, purl remaining 14 sts. [30 sts]. Heel flapNext Row: *
Slip 1, knit 1; repeat from * across
all 30 sts. Repeat last 2 rows 13 times more. Turn heelTurn the heel by working short rows: Next Row: Slip the first stitch,
p16, p2tog, p1; turn. Continue in this way until all the sts have been incorporated in the row, ending with a knit row. [18 sts] Turn. Purl one row. Pick up and purl 16 sts down side of heel flap to bring the navy wool back to work the patterned instep. Leave these 16 sts along with the 18 heel sts, on a spare needle or stitch holder. Upper foot panelTake 33 sts left on needles 1 and 2, and slip them on to one needle. Continue to use the navy yarn and pick up the contrast C, which should
be waiting for you at the beginning of a purl side instep row (row 6 of
the pattern). Begin working back and forth across these 33 sts, keeping
the continuity of the pattern starting with a purl row and working from
row 6 of the chart where you left off; work alternate rows in knit and
purl. Continue for 5½ inches or 4 inches less than overall desired foot
length, ending with a knit row. Break contrast yarn, and continue in navy only. Turn the work and purl across 15 sts; p2tog; p16. Continue with wrong side facing, using another No 12 needle, pick up
and purl about 27sts from the slipped sts down the right side of the upper
foot panel, and from the edges of the first 5 rows you knitted. Using the same No 12 working needle, pick up and purl 17 sts from side of heel flap, then purl 9 sts from the heel. Using another No 12 working needle, purl the 9 remaining heel sts, and then purl the 16 sts you already picked up from the other side of the heel flap. Mark the stitch with a piece of waste wool, as before. Continuing with this needle, purl along the left side of the upper foot panel, picking up 27 sts from the edges of the first 6 rows you knitted and from the slipped edge sts.
The work is arranged on 3 needles. The picture shows the working needle
in the process of knitting across the sole,
and the waste wool markers in white. Purl across the 32 sts at the top of the panel. Then using one of the
spare needles, purl down the right side of the panel again, as far as
the stitch marker.] Do not turn the work. SoleUsing the No 12 working needles, you are going to knit back and forth across the sole (between the markers) in stocking stitch, knitting the last stitch from each row together with one stitch from the upper foot panel. 1st Row: (Wrong side facing) Slip1,
p24 from first needle, (16 sts up side of heel and 9 sts from heel flap),
then purl 24 sts from second needle, up to 1 stitch before the stitch
marker. Purl the last stitch of the sole section together with the first
of the instep sts. [50sts between the markers] 2nd Row: (Right side facing) Pass
the waste wool marker between the sts. Slip 1, ssk2tog; knit to the last
3 sts before the marker; k2tog, ssk the last stitch of the row together
with the next instep stitch as before. [48sts between the markers] Turn. Repeat 2nd and 3rd rows, shaping the sole by decreasing 2 sts on the knit rows, until 28 sole sts remain between the markers. Then continue without shaping as follows (continuing to weave in the markers as before): Next Row: Slip 1, purl to the last
stitch before the marker; purl together the last of the sole sts with
the first instep stitch as before. Repeat the last 2 rows until all the sts from the sides of the upper
foot have been joined to the sole. Do not join any of the sole sts to
the 32 sts left on the 4th needle at the end of the panel. ToeNow you continue to work the sole and upper foot sts together in a round, as follows: With right side facing, using your working needle (needle 1), knit across
32 sts from the upper foot. Knit the next 14 sts from the sole on to the
next needle (needle 2), and knit the final 14 sts from the sole on to
the next needle (needle 3). You have 60 sts arranged with 30 sts on needle 1, and 15 sts on each off needles 2 and 3. Continue to work in rounds as follows: [ Editor's note: This is where you can adjust the length of the foot if your feet have not grown to a multiple of half inches. Work a couple of extra plain rounds here before starting the decreasing.] 1st Round: Needle 1: k1, ssk2tog;
knit to the last 3 sts; k2tog, k1. Repeat rounds 1 and 2 until 24 sts remain. Slip the sts from needles 1 and 2 on to one needle and graft together with the sts on needle 3. Making upSew in all ends. Fold down cuff. |
Materials4 ply: 2 ozs navy, 1 oz contrast colour. One set each of 4 double pointed needles (dpns) size 11 (3mm) and 12
(2¾mm). Tension30 stitches and 32 rows to 4 inches over pattern. Size mattersLength from top to bottom of heel, top turned down, 5 inches; length of foot 9 inches (adjustable). AbbreviationsN is main shade (navy). m1: make one by picking up the loop between sts and knitting into the back of it ssk/ssk2tog: (slip, slip, knit) - or (slip1, knit 1, pass the slipped stitch over). Effectively you are "knitting 2 together through back loops".
A Word
|
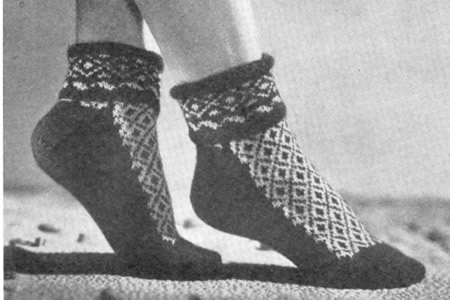
Original photo from Stitchcraft April 1950, constructed using a different pattern on 2 needles with seam under sole. Generally, seams in socks are avoided so they are more comfortable to wear; a seam right under the ball of the foot cannot be ideal as sportswear. I imagine these socks were for visual impact rather than practicality.
My sister was going on a summer trekking holiday and wanted some suitable socks to wear in her riding boots. I have created these simple socks in soft wool/cotton double knitting to meet the needs for a thick summer sock. I can't say how well the wool/cotton will wear as a sock wool, but the double knitting weight means they take about 5 minutes to knit (OK maybe a bit longer...).
I made the largest size for my sister (UK shoe size 5 or 6) - the smaller sizes are intended for children. You can wear the tops extended if used under riding boots, or rolled down if, perhaps, wearing shorts with heavy hiking boots.
Instructions (work 2 alike).Cast on 36 (40;44;48) stitches loosely; divide over 3 needles and join in a round. Work 35 rounds in k2, p2 rib (or required length). Next Round: K1, make 1 by picking up bar between sts and knitting into the back of it; knit to last st; make 1, k1. [38 (42;46;50) sts] Knit 5 rounds straight. Divide for heelNext Round: K9 (10;11;12), and then slip the last 10 sts of the round onto the other end of the same needle - these 19 (21;23;25) sts are for the heel. Divide the remaining sts between two needles, and leave for the instep. Commence Heel1st Row: Slip 1 purlwise, purl to end. 2nd Row: Slip 1 knitwise. * K1, keeping yarn at back of work, slip 1 purlwise; repeat from * to last 2 sts; k2. Repeat these 2 rows 8 (9;10;11) times more, then the first row again. Turn Heel1st Row: K13 (14;15;16) sts, slip 1, k1, psso (pass the slipped stitch over), turn. 2nd Row: Slip 1, p7, p2tog, turn. 3rd Row: Slip 1, k7, slip 1, k1, psso, turn. Repeat the 2nd and 3rd rows 3 (4;5;6) times more, then the 2nd row once. K5, thus completing the heel. 4 sts remain unworked on the left-hand needle. Using spare needle, knit 4 heel sts, pick up and knit 10 (12;14;16) sts along side of heel. Slip all instep sts on to one needle, and using 2nd needle knit across instep sts. Using 3rd needle, pick up and knit 10 (12;14;16) sts along side of heel, then knit 5 heel sts. [48 (54;60;66) sts]. Shape instep:1st round: Knit. 2nd round: 1st needle: knit
to the last 3sts, k2tog, k1. Repeat these two rounds until 38 (42;46;50) sts remain. Continue on these sts until work measures 4¼(5;5¾;6½) inches, or desired length, from where sts were knitted up at the heel. Shape Toe:1st round: 1st needle: knit
to the last 3sts, k2tog, k1. 2nd round: Knit. Repeat these 2 rounds until 18 sts remain. Making UpKnit sts from 1st needle on to end of 3rd needle. |
Materials2 x 50g balls Rowan Wool Cotton , shade 930, "Riviera". One set of 4 number 9 (3¾mm) needles. Tension24st and 32 rows to four inches on No 9 needles. Size mattersLength of foot approximately 7½(8½;9½;10½) inches (adjustable). A word on the wool.Wool Cotton is possibly my favourite Rowan yarn; a 50/50 blend of soft
Merino wool and cotton. I am not sure how well it will stand up to wear
and tear in a sock, but the cotton should improve durability. Disclaimer
|
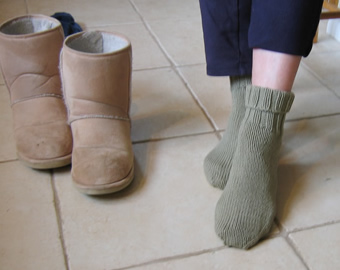
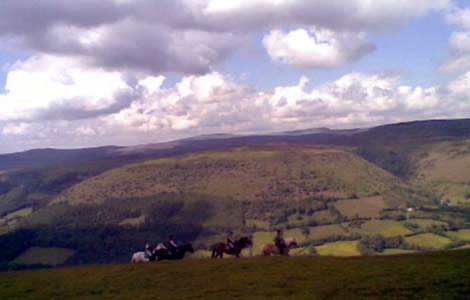
Here's a picture of the socks "in use". Left to right - my sister at the rear on the grey, Susanna, Liz, and leading on the palamino, Tom, the guide.
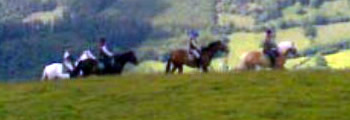
Llanthony Riding and Trekking is based at Court Farm, next to Llanthony Priory; here's the full picture (from which the detail above is taken) showing the fabulous scenery and environment in Wales. Lyn strongly recommends the bed and breakfast accommodation that she enjoyed at Pen-y-dre Farm
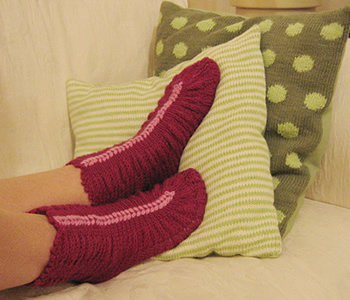
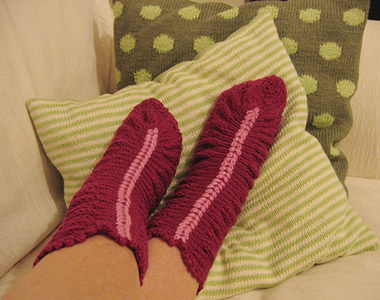
Three offerings this month: this first pattern from 1968 is very similar in design (and the principle of the stretchy fit) to the second offering, Boudoir Boots; however these socks are knitted in a different (more conventional) orientation. They particularly appeal to me, being very jolly, knitted in stripes, (although, as a general rule, I prefer my socks wide awake...).
InstructionsMake two socks alike. Main body - With main shade (M) cast on 56 stitches, and arrange across 3 needles (19 on each). Work as follows: Rib round: k5, * p1, k1; repeat from
* to last stitch, p1. Repeat this round 10 times more. ** Repeat from ** to ** 13 times more, and then work the 12th, 13th and 14th pattern rows again Break C. Work the toe - Continuing in M only, re-arrange the sts over the
3 double pointed needles as follows: You now have 56 sts in the round. Next round: knit to the last 3 sts on the first needle, sl1, k1,
psso, k1. Beginning the second needle, k1, k2tog, knit to the last 3 sts
on the second needle, sl1, k1, psso, k1. Beginning the third needle, k1,
k2tog, knit to end of round, [52 sts]. Continue to decrease on every alternate round in this way until 24 sts
remain. [8 on the first needle, 12 on the second needle, 4 on the third
needle]. Making up - slip the last 4sts of the round on to the first needle
and graft
the two sets of 12 sts together to make the toe. 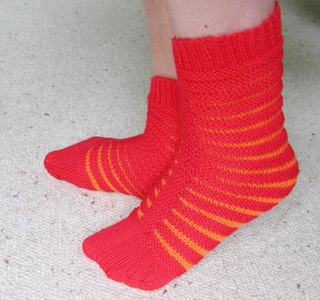 |
MaterialsOriginal pattern calls for a total of 2 (1oz) balls of 4ply - 1 ball in each colour. One set of 4 double pointed No 11 needles. Tension30st and 38 rows to 4 inches (10cm). Size mattersOne size fits all. A word on the wool.Original knitted in Patons 101 Courtelle Crepe in "Venus blue" and "Starlight white". Example knitted in Phildar Lambswool (51% wool, 49% acrylic), colours rouge and melon. |
Second pattern this month from an "Oddments" leaflet for "using up old Scraps of Wool", dating anywhere between the 1930s and the 1950s. Described originally as Lady's Bedsocks*, I hope they will prove to be the perfect partner for Boudoir Bedjacket.
*One of the other patterns was called "Bedroom Boots" and I couldn't resist the alliteration; however, this pattern described here makes footwear that is much more elegant than either "bedsocks" or "boots" implies. They look at their best when on the feet, (as opposed to just after you have knitted them, when they look like a pair of unattractive caterpillars). It is hard for me to date the design, as many patterns were reproduced out of their true era; possibly an expert on publishing could be more accurate.
InstructionsEach sock is worked in one piece. Make two alike. Commence at the front edge. Using No. 12 needles, cast on 64 stitches,
and work 6 rows in k1, p1 rib. ** Change to No. 12 needles. Work 6 rows in k1, p1 rib. Making up - Press each piece lightly on the wrong side under
a damp cloth with a hot iron. Crochet edging - Using the main colour, work a picot edge all around the top of each of the socks, as follows: One slip st to secure the yarn to the top front edge. Embroidery |
MaterialsOriginal pattern calls for 2oz of 4ply, and a small quantity of contrast
for embroidery. One pair each of number 12, an No 6 needles. Tension20st to 4 inches (10cm) on No 6 (5mm) needles. Size mattersOne size fits all. A word on the wool.Baby Cashmerino is heavier than a 4ply, knitting to a tension of 25st and 34 rows to 4 inches. Thus I used more yarn than the original pattern. Each 50g is 125m, and I used 90g. |
As a variation (or to "use up old scraps of wool") you might choose to make the picot edging in the contrast colour to match the embroidery - I believe this would work better if the contrast were darker than the main colour.
Alternatively, if you are not confident in your embroidery skills (I found it harder than I had imagined) you could stick with a single colour and embroider in the main yarn; this provides a more sophisticated look - if indeed a bedsock can be said in any way to contribute to a sophisticated look!
 Men's slippersocks in 2 colours. I have also knitted a 3 colour version to use up wool oddments. I did try to knit these completely in the round to avoid seams but found it almost impossibly complex to do the fair-isle over only half the round - so I would stick to the instructions as given |
InstructionsWith No. 12 needles and main shade (M) cast on 60 stitches loosely, and
arrange over 3 needles. Commence pattern as follows: Rnd 1: Change to contrast colour (C) and knit all sts. These 20 Rows form the pattern. Work top of foot as follows: Break off M and slip the first 16 sts of the round on to a spare dpn,
and slip the last 13 sts on to a second spare dpn. [Editor's
note: these can be your No. 12 needles if required]. Row 1: Using C knit all sts. Now work one more pattern set of 20 rows, and then the first 8 rows again,
decreasing 1st at the end of the last row, (30 sts). Shape toe: Using M only, continue in stocking stitch, (one row knit, one row purl), decreasing 1 st (k2 tog) at each end of the next, and every alternate row, until 14 sts remain. Leave these sts on a safety pin. Make the heel: Return to the remaining 29sts; place both sets together on one needle,
and continue to work on them in st st, using colour M. Continue in st st until the foot is the same length as the top. Making up. Graft
the two sets of 14 sts together. Make a second sock to match. |
Materials2 x 50g skeins of main shade and 1 x 50g contrast in double knitting wool. Two sets of 4 double pointed needles, Nos. 10 and 12. Tension24 sts to 4 inches measured over stocking stitch on No 10 (3¼mm) needles. Size mattersThe pattern as written should fit a foot of 11 inches in length. |
© Christina Coutts 2007
![]()