Cuddly Mouse Toy
More....
Please note:
Patterns are for
Personal Use Only
You may freely circulate patterns with the Copyright Statement Preserved.
See terms of use.
This is another simple (and fairly flat) toy which could go with the baby layette.
It's made in two colours using a slip stitch technique to make the pattern. It looks good with the main colour in white, and might work well using up left over yarns.
InstructionsThe original pattern used two strands held together of a 4ply weight yarn, but you could easily use a single strand of anything from a double knit through to a chunky yarn, which would ultimately only affect the resulting size of the toy. It's nice to have a fairly firm tension for a toy so adjust the needle size as appropriate. Body (2 pieces)Using contrast colour (B), cast on 23 stitches.
These four rows form the colour pattern. Keeping the pattern correct, continue and cast on 2 stitches at the beginning
of the next 2 rows. Repeat the last 4 rows [31 sts]. Decrease 1 stitch at each end of the next and every following 8th row
until 15 stitches remain. Work a second piece in the same way.

Head (2 pieces)Using white (A), start at the nose and cast on 3 stitches. Decrease 1 stitch at each end of the next row. Work a second piece in the same way.
Ears (4 pieces)Using contrast colour (B), cast on 7 stitches, and, starting with a knit
row, work in stocking stitch, increasing 1 stitch at each end of the 3rd
and following alternate row. Work three further pieces in the same way.
Tail (1 piece)The tail can be either a 4-stitch I-cord, or a twisted cord - make it as long as you think suitable for the toy. To Make Up[Editor's note: This toy is designed to have a cotton lining - which I believe is designed to help it keep its flat shape. I stuffed it with concentric layers of flat synthetic quilt padding instead, using the knitted shapes as a guide.] Cut out the body and head in calico, leaving a 1½cm seam allowance, using the knitted pieces as a template. Join the side seams of the body and the outside edges of the head, of both the knitted and calico versions. Turn the calico lining to the right side and sew head to body. Fill and sew up lower edge. Place the lining inside the the knitted version and finish all seams. [Editor's note: I found the instructions a bit vague here - you just have to use the picture as a guide to see how and where to attach the head to the body, and discover how that all works out with a lining! However this is simple toy so it's easy enough to extemporise.] Seam the ears together, noting that the reverse stocking stitch is the right side. Sew the cast-off edges of the ears to the head. Attach the tail to the body. The eyes can be embroidery or buttons as shown in the picture. There is also a tiny embroidered nose. |
Materials
|
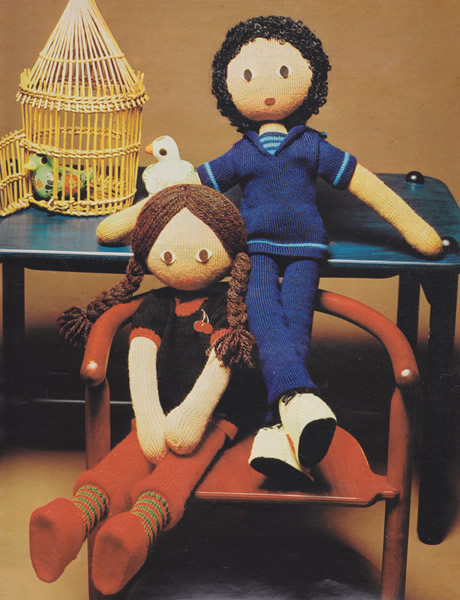
Lovable leggy dolls in their fashionable trouser suits - knitted with sewn-on felt features.
Instructions.The basic dolls are identical, differing only in hair and clothing. Girl Doll - head (2 pieces alike): With No 11 needles and flesh colour, cast on 12 stitches. Now decrease 1 stitch at each end of the next and every 3rd row Make a second piece the same and join together, leaving cast-on edges
open.
Girl Doll - body (2 pieces alike): With No 11 needles and flesh colour, cast on 24 stitches. Make a second piece the same and join together, leaving cast-off edges
open. Girl Doll - legs (make 2): With No 11 needles and flesh colour, cast on 38 stitches. Next Row: k14, k2tog, k6, k2togtbl,
k14. Continue straight until work measures 12 inches. Join back and foot seams. Girl Doll - arms (make 2): With No 11 needles and flesh colour, cast on 25 stitches. Next Row: k1, (m1, k11, m1, k1) twice.
Work 11 rows straight. Continue to decrease as set on the next 4 rows. Join side and hand seams. Girl Doll - hair: Cut brown yarn in 36 inch lengths. With centre of strands of yarn at
centre of head, arrange evenly over head from front hairline to nape of
neck, backstitching securely over centre for parting. Girl Doll - features:Cut oval sections, as given in the diagram, for eyes, (white felt); centres
(black), mouth (red); sew on as shown in picture. Girl Doll - jumper:BACK: With No 9 needles and Red yarn, cast on 48 stitches. ** Continue in stocking-stitch until work measures 3¼ inches, ending with a purl row. Next Row (make back opening): k26;
turn. Shape the armhole by casting off 3 stitches at the armhole edge
on the next 3 rows. Rejoin yarn to the inner edge of the remaining stitches, cast on 4 stitches, and complete to match the other side. FRONT: Work exactly as for BACK as far as *. Shape armholes by casting off 3 stitches at the beginning of
the next 2 rows, then k2tog at each end of the next 3 rows. Neck shaping: Slip the centre 12 stitches on to a stitch holder and work the other side of the neck to match. SLEEVES: With No 9 needles and Red yarn, cast on 40 stitches, and work as for the BACK up to *. Continue in stocking stitch, until work measures 2 inches, ending with
a purl row. NECKBAND: Join the shoulder seams. Set in the sleeves. CHERRIES: Cut two circles in red felt - about the size of a 1p piece. Sew on and embroider stems with white yarn as shown in the photo. Girl Doll - trousers:LEGS (2 pieces alike): With No 9 needles and Red yarn, cast on 42 stitches. Work in stocking stitch, until work measures 8 inches, ending with a purl row. Increase 1 stitch at each end of the next and following 4th row. Make a second leg the same. Join front and back seams. Girl Doll - socks:With No 9 needles and Green yarn, cast on 46 stitches. Next Row: k17, k2tog, k8, k2togtbl,
k17. Working in stripes of 2 rows Red, and and 2 rows Green, continue decreasing
as set until 32 stitches remain. Girl Doll - shoes:Cut out 4 upper sections and 2 soles from red felt, using the pattern
given in the diagram. Boy Doll - head, body, legs, and arms:Work exactly as for GIRL doll. Boy Doll - hair: Using a darning needle and 2 strands of dark brown yarn, work around
hair line, then then fill centre thus: Boy Doll - features:Exactly as the GIRL doll. Boy Doll - jumper:BACK: With No 9 needles and Blue yarn, cast on 48 stitches. Complete the back as for the GIRL doll's jumper, starting from **. FRONT: Work exactly as for BACK (above) as far as ***. Shape armholes by casting off 3 stitches at the beginning of
the next 2 rows, then k2tog at each end of the next 3 rows. Neck shaping: Rejoin the yarn to the inner edge of the remaining stitches, and work the other side to match, working k2togtbl, instead of k2tog. SLEEVES: With No 9 needles and Blue yarn, cast on 40 stitches, and work as for the (Boy's) BACK up to ***. Continue in stocking stitch, until work measures 2½ inches, ending
with a purl row. NECK INSET: COLLAR: Continue on these stitches only. With right side facing, rejoin yarn to inner edge of remaining stitches,
and work other side to match. Join shoulders. Boy Doll - trousers:Work as for the GIRL doll's trousers but using Blue yarn, and turning all the hems to the wrong side. Boy Doll - boots:Cut out 4 upper sections and 2 soles from white felt, using the pattern
given in the diagram. |
MaterialsDouble knitting yarn in 20g balls: Girl Doll: Boy Doll:. • A pair each of Nos 11 (3mm) and 9 (3¾mm) knitting needles Tension28sts x 36 rows to 4 inches on No 11 needles. Size mattersHeight 24 inches. Abbreviationsm1: make 1 stitch by picking up the strand of yarn before the
next stitch and knit into the back of it
A Word
|
Pattern DiagramThis is the pattern for the felt pieces used for the features, shoes,
and boots. 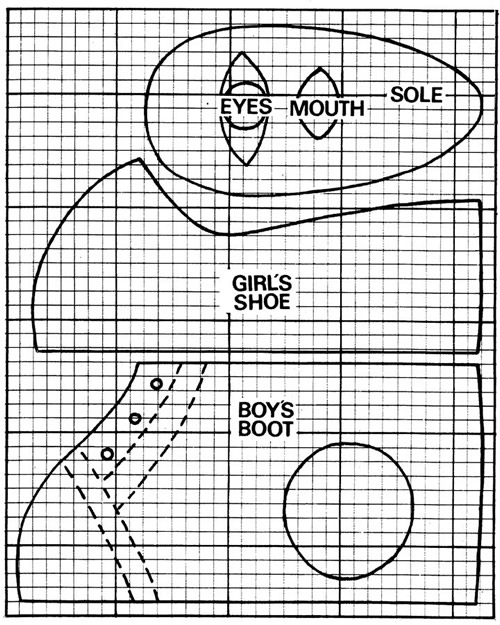 |
|
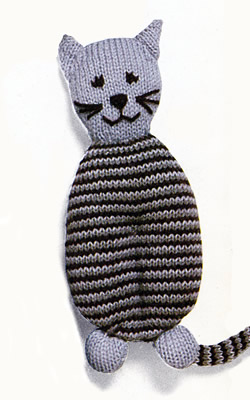
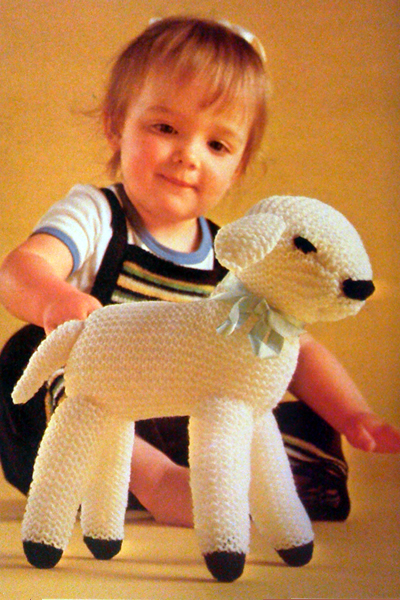
A simple cuddly toy to go with the gown for bedtime.
InstructionsThis is a very simple toy made up of fairly flat ovals, which should not be over-stuffed. Body (2 pieces)Using dark colour (B), cast on 12 stitches and work in striped stocking
stitch following Chart 1 with stripes as follows:
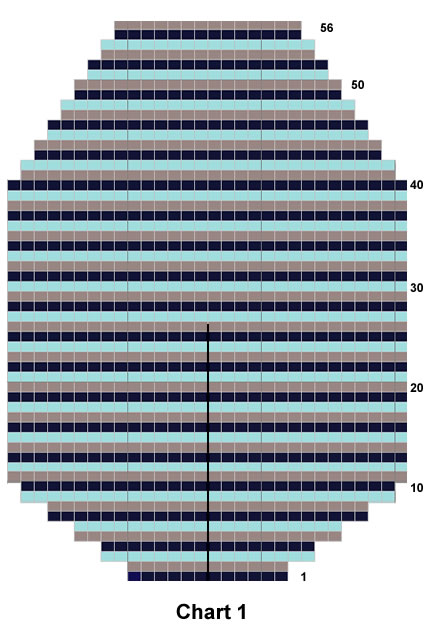
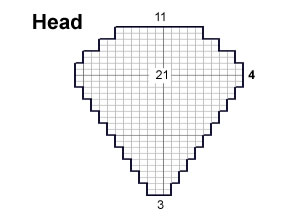
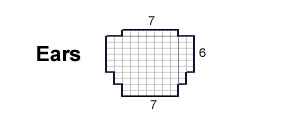
(The chart shows casting on 2 stitches at the end of every row, until there are 28 stitches, then increase 1 stitch at each end of the next row [30 sts]; then working 29 rows straight, before starting to decrease 1 stitch at at each end of the next and every alternate row until 14 stitches remain). Cast off using B. Work a second side in the same way. Head (2 pieces)Using light colour (M), cast on 11 stitches and work in stocking stitch following Chart 2, (which shows increasing 1 stitch at each end of the third and every following alternate row until there are 21 stitches; then working 9 rows straight, before starting to decrease 1 stitch at at each end of the next and every alternate row until 11 stitches remain). 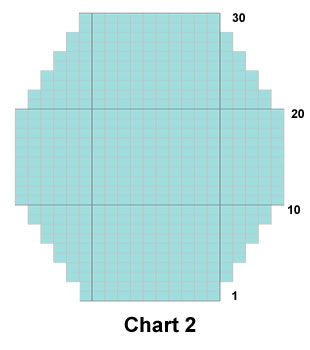 Work a second side in the same way. Ears (2 pieces)Using light colour (M), cast on 8 stitches, and work 10 rows straight. Work a second ear in the same way. Paws (4 pieces)Using light colour (M), cast on 10 stitches and work in stocking stitch following Chart 3, (which shows working 6 rows straight, then decreasing 1 stitch at at each end of the next and every alternate row until 4 stitches remain). 
Cast off. Work a further 3 pieces in the same way. Tail (1 piece)Using dark colour (B), cast on 12 stitches and work 62 rows in striped
stocking stitch as follows: To Make UpAssemble the two faces of the body, the head and the paws. Sew, (right
sides together) leaving an opening. Turn right side out, stuff, and sew
closed. |
Materials
|
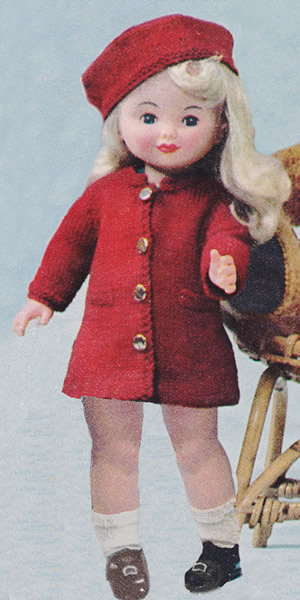
A sweet little old-fashioned set for a dolly.
Instructions.Outfit includes coat and beret in double knitting wool; dress in 3 ply; and vest, pants and socks in 3 ply. Coat - backCast on 48 stitches work 4 rows in stocking stitch. Next Row: purl (this marks the hem- line). Continue in stocking stitch beginning with a purl row, and decreasing 1 stitch at each end of every 6th row until 38 stitches remain. Continue straight until work measures 5½ inches from hemline. Raglan Shaping: Cast off 2 stitches at the beginning of the next
2 rows, then decrease 1 stitch at each end of every alternate row until
16 stitches remain. Coat - right frontCast on 28 stitches. Work 4 rows in stocking stitch. Next Row: purl (this marks the hem-
line). Next Row: k2, cast off 2, knit to
end. Make 2 more buttonholes at the front edge, 1½ inches apart. Raglan Shaping: Making 4th buttonhole 1½ inches from 3rd, cast off 2 stitches at beginning of the next row. Decrease 1 stitch at the beginning with of every alternate row until 16 stitches remain, ending with a purl row. Neck Shaping: Coat - left frontAs right front, reversing shaping and omitting buttonholes. Coat - sleevesCast on 26 stitches and knit 4 rows. Coat - collar Join raglan seams. Coat - mock pocketsCast on 10 stitches and knit 2 rows. Coat - making upPress work. BeretCast on 68 stitches and knit 4 rows. Next Row: (k3, increase in next stitch),
repeat to end. Beret - making upThread wool through remaining stitches and secure.
Dress - backCast on 49 stitches and work 6 rows in moss stitch. Continue straight until work measures 5½ ins. Sleeve Shaping. Cast on 9 stitches at the beginning of the next
2 rows. Then continue until work measures 8 ins. Dress - right frontCast on 27 stitches. Sleeve Shaping. Neck Shaping. Dress - left frontAs right front, reversing shaping and omitting buttonholes. Dress - neckbandJoin shoulder seams. Dress - sleeve borderPick up and k. 33 stitches along sleeve edge. Dress - making upPress work. Vest - back and front alikeWith No 10 needles cast on 36 stitches. Armhole Shaping. Neck Shaping. Vest - making upJoin side and shoulder seams. Pants - back and front alikeWith No 10 needles cast on 34 stitches and knit 2 rows. Leg Shaping. Pants - making upPress work. SocksWith No 11 needles, cast on 28 stitches 1st row: increase in first stitch,
k12, (increase in next stitch) twice, k12, increase in last stitch. Socks - making upPress work. |
MaterialsCoat and Beret:
3ozs Double Knitting Dress:
1oz 3 ply Vest, Pants and Socks:
2ozs 3 ply Tension24 sts to 4 inches on No 9 needles. Size mattersDesigned to fit a 20-inch doll. Abbreviationsch: chain k2tog: knit 2 sts together A Word on the Wool.The pattern is sized for a 20 inch doll which may suit "Our Generation", "American Girl" or vintage Pedigree dolls. 3 ply yarn can be easily found as baby wool in white which would be fine for the vest/pants/socks but for the dress you may be challenged to find more interesting colours. 1 ounce (oz) is approximately 28g. Disclaimer (well...almost)In transposing any pattern it is always a risk that errors will be introduced, in spite of dedicated proof reading. If you have any problems with this pattern, please and I will try and assist. |
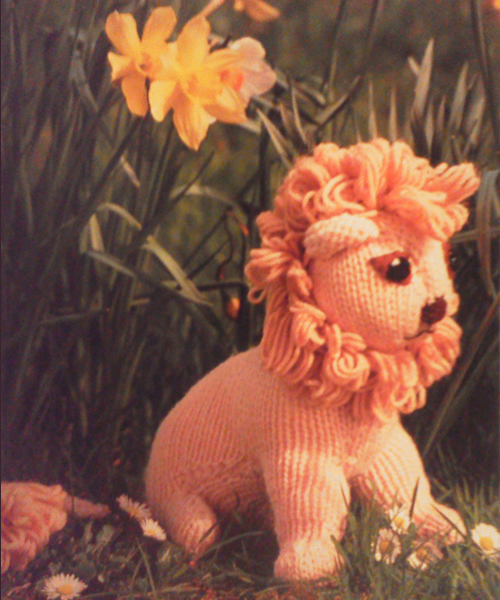
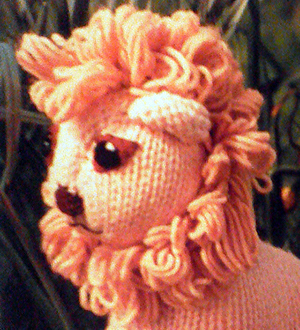
So says 17th century weather-watching folklore in respect of March. So here are a couple of delightful toy patterns to herald the change of season.
LION INSTRUCTIONS.Note that: the lion is knitted with the yarn doubled (2 strands held together). Front Legs (make 2 mirror image)Using 2 strands of main colour (M), and 5½mm needles, cast on 19
stitches. 5th row: k4, (k2tog) twice, k3, (sl1,
k1, psso) twice, k4. 13th row: k1, m1, k4, m1, k1, m1,
k4, m1, k1. [15 sts] 19th row: k1, m1, knit to last stitch,
m1, k1. 23rd row: k1, m1, knit to last stitch,
m1, k1. Cast off 9 stitches, knit to end of row, and leave remaining 10 stitches on a stitch holder. Work a second leg the same way, omitting the last purl row and working the cast off row on a purl row to reverse the shaping. Body Using 2 strands of main colour (M), and 5½mm needles, cast on 44
stitches. Cast off 12 stitches at the beginning of the next 2 rows for back legs. Increase 1 stitch at each end of the next and following 2 alternate rows. Repeat the last 2 rows twice. Cut yarn. Join in Front Legs: Next row: k18, (k2tog) twice, k2,
(sl1, k1, psso) twice, k18. [42 sts]. Next row: k1, m1, k17, k2tog, k2,
(sl1, k1, psso), k17, m1, k1. Next row: k18, k2tog, k2, (sl1, k1,
psso), k18. [40 sts]. Next row: k1, m1, k16, k2tog, k2,
(sl1, k1, psso), k16, m1, k1. Next row: k15, (k2tog) twice, k2,
(sl1, k1, psso) twice, k15. [36 sts]. Next row: k1, (sl1, k1, psso), k10,
(k2tog) twice, k2, (sl1, k1, psso) twice, k10, k2tog, k1. [30 sts]. Next row: k1, (sl1, k1, psso), k7,
(k2tog) twice, k2, (sl1, k1, psso) twice, k7, k2tog, k1. [24 sts]. Next row: k7, (k2tog) twice, k2,
(sl1, k1, psso) twice, k7. [20 sts]. Divide for head and face1st row: k1, m1, k6, k2tog, k1. Turn. 5th row: (k1, m1) 6 times, k5, k2tog,
k1. 7th row: k4, (m1, k1) twice, k10,
k2tog, k1. 9th row: k17, k2tog, k1. 11th row: k1, (sl1, k1, psso), knit
to last 3 stitches, k2tog,k1. Repeat the last 2 rows twice more. Cast off 3 stitches at the beginning of the next 2 rows. With right side of work facing, rejoin yarn to remaining 10 stitches on the stitch holder, and work the other side of the head to correspond with the first side, reversing shaping. To reverse shaping, read rows from end to beginning, or, rejoin yarn with wrong side of work facing and then read knit for purl, and purl for knit. Front GussetUsing 2 strands of main colour (M) and 5½mm needles, cast on 6 stitches. Place marker threads and the end of the last row. Next row: k3, (k2tog) twice, k2,
(sl1, k1, psso) twice, k3. [12 sts]. Next row: k3, k2tog, k2, sl1, k1,
psso, k3. [10 sts]. Next row: k2, (k2tog) 3 times, k2.
[7 sts]. Next row: k2, k3tog, k2. [5 sts]. Next row: k1, k3tog, k1. [3 sts].
Last row: k3tog, and finish off by drawing yarn through last stitch. Head GussetUsing 2 strands of main colour (M) and 5½mm needles, cast on 4 stitches
for base of nose. 9th row: k1, m1, knit to the last
2 stitches, m1, k1. 15th row: (k1, m1) twice, knit to
the last 2 stitches, (m1, k1) twice. Decrease 1 stitch at each end of the next and every following 4th row until 2 stitches remain. Work 3 rows. Last row: k2tog, and draw end of yarn through last stitch. Mane Using 2 strands of contrast colour (C) and 5½mm needles, cast on
33 stitches. 1st row: knit. Ears (make 2)Using 2 strands of main colour (M) and 5½mm needles, cast on 9 stitches. TailUsing 2 strands of main colour (M) and 5½mm needles, cast on 30
stitches. Tail tipUsing 2 strands of contrast colour (C) and 5½mm needles, cast on
9 stitches. To make upFold front legs in half and seam along cast-on edges and up leg to cast-off
edge. Stuff each section as it is seamed. |
Materials
|
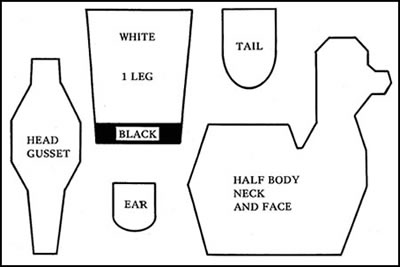
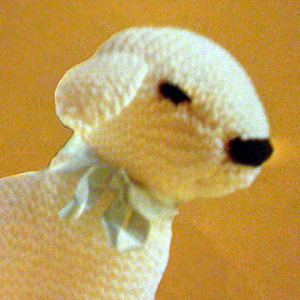
LAMB INSTRUCTIONS.This pretty toy is simply knitted in garter stitch (every row knitted). You use only the basic increasing and decreasing stitches to shape the body. This shows the shape of the pieces:
Body (make 2)With white yarn cast on 28 stitches. 1st row: k1, increase in next stitch,
knit to the last 2 stitches, increase in next stitch, k1. Divide for neck: Rejoin yarn for back to neck edge of remaining 19 stitches from stitch
holder, an knit 4 rows. Head GussetWith white cast on 3 stitches. Knit 9 rows. Ears (make 2)With white cast on 9 stitches. Legs (make 4)With white cast on 17 stitches.
TailWith white, cast on 12 stitches. Next row: k1, k2tog, knit to the
last 3 stitches, k2tog, k1. Thread yarn through remaining 8 stitches and draw up tight. To make upSeam or graft body pieces together along back. |
Materials
|
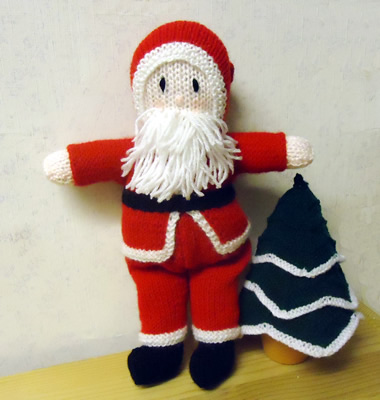
So is he a "Santa Claus" or is he a "Father Christmas"? I never thought much about this until my friend Louise (an American) suggested there was a difference; in the ensuing discussion, it seems my guess did not gel with her view. I think she told me that Father Christmas is the traditional old chap and that Santa Claus is one in red with the white trim.
Anyway - which ever he is, I'm sure he'll make a nice little seasonal knitted toy.
This example knitted by my friend Jennie, and if you live around Ewell in Surrey in the UK you can find her work for sale at local craft fares .
Instructions.Note that: the body is knitted with the yarn doubled (2 strands held together), and the clothes are single. BodyWith white yarn (W) and 3mm needles and yarn used double, cast on 20 stitches and work 3½ inches in stocking stitch (1 row knit, 1 row purl). Shape shoulders by casting Off 5 stitches at the beginning of
the next 2 rows. [10 sts]. Now increase 1 stitch at each end of every row until there are 18 stitches. Work 14 rows straight for back of head. Now decrease 1 stitch at each end of every row until 8 stitches remain. Join the two halves together and stuff firmly. Arms (Make 2)With yarn C, cast on 14 stitches, and work 1 inch in stocking stitch, ending with a purl row. Break off C. Join in W, and continue until work measures 2½ inches. Fold in half lengthways and join seam, leaving top open for stuffing. Stuff and sew to body. Legs (Make 2)With yarn B, cast on 24 stitches, and work 1 inch in stocking stitch, ending with a purl row. Next row: k8, cast off 8, k8 [16 sts] Work across these 16 stitches for 1 inch, leaving 8 cast-off stitches for toe of boot. Break off B. Join in yarn W, and continue straight until work measures 3½ in.
Coat (Fronts)For the left front: with yarn W, cast on 16 stitches, and knit 4 rows. Break off W. Continue in red (R) and white (W) thus: Cast on 10 stitches at the beginning of the next row for the sleeve,
then work 1 inch straight on these 26 stitches, ending at the neck edge.
Work the right front to correspond, reversing all shaping. Coat (Back)With yarn R, p19 stitches from the from right front, cast on 10 stitches, then p19 from left front. Continue in stocking stitch for l inch Cast off 10 stitches at the beginning of the next 2 rows, then work 2½ inches, finishing with 4 rows of garter stitch in white (W). Join side and sleeve seams of coat and fit on body, then join the front edges in white from neck to waist. Trousers (Make 2)With yarn W, cast on 30 stitches and k4 rows. Break off W. Join in yarn R, and work in stocking stitch until piece measures 2½
inches, then increase 1 stitch at each end of the next and every alternate
Continue straight until work measures 5 inches from the start. Join seams and fit on body. Attach garments to body stitching round neck, wrists, waist of trousers and top of boots. HoodWith yarn W, cast on 36 stitches, and knit 4 rows. Join in R, and work straight in stocking stitch until piece measures
3½ inches. Then k2tog at the beginning of every row until 4 stitches
remain. Fold in half lengthways and join seam from point to start of shaping.
Embroider featuresTaking photo as a guide use blue for eyes and black for eyebrows and nose. Make moustache and beard with loops of white, sewing in position. Belt With yarn B, cast on 4 stitches, and work 5 inches in garter stitch,
(every row knit). Cast Off. Sack (not shown in photo)With white (or any colour of your choosing), cast on 34 stitches and
work 3 inches in stocking stitch. Cast off. With double yarn (or make a 2-ply twisted rope) gather up sack and sling round shoulder and under arm. |
Materials
|
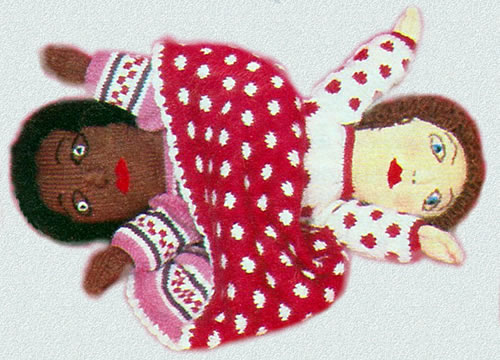
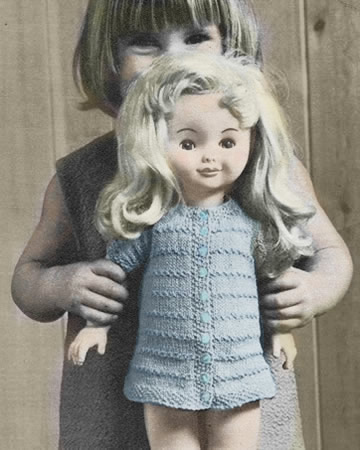
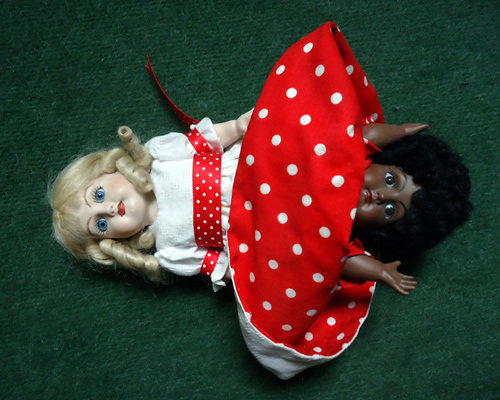
I have a mysterious fascination with this type of doll. I have even gone as far as cutting two moulded porcelain dolls at the soft slip stage and sticking them together to create my own porcelain version. I think that this must have all started by my seeing one in the Worthing Museum when I was a small child even though I cannot precisely recall it. As a child I am not sure I would have been so keen to play with such a doll - I liked realistic dolls rather than novelty items. However, it left a lasting impression on me, and here is knitted version for you to try.
Instructions.This design has two completely different dolls with different dresses - sometimes you even find Red Riding Hood and the Wolf in topsy-turvy form though I find that a bit horrific. However, I quite like the complete negative effect as I made for my bisque doll - one dress in white with red spots, and the other red with white spots - if that appealed then you could easily adapt this pattern by reversing the spot colour dress colours. Doll Body Back
|
Materials
|
My porcelain version of a topsy turvy doll.
How very 1950s! How very French!.
How could I resist?
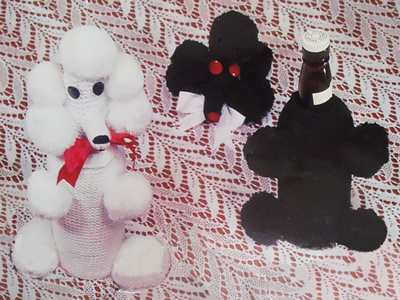
At first glance I assumed this was the more usual toilet roll cover (because nobody wants their spare toilet rolls exposed to the world do they?) - but no! It is a "bottle" cover. How much better to have a knitted poodle gracing the dining table rather than leaving your Castle Lafite Rothschild labels tastelessly speaking for themselves. [Actually I think it looks like it's designed for the sherry bottle - perhaps to hide the little nip you need to get through the housework.]
Alternatively you can wimp out and knit it as a toy - provided your child is also into retro 1950s toys, (did I mention that as a kid my favourite toy was a poodle ? ... he wasn't knitted though ..... Pom Pom .... ‹closes eyes in reminiscence›)
[Please note: This has not been knitted up to test the pattern but is provided as per the original. The shapes are very simple and the main effort is in the making up.]
Instructions.The poodle is knitted mainly in garter stitch with some eyelet rows to
carry elastic and drawstring. I think the two methods of assembly have
not been quite thought through in the original pattern, so you need to
use your common sense and refer to the picture when sewing it together. BodyWith No 8 needles cast on 49 stitches, and knit 2 rows. Next row: * k1, wf, k2tog; repeat from * to last stitch, k1. Continue in garter stitch (every row knit) until work measures 7½ inches from the beginning. Next row: *
k5, k2tog; repeat from * to end. [42 sts] Next row: *
k4, k2tog; repeat from * to end. [35 sts] Next row: *
k3, k2tog; repeat from * to end. [28 sts] Next row: *
k2, k2tog; repeat from * to end. [21 sts] Next row: K1; *
k2tog; repeat from * to end. [11 sts] Thread wool through remaining stitches, draw up and fasten off securely. [Editor's note: I think there is a bit of an implied error here - this is the neck, so only draw up to the degree that the neck of the bottle will fit...] HeadCast on 49 stitches, and knit 3 rows. Next row: *
k5, k2tog; repeat from * to end. [42 sts] Next row: * k1, wf, k2tog; repeat from * to last stitch, k1. Continue without any shaping for 3 inches. Next row: *
k2tog; repeat from * to end. [14 sts] Thread wool through remaining stitches, draw up and fasten off securely. NoseCast on 12 stitches, and work 1½ inches in garter stitch. Next row: *
k1, k2tog; repeat from * to end. [8 sts] Thread wool through remaining stitches, draw up and fasten off securely. Pom-PomsMake 8 pom-poms, 2½ inches in diameter. Cut 2 pieces of cardboard the diameter of the finished pom-pom; cut a ½ inch diameter hole in the centre. Wind wool over the rings until the centre hole is filled. With a sharp pair of scissors, cut through the wool at the outer edge. With double wool, bind round the centre of the pom-pom between the two pieces of cardboard; tie a knot and fasten off securely. Remove the cardboard. Fluff out and trim. To Make UpJoin back seam. Take 4 strands of light coloured wool and thread through holes at neck
and secure with a small knot. Tie in a bow. To Make Up the Poodle as a ToyFollow the instructions for the Bottle Cover. [Editor's note: After this there are a few inconsistencies which you need to work out as you go.] Assemble as the bottle cover. Insert a circle of cardboard 3 inches in diameter into the bottom of
the body. Make a roll of stuffing 13 inches long and insert this into
the base firmly, leaving excess sticking out for the head to fit over. Fluff out the stuffing slightly and fit head over it; pull down and stitch
over body. |
Materials
|
How to make pom-poms.
This is a different method which I ran across while looking for the simple tutorial above. It's less relevent for making our Poodle maybe but good if you want to make a load of these for a scarf or a necklace (ok - bit dated perhaps - think of your own project!)
|
|
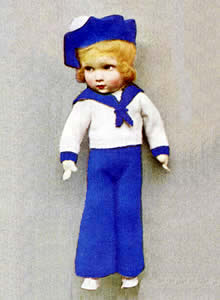
A cute little 1940's outfit for sailor doll. Sized to fit a 16 inch doll and shown on a felt doll, (Lenci I think), with the characteristically modest expression. Quite delightful.
Instructions.Patterns for the outfit as shown, plus the option of a skirt instead of trousers if preferred. Beret:With blue wool and crochet hook, make 4 ch, and join into ring with slip-stitch, then work 8 double crochet into ring. 1st Round: 2 ch, then 2 dc on each
stitch (join with slip stitch to top of 2 ch at end of each round). Continue in this manner, working an extra stitch between increasings each time until work measures 5½ inches across at widest part (17 rounds). Now decrease thus:- 1st Round: 2 ch, *
miss 1 stitch, 17 dc, repeat from *
to end. Jumper:FRONT: With white wool and No 12 needles, cast on 36 stitches
and work ½ inch in k1, p1 rib. Change to No 10 needles and continue
in stocking-stitch until work measures 2 inches. Shape armholes by casting
off 2 stitches at beginning of next 2 rows, then k2tog at each end of
the next 2 rows. BACK: Work exactly as for front to completion of armhole shapings, then continue straight until length equals that of front to shoulders. Cast off straight across. SLEEVES: With blue wool and No 12 needles, cast on 22 stitches and work ½ inch in k1, p1 rib. Change to No 10 needles and white wool, and continue in stocking stitch, increasing at each end of 5th and every following 6th row until there are 30 stitches on the needle. Work straight until sleeve measures 3½ inches, then shape the top by casting off 3 at the beginning of the next 2 rows, then k2tog at each end of every row until 16 remain. Cast off loosely. COLLAR: With No 10 needles and blue wool, cast on 38 stitches
and knit 8 rows garter stitch, (every row knit), slipping the first stitch
of each row. Work the remaining 12 stitches to correspond reversing the shaping. SkirtWith No 10 needles and blue wool, cast on 183 stitches. 1st Row:
k3, * p8, k5, repeat from *
to last 11 stitches, p. 8, k. 3. Repeat these 2 rows for 1 inch, then decrease as follows:- Next Row:
(right side facing): k3, * p2tog,
p4, p2tog, k5, repeat from *, ending
k3. Next Row: k3, *
p2tog, p2, p2tog, k5, repeat from *,
ending k3. Next Row: k. 3, *
(p2tog) twice, k5, repeat from *,
ending k3. Next Row: k. 3, *
p2tog, k5, repeat from *, ending k3.
Change to No 12 needles and work in k1, p1 rib until work measures 4½ inches, then cast off in rib. Trousers (front and back alike)With No 10 needles and blue wool, cast on 23 stitches for right leg,
and work 6 rows garter stitch. Change to stocking stitch and decrease
at beginning of every following 8th row (outside edge) until 18 stitches
remain. [ Editor's note: Make sure you have right side facing you for both legs and that they are arranged so that the shapings are on the outside edges.] Continue in stocking stitch for another 2½ inches, then change
to No 12 needles and work 3 rows in k1, p1 rib. Next Row: (make holes for elastic):
rib 2, * wfwd, k2tog, repeat from
* to last 2 stitches, rib 2. Work a second piece in the same way. To make upPress all pieces lightly with a damp cloth. Sew in all ends. |
MaterialsOriginal yarn requirements: A pair each of No 10 (3¼mm) and No 12 (2¾mm) needles. Tension30 sts to 4 inches on No 10 needles. Size mattersDesigned to fit a 16-inch doll. Abbreviationsch: chain k2tog: knit 2 sts together A Word
|
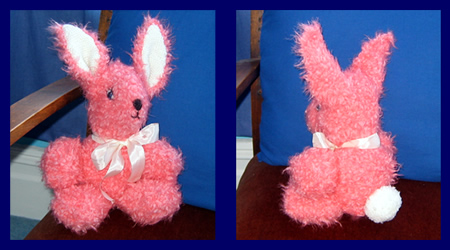
"Who could resist this adorable dressed bunny?"
Well, I for one can resist the dressed part. I am not very fond of dressed animals (even stuffed ones). However, the dress is very pretty, and it would tone down the effect of the rather strong pink colour I have chosen for the rabbit. The Phildar yarn makes for a really soft effect; the pink is discontinued but there is a white, which I think would be very cute.
"So cuddly, a small child would love her at once. Very easily and quickly knitted in garter stitch throughout."
Instructions:Bunny is worked throughout on No 8 needles and garter stitch (ever row knit). When making up, all seams are joined on the right side. Body (work two pieces alike): 1st row: Knit Base: 1st row: Knit Making up the body: Front Legs (work four pieces alike): 3rd row: Knit twice in first stitch;
knit to last st, and knit twice in last st [13 sts] Making up the front legs: Back Legs (work four pieces alike): Making up the back legs: Tail (work 2 pieces alike): Making up the tail: Head (work 2 pieces alike):
* Knit the next 8 rows. Cast off 3 sts. Making up the head: Features (embroidered): Ears (work 2 alike): Repeat these 4 rows 5 times more until there are 15 sts. Knit the next 12 rows. 37th row: K2 tog; knit to last 2
sts, and k2tog. [13 sts] Cast off 11 (this is the edge sewn to the head). Ears Linings (work 2 alike): Repeat these 4 rows 7 times more until there are 20 sts. 53rd row: K2 tog; knit to last 2
sts, and k2tog. [18 sts] Making up the ears: |
MaterialsOriginal: 3 x 2oz hanks of Big Ben Knitting in Oystershell (main colour); Example shown is knitted in 2 x 50g ball Phildar
"Neige" (65 yds/60m per 50g ball), colour Oeillet (0013
discontinued). One pair each of No. 8 (4mm) and No 11 (3 mm) needles. TensionBig Ben was a chunky wool and worked to a tension of approx. 14sts and 18rows to 4 inches on No 3 (6½mm) needles in stocking stitch. The Phildar Neige tension is 11sts and 18 rows to 4 inches on No 5 (5½mm)
needles in stocking stitch. Size mattersOriginal instructions and yarn made a 12½ inch rabbit (including ears). A word on the woolBig Ben is a chunky wool similar in gauge to the Phildar I used but knits
up very differently on the smaller needles. I used a lurid pink for the rabbit - but wouldn't she be nice in white with pink ear linings? Disclaimer
|
Bunny ClothesI chose just to put a ribbon on the bunny. You could make the knitted
tie instead or go for the whole dressed bunny look. The dress is pretty
and allows you to see the cute little tail. Neck tie: Dress: Rejoin yarn to centre 18 sts, and knit 14 rows. Next row: Knit 4; cast off 10; knit
last 4 sts. Continue to work on the last 4 sts and knit 25 rows. Dress Frills: Make another frill the same and sew in place half an inch above the first frill. Put dress on bunny and gather up waist edge to fit. |
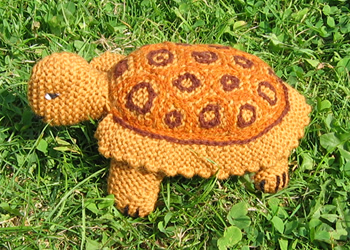
I do enjoy unusual knitted toys - and I had a succession of pet tortoises as a child (when it was legal...) - so this seems a natural choice. I am very pleased with the way he worked out, and he was not as fiddly to make as I had expected; probably about 2 evenings work in all.
InstructionsThe tortoise is knitted in garter stitch (every row knit) throughout. ShellCast on 11 stitches, and knit 1 row. [Editor's note: To increase, I work into the front and back of the first st, knit to the last two sts, then work into the front and back of the next st, then knit the last st. This avoids a stepped effect at the end of the row. If you increase in a different way - for example, picking up the loop between sts - then you may not have this problem. Make sure you know how the pattern instuctions intend you to work an increase by looking at the abbreviations. There is usually an implied difference between "increase in the next st" and "make 1".] Knit 32 rows straight, then decrease 1 st at each end of the next and
every alternate row until there are 11 sts remaining. Make another piece the same. [Editor's note: I embroidered the top half of the shell before sewing up. The tension of the embroidery encouraged the shell-shape of the piece.] Join the two halves together leaving an opening for stuffing. Stuff firmly and sew up opening. Embroidery on top half: outer circles in light brown chain-stitch with
smaller dark brown circles inside. [Editor's note: I am not very good at free-form embroidery, so was a bit worried about this - but it worked out OK. You can see that what I did was very lop-sided, but despite that it looks fine I think...] 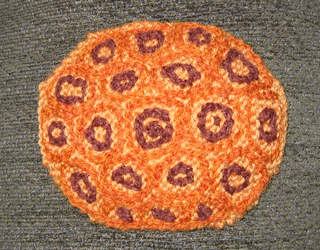 HeadStart at neck edge and cast on 10 sts. Next row: Knit to the last 2 sts; inc in next st, k1. Next row: Inc in the first st; knit to the last 2 sts; inc in next st, k1. [15 sts]. Knit 5 rows. Next row: K2tog; knit to the last 2 sts; k2tog. Next row: K2tog.; knit to the last 2 sts; k2tog. Make another piece the same. Sew halves together leaving neck end open
for stuffing. Features: Eyes - black and white straight stitches; mouth - long black straight stitch. Front feetCast on 4 sts. Shape thus: Next row: k2, turn, k back; Next row: Inc in the first st; knit to the last 2 sts; inc in
next st, k1. Now dec. 1st at each end of the next 3 rows. Make 3 more pieces the same. Sew each pair together, leaving cast off
edges open for stuffing. Back feetCast on 16 sts, and knit 7 rows. Next row: Inc in the first st; (k4; inc in the next st.) 3 times.
[20 sts]. Sew the short sides together to form a cylinder shape. Make another piece the same. Pads: Cast on 3 sts. Dec 1 st at each end of the next and following alternate row. Make another pad piece in the same way. Sew pads to cast off ends of
back feet. Stuff firmly; sew open ends to back on underside of shell about
1 inch apart. Mark claws with 4 black straight stitches on each foot. TailCast on 17 sts. Sew together along edges to make a cone shape; flatten slightly into a traingle, along line of increases; stuff lightly and sew the wider, open end to the shell at the back, (in line with the head), and so that the seam is underneath. Edging around shellCast on 7 sts. * Knit 2 rows. [Editor's note: Again
I altered the pattern here omitting one of the 5 st short rows, making
the shell edge less frilly - this is what I did: Sew straight edge around the seam of the shell, finishing on either side of the head. Work a line of light brown chain stitch over the join, then a second line in dark brown 2 sts away. Using an oddment of bright coloured wool, cut into 3 strands and tie round neck. [Editor's note: ...or use a ribbon...] |
MaterialsOriginal pattern calls for 2oz of DK in French Mustard. One pair of number 11 needles. Toy stuffing. TensionNot given - but DK wool usually knits to approximately 22st to 4 inches
(10cm) on No. 8 (4mm) needles over st. st. Size mattersTortoise measures 8 inches in length and 6 inches across width of shell. A word on the wool.I had some difficulty in finding what I thought a satisfactory colour. Eventually I bought some 4ply from eBay and used it knitted double. I use 4ply oddments for the embroidery. Disclaimer
|
© Christina Coutts 2007
![]()