Andy Pandy Romper
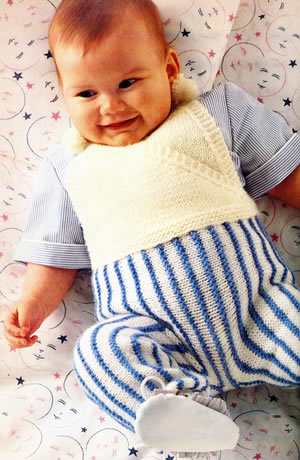
This is an adorable romper; the stripes are created by knitting garter stitch ridges sideways using contrast yarn. Pom-pom ties are used as fasteners at the shoulders.
After last months picture of the Andy Pandy puppet, how could I resist making this outfit.
InstructionsThe romper is easy to knit, though - like exam questions - make sure you read the pattern and understand the pictures of the pieces clearly before you start. Pattern stitchesGarter Stitch: every row knitted. Trouser legsThis section is worked sideways in one piece up to the armhole. Dotted lines in picture show the centre sides and the ankle borders. 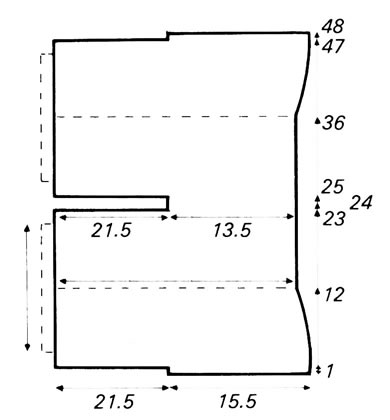
Using 3mm needles and white yarn (A) , cast on 34 sts and knit 3 rows of striped pattern. Next row (wrong side) : Cast on 47 sts and purl across these and to end of row. [81 sts] Continue in striped pattern, shaping waist by decreasing 1 stitch at the beginning of the 9th and every following 10th row until 77 sts remain. Work straight until leg measures 23cm (9 inches) from the beginning,
ending with wrong side facing.
Next row (wrong side) : Cast off 47 sts and purl to end of row. [30 sts] Work straight on these 30 sts for 2 cm (¾ inch) ending with wrong
side facing.
Next row (wrong side) : Cast on 47 sts and purl across these and to end of row. [77 sts] Work straight until section measures 36 cms (14¼ inches) from the
beginning, ending with right side facing. Start shaping the waist again by increasing 1 stitch at the beginning
of the next and every following 10th row until there are 81 sts.
Work straight until section measures 47 cms (18½ inches) from the
beginning, ending with wrong side facing. Next row (wrong side) : Cast off 47 sts and purl to end of row. [34 sts] Work 2 rows stocking stitch in white (A). Ankle BordersWith 2½mm needles and white yarn A, knit up 70 sts along lower edge of leg. Next row: K1; (k2tog) 34 times; k1. [36 sts] Now work in garter stitch for 2 cm (¾ inch). Left FrontWith 3mm needles and white yarn A throughout, cast on 53 sts and work 1 cm (½ inch) in garter stitch. Next row (right side): Knit. Next row: K4, SL 1, k2tog, psso,
knit to the last 6 sts; k2tog, k4. Repeat these last 4 rows until 11 sts remain. Next row: K3, SL 1, k2tog, psso,
k3tog, k2. [7 sts] Cast off. 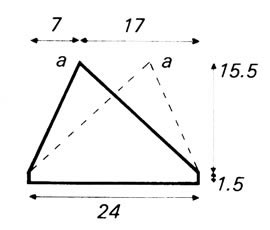 Right BackWork as for Left front. Right FrontWith 3mm needles and white yarn A throughout, cast on 53 sts and work 1 cm (½ inch) in garter stitch. Next row (right side): Knit. Next row: K4, SL 1, k1, psso, knit
to the last 7 sts; k3tog, k4. Rep these last 4 rows until 11 sts remain. Next row: K2, SL 1, k2tog, psso,
k3tog, k3. [7 sts] Cast off. Left BackWork as for Right front. Making UpJoin centre back seam and leg seams. Placing left front over right front and right back over left back, sew
bodice pieces to trousers. Make twisted cords and small pom-poms, and attach to shoulders for fastenings.
|
Materials
|
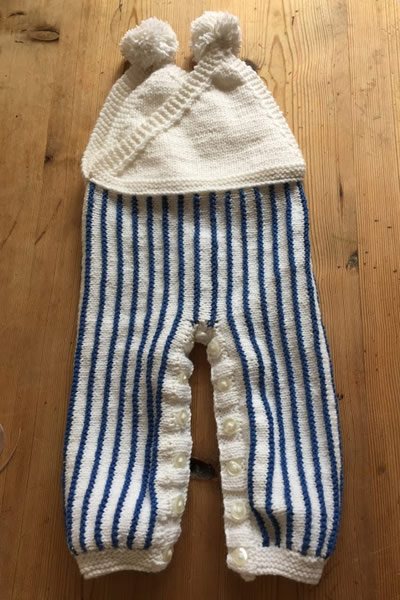
Adapting the leg seams
I think it is very awkward to put a small baby into trousers in the conventional way. Many of these vintage baby patterns from the 1980s have leg openings which I think are much more practical, so I adapted this pattern. I chose buttons but you can apply press studs if you think that is safer.
Instead of sewing the inside leg seams I picked up 111 stitches all around each side and knitted a few rows in 3 x 3 rib, working as follows:
Row 1: K3, *P3, K3; repeat from * to end of row.
Row 2: P3, *K3, P3; repeat from * to end of row.
Repeat these last 2 rows once and cast off in rib
For the other side I inserted a button hole row:
Work rows 1 and 2 in rib as before.
Next (buttonhole) row:
K3, (P1, yrn, P2tog), K3, P3; (K1, yfwd, K2tog);*
P3, K3, (P1, yrn, P2tog), K3, P3; (K1, yfwd, K2tog);
repeat from * once, (6 buttonholes worked), then,
P3, (K1, yfwd, K2tog), P3, (centre buttonhole worked), then,
(K1, yfwd, K2tog), P3, K3, (P1, yrn, P2tog), *
K3, P3, (K1, yfwd, K2tog), P3, K3, (P1, yrn, P2tog);
repeat from * once, K3.
Work row 2 again, then row one, and cast off in rib.
