Instructions.
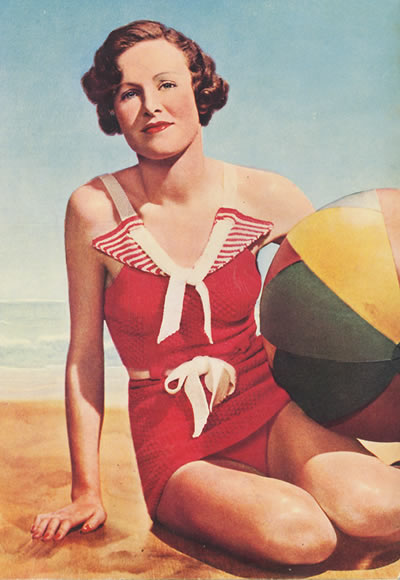
These instructions are given in one size only for a sun-suit with skirt and integrated knickers.
Front
Start with the front of the KNICKERS.
With red wool, cast on 32 stitches. Work in stocking stitch, always knitting
into backs of cast-on stitches. After the first row, cast on 3 stitches
at the end of every row until there are 116 on the needle.
[Editor's note: I always love these vintage patterns that get straight
into 3 figures in the opening paragraph.]
Continue on these for 4 inches, ending with a knit row, then decrease
1 stitch at each end of every 4th row till 104 stitches remain.
Continue on these until the side seam edge measures 9 inches, ending with
a purl row. Leave these stitches on spare needle..
Now start at lower edge of SKIRT.
With red wool, cast on 104 stitches. Work 6 rows in k1, p1 rib, then
work in pattern as follows:-
1st row (right side facing): (k1,
p1) 3 times; p20, (k1, p1) 4 times; p36, (k1, p1) 4 times, p20, (k1, p1)
3 times.
2nd row: (k1, p1) 3 times;
(p3tog, then k1, p1, k1 all into next stitch) 5 times, (k1, p1) 4 times,
(p3tog, then k1, p1, k1 all into next stitch) 9 times, (k1, p1) 4 times,
(p3tog, then k1, p1, k1 all into next stitch) 5 times, (k1, p1) 3 times.
3rd row: as 1st row
4th row: (k1, p1) 3 times;
(k1, p1, k1 all into next stitch, p3tog) 5 times, (k1, p1) 4 times,
(k1, p1, k1 all into next stitch, p3tog) 9 times, (k1, p1) 4 times,
(k1, p1, k1 all into next stitch, p3tog) 5 times, (k1, p1) 3 times.
These four rows form pattern.
Repeat until work measures 13 inches from lower edge, ending with the
4th row of pattern.
Now place needle containing the knicker stitches right side towards you,
behind needle containing skirt stitches, and knit in pattern, as
first row, knitting together 1 stitch from each needle.
Complete this pattern, then work 4 more patterns.
[Editor's note: This means continue with 19 pattern rows ending on a 4th
row..]
Keeping the continuity of pattern, shape for waist by decreasing
1 stitch at each end, in side ribbing, in every 4th row, until 2 stitches
remain in rib at edges (4 stitches decreased each side).
Work 4 more rows in pattern, then make belt slots as follows:-
Next row: k1, p1, p20. Turn.
Work in pattern on these 22 stitches for 8 rows, then leave on spare needle.
Join in wool and work in k1, p1, rib on the next 8 stitches for 9 rows.
Put these stitches on the spare needle, (next to the 22 sts from before).
Work in pattern on the next 36 stitches for 9 rows. Put these stitches
on the spare needle.
Work in k1, p1, rib on the next 8 stitches for 9 rows. Put on the spare
needle.
Work in pattern on the remaining 22 stitches for 9 rows.
Work the next row in the pattern, working all the stitches on to one needle
again.
Continue in pattern, increasing 1stitch at each end in the 2nd and every
following 4th row until there are 104 stitches.**
Work in pattern on these for 3 inches, ending with 4th row
of pattern.
Then proceed as follows:-
1st row: (k1, p1) 5 times, p16, rib
8, p36, rib 8, p16, rib 10.
2nd row: rib 10, (p3tog, then k1,
p1, k1 into next stitch) 4 times, rib 8, (p3tog, then k1, p1, k1 into
next stitch) 9 times, rib 8, (p3tog, then k1, p1, k1 into next stitch)
4 times, rib 10.
3rd row: rib 14, p12, rib 8, p36,
rib 8, p12, rib 14.
4th row: Rib 14, (k1, p1, k1 into
next stitch, p3tog) 3 times, rib 8, (k1, p1, k1 into next stitch, p3tog)
9 times, rib 8, (k1, p1, k1 into next stitch, p3tog) 3 times, rib 14.
5th row: rib 18, p8, rib 8, p36, rib
8, p8, rib 18.
6th row: rib 18, (p3tog, then k1,
p1, k1 into next stitch) twice, rib 8, (p3tog, then k1, p1, k1 into next
stitch) 9 times, rib 8, (p3tog, then k1, p1, k1 into next stitch) twice,
rib 18.
7th row: rib 22, p4, rib 8, p36, rib
8, p4, rib 22.
8th row: rib 22, k1, p1, k1 into next
stitch, p3tog, rib 8, (k1, p1, k1 into next stitch, p3tog) 9 times, rib
8, k1, p1, k1 into next stitch, p3tog, rib 22.
9th row: rib 34, p36, rib 34.
10th row: rib 34, (p3tog, then k1,
p1, k1 into next stitch) 9 times, rib 34.
11th row: rib 34, p36, rib 34.
12th row: rib 34, (k1, p1, k1 into
next stitch, p3tog) 9 times, rib 34.
13th row: rib 38, p28, rib 38.
14th row: rib 38, (p3tog, then k1,
p1, k1 into next stitch) 7 times, rib 38.
15th row: rib 42, p20, rib 42.
16th row: rib 42, (k1, p1, k1 into
next stitch, p3tog) 5 times, rib 42.
17th row: rib 46, p12, rib 46.
18th row: rib 46, (p3tog, then k1,
p1, k1 into next stitch) 3 times, rib 46.
19th row: rib 50, p4, rib 50.
20th row: rib 50, k1, p1, k1 into
next stitch, p3tog, rib 50.
Now continue to work all across in rib, decreasing 1 stitch at each end
of every row until 92 stitches remain.
Next row: k2tog, rib 44. Turn, and
work on these stitches, leaving remaining 46 stitches on a spare needle.
Next row: k2tog, rib to last 2 stitches,
k2tog.
Next row: k2tog, rib to end.
Repeat last 2 rows until 10 stitches remain.
Cast off.
Rejoin in wool at centre and work the other side to match.
Back
Work exactly as for front to end of waist shaping,
[Editor's note: I have to say I am not clear exactly where this is but
I assume it to be after the increases back to 104 stitches which seems
to be the number of stitches worked on thereafter in shaping the low back.
I have marked this position **.]
then work 4 inches in pattern.
Work right across in rib for 4 rows.
Now begin to shape low back.
Next row: rib 20, cast off 64 (tightly)
rib 20.
[Editor's note: You now work the 20 stitches on each side of the cast-off separately.]
Next row: Rib to last 2 stitches,
k2tog.
Next row: k2tog, rib to end.
Repeat last 2 rows until all stitches are cast off.
Join in wool at centre and work other side to match.
Revers
These are worked in stripes of 2rows red, 2 rows white.
Do not break off wool between stripes.
Start with LEFT REVER.
With red wool, cast on 26 stitches.
1st and 2nd rows: Knit (in red).
3rd row: Join in white wool, knit.
4th row: k2tog, knit to end.
5th row: pick up red, knit to end.
6th row: k2tog, knit to end.
7th row: pick up white, k2, cast off
8, knit to end.
8th row: k2tog, k12, cast on 8, k.
2.
9th row: pick up red, knit to end.
10th row: k2tog, knit to end.
11th row: pick up white, knit to end.
12th row: k2tog, knit to end.
Repeat last 4 rows until 2 stitches remain.
Cast off.
For RIGHT REVER, work as follows:-
With red wool cast on 26 stitches.
1st and 2nd rows: Knit (in red).
3rd row: Join in white wool, knit.
4th row: knit to last 2 sts, k2tog.
5th row: pick up red, knit to end.
6th row: knit to last 2 sts, k2tog.
7th row: pick up white, knit to last
10 sts, cast off 8, k2.
8th row: k2, cast on 8, knit to last
2 sts, k2tog.
9th row: pick up red, knit to end.
10th row: knit to last 2 sts, k2tog.
11th row: pick up white, knit to end.
12th row: knit to last 2 sts, k2tog.
Repeat last 4 rows until 2 stitches remain.
Cast off.
Belt
With white wool cast on 2 stitches. Work in k1, p1, rib, casting on 2
stitches at the end of every alternate row until there are 14 stitches
on the needle. Work in rib on these stitches for 45 inches.
Shape end by casting off 2 stitches at beginning of every alternate row.
Shoulder straps (make 2)
With white wool cast on 2 stitches.
Work in k1, p1, rib, casting on 2 stitches at the end of every alternate
row until there are 12 stitches on the needle. Continue on these stitches
for 24 inches.
Cast off.
Make second piece to match.
To Make Up
Press all pieces well with damp cloth and hot iron.
Sew up side seams and knicker seams.
Work a row of double crochet round leg openings.
Place lower edge of slot in front trimming to top of the 10 cast off
stitches at top of front. Sew along lower edge of this slot, then sew
straight edge of trimming along edge of the V of front opening. Shaped
edge of trimming is not fastened down.
Sew unshaped end of shoulder straps to back, draw through slot at front
to required length, then stitch to the top of the slot and knot at bottom
of V opening.
Draw belt through slots at waist and tie in bow, at back or front, as
preferred.
|
Materials
13 ozs of "Diana" non-shrink 4ply [pictured costume uses 11ozs
of Cavalcade red and 2 ozs white].
[Editor's note: When substituting with modern fibres you may need more
than the quantities stated.
1 oz = 28 grams]
One pair No 11 (3mm) needles.
Tension
32sts to 4 ins.
Size matters
To fit 32-33 inch chest.
Abbreviations
k2tog or p2tog: knit or purl 2 sts together (decrease one stitch).
p3tog: purl 3 sts together (decrease 2 stitches).
(k1, p1, k1 all into next stitch): increases 2 stitches.
double crochet:
find instructions to crochet stitches >>here<<
[Editor's note: Remember
these are English crochet instructions where double crochet is
equivalent to US single crochet - see "Terminology" in the side
bar.]
A Word on the Wool
The Diana yarn is stated as a 4 ply with a tension consistent with that on
a 3mm needle. [Not to be confused with Patons Diana brushed DK sold in
the 1980s]
Internet search states a yardage of 209 but no ball weight given. 209
yards for a 1 oz ball would be quite high.
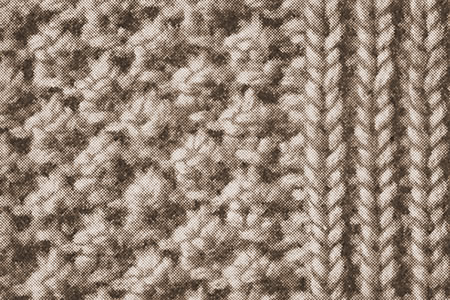
If you make this with a substitute yarn, perhaps a cotton would be nicest
though cotton does tend to stretch, despite the reassurance that bramble
stitch "doesn't stretch out of shape".
Disclaimer
(well...almost)
In transposing any pattern it is always a risk that errors will be introduced,
in spite of dedicated proof reading.
If you have any problems with this pattern, please
and I will try and assist.
|