A Jumper for your Dog
More....
Please note:
Patterns are for
Personal Use Only
You may freely circulate patterns with the Copyright Statement Preserved.
See terms of use.
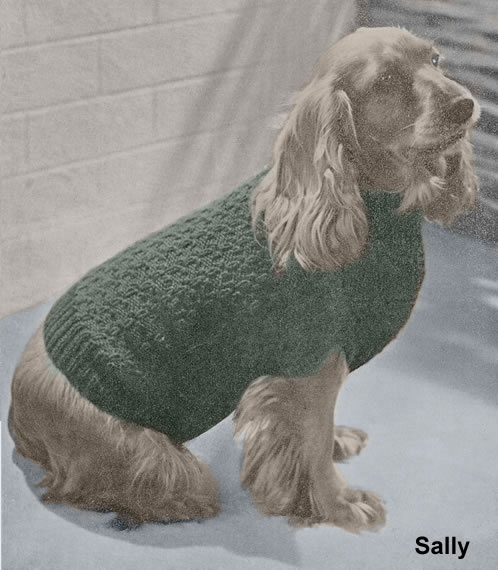
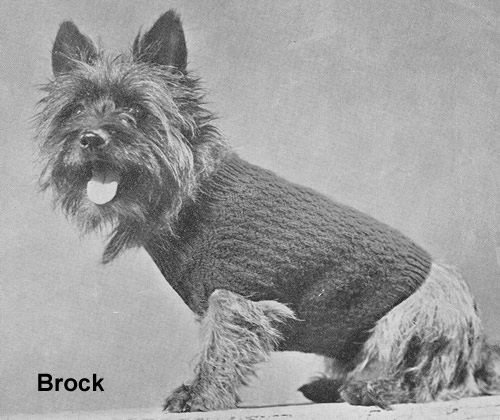
A dog coat which is basically for smaller dogs (which are more likely to need one in colder weather). The pattern is worked out to fit the dogs shown in the photos; Sally, pictured above is the larger size and the other three dogs are shown at the end. Here is the introduction for this 1930s pattern:
Here is a very easy way to keep your dog free from chills during the winter months. Most dogs feel the damp just as much as you do, especially when they are getting on in years, and a nice jumper like this to keep the tummy warm will help to prevent colds and rheumatism. The collar has been made to fit low down as a dog is apt to feel heat easily round the neck.
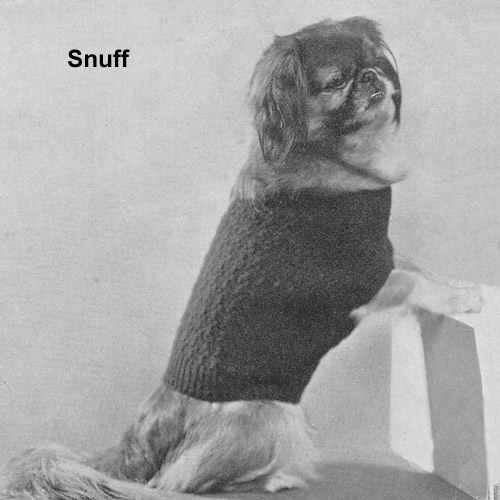
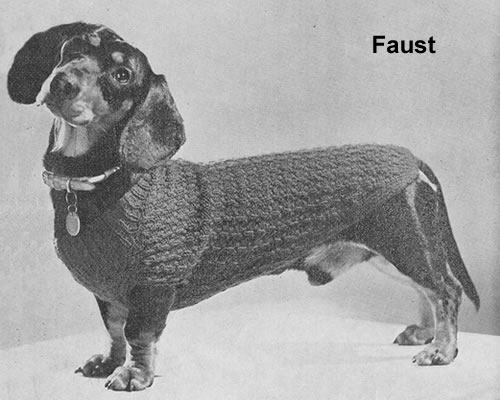
Instructions.Instructions are given for 3 sizes (large, medium, small) which are named
after the doggy models "Sally", "Snuff",
and "Faust" (see pictures) As far
as I can tell they are a Spaniel, a Pekingese, and a Dachshund. The additional "Brock" seems to be some kind of terrier; his
coat is worked exactly as for Snuff, but you need to knit an extra inch
on the back, so continue until work measures 6 inches from the leg openings
before shaping the back, instead of 5 inches. Pattern rows1st row: *
p3, k1; repeat from * to end. Work up a small piece of pattern before starting to make sure you can follow it correctly when increasing - and perhaps use it to make a swatch to check your tension. Coat (or "Jumper")With No 7 (10) [10] needles, cast on 68 (96) [72] stitches, and work in k1/p1 rib, shaping for neck as follows: 1st row: Rib 18 (24)
[20], turn. Now repeat the all previous 12 rows 3 (2) [3]times. Change to No 6 (9) [9]
needles and pattern stitches as above, at the same time
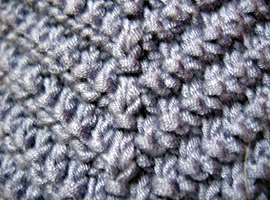
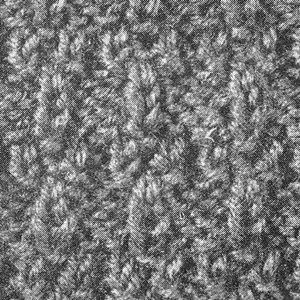
increasing as follows: Continue in pattern, increasing thus in every row, and taking the extra stitches into the pattern as set, until there are 124 (136) [120] stitches on the needle. (Be very careful to keep the pattern correct over the increasings, and refer to close-up photo.)
Divide for leg openings: Work 16 stitches in pattern, turn, leaving remaining stitches on a spare needle or stitch holder, and work 4 (3) [3] inches straight. Leave these stitches and work 4 (3) [3] inches straight on the next 92 (104) [88] stitches, and then work 4 (3) [3] inches straight on remaining 16 stitches. Continue in pattern, working across all the stitches again, decreasing
in every alternate row (every row)
[every 4th row] as follows: Continue thus until 100 (100) [116] stitches remain, and then work straight until work measures 7½ (5) [4½] inches from the leg openings. For Sally and Snuff only continue
as follows: Work 1½ (1) inches more in rib
working across all stitches. For Faust only, work as follows: Change to No. [10] needles. 1st row: (k1, p1) 8 times, pattern
the next 84 stitches, (k1, p1) 8 times. Rejoin wool to main work. Now work over all stitches in k1/p1 rib, decreasing at each end of every
row until 36 stitches remain. To Make UpPress main part lightly under a damp cloth, avoiding the ribbing. Join
the two edges together and, if desired, over sew neatly round leg openings. |
Materials5oz Double Knitting for the largest size "Sally", 2oz 4ply
for medium "Snuff" or "Brock", and A pair each of No 6 (9) [9] {5mm (3¾mm) [3¾mm]} and No 7 (10) [10] {4½mm (3¼mm) [3¼mm]} needles. Tension22 (32) [32] sts and 24 (32) [32] rows to 4 inches over pattern. Size mattersAround the neck: 13½ (12) [9] inches; width all round at foreleg: 24 (18) [16] inches; foreleg to back leg at underseam: 9 (6) [6] inches; width all round at back leg: 21 (13) [15] inches; width between forelegs: 6½ (4) [4] inches. A Word on the WoolOriginally these were knitted in Totem and Diana Non-Shrink Knitting Wool. Given the prevalence of wonderfully practical acrylics these days, they would seem to be a good alternative to wool, (and appear in almost any colour you would care to imagine). Disclaimer
|
|
Slide the jumper over your little doggy's head and gently push his little doggy legs through the openings. Say "what a good dog" a few times to avoid distress. I expect he'd like a biscuit too (what a good dog...).Here is some promotional advice from the 1930s: When it turns very cold indeed and these handsome coats aren't sufficient to ward off chills, their cautious owners give them a few extra Spratt's biscuits every day. These contain warming cod-liver oil and are most nourishing. |
|
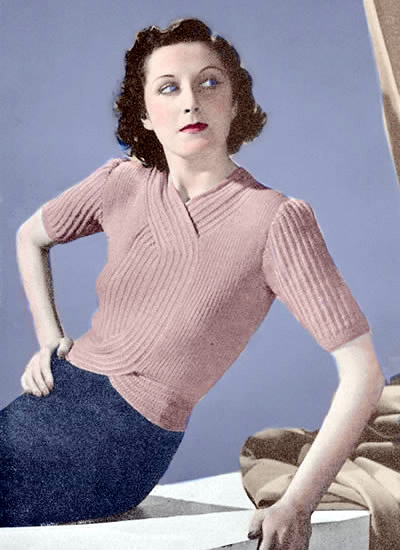
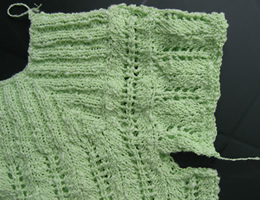
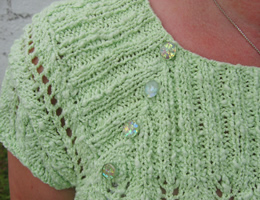
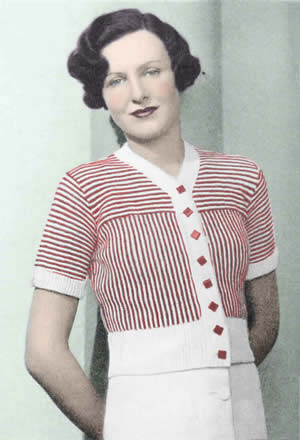
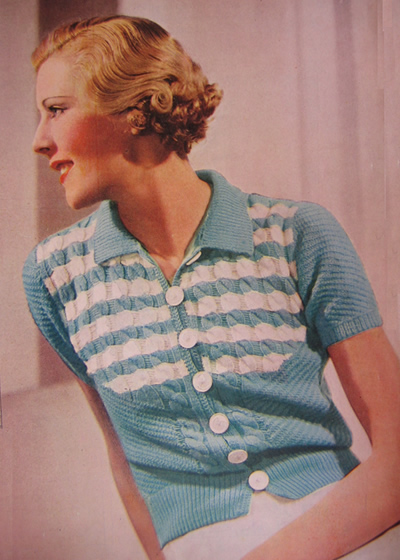
The criss-cross front on this knitted blouse is a new*, exciting idea. It fits close and snug around the waist, and does up With eight buttons - four at the back of the neck, and four at the waist. The main part is in plain k1/p1 rib, while the bands are in a fancy rib stitch.
* New in the autumn of 1938.
... and being from the 1930s, there is only one set of instructions to fit a modest 34-36 inch chest - however, they do suggest using different needle sizes to make a minor adjustment within that size range.
Instructions.Instructions for one size only; you can slightly alter the size by using different needles as indicated in the pattern materials. FrontStart with the belt as follows: 1st row: Slip 1,*
slip 1 knitwise, p3; repeat from *
to last 2 stitches, slip 1 knitwise, k1. Repeat these 2 rows (which form the pattern) until work measures 13½ inches, then, with right side facing: * work to last 3 stitches, turn, and work back. Work straight across tow rows then repeat from * twice. Now shape as follows: With right side facing, pick up and knit 46 stitches, commencing 3½
inches in from the holder, and ending 6 inches from beginning of work
along upper edge (inside of curve) for right front. [The 6 inch straight
piece left should reach to the centre back.]
Work 19 rows in k1/p1 rib over these 46 stitches. Work a second piece to correspond to the first to make the left front, working all shapings at the opposite ends of the needle. (ie: commence picking up stitches with right side facing, 6 inches from commencement, and start the rib with p1). The two front pieces are now joined together as follows: Now continue over all stitches: Now work straight until front measures 11 inches, or length required; it is advisable to measure yourself here and make sure that the belt fits snugly round the natural waistline. With right side facing, shape armholes by casting off 6 stitches at the
beginning of the next 2 rows, 5 stitches at the beginning of the next
2 rows, 4 stitches at the beginning of the next 2 rows, and 3 stitches
at the beginning of the next 2 rows. 1st row (right side facing): Rib
38 stitches, turn, leaving remaining stitches on a spare needle. Return to the main work, and complete the right shoulder to correspond.
1st row:Work 3 stitches, turn, and
work back. Back Cast on 114 stitches and work 28 rows in k1/p1 rib. Shape neck by casting off 2 stitches at the neck edge on the following
5 alternate rows, and then k2tog at this edge on the following 9 alternate
rows [23 sts]. SleevesCast on 91 stitches and work 1 inch in k1/p1 rib. Making UpPress very lightly only with a warm iron under a damp cloth. |
Materials
|

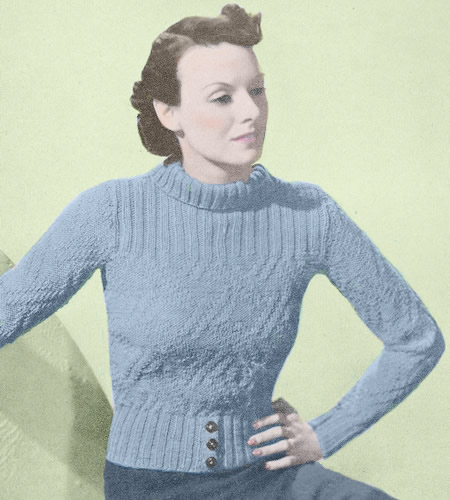
This 1930s sweater has good news and bad news. The good is that it's made in a yarn weight that is more popular today than then - that is a heavy DK or worsted. And as a consequence, the bad news is that the instructions are only given for one size, and with limited opportunity to alter the size by using thicker yarn.
I have referenced some reading material at the end of the instructions, that might help you with adaptations if you are feeling that adventurous.
" An unusual broken trellis pattern makes this warm country jumper. The casual polo collar does up at the back with three buttons, and the button-up idea is carried out again on the front of the welt. ".
Instructions.Instructions are given for only one small/medium size. BackWith No 8 needles, cast on 70 stitches and work 3½ inches in k2,
p2 rib. In the last row increase to 80 stitches by working twice into
each of the first and last 5 stitches of the row. Change to No. 7 needles
and pattern as follows: These 24 rows form the pattern, which is repeated throughout. Next row: Rib across the first 30 stitches, k6, turn, leaving remaining stitches on a spare needle. Work on these 36 stitches, keeping the 6 stitches at the inside edge in stocking-stitch, and after ½ an inch make a buttonhole as in the front welt (see instructions below). To make a buttonhole: When work measures 19 inches from commencement cast off 9 stitches at
the beginning of the following 2 alternate rows at the armhole edge, and
in the same row as the first casting-off make another buttonhole as before.
Return to the remaining 30 stitches, cast on 6 stitches and, keeping
these in stocking-stitch, work to correspond with the first side, but
omitting the buttonholes. Front:Begin with the right welt. 1st row: k6, *
p2, k2, repeat from * to last 2 stitches,
p2. Repeat these 2 rows once and then make a buttonhole as follows: Continue in pattern for 1 inch, and then make another buttonhole in the
same way, then work for 1 more inch and make another buttonhole. Now change to No 7 needles and pattern as for back, and continue until 3½ inches of the yoke ribbing have been done. Next row (right side facing): Rib
27, leave 12 stitches on a spare needle, rib 27. Cast off 9 stitches at the beginning of the following 2 alternate rows,
at the armhole edge. Sleeves:With No 8 needles, cast on 32 stitches and work in k2, p2 rib for 3 inches.
Now change to No 7 needles and pattern, but after 2 inches have been done, increase in the next and every following 4th row until there are 62 stitches on the needle, taking the increased stitches into the pattern. Work straight until sleeve measures 18½ inches from commencement,
then, cast off 4 stitches at the beginning of the next 2 rows, then k2tog
at each end of every row until 20 stitches remain. CollarJoin shoulder seams. With the set of No 8 needles and front of work facing, take the 18 stitches
from the spare needle at the left back, pick up and knit 19 over the left
shoulder, take 12 from the spare needle at the front, pick up and knit
19 over the right shoulder, and take the 18 from the spare needle at the
right back. To Make UpSew up side and sleeve seams, and insert sleeves. |
Materials
|
A word on the wool...This 1930s pattern is given in only one size - which to be fair is a "medium" although I suspect the average size for women is rather larger than medium these days. The original yarn was Patons Totem - which was a double knit weight but came in a number of guises over the years I believe - and the tension and needles indicate it's more like a worsted weight. So it's not so easy to simply increase the size by using a thicker yarn - it might work if you check your tension, but the resulting sweater might be unappealingly chunky for the intended style. Geraldine Warner has produced a helpful book about how to approach adapting
vintage patterns - however, don't be confused as it is published under
two different titles - but it's the same book. Also note that this
is a book of techniques and "how to" - it's does not contain
any knitting patterns: Whatever you choose to do, when adapting - always knit a swatch! Pattern detail: 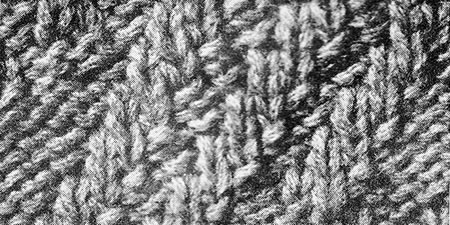 |

Very simple to knit, this open-air jumper, since the pattern is rib, broken by plain and purl rows at intervals. The attractive collar is just two triangular pieces knotted together at the centre front and centre back.
"A nicely casual affair with short sleeves and a scarf collar"
Instructions.The overall pattern stitch as follows: 1st row (wrong side facing): Knit. [Editor's note: The ribbed stitch will have the effect of making the fabric pull in slightly.] BackWith blue wool and No 12 needles cast on 120 stitches. Work 1½ inches
in k1, p1 rib, then start pattern as given above. After completing first pattern (18 rows), increase once at each end of
Continue straight on these sts until you have completed the 6th pattern from commencement (work should measure about 13 inches). Armhole shapings: Cast off. FrontWith blue wool and No 12 needles, cast on 130 stitches. Work exactly as for the back up to the armhole (148 stitches on the needles).
Divide for neck-opening: With right side facing, work 64, turn, leaving remaining stitches on
a spare needle. SleevesWith blue wool and No 12 needles cast on 72 stitches. Work 1¼ inches in k1, p1 rib, then work in pattern, increasing at each end of every 3rd row, and during the first pattern changing to No 10 needles on the 5th row, and to No 9 needles on the 11th row. When you have completed 2 whole patterns and 4 rows of the 3rd pattern (98 stitches on needle) shape for shoulder as follows: Work in pattern to last 4 stitches, turn; slip 1, work to last 4 stitches,
turn; slip 1, work to last 8 stitches, turn; slip 1, work to last 8 stitches,
[Editor's note: You are working short rows here to provide shaping. When you slip the stitches and then pick them up again you can get small holes or discontinuities. You can live with these as part of the pattern (in this design they may well be hidden by the collar) or you can read more about short rows and wrapping stitches >>HERE<<.] Cast off loosely 18 stitches at beginning of next 2 rows. Work second sleeve in same way. CollarThe collar is made up of two triangular pieces, knotted at the centre back and centre front. Using blue wool and No 10 needles, cast on 94 stitches. Work 7 rows in k1, p1, rib, decreasing at the beginning of the first and every alternate row. Changing to white wool, knit the next row plain, decreasing to 72 sts by knitting together every 4th and 5th stitches. Continue in stocking stitch for 24 rows, decreasing on every alternate
row at the opposite edge to the previous decreasings. Now start the edge that is stitched to the neck. With blue wool and No 10 needles, cast on 108 stitches. Sew this blue strip along the straight edge of the white triangle, mitreing the decreased end carefully with the decreased end of the blue ribbing with which triangle was begun. Repeat this triangle with colours reversed, and with shapings at opposite ends. Making UpPress only very lightly. |
Materials
|
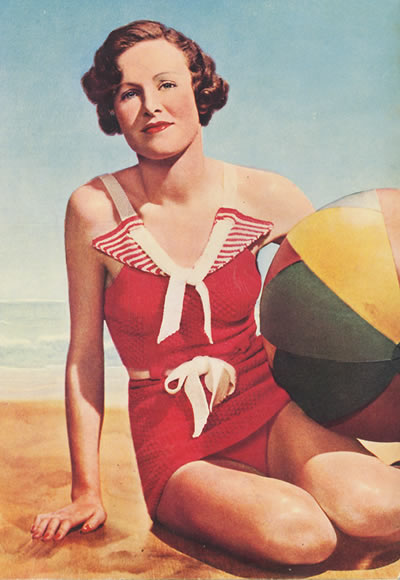
What every girl wants: sun.... sand.... and an oversized beach ball.
Continuing the red and white summer theme - the latest in swimwear for the 1930s.
[O - and did I mention? - it's very practical and fits marvellously, (provided you have a 33-34 inch bust), and we can all breathe easily as it has a REGULATION skirt].
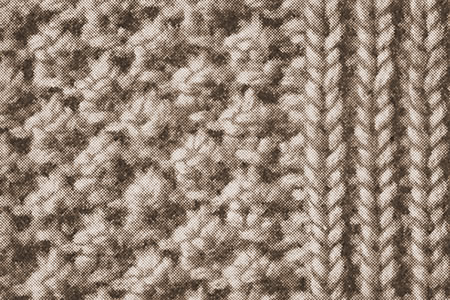
"You couldn't find a swim-suit with more snap about it than this one! And it takes all the prizes on the practical side, too . . . . is simple to knit, fits marvellously and has the forethought to choose a stitch that doesn't stretch out of shape (bramble pattern, shown in detail on page 32, broken with bars of rib through which the belt is slotted). The suit is low at the back, and in front the shoulder straps slot through the amusing little striped revers to tie at the base of the neckline; it has, of course, the regulation skirt with brief, almost legless, trunks beneath."
Instructions.These instructions are given in one size only for a sun-suit with skirt and integrated knickers. FrontStart with the front of the KNICKERS. With red wool, cast on 32 stitches. Work in stocking stitch, always knitting
into backs of cast-on stitches. After the first row, cast on 3 stitches
at the end of every row until there are 116 on the needle. Continue on these for 4 inches, ending with a knit row, then decrease
1 stitch at each end of every 4th row till 104 stitches remain. Now start at lower edge of SKIRT. With red wool, cast on 104 stitches. Work 6 rows in k1, p1 rib, then work in pattern as follows:- 1st row (right side facing): (k1,
p1) 3 times; p20, (k1, p1) 4 times; p36, (k1, p1) 4 times, p20, (k1, p1)
3 times. These four rows form pattern. Repeat until work measures 13 inches from lower edge, ending with the 4th row of pattern. Now place needle containing the knicker stitches right side towards you,
behind needle containing skirt stitches, and knit in pattern, as
first row, knitting together 1 stitch from each needle. Keeping the continuity of pattern, shape for waist by decreasing 1 stitch at each end, in side ribbing, in every 4th row, until 2 stitches remain in rib at edges (4 stitches decreased each side). Work 4 more rows in pattern, then make belt slots as follows:- Next row: k1, p1, p20. Turn. Continue in pattern, increasing 1stitch at each end in the 2nd and every
following 4th row until there are 104 stitches.** 1st row: (k1, p1) 5 times, p16, rib
8, p36, rib 8, p16, rib 10. Now continue to work all across in rib, decreasing 1 stitch at each end
of every row until 92 stitches remain. Next row: k2tog, rib to last 2 stitches,
k2tog. Rejoin in wool at centre and work the other side to match. BackWork exactly as for front to end of waist shaping, Work right across in rib for 4 rows. Now begin to shape low back. Next row: Rib to last 2 stitches,
k2tog. ReversThese are worked in stripes of 2rows red, 2 rows white. Start with LEFT REVER. With red wool, cast on 26 stitches. 1st and 2nd rows: Knit (in red). 9th row: pick up red, knit to end. For RIGHT REVER, work as follows:- With red wool cast on 26 stitches. 1st and 2nd rows: Knit (in red). 9th row: pick up red, knit to end. BeltWith white wool cast on 2 stitches. Work in k1, p1, rib, casting on 2
stitches at the end of every alternate row until there are 14 stitches
on the needle. Work in rib on these stitches for 45 inches. Shoulder straps (make 2)With white wool cast on 2 stitches. To Make UpPress all pieces well with damp cloth and hot iron. Sew up side seams and knicker seams. Place lower edge of slot in front trimming to top of the 10 cast off stitches at top of front. Sew along lower edge of this slot, then sew straight edge of trimming along edge of the V of front opening. Shaped edge of trimming is not fastened down. Sew unshaped end of shoulder straps to back, draw through slot at front to required length, then stitch to the top of the slot and knot at bottom of V opening. Draw belt through slots at waist and tie in bow, at back or front, as preferred. |
Materials
|
"Cherry and white pin-stripes are used both up and down and across here. Wear this woolly as above, jumper fashion, or over a blouse."
I much admired this jumper some time ago but never got round to making it myself. However, here it is if you want to try it out. I think it would look nice in red and white as intended or with beige like This Attractive Affair **, knitted in Rowan's Cotton Glacé - but do read all the information about substituting the yarn before you decide how best to tackle this pattern!
In 2008 I made the Engaging Bouclé Top (also from the same 1935 feature). It worked out very well and I wear it quite often even now.
** This Attractive Affair is a 1930s pattern from A Stitch In Time Volume 2 by Susan Crawford and Jane Waller. You can purchase it at Susan's website or from Amazon.
Instructions.The top and the lower part of the jumper are worked separately, and the ribbed welt added last of all. The pattern is twisted garter stitch, 2 rows red and 2 rows white, alternately. For twisted garter stitch: knit every row plain, but work always into the backs of the stitches. BackStart with lower section, worked sideways. With red wool and No 10 needles cast on 10 stitches. Work as follows in the twisted garter stitch pattern explained above: 1st row: red. [Editor's note: This gradual addition of stitches makes waist shaping.] Now continue in pattern on the 64 stitches on the needle till you have worked 41 red stripes at the casting-on end (the casting on at the beginning of 10th row will be the first of these stripes). At the beginning of the second row of next red stripe,
cast off 14, work to end. [50 sts] Cast off remaining 10 stitches in red. Next work Back Yoke. Hold right side of work towards you. Continue in pattern on the 98 stitches that remain till 55 red stripes have been completed. Next row: white. Continue in pattern on on the latter 32 stitches for first shoulder. Join in red wool to the remaining 32 stitches at the neck-edge and work
the other shoulder to correspond, beginning the casting off with the wrong
side of the work facing. Left frontAs you did on the back, start with the lower section, which is worked sideways. With red wool and No 10 needles cast on 64 stitches (centre front edge).
Work 2 rows red, 2 rows white, until you have completed the 23rd red stripe. [Editor's note: This gradual reduction of stitches makes waist shaping.] For the yoke: with right side of work facing and using red wool
and No 10 needles, knit up evenly 64 stitches along the top (wider) edge,
starting at the 7th stripe. Right frontCast on and work lower section as for left front, but start the casting off at the beginning of the 2nd row in the 23rd red stripe, this bringing the shaping to opposite end of needle.
For the yoke: with the right side of work facing and using No 10
needles and red wool, knit up 64 stitches, finishing at the 7th stripe
from under-arm edge. Work the yoke to correspond with left yoke, reversing
shapings. SleevesWith No 10 needles and red wool, cast on 90 stitches. White bordersFor back waist ribbing: For each of the front waist ribbing: For each cuff: The ribbed front border is worked all in one. In the 9th row, start a buttonhole by working 6, casting off 6, working 6; in the next row finish it by casting on 6 to replace those cast off. * Rib 16 rows, then make
another buttonhole. Making UpJoin side seams and sleeve seams; insert sleeves. |
Materials
|

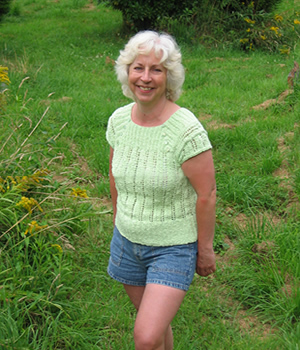
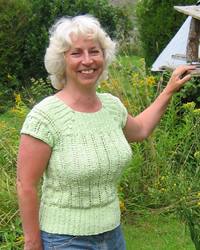
Cool summer top from 1935, knitted in bouclé cotton/linen mix, using an eyelet lace pattern for the body, and ribbing for the yoke. I have adapted the yoke slightly, and given a better fit to the sleeves.
"This engaging affair uses a fairly thick wool (quickly knitted!)".
Here I demonstrate its versatility - it could be worn as a smart top with a skirt - or in the garden with denim shorts!
Instructions.The basic pattern for most of the top is two basic rows: 1st Round: *
k2tog; k2; yarn forward; k1; yarn forward; k2; k2tog through back loops;
repeat from * [Editor's note: If you are knitting in the round, the alternate rounds are knitted; if you are knitting back and front on 2 needles, for example, when you divide at the armholes, then the second row is purl.] Main body:The back and front are knitted together in the round. Using a No 11 (3mm) circular needle, cast on 198 stitches. Change to a No 10 (3¼mmm) needle, and work in pattern as given
above, for an inch. Change to No 9 (3¾mm) needles and continue
in pattern for another inch, then to No 8 (4mm) needles and carry on with
these until work measures 13 inches from commencement, ending with a plain
knit row (2nd round of pattern), but cast off the last 8 sts of the round Shape armhole:Divide front and back and work each side separately as follows: Cast off the first 8 sts of the round, then, with one stitch on the right hand needle, commence the pattern row, and work 9 pattern repeats; k1. Cast off the next 16 sts; then, with one stitch on the right hand needle, commence the pattern row, and work 9 pattern repeats; k1. You should have 83 sts to work for the back and front. Back:Turn the work and purl back across 83sts. Continue working back and forth across these 83 sts in pattern as set,
starting and ending each row, with one plain knitted stitch. Work 2 inches
(about 6 more eyelet rows), ending with a purl row. Here shape the neck. Next Row: k1, *
k2tog, k2, wool forward, k1, wool forward, k2, k2tog *
; put the next 63 stitches on to a spare needle; join in a second ball
of wool, repeat from * to *
once, k1. Continue on the latter 10 stitches till work measures 19½
inches from commencement. Cast off 9 stitches from armhole end. Finish off the opposite shoulder to match. Front:Rejoin the yarn to other set of 83sts, with wrong side facing, and purl back across 83sts. Complete the front exactly as you did the back. Yoke:Join the shoulders either by stitching or grafting. Using the No 10 needles with points at both ends, or a circular needle,
and with the right side of the work facing, knit up 236 stitches, starting
at a shoulder seam as follows: [Editor's note: It took me a while to work out the "continue decreasing in this manner" so at the end of the instructions I am including my explanation of the yoke decreasing. Rounds 2 through 5 are the four decreasing rows that are repeated.] Sleeves:With right side facing and using No 8 needles, pick up and knit 67 sts around the head of the sleeve, (leave the cast off armhole sts).
You will knit backwards and forwards in pattern across these sts, shaping
the sleeve by knitting short rows. 1st Row: K2,
* k2tog; k2; yarn forward; k1; yarn forward; k2; k2tog through
back loops; repeat from * to the last 2 sts,
k2. Knit the next 3 rows. Making UpSew up sleeve seams under the arms, and sew in all ends.
Sew four buttons up each of the two front corners of yoke. |
|
Materials5 x 50g balls Stylecraft Sirocco 80% cotton, 20% linen; 98yds/90m per ball. Numbers 8, 9, 10, and 11 (4, 3¾, 3¼ and 3mm) circular needles. 8 decorative buttons. TensionYarn knits to 20st and 28 rows to four inches on No 8 needles. One pattern = 1½ in on No 8 needles. Size mattersOriginal sized for bust 34 inches; length 18 inches. A word on the wool.I wanted to knit this in a bouclé or slub cotton and just could not find what I wanted - there is the fabulous Debbie Bliss Astrakhan, but that is too wintry and thick. Then, in a local haberdashers, I found this Stylecraft yarn which is absolutely what I was looking for and has the benefit of being natural fibre and very good value! Original: Paton's Super Brindle, which comes (came) in white flecked with colours. This was probably finer than Sirocco - more a straight DK at 22 sts per 4 inches I am guessing. Disclaimer
|
|
Additional Instructions for Yoke Decreasing:These follow the foundation decreasing "Round 1". Instead of writing out every stitch, I have indicated the number of sts between the decreases; "rib" means k2 p2 rib, following the ribs as set out in the row below. 2nd Round: rib 26, p2tog, rib 58, p2tog, rib 54, p2tog,
rib 58, p2tog, rib 28. 6th Round: rib 24, k2tog, rib 54,
k2tog, rib 50, k2tog, rib 54, k2tog, rib 26. 10th Round: rib 22, p2tog, rib 50,
p2tog, rib 46, p2tog, rib 50, p2tog, rib 24. 14th Round: rib 20, k2tog, rib 46,
k2tog, rib 42, k2tog, rib 46, k2tog, rib 22. 18th Round: rib 18, p2tog, rib 42,
p2tog, rib 38, p2tog, rib 42, p2tog, rib 20. 22nd Round: rib 16, k2tog, rib 38,
k2tog, rib 34, k2tog, rib 38, k2tog, rib 18. |
|
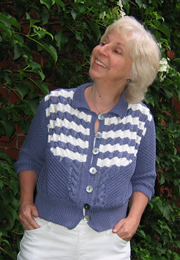
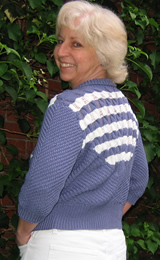
Summer jacket from 1935 has an unusual design that is quite fun to work. It was given only in one nominal size, but has some flexibility for your own alterations. I simply love the way this has turned out; the bamboo yarn is so soft and comfortable. On finishing, I immediately wore it all the next day.
Diagonal Rib PatternSleeves and lower part of jumper are knitted in a k2, p2 rib, with the rib carried one stitch sideways on each row. The following 4 rows form the pattern, worked over an odd number of stitches. Row 1: (k2, p2) repeated to centre
stitch; knit centre stitch; (p2, k2) repeated to end of row.
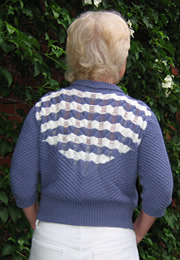
Cable PatternThe yoke of the jumper is knitted in cable ribbing, where the stitch
between the cables is subsequently dropped to form "ladders".
When the sts are dropped, pull them back to where you started the cables,
above the diagonal rib, and secure the stitch by running a thread through
and stitching on the inside. BackUsing No. 12 needles and main colour (blue), cast on 104 stitches, and
work 3 inches in k1, p1 rib, (approximately 25 rows), increasing one stitch
at the end of the last row. Work the 4-row pattern 10 times, then the first two rows again, (42 rows). [Editor's note: The origonal instructions were to work the 4-row pattern 14 times as it was intended for a thinner yarn. For my version, in the bamboo yarn, I worked 16 rows fewer up to the start of the cables, as well as 16 rows fewer in the armhole section (see notes below) which brought the welt up to sit on my hips as shown in the photo.] Row 43: (p2, k2) repeated to centre
stitch; knit centre stitch; (k2, p2) repeated to end of row. (ie
pattern row 3 with 5 sts knitted in the middle). Now start the striped pattern: Row 55: K38 sts in pattern as set
in blue; join on white: k6, cable C4B, k1, cable C4F, k6; join on another
ball of blue and finish row in pattern. Continue as on last 2 rows. increasing number of white stitches for 5 more rows (i.e.. finally 31 blue; 43 white; 31 blue). Row 63: Work in blue right across
row: 30 sts in pattern; k5, (C4B, k1) twice, (C4F, k1) twice, k4; 30 sts
in pattern. Continue thus for 6 more rows in blue, still taking 2 more into stocking stitch in each row (23 pattern sts on each side). Row 71: Pattern 22 sts blue; join
on white: k4, (C4B, k1) 3 times, (C4F, k1) 3 times, k3; join on blue pattern
22 sts. Continue thus for 6 more rows. Row 79: Work in blue right across
row: 14 sts in pattern; k3, (C4B, k1) 4 times, (C4F, k1) 4 times, k2;
14 sts in pattern. Shape armhole: Repeat from ** with alternate colours 4
times, then repeat row 87 row in blue. Work 3 rows in stocking stitch. Row 131: Cast off 2, drop 1 st, leave
big loop (to cover dropped st), and cast off 1 more; knit to end.
Right FrontUsing No. 12 needles and main colour (blue), cast on 66 stitches, and
work 3 inches in k1, p1 rib, (approximately 30 rows), increasing one stitch
at the end of the last row. [67 sts]. Row 1: k15; (p2, k2) repeated to
end of row. Repeat these 8 rows 4 times. Row 41: k15; (p2, k2) repeated to
end of row. Row 61: All blue. K4, (C4F, k1) twice,
C4F, k5; (p2, k2) repeated to end of row. Row 69: Join in white: k4; (C4F,
k1) 4 times, k3. Join in blue: (p2, k2) repeated to end of row. Row 77: All blue. K4, (C4F, k1) 5
times, k2; (p2, k2) repeated to end of row. Shape armhole: Row 85: Join on white: k4; (C4F,
k1) 5 times; k9, k2tog. Work 2 more cable stripes alternately
in white and blue, working only 3 rows in stocking stitch after the cable
row on the second blue stripe. Row 113: Cast off 2, break wool and
pull through last stitch; drop 1. Join on again. Left FrontCast on and work in ribbing as for right front; change to No. 9 needles and purl one row on 67 sts. Row 1: k2; (p2, k2) repeated to last
13 sts, k13. Continue with these rows in pattern as set, reversing the shapings and
making the two fronts correspond. Sleeves (work 2 alike).Cast on 62 stitches on No.12 needles. Next row: Increase once at each end
of needle. Cast off 3 sts at the beginning of the next 2 rows. [Editor's note: The instructions above are as I worked the sleeve but are completely different fom the original. Below are the original instructions in case you are working in the fine fingering weight wool.] Here are the original
instructions for the 3 ply weight yarn: Work 7 rows in pattern.
[My sleeve length is to the elbow. The original sleeve was made much shorter and a different shape.] CollarOn No. 12 needles, pick up 104 stitches
round neck: 33 sts from each front and side neck, and 38 sts across the
back. Making UpDrop stitches between cables. Catch these stitches (and sew in) on the
wrong side to prevent running into the diagonally ribbed pattern. |
MaterialsOriginal pattern calls for 6oz of main and 1oz white in "3 ply". One pair each of numbers 12 (2¾mm) and 9 (3¾mm) needles.
One cable needle. One No 9 (3½mm) crochet hook. Seven buttons, approximately 1 inch. The original shows rather larger buttons as part of the styling. TensionOriginal states 32st to an inch over diagonal rib on No 9 needles. Size mattersNo size given originally - knitted example measured 36-38 inches. My version is knitted with fewer rows than stated in the original pattern (my deviations noted in red); this is - as intended - to keep the cardigan waist length like the original, but with longer sleeves. The result is a good fit for me (a chubby UK size 12), shaped to be fitted around the bust, under the arms, and into the waist, but with a good degree of ease. See the section on sizing. A word on the wool.Rowan Bamboo Soft, is a light weight DK which knits to a tension of 25sts
and 30 rows to 4 inches; 102m/112yds to 50g. Disclaimer
|
The original pattern seems to be intended as a neat fitting jacket in a fine yarn, knitted on larger needles.
I calculated the chest size (one size only given) as working out to only 28 inches, which even for the era seemed a bit small, so I felt confident in moving to a thicker yarn, based on the needle size. What I had failed to take into account, is that when you drop the stitches between the cable, the chest size expands a lot. Purely guessing I would say the original size using fine yarn was intended for a 33 to 35 inch bust.
The design of the cables and ladders, means that the cardigan is in fact self-shaping. In my version, the measurement for the back just above the welt is about 16 inches, and this increases to about 18 inches by the time you get to armholes. This gives you a nominal 36-38 inch bust size as the fronts are slightly larger and you can choose, within limits, to have fewer or more rows of crochet to form the front closure bands.
To increase the length of the cardigan, you can follow the areas marked in red where I have altered the rows. Preferably stick with adding or subtracting in chunks of 8 for simplicity.
To make tweaks to the bust size you can add in crochet rows at the front.
To make a significant alteration is slightly more difficult; in order
to keep the symmetry of the cables you really need to add in two cables
on the back and one each on the front, which would make a difference of
36 sts, and in the yarn I used this would be about 5½ inches.
But please note: This cardigan fits me well, and still looks as shown in the pictures; however the bamboo yarn has eased considerably with wear - I now think I could easily have removed an even 4 cable patterns (5½ inches) and still have a nicely fitting cardigan.
Finally, you can of course make overall size changes by using substitute yarns of other weights. This design is pretty tolerant of such changes, as I discovered, but you risk ending up with a different look - anything from the tiny figure-hugging waist length jacket of the original to a longer altogether looser cardigan style. If you are up to it, you can of course check your tension and work it all out beforehand, but remember the effect of the ladders is to much increase the finished size above that implied by the tension.
Here is a popup of the original picture for comparison with my version:
© Christina Coutts 2007
![]()