Buckets of Pegs
My peg bag finally wore out. It's such a good design that I had a fun time reconstructing the bag using knitting and fabric. You could easily just use a quilted fabric, and while looking on the web I found lots of lovely ideas to make other bag designs. Try this one, or this "clothes-pin bag" which has a tutorial and pattern here - I think it needs a carabiner instead of the loop! (see more below...)
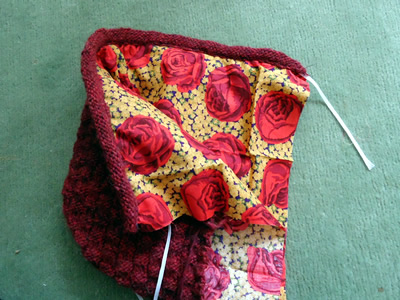
InstructionsWith No 7 needles, cast on 107 stitches (more if felting), and work 4 rows in reverse stocking stitch starting with a purl row.With right side facing, commence pattern as follows: 1st row: (P3, K5) to end These six rows form the pattern; repeat for desired length of about 13-14 inches (more if felting). Cast off. Making upFold the bag in half lengthways and sew together the cast off edge (if you did not graft the edge) to form the bottom edge of the bag. Now prepare the support for the top edge which helps hold the neck of the bag open. Glue or overstitch the supporting paper rope to the length of cotton tape, centring it along the length of the tape. This does not need to be very firm, it just holds it in place while you insert it in the casing. Note that glue may help keep the rope stiffer without being too rigid. Before sewing the side seam, fold the top edge of reverse stocking stitch over to form a casing. This is to hold the supporting rope/tape that you just created. You may need to fold it over with your supporting stiff rope already inside - arrange so that the rope is in the centre of the casing and the tape emerges at each end. There should be about 2 inches at each end of the casing that is unsupported by the rope. Here is a picture showing the tape inside the casing. The lining is already
in place although I describe making the lining differently here, in a
separate step, below.
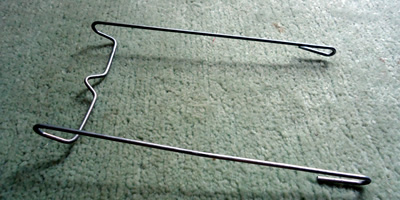
Sew up the side seam, and attach the tape ends together (tie them) so that the neck of the bag will not stretch too much when in use. Cut the ties neatly to about 1 inch - they will be hidden when you sew in the lining. Construct the lining: Cut the lining fabric in one or two pieces, and sew up into a bag with one of the shorter edges left open. The bag need to be about 11 inches by about 15 inches when finished so cut out your pieces allowing for the seams. Insert the lining into the knitted bag with wrong sides together; turn over the a hem at the top edge and sew into place around the knitted casing on the inside. Attach the lining to the knitting at the bottom corners, (a couple of invisible stitches using sewing cotton). Construct the hanger: Using the strong wire from a coat hanger, make the shape you need for the peg bag using rounded pliers. Make open hooks at each end. This photo shows the shape you are aiming at:
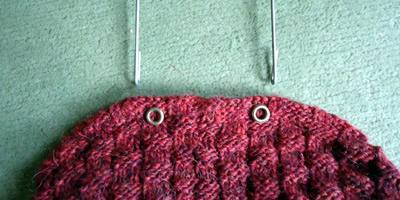
Insert metal eyelets into the top of the bag equally either side of the bag's side seam, matching the position of your constructed wire hanger hooks.
Put the hanger-hook ends through the eyelets and pinch together. Try out the bag. 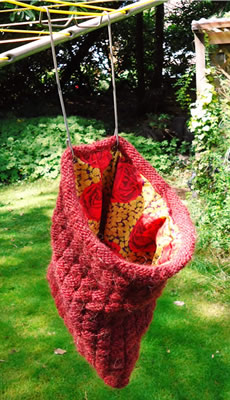 If you don't want to make a hanger: I was reconstructing an old bag, so I already had the hanger. If you don't feel up to messing about with heavy wire and pliers to make your own, you can make a tab on the back of the peg bag and attach an inexpensive carabiner (clip type not locking version) - large ones are fairly easily available on Amazon or eBay. Look at the Brabantia design for inspiration. If you use a carabiner then you should probably use paper rope (22inches)
through the entire length of the casing, not leaving any of the top of
the bag unsupported. |
|
Materials3 x 50g balls chunky yarn to required tension. One pair of number 7 (4½mm) needles. Wire or wire coat hanger to make peg- bag hanger (or carabiner). About 18 inches of paper rope for support. 1 metre or yard of cotton tape. Half a metre (or half a yard) of cotton fabric for lining. Tension20sts x 28 rows to 4 inches (10cm) on 4½mm needles over basket-weave pattern. Chunky yarn used is quoted as 14sts x 19 rows to 4 inches using 6mm needles. Size mattersBag is approximately 14inches by 11inches wide, when sewn into shape. A word on the wool.I used Sirdar Peru (now discontinued) for this project. I used a floral quilting fabric for the lining; I always think linings are fun in bright wild prints. Paper RopeThis is a very useful material used by prop makers as a stiffener or support. It is flexible but holds its shape. I had some difficulty finding it on the web in anything other than industrial quantities. Flints Theatrical Chandlers appear to sell it by the metre, and there seems to be some available at a site devoted to making toys for parrots... |
|
FeltingI used smaller needles to create as denser knitted fabric as I could without too much strain on my fingers. I would have preferred a stiffer felted fabric for the bag, but I tested Sirdar Peru previously and it does not felt well (too much synthetic content). If you do want to felt the bag then from the given tension and needles,
work out how many stitches to cast on with your chosen yarn to make a
width of 22 inches and work out how many rows to knit for 14 inches. Then
increase the stitches and rows according to the shrinkage factor of 85%
in width and 75% in length. Here is an example with a standard double knitting wool:Quoted tension is 22sts to 4 inches: -
Then increase by felting factor:- 121sts ÷ 85% × 100% = 142sts (discard decimal) To work the basket stitch as written, you need your stitches to be divisible by 8 plus 3. So calculate how many:-
8 × 17 + 3 = 139. So cast on 139 sts and knit for 14 inches finished length after shrinkage of 75%, which is:-
If you do make a felted bag and have some fabulous coloured wools - or
you decide to knit a "bag of many colours" with left over Noro
- or... anything that inspires you, then you may find you don't need the
patterning for texture and just want to go with stocking stitch. Just make sure your yarn will felt before you start. |
|