Diamonds to Suit
More....
Please note:
Patterns are for
Personal Use Only
You may freely circulate patterns with the Copyright Statement Preserved.
See terms of use.
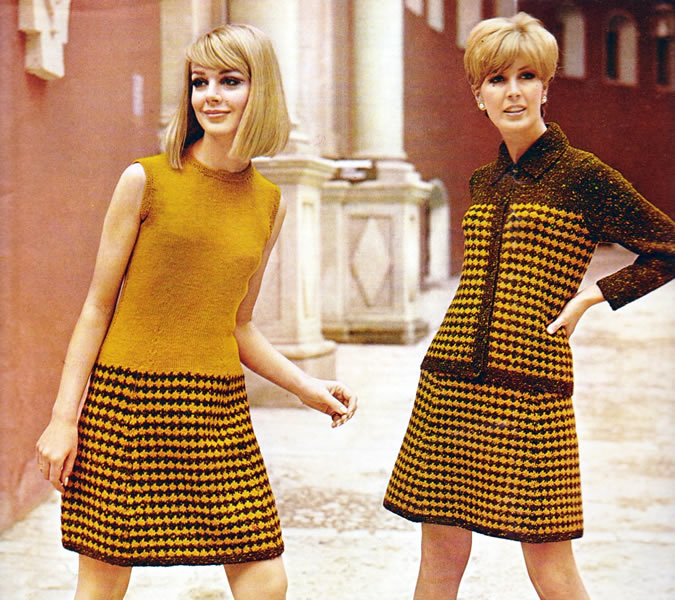
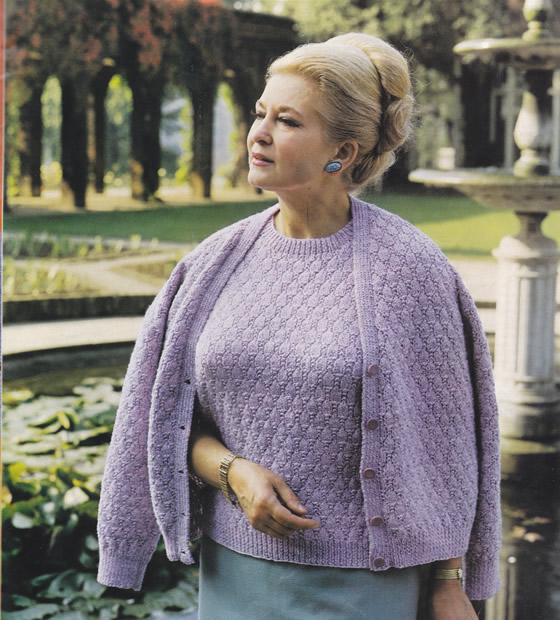
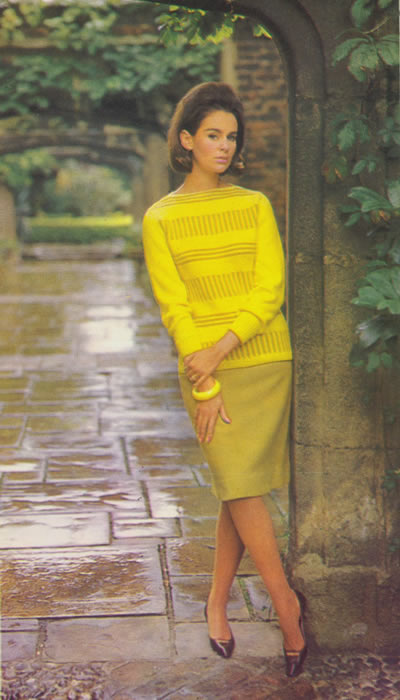
Striking (or startling) sixties "costume" of a jacket with a matching dress or skirt. The colours are very much of the time, so it might be slightly more appealing to current taste if executed in, say, black or navy with a neutral white or cream (but if you like it, I expect you'd already thought of that!).
Instructions for Jacket and Skirt SuitJacket BackUsing No 10 (3¼mm) needles and B, cast on 80 / 84
/ 88 / 92
stitches and work 10 rows in garter stitch. With right side facing, change to No 7 (4½mm) needles, join in D
and work in pattern as follows:— Work straight in pattern until back measures approximately 14 inches,
ending with 8th pattern row. Now decrease 1 stitch at each end of next and every alternate row until 69 / 73 / 79 / 83 stitches remain. Break D. Next row: in B, purl 3 / 6
/ 2 / 5,
p2tog, * p4, p2tog; repeat from *
to last 4 / 5 / 3
/ 4 stitches, purl 4 / 5
/ 3 / 4. Work straight in stocking stitch in B, starting with a knit row, until
back measures 21 / 22 / 22
/ 22½ inches down centre. Jacket Left FrontUsing No 10 needles and B, cast on 38 / 40
/ 42 / 44
stitches and work 10 rows in garter stitch. With right side facing, change to No 7 needles and diamond pattern, starting with 1st pattern row, and work straight until front matches back at side edge, ending with 8th pattern row. With right side facing, shape armholes by casting off 5 / 5
/ 6 / 6
stitches at the beginning of the next row. Next row: in B, purl 3 / 4
/ 3 / 1,
p2tog, * purl 3 / 2
/ 2 / 2,
p2tog; repeat from * to last 3 / 3
/ 3 / 1
stitches, purl 3 / 3 / 3
/ 1. Work straight in stocking stitch in B, starting with a knit row, until
front measures 19½ / 20 / 20
/ 20½ inches down centre. Jacket Right FrontWork to correspond with left front, reversing shapings. SleevesUsing No 10 needles and B, cast on 40 / 42
/ 42 / 44
stitches and work 11 rows garter stitch. Work straight until sleeve seam measures 15 / 15½
/ 15½ / 16
inches. CollarUsing No 10 needles and B, cast on 60 / 62
/ 64 / 66
stitches and work in garter stitch, shaping collar by increasing 1 stitch
at each end of the next and every alternate row until there are 70 / 72
/ 74 / 76
stitches Work 7 rows straight. Work 7 rows straight. Work 7 rows straight, Work 7 rows straight. Cast off. Front BandsRight: With No 10 needles and B, pick up and knit 107 / 109
/ 109 / 111
stitches up right front to start of neck shaping. Left: Work to correspond with right front band, omitting buttonholes. To Make UpPress parts lightly on wrong side under a damp cloth, avoiding garter
stitch borders. SkirtFirst panel: With right side facing, change to No 7 needles, join in D and work in
pattern as follows:— Work a further 4 / 8 / 10
/ 16 rows straight in pattern. Work 3 / 3 / 1 / 1 rows straight, then, decrease 1 stitch at each end of next and every following 6th row until 31 / 33 / 35 / 37 stitches remain. Work a few rows straight until panel measures 20 / 20½
/ 21 / 21½
inches down centre, ending with 8th pattern row. Change to No 10 needles, and work 1 inch k1/p1 rib in B. To Make UpPress parts lightly on wrong side under a damp cloth, avoiding garter
stitch borders. |
MaterialsJacket: Skirt: Pair each of No 7 (4½mm), and 7 buttons. Tension16sts and 27 rows over 3 inches on 4½mm needles over diamond pattern. 18sts and 25 rows to 4 inches in tweed yarn on 4½mm needles over
stocking stitch. Size mattersJacket: Skirt: Abbreviations k: knit D = plain double knitting colour A word on the wool.The original yarn was Patons Bracken combined with a plain DK. I would substitute with Rowan Felted Tweed DK (because I love it and
there is a wonderful range of colours); however it's a finer yarn, and
much loftier and light weight yarn than Bracken, which knitted up quite
firmly, and the tension here aligns Bracken more towards being an Aran
yarn rather than a DK. Disclaimer
|
Instructions for DressSkirt sectionsWork panel as given for skirt above from **
to **. Work a few rows straight until panel measures 16½ / 17
/ 17½ / 18
inches down centre, ending with 4th pattern row, and increasing 1 stitch
in the centre of this row for the 2nd
and 4th sizes only. Break off B yarn, and leave the stitches on a spare needle or stitch holder. Make another 3 panel sections the same, and number each panel 1, 2, 3 and 4. Bodice back:To make the bodice, arrange the stitches from the skirt panels as follows:— *** Continue working back and forth
in stocking stitch on these 94 / 100
/ 106 / 112
stitches for the back, starting with a purl row and work 3 rows straight.
Work straight until bodice measures 12½ / 12½
/ 12 / 12
inches from start. Work a few rows straight until bodice measures 15½ inches down centre,
ending with right side facing. With right side facing, rejoin the yarn to the remaining stitches and finish to correspond with first side of back. Bodice front: With No 8 needles and right side facing, using D yarn, work as follows:—
Work as for Bodice back from ***
to ***. Here divide for neck:- With right side facing, shape shoulder as given for back. With right side facing, slip centre 14 / 16
/ 18 / 20
stitches on a spare needle or stitch holder, rejoin wool to remaining
stitches, and knit to end. To Make Up Press parts carefully on wrong side under a damp cloth, avoiding garter
stitch borders. Neckband: With right side facing, and using the set of No 10 needles,
or circular needle, work in D yarn as follows:— Arranging the stitches evenly on 3 needles, or using circular needle,
work backwards and forwards in garter stitch (every row knitted) for 3
rows. Work a further 3 rows garter stitch. Cast off. Armbands: With right side facing, and using No 10 needles, work
in D yarn as follows:— Join side seams and armbands with a flat seam. |
Materials12 / 13 / 14
/ 15 x 1oz balls in plain double knitting
("Amberglow") Pair each of No 7 (4½mm), No 8 (4mm), and No 10 (3¼mm) needles. A 5 inch zip fastener for back of dress. Tension16sts and 27 rows over 3 inches on 4½mm needles over diamond pattern.
Size mattersTo fit chest: Abbreviations k: knit D = plain double knitting colour A word on the wool.The original yarn was Patons Bracken combined with a plain DK. I would substitute with Rowan Felted Tweed (because I love it and there
is a wonderful range of colours); however it's a much loftier and light
weight yarn than Bracken, which knitted up quite firmly. Disclaimer
|
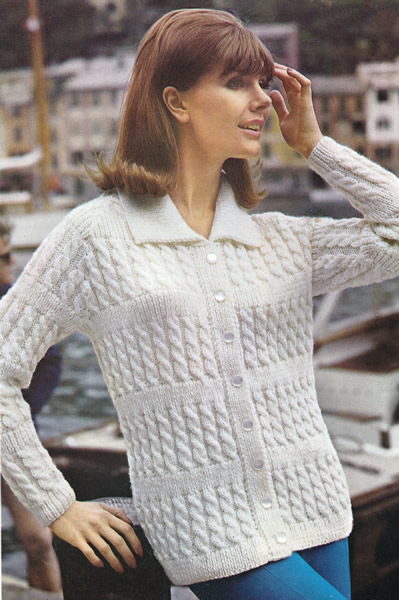
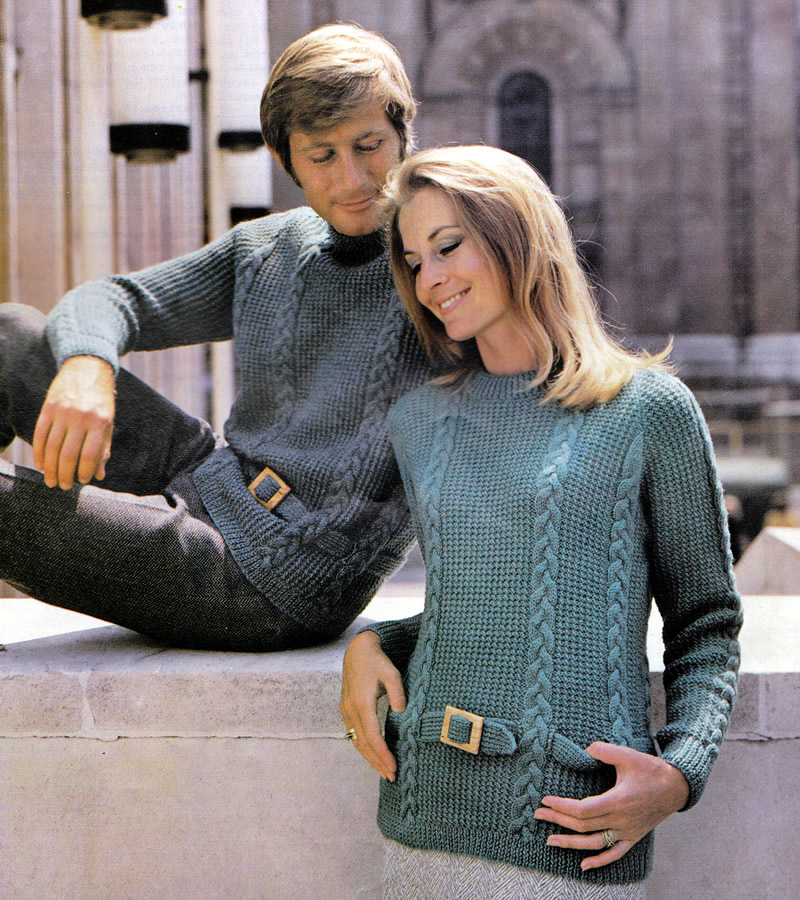
Still beside the sea, as the weather turns cooler. An altogether pleasing design for jackets with broken cable pattern - for him: a zip closure with angled pockets, and for her: a smooth line with buttons.
Instructions for woman's jacketNote: instructions are given for 3 sizes. BackWith No 8 (4mm) needles cast on 122 / 128 / 136 stitches, and work 11 rows in k1/p1 rib, increasing 1 stitch at the end of the last row on the middle size only. [122 / 129 / 136 sts] 12th row: k1, purl to the last stitch,
k1. Change to No 6 (5mm) needles and pattern: 1st row: k1, p2, *
k4, p3; repeat from * to last 7 sts;
k4, p2, k1. ** Repeat from ** to ** twice more, then repeat the 3rd, 2nd, and 1st rows once more, in that order. Change to No 7 (4½mm) needles. 24th row: k1, purl to the last stitch,
k1. These 34 rows form the pattern. Change to No 6 needles and repeat from 1st to 34th rows inclusive once,
then 1st to 24th rows inclusive once. Keeping pattern correct and changing needles as before, shape armholes
by casting off 7 / 8 / 9
stitches at the beginning of the next 2 rows. Repeat the last 6 rows until 32 / 37 / 42 stitches remain, ending with right side facing. For the 2nd size: work 4 more rows, decreasing 1 stitch at each end of the 1st and 3rd rows. For the 3rd size: work 8 more rows, decreasing 1 stitch at each end of the 1st and then alternate rows. For all sizes: cast off the remaining 32 / 33 / 34 stitches, firmly. Left FrontWith No 8 needles cast on 66 / 72 / 80 stitches, and work exactly as for back to ***. Keeping pattern correct and changing needles as before, shape armhole: Next row: cast off 7 / 8
/ 9 stitches, work in rib to end. Continuing on No 6 needles: SHAPE NECK: For the 2nd and 3rd
sizes: continue decreasing as before but at each end
of the needle until 31 / 21
stitches remain. Right FrontWork exactly as for left front to the start of the armhole shaping, then work one more row in rib to end with the wrong side facing. Now shape the armhole: Next row: cast off 7 / 8
/ 9 stitches, purl to the last stitch, k1.
Continuing on No 6 needles: SleevesWith No 8 needles cast on 40 / 40 / 42 stitches, and work 11 rows in k1/p1 rib, increasing 5 / 5 / 10 stitches evenly across on the last row. [45 / 45 / 52 sts] Next row: k1, purl to the last stitch, k1. Change to No 6 needles and cable pattern, as for the back, and work Continue working in cable and rib pattern, increasing 1 stitch at each end of the next and every following 4th row until there are 89 / 91 / 98 stitches. Then continue straight until the 28th row of the 3rd pattern has been completed - that is, finishing on on the same row as the back before the start of the armhole shaping. Shape armhole exactly as for back until 43 / 43
/ 48 stitches remain. Front BordersLeft: With No 7 needles, cast on 11 stitches. 1st row: k2, *
p1, k1; repeat from * to last stitch,
k1. Repeat these 2 rows until border fits up edge of left front to the start
of the neck shaping when slightly stretched. Right: Work a similar strip for the right front, with the
addition of 8 buttonholes; the first to come in the 5th and 6th rows up
from the lower edge, and the 8th just below the start of the neck shaping,
and the remaining 6 spaced evenly in between. To make a buttonhole: with right side facing, rib 4, cat off 3, rib 4;
rib back, casting on 3 over those cast off. When border is finished, cast off evenly in rib, and sew in position. CollarWith No 7 needles, cast on 139 / 141
/ 145 stitches, and work in k1/p1 rib as
given for left front border, until collar measures 4 inches. Cast off
24 / 25 / 27
stitches at he beginning of the next 4 rows.
To Make UpPin out the pieces to sizes required and block or press according to
the instructions for the wool you are using (usually given on the ball
band). |
MaterialsAran or worsted weight yarn: Pair each of No 6 (5mm), No 7 (4½mm), and No 8 (4mm) needles. 8 buttons. Tension19sts and 24 rows to four inches on 5mm needles over stocking stitch.
Size mattersTo fit chest: Abbreviations k: knit A word on the wool.The original yarn was Patons Ariel designed for outer wear with a slightly
rough texture. It was one of those "tripleknit" yarns which
never really caught on in the UK. More or less Aran or American worsted
weight. It came in 2oz (57g) balls at 89m/97yards, 80% wool, 20% man-made
fibres. Disclaimer
|
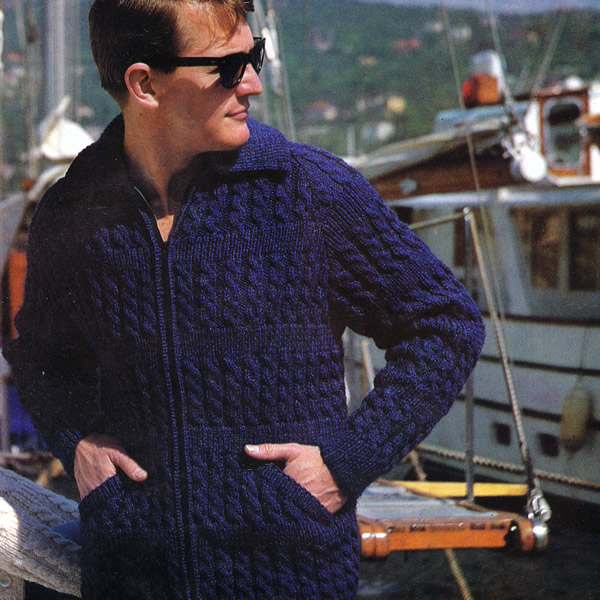
"The sporty out-door look is perfectly typified in this popular, but first-class looking, zipped jacket. Companion to the woman's jacket, in the same attractive crunchy broken rib pattern. Lovely waterside colour of deep, shimmering blue, lightweight, but windproof by the sea, in the special triple-knit texture."
Instructions for man's zipped jacketNote: instructions are given for 2 sizes. BackWith No 8 (4mm) needles cast on 136 / 142 stitches, and work 11 rows in k1/p1 rib, increasing 7 stitches evenly across on the last row. [143 / 150 sts] 12th row: k1, purl to the last stitch,
k1. Change to No 6 (5mm) needles and pattern: 1st row: k1, p2, *
k4, p3; repeat from * to last 7 sts;
k4, p2, k1. ** Repeat from ** to ** twice more, then repeat the 3rd, 2nd, and 1st rows once more, in that order. Change to No 7 (4½mm) needles. 24th row: k1, purl to the last stitch,
k1. These 34 rows form the pattern. Change back to No 6 needles and continue in pattern until 3 complete patterns have been completed from the start. Keeping pattern correct and changing needles as before, with right side facing, shape armholes by casting off 4 stitches at the beginning of the next 2 rows, then decrease 1 stitch at each end of every row until 103 / 98 stitches remain. Now decrease 1 stitch at each end of the next and every alternate row until 41 / 42 stitches remain, ending with right side facing. Leave these stitches on a spare needle or stitch holder. Right FrontWith No 8 needles cast on 66 / 72 stitches, and work 11 rows in k1/p1 rib, increasing 7 / 8 stitches evenly across on the last row. [73 / 80 sts] 12th row: k1, purl to the last stitch, k1. Change to No 6 needles and pattern as given for the back. Here divide for pocket. Next row: rib 21 / 28
and slip these stitches onto a spare needle or stitch holder, cast off
3, pattern to end. Keeping pattern correct and changing needles as before, shape as follows:
Repeat the last 2 rows 10 times more. [27 / 27
sts] With right side facing, rejoin yarn to the last 21 / 28
stitches; cast on 3, and rib to end. Continue in pattern, casting on 2 stitches at the beginning of the next and every alternate row until there are 46 / 53 stitches, taking the cast on stitches into the pattern as they are made, and ending at the side edge. Now continue in pattern over all stitches, until front matches back at side edge, ending with wrong side facing. Keeping pattern correct and changing needles as before, shape raglan armhole: Next row: cast off 4, pattern to end. Now decrease 1 stitch at the armhole edge on the next 10 / 22
rows. [59 / 54 sts] Shape neck: Next row: cast off 12 / 13,
pattern to end. Left FrontWith No 8 needles cast on 66 / 72 stitches, and work 11 rows in k1/p1 rib, increasing 7 / 8 stitches evenly across on the last row. [73 / 80 sts] 12th row: k1, purl to the last stitch, k1. Change to No 6 needles and pattern as given for the back. Here divide for pocket. Next row: pattern 52 / 52
and slip the remaining 21 / 28 stitches
onto a spare needle or stitch holder. Next row: cast off 2, pattern to
end. Break yarn and leave these 27 stitches onto a spare needle or stitch holder. With wrong side facing, rejoin yarn to last 21 / 28
stitches. With wrong side facing, rejoin yarn at front edge, and continue in pattern over all stitches, and finish to correspond with right front, reversing all shapings. SleevesWith No 8 needles cast on 48 / 52 stitches, and work 2½ inches in k1/p1 rib, increasing 11 / 14 stitches evenly across on the last row. [59 / 66 sts] Change to No 6 needles and cable pattern, as for the back, and work Continue working in cable and rib pattern, increasing 1 stitch at each end of the next and every following 4th row until there are 109 / 110 stitches, taking the increased stitches into the pattern as they are made. Then continue straight until the 34th row of the 3rd pattern has been completed - that is, finishing on on the same row as the back before the start of the armhole shaping. Shape top by casting off 4 stitches at the beginning of the next 2 rows, then decrease 1 stitch at each end of the next 18 rows. [65 / 66 sts] Now decrease 1 stitch at each end of the next and every following alternate row until 5 / 6 stitches remain, ending with right side facing. Leave these stitches on a spare needle or stitch holder. CollarJoin raglan seams, matching patterns. Next row: k1, *
p1, k1; repeat from * to end. Next row (increases): rib 4, pick
up horizontal loop lying before next stitch and knit into the back of
it; rib to last 4 stitches, pick up horizontal loop lying before next
stitch and knit into the back of it, rib 4. Pocket Linings an BordersLinings: With No 6 needles and right side facing, pick up and
knit 32 stitches along top slope of each pocket and work 4 inches in stocking-stitch,
starting with a knit row. Cast off.
To Make UpPin out the pieces to sizes required and block or press according to
the instructions for the wool you are using (usually given on the ball
band). |
MaterialsAran yarn: Pair each of No 6 (5mm), No 7 (4½mm), and No 8 (4mm) needles. A zip fastener (double-ended - suitable for a jacket). Tension19sts and 24 rows to four inches on 5mm needles over stocking stitch.
Size mattersTo fit chest: Abbreviations k: knit A word on the wool.The original yarn was Patons Ariel designed for outer wear with a slightly
rough texture. It was one of those "tripleknit" yarns which
never really caught on in the UK. More or less Aran or American worsted
weight. It came in 2oz (57g) balls at 89m/97yards, 80% wool, 20% man-made
fibres. Disclaimer
|
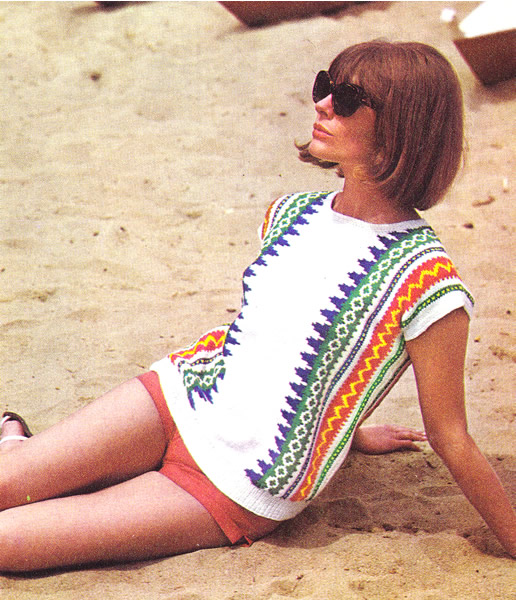
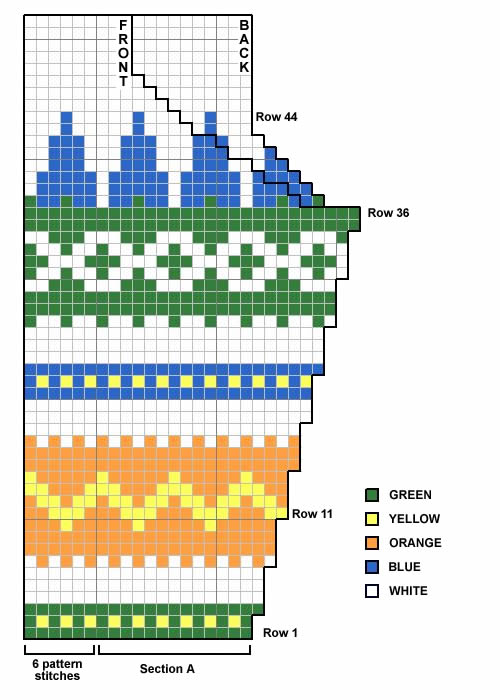
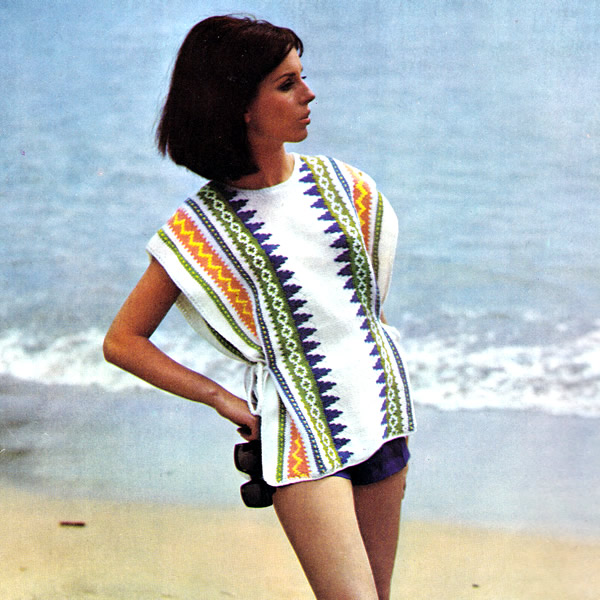
Beach cover-up, which can be made as a sleeveless tunic top (above), or a poncho/tabard (below) -- great for a sandy beach, after a refreshing dip on an English summer's day!
"Poncho wrap to slip on after a bathe, ties loosely at the sides -- warm but light weight, it's the perfect cover-up for after-swim. Tunic uses the same vivid design, to give you a play sweater for the beach to wear over tiny shorts."
Instructions for TunicInstructions are given for 3 sizes, and the tunic is knitted sideways,
following the chart. BackWith No 9 (3¾mm) needles and main shade (W), cast on 121 / 121
/ 127 stitches, and work 1 / 3
/ 5 rows in stocking stitch, starting with
a purl row. Change to No 8 (4mm) needles and with right side facing, work the Fair Isle pattern from the chart, reading odd rows knit from right to left, and even rows purl from left to right. On knit rows, first work section A, then repeat the 6 pattern stitches 18 / 18 / 19 times. On purl rows, repeat the 6 pattern stitches 18 / 18 / 19 times, then work section A, as indicated. Thus your first 2 rows will read : Continue working from chart until 36th pattern row has been completed,
increasing 1 stitch at the beginning of the next and every Shape back of neck by casting off 3 stitches at the beginning
of the next row, then decrease 1 stitch at this edge on the following
6 rows as indicated: [121 / 121 /
127 sts]. Change back to No 9 needles and work 42 / 46
/ 50 rows straight in stocking stitch in
main shade W, starting with a knit row. Finish to correspond with chart, increasing for neck and decreasing for
shoulder as indicated. Change to No 9 needles and work 1 / 3
/ 5 rows in stocking stitch, in W, starting
with a knit row. FrontWork as for back, shaping neck by casting off 5 stitches at the beginning of the 37th row, then decreasing as indicated, and changing to No 9 needles when the 44 rows of the Fair Isle panel have been completed: [111 / 111 / 117 sts]. When the neck shapings are complete, work 34 / 38
/ 42 rows straight in stocking stitch using
W, starting with a knit row.
Ribbed BorderFront: with right side facing, using W wool and No 9 needles,
pick up and knit 114 / 120 / 126
stitches evenly along the lower edge. To Make UpPress work lightly on the wrong side, under a damp cloth, avoiding the ribbing. Join right shoulder seam. Turn with 1 chain, and work a further 3 rows dc, turning with 1 chain
Join the left shoulder and neckband seam. Armholes: Measure 6¼ / 6¾
/ 7¼ inches from the top of the shoulder
down the side edge on the back and front, and mark with pins. Join side and border seams; press seams. |
MaterialsDouble Knitting yarn: Pair each of No 8 (4mm) and No 9 (3¾mm) needles. Tension23sts and 31 rows to four inches on 3¾mm needles over stocking stitch.
Size mattersTo fit chest: Abbreviations k: knit A word on the wool.Original yarn was a double knitting Disclaimer
|
Instructions for PonchoInstructions are given for 3 sizes, and the tunic is knitted sideways,
following the chart. BackWith No 7 (4½mm) needles and main shade (W), cast on 127 stitches,
and work 6 rows in stocking stitch, starting with a knit row. Change to No 6 (5mm) needles and with right side facing, work the Fair Isle pattern from the chart, reading odd rows knit from right to left, and even rows purl from left to right. On knit rows, first work section A, then repeat the 6 pattern stitches 19 times. On purl rows, repeat the 6 pattern stitches 19 times, then work section A, as indicated. Thus your first 2 rows will read : Continue working from chart until 36th pattern row has been completed,
increasing 1 stitch at the beginning of the next and every Shape back of neck by casting off 3 stitches at the beginning
of the next row, then decrease 1 stitch at this edge on the following
6 rows as indicated: [127 sts]. Change back to No 7 needles and work 26 rows straight in stocking stitch
using main shade W, starting with a knit row. Finish to correspond with chart, increasing for neck and decreasing for
shoulder as indicated. Change to No 7 needles and work 6 rows in stocking stitch, using W, starting
with a knit row. Front Work as for back, shaping neck by casting off 5 stitches at the beginning
of the 37th row, then decreasing as indicated, and changing to No 7 needles
when the 44 rows of the Fair Isle panel have been completed: [117 sts]. When the neck shapings are complete, work 18
rows straight in stocking stitch using W.
To Make UpPress work lightly on the wrong side, under a damp cloth. Neck edging front: with right side facing, using W and crochet
hook, start at the left side of the neck on the front, and work a row
of double crochet (English = double crochet, American= single crochet)
evenly round neck edge. In the same way, neaten the side edgings by working a row of dc down
the right side of the front, along the lower edge, and up the other side;
turn with one chain, and work a 2nd row. Work a crochet edging on the back in the same way. Join shoulder seams. Make ties: with 3 strands of W, or contrast yarn, make 4 lengths
of crochet chain, about 20 inches long. Sew one length to each side of
front and back, about 3½ inches in from the side and 10 inches up
from the lower edge. |
MaterialsAran or worsted weight yarn: Pair each of No 6 (5mm) and No 7 (4½mm) needles. Tension20sts and 25 rows to four inches on 4½mm needles over stocking stitch.
Size mattersWidth across front measured flat: Abbreviations k: knit A word on the wool.Original yarn was a blend of wool and acrylic, making it so-called "light
weight", though it's an Aran or worsted weight yarn. Disclaimer
|
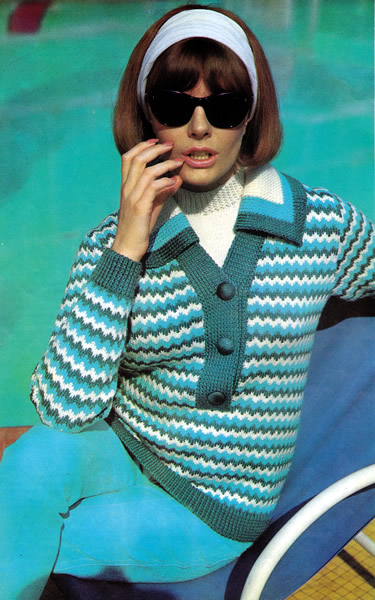
I love this brilliantly coloured overblouse - a taste of the Aegean. It can be paired with the sparkling white classic sweater (also in the April entry and shown under the overblouse in the photo), making for a two-piece with just the right look of colour dash for a sixties Continental beach holiday.
InstructionsInstructions are given for 3 sizes. Back** Change to No 8 needles and work 2 rows in stocking stitch (1 row knit,
then 1 row purl). Leave yarn M hanging and join in turquoise yarn (T). 1st row (right side facing): in T,
k1, * slip 3 purlwise, k1; repeat from * to end. These 12 rows form pattern. ** Carrying wools loosely up the side of the work, continue in pattern and work straight until back measures 16 inches at centre. With right side facing, shape armholes, by casting off 6 / 7 / 8
stitches at the beginning of the next 2 rows; then k2tog at
each end of the next and every alternate row until 91 / 95 / 99
stitches remain. With right side facing, shape shoulders by casting off 7 / 7
/ 7 stitches at the beginning of the next
6 rows, then 6 / 7 / 8
stitches at the beginning of the next 2 rows. Front Work as for back from ** to **. Here divide for front opening: Next row: right side facing, pattern 54 / 58 / 60, turn and leave remaining stitches on a spare needle, or stitch holder. Work straight until front measures the same as the back at the side edge. With right side facing, shape armhole and neck edge as follows: Next row: cast off 6 / 7
/ 8, pattern to last 2 stitches, k2tog. Now continue to shape armhole edge by decreasing 1 stitch at the beginning of the next and following 8 / 9 / 8 alternate rows, and at the same time shape neck by decreasing 1 stitch at the end of the 5th row, then at this edge on every following 6th row. When the armhole shapings are done, keep this edge straight but continue
to decrease at the neck edge on every 6th row as before until 27 / 28
/ 29 stitches remain. With right side facing, shape shoulder, by casting off 7 / 7 / 7 stitches at the beginning of the next and following 2 alternate rows, then 6 / 7 / 8 stitches at the beginning of the following alternate row. With right side facing, rejoin wool to the remaining stitches on the
spare needle or stitch holder. Cast off the centre 13 stitches, pattern
to end. SleevesWith No 10 needles and main shade (M), cast on 52 /
56 / 60 stitches, and work 2 inches
twisted k1/p1 rib, increasing 1 stitch at the end of the last row. Change to No 8 needles and work 2 rows in stocking stitch (1 row knit,
then 1 row purl). Leave yarn M hanging, join in turquoise yarn (T), and
work 12 rows in pattern as for back. Work straight until sleeve seam measures 18 inches. With right side facing, shape top by casting off 6 / 7
/ 8 stitches at the beginning of the next
2 rows, then k2tog at each end of the next
and every alternate row until 37 / 37
/ 37 stitches remain. Now (right side facing) cast off 2 stitches at the beginning of the next
2 rows, 3 stitches at the beginning of the following 2 rows, and 4 stitches
at the beginning of the following 2 rows.
Front BorderJoin shoulder seams. Make a buttonhole in next 2 rows thus: CollarBegin by winding off a small ball each of M and T yarns. Next row: rib 10 M, rib 176 in T,
rib 10 M. In rib and using appropriate colours, cast off 10 stitches at the beginning
of the next 8 rows. To Make UpPress parts lightly under a damp cloth, avoiding ribbing. Join side and sleeve seams ; insert sleeves. |
MaterialsDouble Knitting yarn: Pair each of No 8 (4mm) and No 10 (3¼mm) needles. 3 large buttons. Tension22sts and 30 rows to four inches on 4mm needles over stocking stitch.
Size mattersTo fit chest: Abbreviations k: knit A word on the wool.Original yarn was a pure wool double knitting Disclaimer
|
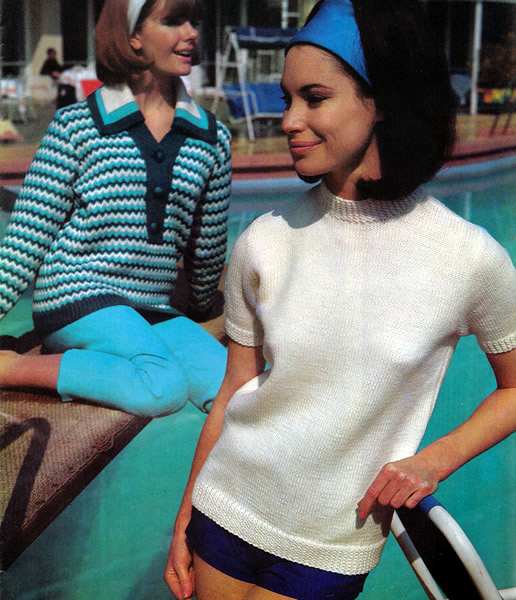
Sparkling white classic sweater which can be teamed with the overblouse (also in the April entry, and pictured in the background here) - for "a two-piece with just the right look of colour dash for a Continental beach holiday". The short-sleeved sweater is long enough to wear over shorts, and the fairly high round turtle band just shows at the neck of the overblouse.
This could also be teamed up with the Sail Away Pullover from POM April 2017, (another favourite of mine).
InstructionsInstructions are given for 3 sizes. Back** Change to No 8 needles and stocking stitch (1 row knit, then 1 row purl), and work straight until back measures 15 inches at centre. With right side facing, shape armholes, by casting off 5 / 6
/ 7 stitches at the beginning of the next
2 rows; then k2tog at each end of the next and every following alternate
row until 76 / 79 / 83
stitches remain. Work straight until back measures 19 / 19½ / 20 inches at centre. With right side facing, divide for back opening: Next row: right side facing, pattern 38 / 39 / 41, turn and leave remaining stitches on a spare needle, or stitch holder. Work straight until back measures 22½ / 23 / 23½ inches. With right side facing, shape shoulder by casting off 6 / 6
/ 7 stitches at the beginning of the next
row, then 6 / 6 / 6
stitches at the beginning of the following 2 alternate rows, then 5 /
6 / 6
stitches at the beginning of the following alternate row. With right side facing, rejoin wool to the remaining stitches on the
spare needle or stitch holder. For 2nd and 3rd sizes only, cast off the
centre stitch, then knit to end for all sizes. [38 / 39
/ 41 sts] Front Work as for back from ** to **. With right side facing divide for neck as follows: Next row: knit 30 / 31 / 32, turn and leave remaining stitches on a spare needle, or stitch holder. Then with wrong side facing, shape neck by casting off 2 stitches at the beginning of the next and following alternate row; then decrease 1 stitch at this (neck) edge on the following 3 rows. [23 / 24 / 25 sts] Work a few rows straight until front measures the same as the back at the armhole edge. With right side facing, shape shoulder, by casting off 6 / 6 / 7 stitches at the beginning of the next row, then 6 / 6 / 6 stitches at the beginning of the following 2 alternate rows, then cast off the remaining 5 / 6 / 6 stitches at the beginning of the following alternate row. With right side facing, slip the centre 16 / 17 / 18 stitches on a spare needle, or stitch holder, rejoin the wool to the remaining 30 / 31 / 32 stitches on the spare needle or stitch holder, and finish to correspond with the first side, reversing shapings. SleevesUsing No 10 needles, cast on 62 / 66
/ 70 stitches, and work 1 inch in twisted
k1/p1 rib, increasing 2 stitches evenly across the last row. Change to No 8 needles and stocking stitch (1 row knit, then 1 row purl), and shape sides by increasing 1 stitch at each end of the 3rd and every following 4th row until there are 70 / 74 / 78 stitches. Work a few rows until until sleeve measures 3½ inches. With right side facing, shape top by casting off 5 / 6
/ 7 stitches at the beginning of the next
2 rows, then k2tog at each end of the next
and every alternate row until 34 / 34
/ 34 stitches remain. Now (right side facing) cast off 2 stitches at the beginning of the next
2 rows, 3 stitches at the beginning of the following 2 rows, and 4 stitches
at the beginning of the following 2 rows.
To Make UpPress parts lightly under a damp cloth, avoiding ribbing. Neckband: Join side and sleeve seams; insert sleeves. |
MaterialsDouble Knitting yarn: Pair each of No 8 (4mm) and No 10 (3¼mm) needles. 6 inch zip. Tension22sts and 30 rows to four inches on 4mm needles over stocking stitch.
Size mattersTo fit chest: Abbreviations k: knit A word on the wool.Original yarn was a pure wool double knitting Disclaimer
|
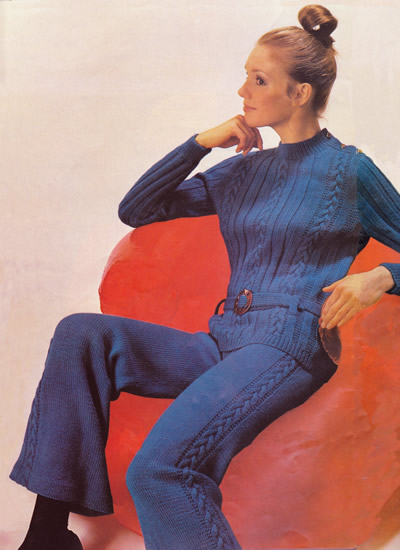
Having spent years making tongue-in-cheek comments about knitted trousers, I find they seemed to become a kind of pandemic fashion item - safely out of site during Zoom meetings. I'm not sure the fashion was really for anything like hand-knitted trousers; however, sitting (unobserved!) in my poorly-insulated chilly office at the top of the house, cosy woollen trousers are taking on some kind of appeal.
Even if the trousers don't appeal, there is a rather nice matching low-belted long-line cable sweater - very much of the period.
Instructions. 3 sizes - larger sizes are given between brackets - Jumper BackUsing No 10 (3¼mm) needles, cast on 94 (106,
116) stitches and work 11 rows in k1/p1 rib.
Change to No 8 (4mm) needles and pattern: 1st row (right side facing): k5 (4, 1);
[p4, k4] one (two, three)
times; * p2, k9, p2, [k4, p4] twice,
k4; repeat from * once, p2, k9, p2,
[k4, p4] one (two, three)
times, k5 (4, 1). These 8 rows form the pattern. Continue in pattern until work measures 16 inches from the beginning, ending with a wrong side row. Shape Armholes: * Continue without further shaping until work measures 7 (7½, 8) inches from start of armhole shaping, ending with a right side row. Shape Shoulders: With wrong side of work facing, join in yarn at the neck edge and work
to end. Jumper FrontFollow instructions for Back from *
to *. Shape Neck: Shape Shoulder: Shape Shoulder: Jumper SleevesUsing No 10 (3¼mm) needles, cast on 52 (54,
56) stitches and work 15 rows in k1/p1 rib. Change to No 8 (4mm) needles and rib pattern. These 2 rows form the pattern. Shape Top: Jumper Shoulder EdgingUsing size 10 needles, cast on 11 stitches. 1st Buttonhole row: Rib 4, cast off
3, rib to end. Jumper Neckband Using a back stitch, join right shoulder seam. Next row (wrong side facing): p1,
* k1, p1, repeat from *
to end. Continue in rib, making a third buttonhole 1¾ (2,
2¼) inches from base of previous buttonhole.
Jumper BeltUsing No 10 needles, cast on 13 stitches. Belt Tabs (Make 4): Using No 10 needles, cast on 7 stitches. Making Up JumperUsing a back stitch, join side and sleeve seams. |
Materials
|
Trousers Right LegUsing No 8 (4mm) needles, cast on 121 (129,
137) stitches and work 9 rows stocking stitch,
(1 row knit, 1 row purl). Commence pattern: 1st row (right side facing): k53
(57, 61);
p2, k9, p2; k55 (59, 63). These 8 rows form the pattern. Keep continuity of cable panel: Next row: k2tog, work to last 2 stitches,
k2tog. [113 (121, 129)
sts] Trousers Left Leg Using No 8 (4mm) needles, cast on 121 (129,
137) stitches and work 9 rows stocking stitch,
(1 row knit, 1 row purl). Commence pattern: 1st row (right side facing): k55
(59, 63);
p2, k9, p2; k53 (57, 61). These 8 rows form the pattern. Keep continuity of cable panel: Next row: k2tog, work to last 2 stitches,
k2tog. [113 (121, 129)
sts] Next row: Work to last 2 stitches,
k2tog. [110 (118, 126)
sts] Trousers Waistband Using backstitch, join front and inside leg seams. Making Up TrousersSew in zip to centre back seam, placing top of zip in line with base
of waistband, then join |
|
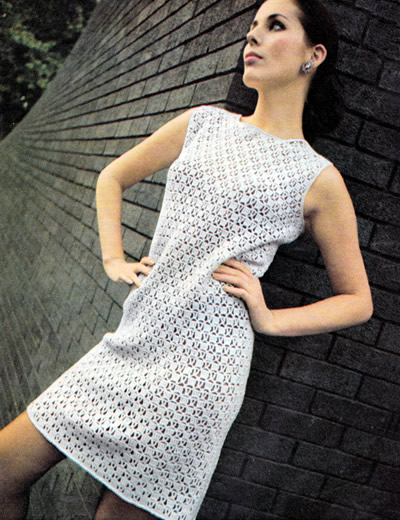
A sixties dress in crochet - which is apparently one of the trends for the season. The simple lacy-look design is worked in light weight yarn over a four-row pattern.
Personally I have a slight prejudice that it can be a bit thick and heavy for summer wear - however the catwalks featured "jumbo" crochet items - so - time to sacrifice all for fashion!
On the plus side, crochet is a speedy technique, meaning that items are highly suitable for you to make for yourself in a reasonable time frame.
Instructions.The dress is given for 3 sizes - larger sizes in brackets - which once again only go up as far as a 38 inch chest. The yarn required is a 4 ply fingering weight, but you could experiment with the tension using a DK soft cotton and a larger hook, which would tend more towards the "jumbo" nature of the designer version. Back and Front (make 2 alike)Using No 11 (3mm) hook make 141 (150 : 159) chain. 1st row: 1 dtr in 6th chain from
hook, * miss 2 chain, 1 dtr in each
of the next 4 chain, miss 2 chain, (1 dtr, 2 chain, 1 dtr) - referred
to as 1 group - in next chain; repeat from *
to end. Continue in pattern until work measures 7 (8
: 9) inches. Armhole Shaping: Continue in pattern until work measures 32½ (33½ : 34½) inches, ending with a 3rd pattern row. Neck and Shoulder shaping: Miss 6 (7 : 8) complete patterns and 1 group; join in yarn and complete to match the other side. To Make UpPress work with a warm iron over a damp cloth. Edging: Work in rounds around neck, armholes and lower edge. Fasten off. For an excellent round-up of SS22 trends on the catwalks review the items at Wardrobe Icons. Crochet dress, seen here in Tod's sixties-inspired jumbo crochet shift. 
|
Materials4ply fingering yarn: Nos 11 (3mm), 12 (2¾mm), and 13 (2¼mm) crochet hooks. Tension2 patterns to 3 inches on 3mm hook. Size mattersTo fit chest: Abbreviationsch: chain A word on the wool.Original yarn was pure wool crepe 4 ply - crepe being good for crochet
as the yarn tends to resist splitting. Disclaimer
|
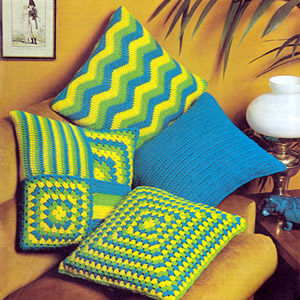
These crochet cushion covers are really easy (and quick) to make in double knitting yarn, and would be good for a beginner if you fancy them. They are so simple that an experienced crocheter could no doubt make them without a pattern. However, although simple, they are a good example of creating an effect purely through the use of colour - if you want them to really pop, use opposites on the colour wheel (turquoise/tangerine, purple/yellow] - or you can dial it right down and use natural sheep colours. As the size and therefore tension for cushion covers is pretty adaptable, it could provide a useful project for handspun, - or you could use up any bright knitting oddments for a colourful designer effect, (as controversially favoured by our current colourful prime minister).
Instructions.Basic instructions for 4 cushions as illustrated.
Chevron cushionUsing B, make 68 chain. Foundation row: using B, 1 tr in 4th ch from hook, 1 tr in each of next 6 ch, (decrease 2, 1 tr in each of next 6 ch, 3 tr in next ch, 1 tr in each of next 6 ch) 3 times, decrease 2, 1 tr in each of next 6 ch, 2 tr in last ch. [65 sts - 3 ch at start of row counts as 1 stitch] Joining in colours as required, work in pattern as follows: 1st row: using B, 3 ch, 1 tr in first
stitch, 1 tr in each of the next 6 stitches, (decrease 2, 1 tr in each
of the next 6 stitches, 3 tr in the next stitch, 1 tr in each of next
6 stitches) 3 times, decrease 2, 1 tr in each of the next 6 stitches,
2 tr in top of 3 ch These 6 rows form the pattern. Making up the chevron cushionJoin starting and finishing edges using a flat seam. Patchwork cushionMake 2 of each of the following squares: First Square (wide stripes):
Using B, make 33 chain. Continue repeating last row, working 1 row more in B, then 3 rows G,
3 rows Y, 3 rows B, 3 rows G, 3 rows Y: 18 rows in all. Second Square (mitred corner): Work 18 rows as for first square, but working 1 row B, 1 row G, 1 row Y. Third Square (wide stripes):
Using Y, make 4 chain. 1st row: Using Y, 3 ch, (3 tr, 1 ch 3 tr) all chain space, 1 tr in top of 3 starting chain. [3 ch counts as 1 stitch, 3 tr forms a group] 2nd row: Using G, 3 ch, 1 tr in space
between first stitch and next group, (1 group, 1 ch, 1 group) in chain
space, 2 tr in space between last group and 3 ch. 3rd row: Using G, 3 ch, 1 group in
space between half group and next group, (1 group, 1 ch, 1 group) in chain
space, 1 group in space between group and half group, 1 tr in top of 3
chain. 4th row: Using B, 3 ch, 1 tr in space
between first stitch and group, 1 group in next space between 2 groups,
(1 group, 1 ch, 1 group) in chain space, 1 group in next space between
2 groups, 2 tr in space between last group and 3 ch. 5th row: Using B, 3 ch, 1 group in
space between half group and group, 1 group in next space between 2 groups,
(1 group, 1 ch, 1 group) in chain space, 1 group in next space between
2 groups, 1 group in space between group and half group, 1 tr in top of
3 chain. 6th row: Using Y, 3 ch, 1 tr in space between first stitch and group, 1 group in each space between 2 groups, (1 group, 1 ch, 1 group) in chain space, 1 group in each space between 2 groups, 2 tr in space between last group and 3 ch. 7th row: Using Y, 3 ch, 1 group in space between half group and group, 1 group in each space between 2 groups, (1 group, 1 ch, 1 group) in chain space, 1 group in each space between 2 groups, 1 group in space between last group and half group, 1 tr in top of 3 chain. 8th and 9th rows: Using G, as 6th
and 7th rows. Fasten off. Fourth Square (squared circle):
** worked in rounds as follows: 1st round: Using Y, 4 ch, (3 tr, 1 ch) 3 times into the ring, join with a slip stitch in the 3rd of the 4 starting chain. 2nd round: Using G, slip stitch into
first ch space (formed by top of starting chain of previous round), then
4 ch, 3 tr into that same ch space, (3 tr, 1 ch, 3 tr in next ch space)
3 times, 2 tr in first chain space again, join with a slip stitch in the
3rd of the 4 starting chain. 3rd round: Using B, slip stitch into first ch space, then 4 ch, 1 group into that same ch space, (1 group in next space between 2 groups, 1 group, 1 ch , 1 group in next ch space) 3 times, 1 group in next space between 2 groups, 2 tr in first ch space, join with a slip stitch in the 3rd of the 4 starting chain. 4th round: Using Y, slip stitch into first ch space, then 4 ch, 1 group into that same ch space, * 1 group in each space between 2 groups,1 group, 1 ch, 1 group in ch space; repeat from * but ending with 2 tr in first ch space, join with a slip stitch in the 3rd of the 4 starting chain, as on previous rounds. 5th round: Using G, work as 4th round. Making up the patchwork cushionUsing a flat seam piece together the squares, to make two large squares
each made up of 4 smaller squares, for the front and back of the cushion
(see photograph). Block cushionThe fourth square of the patchwork cushion is a squared-off circle -
a form of the traditional "granny" square. The block cushion
is a giant version of this square. Make a second piece in the same way. Making up the block cushionJoin 3 sides, slip in pad, and join remaining side. Plain cushionUsing a single colour throughout, make 62 chain. Next row: 3 ch, miss first stitch, 1 tr in each remaining stitch. Repeat the last row until cushion measures 16 inches (or to make the
size you require). Make a second piece in the same way. Making up the plain cushionJoin 3 sides, slip in pad, and join remaining side. |
Materials
|
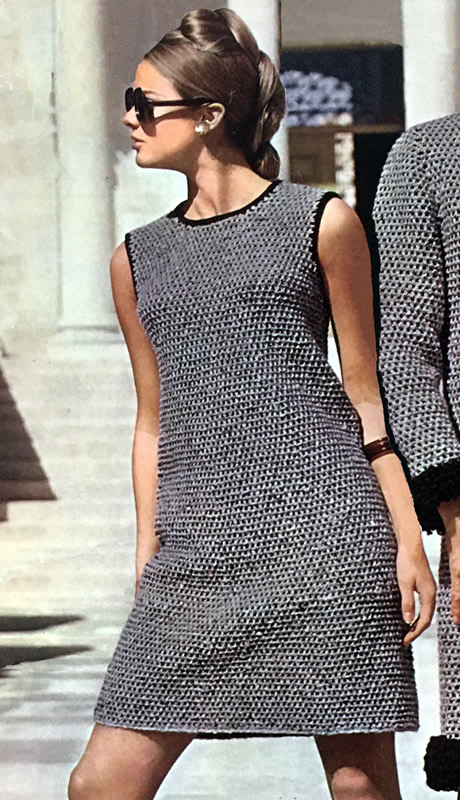
This wasn't my original choice for this month, but recently I have noticed a trend for monochrome wool dresses in some fashion articles. Not too hard to knit as the two-colour effect is formed by slipping stitches - so only one colour in any one row.
Instructions.A tweed dress in 3 sizes (small/medium/large). Back** 1st row (right side facing): Purl
in L - do not break yarn L. These 8 rows form the pattern. Work straight until back measures 3 inches, ending with a 4th or 8th
pattern row. Work straight until back measures 6 inches, ending with a 4th or 8th
pattern row. Work straight until back measures 9 inches, ending with a 4th or 8th
pattern row. Work straight until back measures 12 inches, ending with a 4th or 8th pattern row. Continue in this way, decreasing 4 stitches on every 1st or 5th pattern row at 3 inch intervals, until 97/103/109 stitches remain. Work straight until back measures 29½ inches down centre, ending
with 2nd or 6th pattern row. Work a few rows straight until back measures 31/31½/32 inches, ending with right side facing. Here divide for back opening: Continue straight on these 37/38/41
stitches for first side, until back measures 36½/37/37½
inches. With right side facing, rejoin wool to remaining stitches, cast off the centre stitch, then finish to correspond with first side, reversing shapings. FrontWork as for back from ** to **
. Work straight until front measures 34/34½/35 inches, ending with right side facing. Here divide for neck: Next row: pattern 28/29/30,
turn, and leave remaining 47/50/53
stitches on a spare needle. Continue on these stitches for first side, decreasing 1 stitch at the neck edge on the next and every alternate row until 20/21/22 stitches remain. Work a few rows straight until front matches back at armhole edge, ending with right side facing. Shape shoulder as given for back. With right side facing, rejoin wool to the remaining stitches, cast off
the centre 19/21/23
stitches, and pattern to end. To Make UpPress parts or block lightly on the wrong side under a damp cloth. Neck Facing: Armhole Facing: Join side seams. |
MaterialsDouble knitting: Pair each of 6 inch zip. Tension22sts to 4 inches on 4mm needles over pattern. Size mattersTo fit chest: Abbreviations k: knit A word on the wool.Original yarn was pure wool in a standard DK weight. Disclaimer
|
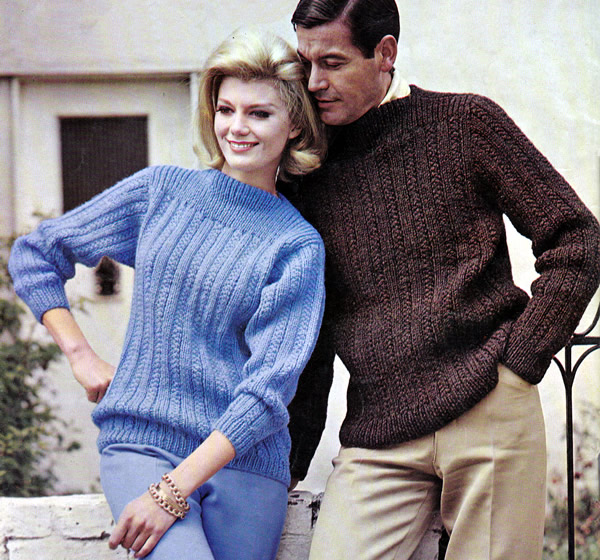
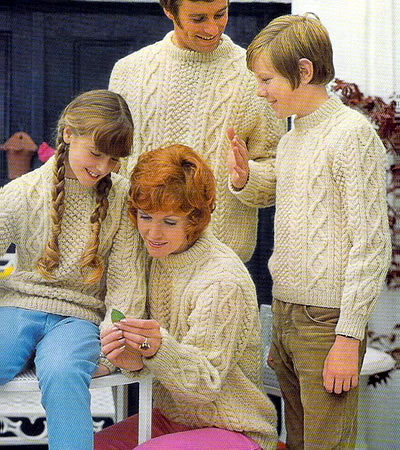
Simply styled early sixties casual sweaters with separate instructions for her and for him. They are knitted in "triple knitting" yarn - a short-lived experiment by the yarn companies to introduce what is now the American "worsted" weight standard to British knitters. However, we were too much in love with our double knitting yarn - I mean that was bulky enough surely?!
However, owing to globalisation, we have now fully embraced worsted weight yarns which means we can easily find a good selection of yarn colours and fibre mixes to use with this pattern. [Failing that we always have Aran yarns to fall back on...]
|
The man's and womans versions are very similar - and similar in chest sizes offered as well. The changes are mainly to the proportion. However, the man's version has a set-in sleeve, while the woman's is more of square almost drop-shoulder - you can see this in the photo. I prefer the set in sleeve and if you are a woman of size 36-40 then it would be quite feasible to knit the man's sweater, adjusting sleeve and overall length to suit. Instructions for WOMAN's version.Instructions are given for three sizes with larger sizes given in bold or colour between slashes. Where one set of figures is given this applies to all sizes. Back and Front alike (knit 2)With No 8 (4mm) needles, cast on 80/86/92 stitches and work 2 inches in k1/p1 rib. Increase 5/7/9 stitches evenly across on last row. [85/93/101 sts] With right side facing change to No 4 (6mm) needles and work in pattern as follows: 1st row: *
p1, Cross2K, k1, p1, k3; repeat from *
to last 5 stitches; p1, Cross2K, k1, p1. These two rows form the pattern. Continue straight in pattern until work measures 15 inches down centre, ending with row 2. With right side facing shape armholes, by casting off 8 stitches at the beginning of the next 2 rows. [69/77/85 sts] Continue straight in pattern until work measures 21/21/21½ inches, ending after a first row with wrong side facing. Next row: purl, increasing 9 stitches evenly across the row by working twice into every 7th/8th/9th stitch. [78/86/94 sts] Change to No 6 (5mm) needles and continue in k1/p1 rib until work measures 24/24/24½ inches. With right side facing, shape shoulders, by casting off 11/12/13
stitches at the beginning of the next 4 rows. Work a further 6 rows in
rib on the remaining 34/38/42
stitches, increasing 1 stitch at each end of every row. SleevesWith No 8 needles, cast on 40/40/44 stitches, and work 2 inches in k1/p1 rib. Increase 5/5/9 stitches evenly across on last row. [45/45/53 sts] With right side facing, change to No 4 needles and work in pattern, shaping
sides by increasing 1 stitch at each end of the 5th/5th/9th
and every following 4th row until there are 83//83/89
stitches, taking the increased stitches into the pattern as they
are made. To Make UpIMPORTANT: Press parts on wrong side using a dry cloth
and cool iron. Join shaped ends of neck facing with flat seam, then turn under 6 rows
of the rib to the wrong side at the back neck and catch down loosely;
turn under rib in the same way across the front graduating the hem to
a depth of 12 rows at the centre front. Instructions for MAN's version.Instructions are given for three sizes with larger sizes given in bold or colour between slashes. Where one set of figures is given this applies to all sizes. Back and Front alike (knit 2)With No 8 (4mm) needles, cast on 90/96/102 stitches and work 2½ inches in k1/p1 rib. Increase 3/5/7 stitches evenly across on last row. [93/101/109 sts] With right side facing change to No 4 (6mm) needles and work in pattern as follows: 1st row: *
p1, Cross2K, k1, p1, k3; repeat from *
to last 5 stitches; p1, Cross2K, k1, p1. These two rows form the pattern. Continue straight in pattern until work measures 16/16½/16½ inches down centre, ending with row 2. With right side facing shape armholes, by casting off 4 stitches at the beginning of the next 2 rows; then decrease 1 stitch at each end of the next and every alternate row until 69/77/85 stitches remain. Continue straight in pattern until work measures 23 inches down centre, ending after a second row with right side facing. Change to No 6 (5mm) needles. Continue in k1/p1 rib until work measures 25½/26/26 inches down centre. With right side facing, shape shoulders, by casting off 8/8/9
stitches at the beginning of the next 2 rows; then 7/8/9
stitches at the beginning of the next 4 rows. Work a further 6 rows in
rib on the remaining 38/42/44
stitches, increasing 1 stitch at each end of every row. SleevesWith No 8 needles, cast on 46 stitches, and work 2½ inches in k1/p1 rib. Increase 7 stitches evenly across on last row. [53 sts] With right side facing, change to No 4 needles and work in pattern, shaping
sides by increasing 1 stitch at each end of the 3rd
and every following 8th//8th/6th
row until there are 73/73/77
stitches, taking the increased stitches into the pattern as they are made.
With right side facing, shape top, by casting of 3 stitches at the beginning
of the next 2 rows, then decrease 1 stitch at each end of the next and
every alternate row until 45/45/51
stitches remain. Work 1 row back, so that the right side is facing again. Cast off loosely. To Make UpIMPORTANT: Press parts on wrong side using a dry cloth and cool iron. Join shoulder, side and sleeve sleeve seams; insert sleeves. Join shaped ends of neck facing with flat seam, then turn under 6 rows
of the rib to the wrong side at the back neck and slip stitch loosely
in position; turn under the rib in the same way across the front graduating
the hem to a depth of 12 rows at the centre front. [Editor's note: I imagine the heavy emphasis on the ironing instructions are specific to the original yarn. In general, if using an iron, press only very gently with a cool iron using either a dry or damp cloth as appropriate to the yarn; use the instructions on the ball band if any are given.] |
MaterialsIn Aran or worsted weight yarn. Woman's version: Man's version: A pair each of Nos 4 (6mm), 6 (5mm), and 8 (4mm) needles. Tension17 sts x 22 rows to 4 ins on No 4 (5mm) needles. Size mattersWoman's version To fit chest: 34/36/38
inches. Man's version Abbreviationsstocking stitch: one row knit, one row purl. Cross2K: knit into the back of the 2nd stitch on the left hand (but do not slip off the needle), then knit into the front of the 1st stitch, and slip both stitches off the needle together. Cross2P: purl into the front of the 2nd stitch on the left hand (but do not slip off the needle), then purl into the front of the 1st stitch, and slip both stitches off the needle together. k2tog or p2tog: work 2 sts together to decrease. A Word on the WoolThe original yarn was Patons Ariel designed for outer wear with a slightly
rough texture. It was one of those "tripleknit" yarns which
never really caught on in the UK. More or less Aran or American worsted
weight. It came in 2oz (57g) balls at 89m/97yards, 80% wool, 20% man-made
fibres. Disclaimer
|
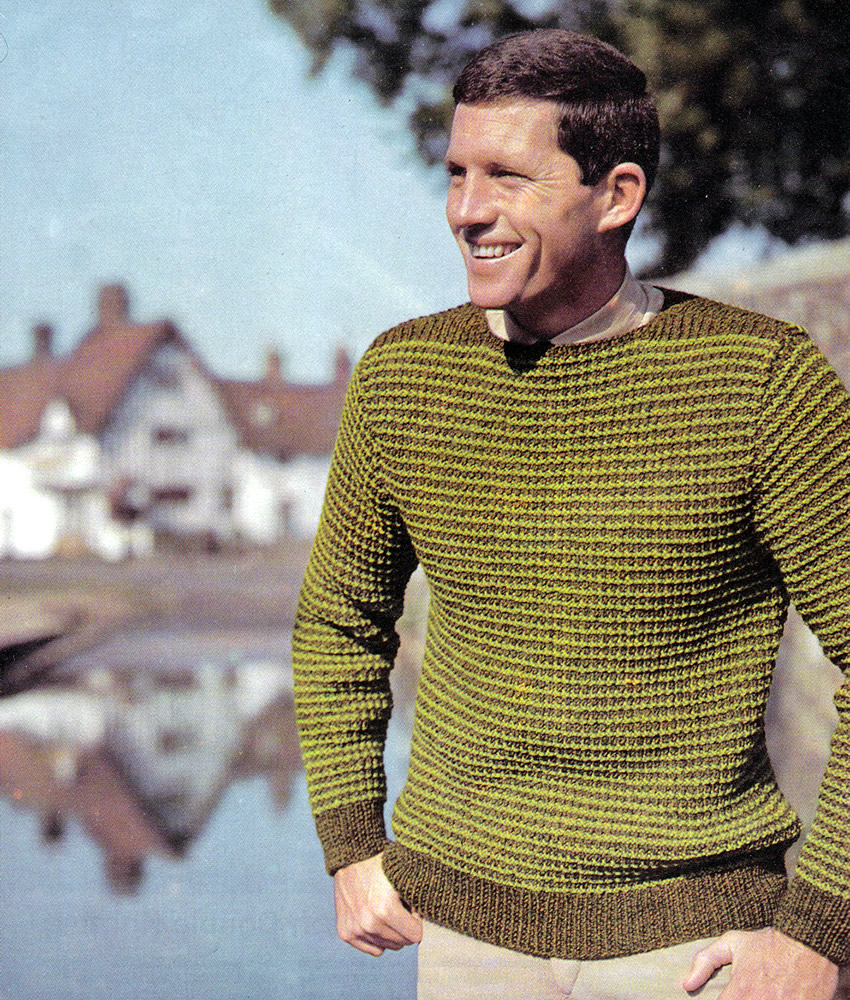
Man's sweater with a textured pattern, made in two colours intended to blend with each other. The overall tweedy look makes this colour scheme look a little autumnal - perhaps the acid green combined with grey or a different shade of green might be more redolent of Spring.
I think the cropping of the picture is an illustration of "never let knitting get in the way of a good photo".
Instructions.Sweater is worked in stripes of the two colours using a textured moss stitch. Instructions are given for 3 sizes. Back and Front alikeWith No 9 needles and main shade (M), cast on 104/108/112
stitches, and work 3 inches in k1/p1 rib, increasing 7/9/11
stitches evenly across the last row. With right side facing, change to No 7 needles and work in pattern as
follows: These 4 rows form the pattern. With right side facing, shape armholes by casting off 4 stitches
at the beginning of the next 2 rows, then decrease 1 stitch at each end
of the next and every alternate row until 91 / 95
/ 99 stitches remain. Continue straight in pattern until back measures 25 / 25½
/ 25½
inches, ending with 4th pattern row. With right side facing continue in M and shape neck: With right side facing, slip the centre 33 / 35
/ 37 stitches on a spare needle or stitch
holder. SleevesWith No 10 needles and main shade (M), cast on 50 / 52
/ 52 stitches, and work 3 inches in k1/p1
rib, increasing 7 stitches evenly across the last row. With right side facing, change to No 7 needles, join in C and continue in pattern, shaping sides by increasing 1 stitch at each end of the 9th and every following 8th row until there are 79 / 83 / 83 stitches, taking the increased stitches into the pattern as they are made. Continue straight in pattern until sleeve seam measures 18½ / 18½ / 19 inches, ending with 2nd pattern row. With right side facing, keeping pattern correct, shape top by
casting off 4 stitches at the beginning of the next 2 rows, then decrease
1 stitch at each end of the next and every alternate row until 37 / 39
/ 39 stitches remain. Neck Ribbing - back and front alike.With No 9 needles, main shade M, and right side facing, start at shoulder
edge and pick up and knit, 8 / 8 /
8 stitches down side of neck, rib 33 / 35
/ 37 stitches from spare needle or stitch
holder, pick up and knit 8 / 8 / 8
stitches up other side of neck. Work 3 rows in rib over all stitches, decreasing 1 stitch at each end of the next and following alternate row. Cast off evenly in rib. To Make UpPress work lightly on wrong side under a damp cloth, avoiding ribbing.
|
MaterialsAran or worsted weight yarn: Pair each of No 7 (4½mm), No 9 (3¾mm), and No 10 (3¼mm)
needles. Tension20sts and 25 rows to four inches on 4½mm needles over stocking stitch.
Size mattersTo fit chest: Abbreviations k: knit A word on the wool.The original yarn was Patons Flair - one of those "tripleknit" yarns which never caught on so much in the UK. More or less Aran or American worsted weight . As usual no clues as to the yardage, but it was 60% wool, 40% courtelle (acrylic). Note that later on Patons made "Flair DK" in 20g balls and with a slightly different wool blend. Disclaimer
|
"Fuller figure" shown off on a suitably matronly figure for the post-rationing 1950s - but actually means a pleasing pattern in a reasonable size range for this century.
Instructions.Instructions are given for 6 sizes - larger sizes given in brackets. Jumper Back† Next row: Rib 4 (7
: 10 : 6 : 9
: 8), *
work twice into the next stitch, rib 5, repeat from *
to last 4 (7 : 10
: 6 : 9 : 8)
stitches, work twice into next the stitch, rib 3 (6
: 9 : 5 : 8
: 7). Change to size 8 (4mm) needles and pattern as follows: 6th row: *
knit into back of stitch, p1, knit into back of stitch, p3, repeat from *
to last 3 stitches, knit into back of stitch, p1, knit into back of stitch. Shape Raglan Armholes: Jumper FrontFollow the instructions for the Back from † to † until 69 (73 : 77 : 79 : 83 : 93) stitches remain, ending with a wrong side row. Shape Neck: 1st size only: Keeping the neck edge straight, decrease 1 stitch at the armhole edge
on every row until 2 stitches remain. 2nd, 3rd
and 4th sizes only 5th and 6th
sizes only: All sizes: Jumper Short Sleeves Using size 10 needles, cast on 80 (86
: 86 : 92 : 92
: 98) stitches and work in k1, p1
rib for ¾ of an inch, ending with a wrong side row and increasing
1 stitch at the end of the last row. Change to size 8 needles and work in pattern as given for the Back until the work measures 3 (3 : 3½ : 3½ : 3½ : 3½) inches from the beginning, ending with a wrong side row. Shape Raglan Top: Jumper Neckband Using a back stitch, join raglan seams, leaving left back raglan seam
open. Work in k1, p1 rib for 1 inch. Cardigan BackFollow the instructions exactly as for the Jumper, but on completion cast off the stitches at the back neck. Cardigan Left FrontUsing size 10 needles, cast on 60 (60 : 66 : 66 : 70 : 76) stitches and work in k1, p1 rib for 2 inches, ending with a right side row. Next row: Rib 6 (6
: 5 : 5 : 5
: 8), *
work twice into the next stitch, rib 5 (5
: 6 : 6 : 5
: 5), repeat from *
to last 6 (6 : 5
: 5 : 5 : 8)
stitches, work twice into next stitch, rib 5 (5
: 4 : 4 : 4
: 7). Change to size 8 needles and pattern as given for Back until work measures 12 (12 : 12½ : 12½ : 13 : 13) inches, from the beginning, ending with a wrong side row. Shape Raglan Armhole and Neck: 2nd, 3rd,
4th, 5th
and 6th sizes only: All sizes: Cardigan Right FrontFollow the instructions exactly as for Left Front, reversing all shapings. Cardigan Long Sleeves Using size 10 needles, cast on 58 (60
: 60 : 62 : 62
: 64) stitches and work in k1, p1
rib for 2½ inches, ending with a right side row. Change to size 8 needles and pattern. Shape Raglan Top: Cardigan Front Bands Using size 10 needles, cast on 11 stitches. To Make UpJumper Cardigan |
Materials
|
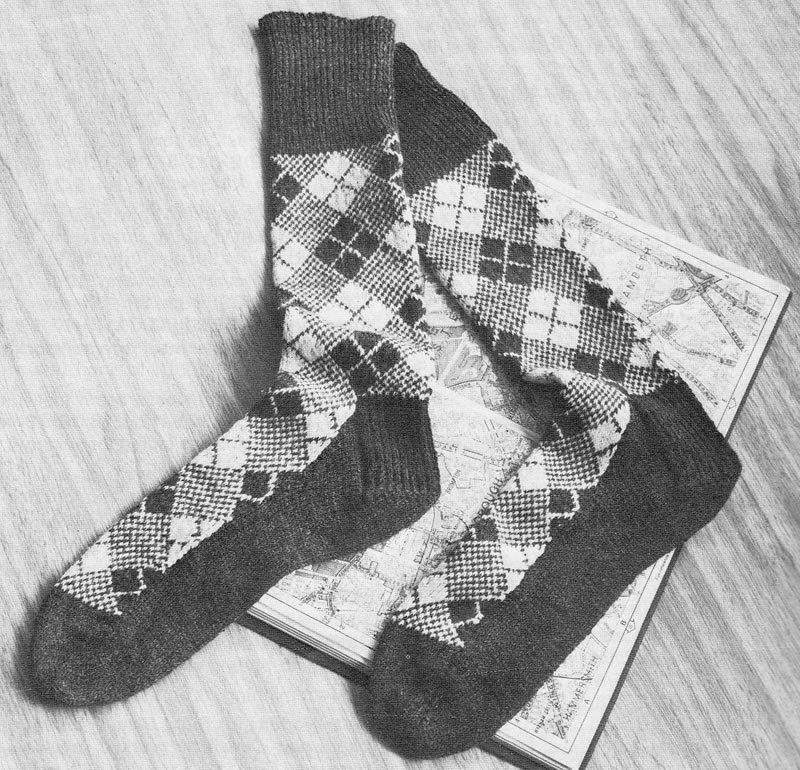
Socks created in two colours with the fair isle technique. Less common these days, now that we can create such exciting coloured socks with self-patterning yarns. Nonetheless quite satisfying since space dyed skeins cannot produce this lovely traditional Argyll pattern.
Instructions.Each sock is worked in three (attached) sections - leg, upper foot, and
lower foot - and mostly using only 2 needles, but these needles need to
be double points (that is, pointed at both ends). Leg and instepStarting at the top leg, using 2 needles and Main Shade (MS), cast on 78 stitches and work in k1/p1 rib for 4 inches, decreasing 1 stitch at the end of the last row : 77 stitches. Start with a knit row, working in stocking stitch in pattern from chart, joining in Contrast (C), reading odd rows knit from right to left and even rows purl from left to right, until 75 rows have been worked. 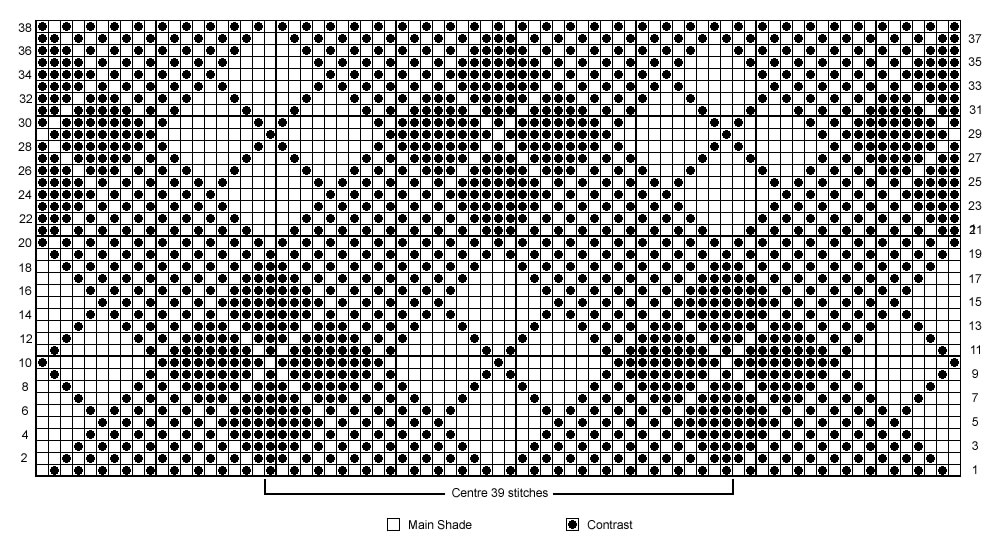
Next row: pattern 18, increase in
the next stitch, pattern to last 19 stitches, increase in the next stitch,
pattern to end : 79 stitches. Slip first and last 20 stitches on spare needles for heel. Continue in MS and stocking stitch (1 row knit one row purl), starting with a knit row, until foot is required length, allowing 2½ inches for toe shaping and ending with a purl row. Leave stitches on a spare needle. Heel and sole:Slip the 2 groups of 20 stitches on to one needle....
1st row: k19, k2tog, k19. Turn heel as follows: Continue in this way until all the stitches have been worked : 21 stitches. Next row: p21 stitches, then pick
up and purl 18 stitches down side of heel piece, turn. Continue straight until work matches the patterned instep piece, ending with a purl row. Toe:Next row: k18 and now (finally) arrange
the stitches on 3 needles for working the toe in the round as follows: Work in rounds shape toe as follows: Making upOmitting ribbing, press parts lightly on wrong side following instructions on the ball band. Sew seams down back of leg, and on each side of the sole, using a flat seam technique (not mattress stitch for example). Sew in all ends. Make a second sock to match. |
Materials3 x 25g balls of 3 ply yarn in main shade and 1 in lighter contrast. Set of four No 13 (2¼mm) needles, pointed at both ends.
Tension36 sts x 44 rows to 4 inches Size mattersLength from top to base of heel: 13½ inches (34 cm); AbbreviationsMS is main shade (Lovat Heather). sl1: slip the next stitch k2tog or p2tog: work 2 sts together to decrease. psso: pass the slipped stitch over, ("sl1, k1, psso" also known as "ssk") A Word on the Wool.Original yarn was Patons Nylox 3ply in colours Lovat Heather (2002) and Snow White (504). Disclaimer (well...almost)In transposing any pattern it is always a risk that errors will be introduced, in spite of dedicated proof reading. If you have any problems with this pattern, please and I will try and assist. |

Long-line sweaters with belts at hip level. Very up-to-the-minute sixties styling - but somehow I feel they should have been shown in Lincoln Green - no?
InstructionsThe main body of the sweater is knitted in "rice stitch" which is knitting a kind of sparse moss or seed stitch with some of the knit stitches on the right side worked into the back of the stitch. Back:‡ Change to size 8 needles and pattern: 2nd row: k8 (8, 10, 14, 18, 18, 20), p9, k17, p9, k29 (33, 33, 33, 33, 37, 37); p9, k17, p9; k8 (8, 10, 14, 18, 18, 20). 3rd row: [p1, k1tbl] 3 (3, 4, 6, 8, 8, 9) times, * p2, sl3F, k3, k3 from cable needle, k3, p2, [k1tbl, p1] 6 times, k1tbl, p2, sl3F, k3, k3 from cable needle, k3, p2, * [k1tbl, p1] 12 (14, 14, 14, 14, 16, 16) times, k1tbl, repeat from *to * once, [k1tbl, p 1] 3 (3, 4, 6, 8, 8, 9) times. 4th row: As 2nd row. 7th row: [p1, k1tbl] 3 (3, 4, 6, 8, 8, 9) times, * p2, k3, sl3B, k3, k3 from cable needle, p2, [k1tbl, p1] 6 times, k1tbl, p2, k3, sl3B, k3, k3 from cable needle, p2, * [k1tbl, p1] 12 (14, 14, 14, 14, 16, 16) times, k1tbl, repeat from * to * once, [k1tbl, p1] 3 (3, 4, 6, 8, 8, 9) times. 8th row: As 2nd row. These 8 rows form the pattern. Make Slots for Belt: Next row: Pattern 6 (6,
8, 12, 16,
16, 18) stitches and turn, leaving
remaining stitches on a spare needle. Join in yarn to remaining stitches, pattern 13 stitches and turn, leaving
remaining stitches on a spare needle. Join in yarn to remaining stitches, pattern 13 stitches and turn, leaving
remaining stitches on a spare needle. Join in yarn to remaining stitches, pattern 13 stitches and turn, leaving remaining stitches on a spare needle. Work 8 rows on these stitches. Break off yarn. Join in yarn to remaining stitches, pattern 25 (29,
29, 29, 29,
33, 33) stitches and turn, leaving
remaining stitches on a spare needle. Join in yarn to remaining stitches, pattern 13 stitches and turn, leaving
remaining stitches on a spare needle. Join in yarn to remaining stitches, pattern 13 stitches and turn, leaving
remaining stitches on a spare needle. Join in yarn to remaining stitches, pattern 13 stitches and turn, leaving remaining stitches on a spare needle. Work 8 rows on these stitches. Break off yarn. Join in yarn to remaining 6 (6, 8,
12, 16, 16,
18) stitches, work to end. Next row: Work in pattern across all stitches. Continue in pattern until work measures approximately 15 (15½, 15½, 16, 16, 16½, 16½) inches from the beginning, ending with a wrong side row. Mark each end of the last row with a coloured thread to facilitate easier working when joining raglan seams. Shape Raglan Armholes: 1st, 2nd, 3rd, 4th, and 7th sizes only. Decrease 1 stitch at each end of the next and 3 (3, 3, 3, -, -, 1) following 4th rows. 107 (111, 115, 125, -, -, 143) remaining. All sizes . Decrease 1 stitch at each end of the next and every following alternate
row Shape Shoulder Sections: Front:Follow instructions as for the Back from ‡ to ‡, until 79 (81, 81, 85, 87, 89, 91 ) stitches remain, ending with a wrong side row. Shape one side of the Neck: Shape other side of the Neck: Sleeves:Using size 10 needles, cast on 53 (53, 57, 57, 61, 61, 61) stitches. Using size 10 needles, cast on 115 (119,
123, 131, 139,
143, 147) stitches. Change to size 8 needles and pattern: 2nd row: k22 (22, 24, 24, 26, 26, 26), p9, k17, p9, k29 (33, 33, 33, 33, 37, 37); p9, k22 (22, 24, 24, 26, 26, 26). 3rd row: [p1, k1tbl] 10 (10, 11, 11, 12, 12, 12) times, p2, sl3F, k3, k3 from cable needle, k3, p2, [k1tbl, p1] 10 (10, 11, 11, 12, 12, 12) times. 4th row: As 2nd row. 7th row: [p1, k1tbl] 10 (10, 11, 11, 12, 12, 12) times, p2, k3, sl3B, k3, k3 from cable needle, p2, [k1tbl, p1] 10 (10, 11, 11, 12, 12, 12) times. 8th row: As 2nd row. These 8 rows form the pattern. Increase and work into pattern, 1 stitch at each end of the next and
every following 10th (9th, 9th,
8th, 8th, 7th,
6th) row until there are 73 (77,
81, 85, 89,
93, 97) stitches on the needle. Shape Raglan Top: Work 1 row. Now decrease 1 stitch at each end of the next and every following alternate
row until 13 stitches remain, ending with a wrong side row. NeckbandWith right side of work facing and using size 8 needles, knit across
the 13 stitches on top of Left Sleeve, pick up and k20 (20,
22, 22, 24,
24, 24) stitches down left side of
neck, knit across the 17 (19, 19,
21, 21, 21,
23) stitches at centre, pick up and k20 (20,
22, 22, 24,
24, 24) stitches up right side of
neck, knit across the 13 stitches on top of Right Sleeve and the 31 (33,
33, 35, 35,
37, 39) stitches on back neck: 114
(118, 122,
126, 130, 132,
136) stitches. BeltUsing size 10 needles, cast on 13 stitches. 1st row (Right side facing): * k1,
p1, repeat from * to last stitch, k1. Decrease 1 stitch at each end of the next and every following alternate row until 3 stitches remain. Knit 3 together and fasten off. To Make UpUsing a back stitch, join raglan seams, shoulder sections and neckband,
matching coloured threads on raglan to coloured threads on sleeve top. Press seams lightly under a damp cloth. |
Materials23 (24, 26, 27, 29, 30, 31) x 25g balls double knitting wool. Pair each No 8 (4mm) and Buckle for belt. Tension24sts x 34 rows to 4 ins measured over rice stitch. Size mattersActual chest measurement: 34 (36,
38, 40, 42,
44 46) inches
Length to centre back neck: 23 (23¾,
24¼, 25¼, 25¾,
26½, 27) ins
Her sleeve seam: 16 (16½, 16½,
17, 17, 17½,
17½) inches Abbreviations k1tbl: knit through the back of the stitch. A word on the wool.Original yarn was a pure wool superwash yarn. Disclaimer (well...almost)In transposing any pattern it is always a risk that errors will be introduced,
in spite of dedicated proof reading. |
A set of conventional Aran sweaters in a good range of sizes.
Patterns include, twisted cables, lobster claw, diamonds, blackberry or trinity stitch, and double moss stitch.
InstructionsBack:‡ Change to size 7 needles and pattern. 2nd row: [p1, k1] 1 (2, 4, 5, 6, 8, 10, 11, 13) times, * [p4, k1] twice, p2, k2, p2, k6, p2, k2, p2, [k1, p4] twice, * [k1, p1, k1 all into next stitch, p3tog] 3 times; repeat from * to * once, [k1, p1] 1 (2, 4, 5, 6, 8, 10, 11, 13) times. 3rd row: [p1, k1] 1 (2, 4, 5, 6, 8, 10, 11, 13) times, * C4B, p1, C4F, p1, k2, p2, sl2f , p1, k2 from cable needle, p4, sl1b, k2, purl stitch from cable needle, p2, k2, p1, C4B, p1, C4F, *p12; repeat from * to * once, [k1, p1] 1 (2, 4, 5, 6, 8, 10, 11, 13) times. 4th row: [k1, p1] 1 (2, 4, 5, 6, 8, 10, 11, 13) times, * [p4, k1] twice, p2, k3, p2, k4, p2, k3, p2, [k1, p4] twice, * [p3tog, k1, p1, k1 all into next stitch] 3 times; repeat from * to * once, [p1, k1] 1 (2, 4, 5, 6, 8, 10, 11, 13) times. 5th row: [k1, p1] 1 (2, 4, 5, 6, 8, 10, 11, 13) times, * [k4, p1] twice, k2, p3, sl2f , p1, k2 from cable needle, p2, sl1b, k2, purl stitch from cable needle, p3, k2, [p1, k4] twice, * p12; repeat from * to * once, [p1, k1] 1 (2, 4, 5, 6, 8, 10, 11, 13) times. 6th row: [p1, k1] 1 (2, 4, 5, 6, 8, 10, 11, 13) times, * [p4, k1] twice, p2, k4, p2, k2, p2, k4, p2, [k1, p4] twice, * [k1, p1, k1 all into next stitch, p3tog] 3 times; repeat from * to * once, [k1, p1] 1 (2, 4, 5, 6, 8, 10, 11, 13) times. 7th row: [p1, k1] 1 (2, 4, 5, 6, 8, 10, 11, 13) times, * C4B, p1, C4F, p1, k2, p4, sl2f , p1, k2 from cable needle, sl1b, k2, purl stitch from cable needle, p4, k2, p1, C4B, p1, C4F, * p12; repeat from * to * once, [k1, p1] 1 (2, 4, 5, 6, 8, 10, 11, 13) times. 8th row: [k1, p1] 1 (2, 4, 5, 6, 8, 10, 11, 13) times, * [p4, k1] twice, p2, k5, sl2b, p2, p2 from cable needle, k5, p2, [k1, p4] twice, * [p3tog, k1, p1, k1 all into next stitch] 3 times; repeat from * to * once, [p1, k1] 1 (2, 4, 5, 6, 8, 10, 11, 13) times. 9th row: [k1, p1] 1 (2, 4, 5, 6, 8, 10, 11, 13) times, * [k4, p1] twice, k2, p4, sl1b, k2, purl stitch from cable needle, sl2f , p1, k2 from cable needle, p4, k2, [p1, k4] twice, * p12; repeat from * to * once, [p1, k1] 1 (2, 4, 5, 6, 8, 10, 11, 13) times. 10th row: [p1, k1] 1 (2, 4, 5, 6, 8, 10, 11, 13) times, * [p4, k1] twice, p2, k4, p2, k2, p2, k4, p2, [k1, p4] twice, * [k1, p1, k1 all into next stitch, p3tog] 3 times; repeat from * to * once, [k1, p1] 1 (2, 4, 5, 6, 8, 10, 11, 13) times. 11th row: [p1, k1] 1 (2, 4, 5, 6, 8, 10, 11, 13) times, * C4B, p1, C4F, p1, k2, p3, sl1b, k2, purl stitch from cable needle, p2, sl2f, p1, k2 from cable needle, p3, k2, p1, C4B, p1, C4F, * p12; repeat from * to * once, [k1, p1] 1 (2, 4, 5, 6, 8, 10, 11, 13) times. 12th row: [k1, p1] 1 (2, 4, 5, 6, 8, 10, 11, 13) times, * [p4, k1] twice, p2, k3, p2, k4, p2, k3, p2, [k1, p4] twice, * [p3tog, k1, p1, k1 all into next stitch] 3 times; repeat from * to * once, [p1, k1] 1 (2, 4, 5, 6, 8, 10, 11, 13) times. 13th row: [k1, p1] 1 (2, 4, 5, 6, 8, 10, 11, 13) times, * [k4, p1] twice, k2, p2, sl1b, k2, purl stitch from cable needle, p4, sl2f, p1, k2 from cable needle, p2, k2, [p1, k4] twice, * p12; repeat from * to * once, [p1, k1] 1 (2, 4, 5, 6, 8, 10, 11, 13) times. 14th row: [p1, k1] 1 (2, 4, 5, 6, 8, 10, 11, 13) times, * [p4, k1] twice, p2, k2, p2, k6, p2, k2, p2, [k1, p4] twice, * [k1, p1, k1 all into next stitch, p3tog] 3 times; repeat from * to * once, [k1, p1] 1 (2, 4, 5, 6, 8, 10, 11, 13) times. 15th row: [p1, k1] 1 (2, 4, 5, 6, 8, 10, 11, 13) times, * C4B, p1, C4F, p1, k2, p1, sl1b, k2, purl stitch from cable needle, p6, sl2f, p1, k2 from cable needle, p1, k2, p1, C4B, p1, C4F, * p12; repeat from * to * once, [k1, p1] 1 (2, 4, 5, 6, 8, 10, 11, 13) times. 16th row: [k1, p1] 1 (2, 4, 5, 6, 8, 10, 11, 13) times, * [p4, k1] twice, p2, k1, p2, k8, p2, k1, p2, [k1, p4] twice, * [p3tog, k1, p1, k1 all into next stitch] 3 times; repeat from * to * once, [p1, k1] 1 (2, 4, 5, 6, 8, 10, 11, 13) times. These 16 rows form the pattern. Shape Armholes: Continue without further shaping until work measures 7½ (7¾, 8, 8¼, 8½, 8¾, 9, 9¼, 9½) inches from commencement of armhole shaping, ending with a wrong side row. Shape Shoulders: Front:Follow instructions as for the Back, from ‡ to ‡. Continue without further shaping until work measures 5 (5¼, 5½, 5¾, 6, 6¼, 6½, 6¼, 7) inches from commencement of armhole shaping, ending with a wrong side row. Shape Shoulders: Shape Neck: Decrease 1 stitch at the neck edge on the next 8 (8,
8, 9, 9,
9, 9, 9,
10) rows. Shape Shoulders: Slip the centre 16 (16, 18,
18, 18, 20,
20, 22, 22)
stitches on to a spare needle. Sleeves:Using size 10 needles, cast on 42 (44,
46, 48, 50,
52, 54, 56,
58) stitches and work in k1/p1 rib for 2½
inches, ending with a right side row. Change to size 7 needles and pattern.
1st row: [k1, p1] 1 (1, 1, 1, 1, 2, 2, 3, 3) times, k2, p8, [k4, p1] twice, k2, p1, sl2f, p1, k2 from cable needle, p6, sl1b, k2, purl stitch from cable needle, p1, k2, [p1, k4] twice, p8, k2, [p1, k1] 1 (1, 1, 1, 1, 2, 2, 3, 3) times. 2nd row: [p1, k1] 1 (1, 1, 1, 1, 2, 2, 3, 3) times, p2, [k1, p1, k1 all into next stitch, p3tog] twice, [p4, k1] twice, p2, k2, p2, k6, p2, k2, p2, [k1, p4] twice, [k1, p1, k1 all into next stitch, p3tog] twice, p2, [k1, p1] 1 (1, 1, 1, 1, 2, 2, 3, 3) times. 3rd row: [p1, k1] 1 (1, 1, 1, 1, 2, 2, 3, 3) times, k2, p8, C4B, p1, C4F, p1, k2, p2, sl2f , p1, k2 from cable needle, p4, sl1b, k2, purl stitch from cable needle, p2, k2, p1, C4B, p1, C4F, p8, k2, [k1, p1] 1 (1, 1, 1, 1, 2, 2, 3, 3) times. 4th row: [k1, p1] 1 (1, 1, 1, 1, 2, 2, 3, 3) times, p2, [p3tog, k1, p1, k1 all into next stitch] twice, [p4, k1] twice, p2, k3, p2, k4, p2, k3, p2, [k1, p4] twice, [p3tog, k1, p1, k1 all into next stitch] twice, p2, [p1, k1] 1 (1, 1, 1, 1, 2, 2, 3, 3) times. 5th row: [k1, p1] 1 (1,
1, 1, 1,
2, 2, 3,
3) times, k2, p8, [k4, p1] twice, k2, p3,
sl2f , p1, k2 from cable needle, p2, sl1b, k2, purl stitch from cable
needle, p3, k2, [p1, k4] twice, p8, k2, [p1, k1] 1 (1,
1, 1, 1,
2, 2, 3,
3) times. 6th row: [p1, k1] 1 (1, 1, 1, 1, 2, 2, 3, 3) times, p2, [k1, p1, k1 all into next stitch, p3tog] twice, [p4, k1] twice, p2, k4, p2, k2, p2, k4, p2, [k1, p4] twice, [k1, p1, k1 all into next stitch, p3tog] twice, p2, [k1, p1] 1 (1, 1, 1, 1, 2, 2, 3, 3) times. 7th row: [p1, k1] 1 (1, 1, 1, 1, 2, 2, 3, 3) times, k2, p8, C4B, p1, C4F, p1, k2, p4, sl2f , p1, k2 from cable needle, sl1b, k2, purl stitch from cable needle, p4, k2, p1, C4B, p1, C4F, p8, k2, [k1, p1] 1 (1, 1, 1, 1, 2, 2, 3, 3) times. 8th row: [k1, p1] 1 (1, 1, 1, 1, 2, 2, 3, 3) times, p2, [p3tog, k1, p1, k1 all into next stitch] twice, [p4, k1] twice, p2, k5, sl2b, p2, p2 from cable needle, k5, p2, [k1, p4] twice, [p3tog, k1, p1, k1 all into next stitch] twice, p2, [p1, k1] 1 (1, 1, 1, 1, 2, 2, 3, 3) times. 9th row: [k1, p1] 1 (1, 1, 1, 1, 2, 2, 3, 3) times, k2, p8, [k4, p1] twice, k2, p4, sl1b, k2, purl stitch from cable needle, sl2f, p1, k2 from cable needle, p4, k2, [p1, k4] twice, p8, k2, [p1, k1] 1 (1, 1, 1, 1, 2, 2, 3, 3) times. 10th row: [p1, k1] 1 (1, 1, 1, 1, 2, 2, 3, 3) times, p2, [k1, p1, k1 all into next stitch, p3tog] twice, [p4, k1] twice, p2, k4, p2, k2, p2, k4, p2, [k1, p4] twice, [k1, p1, k1 all into next stitch, p3tog] twice, p2, [k1, p1] 1 (1, 1, 1, 1, 2, 2, 3, 3) times. 11th row: [p1, k1] 1 (1, 1, 1, 1, 2, 2, 3, 3) times, k2, p8, C4B, p1, C4F, p1, k2, p3, sl1b, k2, purl stitch from cable needle, p2, sl2f, p1, k2 from cable needle, p3, k2, p1, C4B, p1, C4F, p8, k2, [k1, p1] 1 (1, 1, 1, 1, 2, 2, 3, 3) times. 12th row: [k1, p1] 1 (1, 1, 1, 1, 2, 2, 3, 3) times, p2, [p3tog, k1, p1, k1 all into next stitch] twice, [p4, k1] twice, p2, k3, p2, k4, p2, k3, p2, [k1, p4] twice, [p3tog, k1, p1, k1 all into next stitch] twice, p2, [p1, k1] 1 (1, 1, 1, 1, 2, 2, 3, 3) times. 13th row: [k1, p1] 1 (1, 1, 1, 1, 2, 2, 3, 3) times, k2, p8, [k4, p1] twice, k2, p2, sl1b, k2, purl stitch from cable needle, p4, sl2f, p1, k2 from cable needle, p2, k2, [p1, k4] twice, p8, k2, [p1, k1] 1 (1, 1, 1, 1, 2, 2, 3, 3) times. 14th row: [p1, k1] 1 (1, 1, 1, 1, 2, 2, 3, 3) times, p2, [k1, p1, k1 all into next stitch, p3tog] twice, [p4, k1] twice, p2, k2, p2, k6, p2, k2, p2, [k1, p4] twice, [k1, p1, k1 all into next stitch, p3tog] twice, [k1, p1] 1 (1, 1, 1, 1, 2, 2, 3, 3) times. 15th row: [p1, k1] 1 (1, 1, 1, 1, 2, 2, 3, 3) times, k2, p8, C4B, p1, C4F, p1, k2, p1, sl1b, k2, purl stitch from cable needle, p6, sl2f, p1, k2 from cable needle, p1, k2, p1, C4B, p1, C4F, p8, k2, [k1, p1] 1 (1, 1, 1, 1, 2, 2, 3, 3) times. 16th row: [k1, p1] 1 (1, 1, 1, 1, 2, 2, 3, 3) times, p2, [p3tog, k1, p1, k1 all into next stitch] twice, [p4, k1] twice, p2, k1, p2, k8, p2, k1, p2, [k1, p4] twice, [p3tog, k1, p1, k1 all into next stitch] twice, p2, [p1, k1] 1 (1, 1, 1, 1, 2, 2, 3, 3) times. These 16 rows form the pattern. Increase, and work into the double moss, 1 stitch at each end of the next and every following 10th (9th, 7th, 6th, 6th, 6th, 5th, 6th, 5th) row until there are 72 (74, 78, 80, 84, 88, 92, 94, 98) stitches on the needle. Continue without further shaping until work measures 15 (16, 16½, 17, 17½, 18, 18, 18½, 18½) inches from the beginning, ending with a wrong side row. Shape Top: NeckbandUsing a back stitch, join right shoulder seam. With right side of work facing and using size 10 needles, pick up and
knit 21 (21, 21,
22, 22, 22,
22, 22, 23)
stitches down side of neck, knit across the 16 (16,
18, 18, 18,
20, 20, 22,
22) stitches at centre, pick up and knit
21 (21, 21,
22, 22, 22,
22, 22, 23)
stitches up right side of neck, knit across the 32 (32,
34, 36, 36,
38, 38, 40,
42) stitches on back neck. Work in k1, p1, rib for 2½ inches. To Make UpPin out to correct measurements and press lightly with a warm iron over a damp cloth, omitting ribbing. [Editor's Note: Avoid over-pressing the pattern stitches as this will flatten out cables or other textured stitches - in fact spraying the work with water, pinning out to shape (ie blocking), and leaving to dry naturally can work better than pressing.] Using a back stitch, join side and sleeve seams. |
Materials
|
I love the styling of this photo - the poise of the model, the "clashing" colour combination, the bracelet, and the lovely use of the location which makes the very best of the look of fresh summer rain.
This is a fairly simple pattern where the vertical contrast stripes are made by stranding the unused colour across the back (as opposed to intarsia) and this makes for a slightly more interesting 3D effect, even though they compensate by changing needles and stitch count over the different sections.
Not everyone likes mustard (or yellow...) but I think this sweater looks quite sophisticated as the colours are close on the colour wheel but not really matching. I have a sweater in pink with orange trim which gives a similar effect (less violent than it might sound!). Bear in mind also that mustard can be a difficult shade to pin down - so it could be gold or beige - just make sure it tones perfectly with your pencil skirt....
Instructions. Instructions for larger size is given in brackets. Where one set of
figures is given, this applies to both sizes. Back and Front alikeWith No 10 (3¼mm) needles, cast on 100 (106) stitches and work in k1/p1 rib for 1¼ inches, increasing 14 (16) stitches on the last row by working twice into every 7th (6th) stitch 14 (16) times: [114 (122) sts] ‡‡ 1st row: Using Mustard yarn (M),
* k2, keeping wool at back of work,
slip 2 purlways; rep from * to last
2 stitches, k2. Repeat the last 4 rows 8 times more. Change to No 8 needles and continue in stocking stitch in yarn Y, thus: Next row: * k 7 (8), k2tog; repeat from * to last 6 (2) stitches; k6 (2): [102 (110) sts] Work 13 rows straight in stocking stitch. Join in yarn M, and work horizontal stripes of 2 rows M, 2 rows Y, 2
rows M, 2 rows Y, 2 rows M. Work 13 rows in yarn Y. Next row: * p7 (8), purl twice into next stitch; repeat from * to last 6 (2) stitches, p6 (2): [114 (122) sts] Repeat from ‡‡ to ‡‡ Continue in yarn Y and shape armholes by casting off 5 (6) stitches at the beginning of the next 2 rows, then decrease 1 stitch at each end of the next 6 knit rows: [80 (86) sts] Next row: * p 6 (9), purl twice in the next stitch; repeat from * to last 10 (6) stitches, p 10 (6): [90 (94) sts] Change to No 7 needles, join in M and work the 36 rows of vertical stripes.
Change to No 8 needles. Next row: *
k6 (9), k2tog; repeat from *
to last 10 (6) stitches, k10 (6):
[80 (86) sts] Join in M and work horizontal stripes of 2 rows M, 2 rows Y, 2 rows M,
2 rows Y, 2 rows M. Shape shoulders: by casting off 6 (7)
stitches at the beginning of the next 6 rows. Back and Front alikeMake a second piece for the front exactly as instructions above. SleevesWith No 10 needles and yarn Y, cast on 48 (50) stitches, and work 2½ inches in k1/p1 rib. With right side facing, change to No 8 needles and stocking-stitch, starting with a knit row, and shape sides by increasing 1 stitch at each end of the 7th and every following 6th row until there are 70 (72) stitches. Work straight until sleeve seam measures 16½ (16½)
inches. To Make Up Press parts lightly on wrong side under a damp cloth, avoiding ribbing.
|
Materials
|
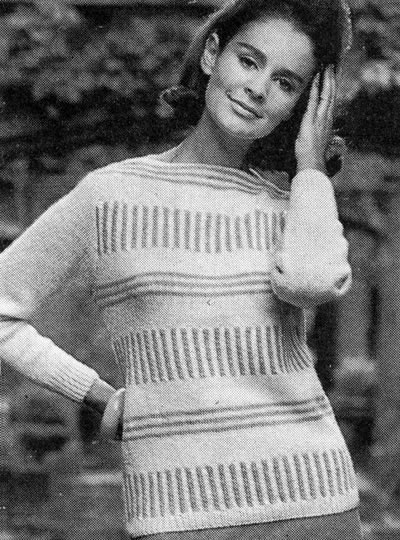
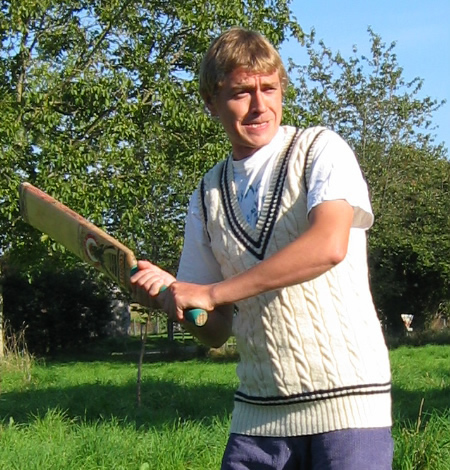
Anyone for cricket?
I made this as a slipover for a long, lean, and lanky chap; it is based on the pattern given but I adapted it to use some Guernsey yarn instead of DK (by knitting a bigger size and making it much longer to fit the chap - seemed like the body was never-ending!).
The instructions are for a full sweater pattern as well as the slipover.
Instructions.The sweater is worked in a good range of sizes, intended to cover kids
and men, but could also fit women, making suitable length adjustments
in body and sleeve. Instructions for the larger sizes are shown in brackets.
Sweater BackWith No 10 (3¼mm) needles and main shade, cast on 77, 83, 89, 95, 99, 105, 111, 117, 121, 127 stitches. ** If not including contrast colours, Repeat 1st and 2nd rows 10 times then the 1st row again, and continue below with 24th (increase) row. If including contrast colours, repeat 1st and 2nd rows once. Change to No 8 (4mm) needles and proceed as follows:- For three smallest sizes only (28, 30 and 32 inch chest): *** For the medium-small sizes only (34, and 36 inch chest): *** For the three medium-large sizes only (38, 40 and 42 inch chest): *** For two largest sizes only (44 and 46 inch chest): *** FOR ALL 10 sizes Under each separate section for the size you are working, the instructions embedded between *** to *** forms the pattern. Keeping continuity of pattern (throughout) continue until work measures 11½ (13, 14, 13½, 15½, 15½, 15½, 15½, 15, 16) inches from the beginning, ending on a wrong side row. Shape armholes: **** Continue without shaping until armhole measures 7½ (8, 8, 8½, 10½, 10½, 10½, 10½, 11, 11) inches, ending on the wrong side. Shape shoulders: Cast off remaining 33 (37, 37, 37, 37, 43, 43, 43, 43, 47) stitches in pattern. Sweater FrontWork exactly as given for back until **** is reached in the armhole shaping section. Divide for neck: Working on these 47 (51, 54, 58, 62, 67, 71, 74, 78, 82) stitches only, proceed as follows: Next row: pattern to last 2 stitches,
p2tog. Work 7 (9, 11,
13, 5, 11,
15, 16, 13,
21) rows, decreasing once at the armhole edge on every row, and
at the same time decreasing at the neck edge on the next
and every alternate row. For one medium and the two largest sizes only (36, 44 and 46 inch chest): Work - (-, -,
-, 3, -,
-, -, 7,
1) rows, decreasing once at the armhole edge in every row, at
the same time decreasing once at the neck edge on the - (-,
-, -, 0,
-, -, -,
4th, 0) row. For the smallest and other large sizes only (28, 30, 32, 34, 38, 40, 42 inch chest): Work 12 (14, 12,
6, -, 6,
2, 1, -,
-) rows, decreasing once at the neck edge only on every following
2nd (2nd, 2nd,
2nd, -, 2nd,
2nd, 1st, -,
-) row. FOR ALL 10 sizes Work 20 (20, 20,
28, 53, 44,
44, 44, 45,
43) rows, decreasing once at the neck edge only on the 4th (4th,
4th, 4th, 1st,
4th, 4th, 4th,
1st, 3rd), and every following 4th
row. Continue without shaping until armhole measures same as Back to "Shape Shoulders" section, ending on wrong side row. Shape shoulders: Work the other half of the front to match the first as follows: With right side facing, slip the first stitch of the the remaining stitches
on to a safety pin (this is the centre stitch). Next row: k2tog, pattern to last
2 stitches, k2tog. Work 7 (9, 11,
13, 5, 11,
15, 16, 13,
21) rows, decreasing once at the neck edge on the next and every
alternate row, and at the same time decreasing once at
the armhole edge on every row. For one medium and the two largest sizes only (36, 44 and 46 inch chest): Work - (-, -,
-, 3, -,
-, -, 7,
1) rows, decreasing once at the neck edge on the - (-,
-, -, 0,
-, -, -,
4th, 0) row, at the same
time decreasing once at the armhole edge on every row. For the smallest and other large sizes only (28, 30, 32, 34, 38, 40, 42 inch chest): Work 12 (14, 12,
6, -, 6,
2, 1, -,
-) rows, decreasing once at the neck edge only on every following
2nd (2nd, 2nd,
2nd, -, 2nd,
2nd, 1st, -,
-) row. FOR ALL 10 sizes Work 20 (20, 20,
28, 53, 44,
44, 44, 45,
43) rows, decreasing once at the neck edge only on the 4th (4th,
4th, 4th, 1st,
4th, 4th, 4th,
1st, 3rd), and every following 4th
row. Continue without shaping until armhole measures same as Back to "Shape Shoulders" section ending on right side. Shape shoulders: Sweater Sleeves (both alike)With No 10 needles and main shade, cast on 43 (43, 45, 45, 55, 55, 59, 59, 59, 61) stitches. Work from ** to ** as given for Back. 24th (increase) row: p6 (6,
8, 8, 11,
11, 11, 11,
11, 13); *
increase once in the next stitch purlwise; repeat from *
to the last 7 (7, 9,
9, 12, 12,
12, 12, 12,
14) stitches: p7 (7, 9,
9, 12, 12,
12, 12, 12,
14). Change to No 8 (4mm) needles and using main shade throughout proceed in pattern as give for 1st (1st, 1st, 1st, 3rd, 3rd, 9th, 9th, 9th, 9th) size of Back and at the same time, increasing once at each end of the 1st (1st, 1st, 1st, 3rd, 3rd, 9th, 9th, 9th, 9th) and every following 1st (1st, 1st, 1st, 3rd, 3rd, 9th, 9th, 9th, 9th) row until there are 87 (81, 89, 81, 117, 117, 107, 107, 125, 125) stitches, working the increased stitches into the pattern. For all sizes EXCEPT the smallest only (30, 32, 34, 36, 38, 40, 42, 44, 46 inch chest): Increase once at each end of the following - (6th, 6th, 6th, 4th, 4th, 6th, 6th, 4th, 4th) row, until there are 87 (95, 95, 101, 129, 129, 129, 129, 137, 137) stitches, working the increased stitches into the pattern. FOR ALL 10 sizes Continue without shaping until sleeve measures 14½ (15½, 16½, 17, 20, 20, 20, 20, 20, 20) inches, ending on the wrong side. Shape Sleeve Top Work 20 (20, 20,
24, 36, 36,
32, 32, 36,
36) rows, casting off 2 stitches at the beginning of every row.
Cast off loosely in pattern. Sweater NeckbandJoin right shoulder seams. If you are including a contrast then proceed as follows, otherwise follow the same instructions using only the main shade. 1st row: Using main shade *
p1, k1, repeat from * to last stitch
pl. Cast off in rib. To Make Up the Sweater Review the yarn ball band for any special washing or pressing instructions.
Slipover Back, Front, and NeckbandWork exactly as given for sweater. Slipover Armbands (alike)Join left shoulder and neckband seams. With right side facing, using No 10 (3¼mm) needles and main shade pick up and knit 101 (107, 107, 113, 135, 135, 135, 135, 141, 141) stitches evenly around the armhole edge. If you are including a contrast then proceed as follows, otherwise follow the same instructions using only the main shade. 1st row: Join in and use contrast,
* p1, k1, repeat from *
to last stitch, p1. Using main shade, repeat 1st and 2nd rows twice. To Make Up the Slipover Review the yarn ball band for any special washing or pressing instructions.
|
MaterialsDouble Knitting yarn in white or ivory. Pair each of No 8 (4mm) and No 10 (3¼mm) needles. Tension29sts and 30 rows to four inches on 4mm needles over pattern.
Size mattersTo fit chest: Abbreviations k: knit A word on the wool.Original yarn was a good quality double knitting woollen blend. Disclaimer
|
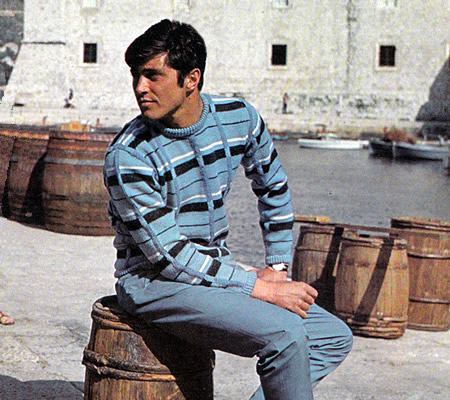
A summer setting with summer colours for this man's sweater in double knitting. Original was knitted in pure wool but there are many cotton blend yarn options in exciting colours that you could use instead.
Perfect for that Indian summer.
Instructions.Sweater is worked in intarsia technique using smaller balls of yarn wound onto bobbins. Instructions are given for 3 sizes. Back** Next row: purl, increasing 6/8/10
stitches evenly across. Change to No 8 needles and winding 5 lengths of contrast B yarn 1st row (right side facing): K10
/ 11 / 12
M; k4 B; * k20 / 21
/ 22 M, k4 B; repeat from *
3 times more, k10 / 11 / 12
M. Repeat 1st and 2nd rows 4 times more, then 1st row again. Join in yarn C, and working with 5 lengths of M yarn on bobbins for stripes, continue thus: 12th row: P10 / 11
/ 12 C; p4 M; *
p20 / 21 / 22
C, p4 M; repeat from * 3 times more,
p10 / 11 / 12
C. Repeat the last 2 rows 3 times more. Join in yarn M, and using 5 bobbins of B yarn for stripes, continue thus: 20th row: as 2nd row. Repeat the last 2 rows once more. Join in yarn W: 24th row: P10 / 11
/ 12 W; p4 B; *
p20 / 21 / 22
W, p4 B; repeat from * 3 times more,
p10 / 11 / 12
W. Break W yarn. Rejoin M, and repeat 2nd then 1st rows in that order 6 times more. Break M yarn. Join in C. 38th row: P10 / 11 / 12 C; p4 B; * p20 / 21 / 22 C, p4 B; repeat from * 3 times more, p10 / 11 / 12 C. Break C yarn. These 38 rows form the pattern. Join in M, and work straight continuing the pattern sequence to the end of the 32nd / 32nd / 36th row of the 3rd pattern. Keeping pattern correct, shape armholes by casting off 5 stitches
at the beginning of the next 2 rows, then decrease 1 stitch at the beginning
of every row until 100 / 104 / 108
stitches remain. Work straight until back measures 25 / 25½
/ 26 inches,
ending with right side facing. Front Work as for back from ** to **
. Shape neck as follows: Next row: K37 / 39 / 41, turn, and leave remaining stitches on a spare needle. Working on first 37 / 39 / 41
stitches, decrease 1 stitch at the neck edge on every row until
32 / 34 / 36
stitches remain. Shape shoulder by casting off 8 stitches at the beginning of the
next and every following alternate row, until 8 / 10
/ 12 stitches remain. With right side facing, slip centre 26 stitches on a stitch-holder, and rejoin yarn to the remaining 37 / 39 / 41 stitches, work to end. Finish to correspond with first side. SleevesWith No 10 needles and main shade (M), cast on 60 stitches, and work 15 rows k1/p1 rib, as for back. Next row: Purl, increasing 2 / 4
/ 6 stitches evenly across the row. Change to No 8 needles and continue in pattern, joining in lengths of yarn B as required. 1st row: K5 M; k4 B; *
k20 / 21 / 22
M, k4 B; repeat from * once more,
k5 M. Repeat 1st and 2nd rows 4 times more, then 1st row again, increasing
1 stitch at each end of next and following 8th row. Join in C. Next row: P5 C; p4 B; *
p20 / 21 / 22
C, p4 B; repeat from * once more,
p5 C. Join in M, and continue in pattern as for back, starting with 1st pattern row, and increasing 1 stitch at each end of every 8th row from last increase until there are 90 / 92 / 94 stitches. Work straight until 7 / 7 / 11 rows have been worked after 3rd W stripe. Keeping pattern correct, shape top by casting off 6 stitches at
the beginning of the next 2 rows, then decrease 1 stitch at the beginning
of every row until 52 / 48 / 52
remain. Now decrease 1 stitch at each end of every row until 20 / 24
/ 24 stitches remain. To Make UpPress parts lightly under a damp cloth, avoiding ribbing. Neck Border: Work 15 rows in twisted rib as given for welt on back. Join left shoulder and neck ribbing. Fold neck ribbing in half to wrong
side and slip-hem lightly in position all round. |
MaterialsDouble Knitting yarn: Pair each of No 8 (4mm) and No 10 (3¼mm) needles. Stitch holders and plastic bobbins Tension22sts and 30 rows to four inches on 4mm needles over stocking stitch.
Size mattersTo fit chest: Abbreviations k: knit A word on the wool.Original yarn was Patons pure wool double knitting Disclaimer
|
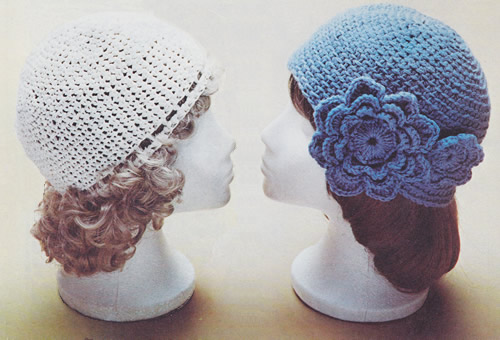
InstructionsNote: Yarn is used double throughout, and the hats are made using
a variation of double crochet: Basic HatMake 3 chain, join in a ring with slip stitch (ss) in 1st chain. Do not join after this round, but carry on working in continuous rounds,
making a spiral. This will be easy if you mark the begninning of the next
Continue in pattern, increasing 6 stitches in every round in this way
until there are 66 stitches. Continue working in rounds of double crochet without shaping for a further 3½ inches (9cm). For the basic hat - fasten off at this point. You can then decorate as required. DaisiesMake one small and one large daisy to sew on the basic hat. You should use a smaller crochet hook (2½ -3mm) and a single strand of the 4ply yarn. Small daisy: Fasten off. Large daisy: Make 11ch. [Editor's note: If you want to create a medium sized flower you can stop here and fasten off - otherwise continue with 2 more rounds.] 6th round: *
5ch, 1ss into back of st on 4th round between next 2 petals, repeat from
* 7 times more, joining last ss into
first of first 5ch. White hatThis hat was made using raffia, using thread single throughout with a
Granny squares hatUsing a No 6 (5mm) crochet hook and double yarn, work crown as given
for basic hat in double crochet pattern until there are 72 stitches. Fasten
off. Make 6 chain. Insert hook from front to back into first chain, yarn round hook and draw loop through chain and loop on hook in one movement. One slip stitch (ss) ss has been worked to join ch into a circle or ring. 1st round: 3ch to count as first
tr, 2tr into circle working under ch, 2ch, work (3tr into circle, 2ch)
3 times. Join with ss to third of first 3ch. 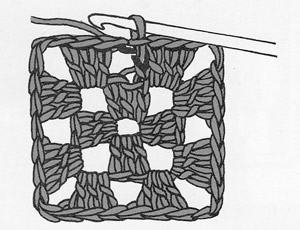
3rd round: 3ch, 2tr into first ch
space to the left of ss join of previous round, 1ch, *
work (3tr, 2ch, 3tr) into 2ch space, 1ch, 3tr into 1ch space, 1ch, repeat
from * twice more, (3tr, 2ch, 3tr)
into last 2ch space, 1ch. Join with ss to third of first 3ch. You can work the square in a single colour or in multiple different colours, fastening off one colour and starting another at the end of each round. Join the 6 squares into a circle. With main colour work 72 dc along To Make UpSew in ends and embellish as desired referring to the photos: - sew daisies to hat, or, |
Materials
|
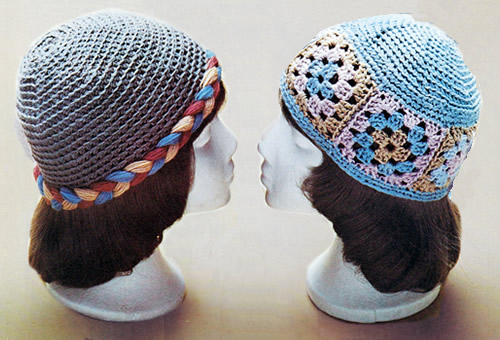
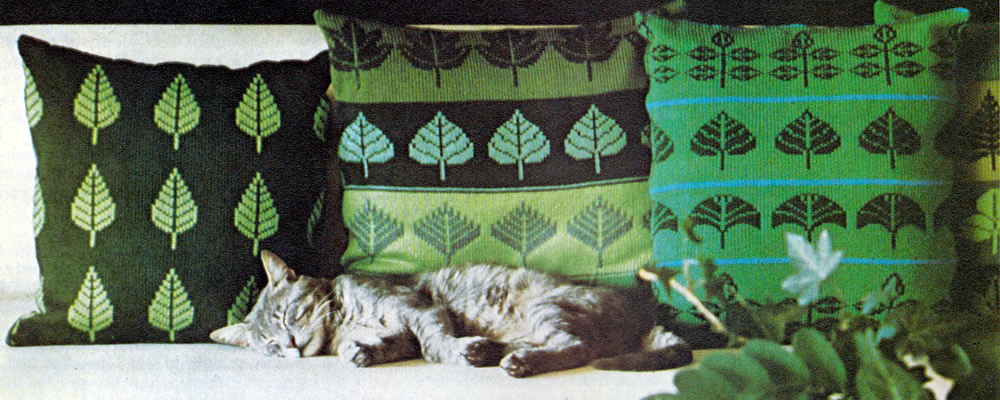
Simple yet effective cushions using stylised leaf motifs.
Cushions can be an opportunity to really give full rein to your creative side with little investment risk - in either time or materials. If (like me) you feel you lack a natural artistic streak of your own, you can find inspiration almost anywhere. Any small motifs from embroidery sources can be used for knitting - but make sure you check the tension you need to aim at as it will dictate the resulting size of the cushion.
Instructions.These cushions are created using a limited colour palette and an intarsia technique. Only two colours are used where the motifs are worked, which is a good idea to start with - both stylistically and technically. Assuming you are familiar with the idea of working from charts, as usual, the charts show the right, or knitted, side of the work, reading knit rows from right to left; every alternate row worked in purl and read from left to right. The yarn not in use is carried loosely across the back of the fabric all the time, so it will be taken behind the stitches on a knitted row and in front of them on a purled row. Ideally you need to keep within a maximum of about five or six stitches
in each colour so that you don't have to carry the yarn not in use across
too many stitches at the back of the work. It is feasible to carry the
yarn across a greater number of stitches as long as you don't pull the
yarn so tightly that it puckers your work. The completed size of a motif, (and the entire design), will depend on the tension at which you are working. For example: with a tension of 20 stitches and 28 rows to 4 inches (10 cm), a motif worked over 15 stitches and 21 rows will form a square measuring 3 inches (7.5cm) by 3 inches (7.5cm). So you can do some simple working out to adapt any motifs to a design measuring the size you want. If you are not so familiar with working from charts, this might be a good project to start out with. For consistency, the charts show each motif on a 23 stitch grid; the actual pattern repeat across the cushion is 24 stitches: each set of stitches on the chart is separated by one background stitch. The overall spacing or layout of the motifs is given by a written set-up row for each cushion, which is the first row on the charts.
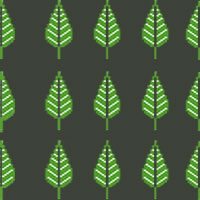 Cushion 1Worked in two colours with the same motif repeated evenly all over the cushion. Using No 9 (3¾mm) needles and main shade (A), cast on 99 stitches, and work in stocking stitch throughout. Work 4 rows in main shade (A). Next row: k1 stitch in A, k1 stitch in B, (k23 stitches in A, k1 stitch in B) 4 times finishing the row with k1 stitch in A. 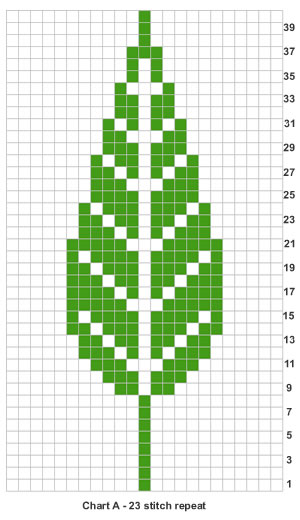 There is half a leaf at each end of the row, plus an extra stitch at each end of the work which will be used for seaming. So now continue in pattern from the chart, starting with the seam stitch followed by the centre stitch of the leaf. The overall pattern repeat is 24 stitches, 13 stitches for the leaf and 11 stitches between the leaves at the widest point. Work the 40 pattern rows, followed by 8 rows in A only, twice, then work
the 40 row pattern again followed by 4 rows in A.
 Cushion 2Worked in 8 colours with stripes of colour and repeated motifs in 8 colours (A-H). Using No 9 (3¾mm) needles and main shade (A), cast on 121 stitches, and work in stocking stitch throughout. Work 2 rows using A, 1 row using B and 4 rows using A. Motif stripe 1: Next row: p12 stitches in A, (p1 stitch in B, p23 stitches in A) 4 times finishing the row with p1 stitch in B, p12 stiches in A. 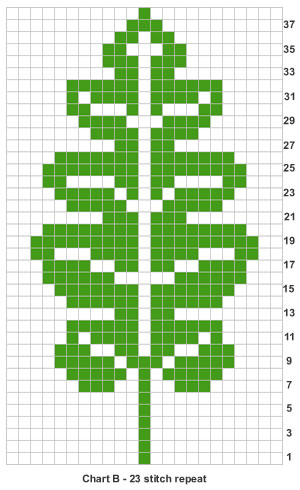 Continue working from the Chart B until 38 rows have been completed. Work plain stripes of 4 rows in A, 1 row in C, 1 row in D, and 4 rows in C. Motif stripe 2: Next row: p12 stitches in C, (p1 stitch in D, p23 stitches in C) 4 times finishing the row with p1 stitch in D, p12 stiches in C. 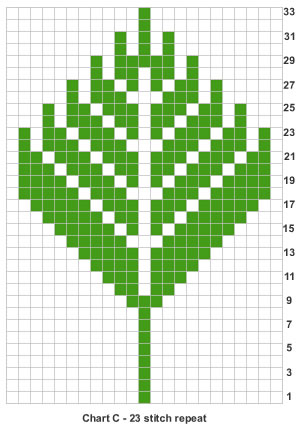 Continue working from Chart C until 33 rows have been completed. Work plain stripes of 4 rows in C, 1 row in E, 1 row in F, and 4 rows in E. Motif stripe 3: Next row: k12 stitches in E, (k1 stitch in F, k23 stitches in E) 4 times finishing the row with k1 stitch in F, k12 stiches in E. 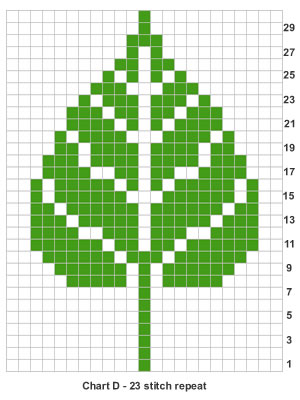 Continue working from Chart D until 30 rows have been completed. Work plain stripes of 4 rows in E, 1 row in H, 1 row in E, and 4 rows in G. Motif stripe 4: Next row: k12 stitches in G, (k1 stitch in H, k23 stitches in G) 4 times finishing the row with k1 stitch in H, k12 stiches in G. 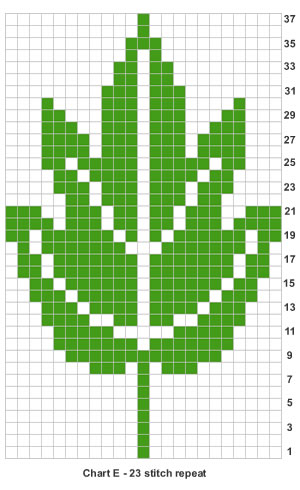 Continue working from Chart E until 37 rows have been completed. Finally, work plain stripes of 4 rows in G, 1 row in H, 2 rows G.
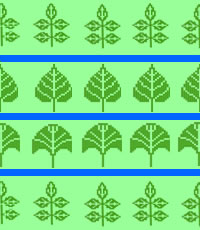 Cushion 3Worked in three colours (A-C) with different motifs repeated in bands across the cushion; the background and motif colours are constant, and the motif bands are separated by thin stripes of the third colour. Using No 9 (3¾mm) needles and contrast colour C, cast on 99 stitches, and work in stocking stitch throughout. Work 2 rows in contrast C, 4 rows in main shade A. Motif stripe 1: Next row: k2 stitches in B, (k23 stitches in A, k1 stitch in B) 4 times finishing the row with k1 stitch in B. 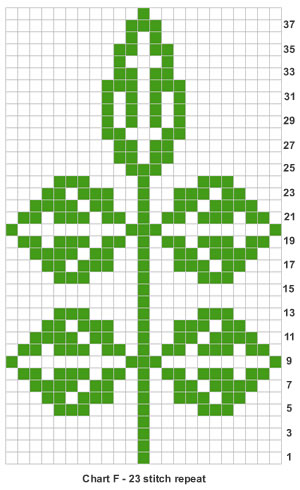 Here again there is half a leaf at each end of the cushion, so the pattern has been set to start with the centre stitch of a leaf, plus the seaming stitch at each end of the row. Continue working from the Chart F until 38 rows have been completed. Work plain stripes of 4 rows in A, 2 rows in C, and 4 rows in A. Motif stripe 2: Next row: k2 stitches in B, (k23 stitches in A, k1 stitch in B) 4 times finishing the row with k1 stitch in B. 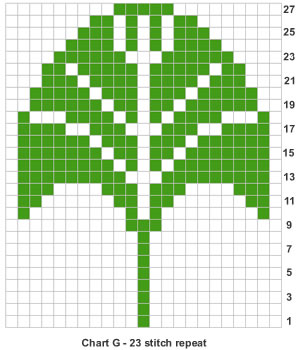 Again there is half a leaf at each end of the cushion, so the pattern has been set to start with the centre stitch of a leaf, plus the seaming stitch at each end of the row. Continue working from the Chart G until the 27 rows of the pattern have been completed. Work plain stripes of 4 rows in A, 2 rows in C, and 4 rows in A. Motif stripe 3: Next row: p2 stitches in B, (p23 stitches in A, p1 stitch in B) 4 times finishing the row with p1 stitch in B. Continue working from the Chart D until the 30 rows of the pattern have been completed. Work plain stripes of 4 rows in A, 2 rows in C, and 4 rows in A. Motif stripe 4: Next row: p2 stitches in B, (p23 stitches in A, p1 stitch in B) 4 times finishing the row with p1 stitch in B. Just as before, there is half a leaf at each end of the cushion, so the pattern has been set to start with the centre stitch of a leaf, plus the seaming stitch at each end of the row. Continue working from the Chart F until 38 rows have been completed. Work plain stripes of 4 rows in A, and 2 rows in C. Making upAll the cushions are made up of two identical pieces. |
Materials
|
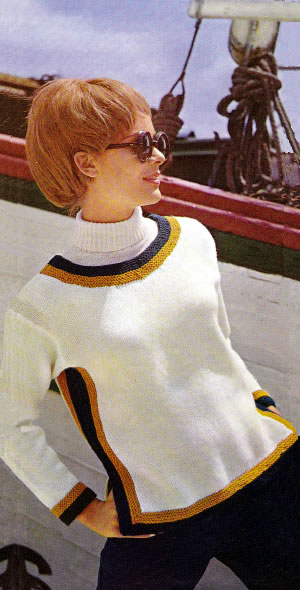
I admit that including the word "tabard" in the description of a pattern is not so inspiring - for one such as I anyway, a teenager in an era where tabards were ubiquitous and possibly naff even then. However it was named prior to that time and is after all merely descriptive - and I love this pullover. Styled perfectly as shown, worn over a polo-neck - very glamorous, very European, very sixties.
Sail away on a windy day in this attractive tabard style overpull. Jaunty and gay in snug and wind-proof yarn -- heavier than double-knit, yet so light and crisp in feeling. Gold and dark blue colour bands stripe the lower edges and smart side slits, and note the special crew neckline, designed to slip easily over a polo sweater.
Instructions.Instructions for three sizes with larger sizes given in bold or colour
between slashes. The pattern is in three colours - White is represented by W, Gold by G and Navy Blue by B. Back and Front alike (knit 2)With No 7 needles and white yarn W, cast on 76/82/88 stitches and work straight in stocking stitch until piece measures 17/17/17½ ins, ending with a purl row. Shape neck: Continue straight until work measures 21 /21
/21½ inches, ending with a purl row.
SleevesWith No 8 needles and blue yarn B, cast on 46/46/48
stitches, and work 8 rows in garter-stitch, (every row knit). Break off
B. Work straight until sleeve seam measures 18½/18½/19
inches.
Cast off loosely using a larger needle. BordersFront Neck: With right side facing, using yarn G, and No 8 needles, pick up and knit 30/30/30 stitches round left side of neck, knit 16/18/20 from stitch-holder, pick up and knit 30/30/30 stitches round right side. {76/78/80 sts} Next row: knit. Back Neck: Work as for front neck Lower Edge: With right side facing, No 8 needles and G, pick up and knit 76/82/88 stitches along lower edge of front. Work 7 rows garter-stitch, increasing 1 stitch at each end of the next
and every alternate row. Join in B, and work 8 rows garter-stitch, increasing stitch at each end
of every alternate row. Side edges:
To Make UpPress parts lightly on wrong side under a damp cloth. |
MaterialsAran or worsted weight yarn: 13/14/15 1oz balls in White and 3 1oz balls in each of Gold and Light Navy Blue. A pair each of Nos 7 (4½mm) and 8 (4mm) needles. Tension20 sts x 25 rows to 4 ins on No 7 (4½mm) needles. Size mattersTo fit chest Abbreviationsstocking stitch: one row knit, one row purl. k2tog or p2tog: work 2 sts together to decrease. A Word on the WoolThe original yarn was Patons Flair - one of those "tripleknit" yarns which never caught on in the UK. More or less Aran or American worsted weight . As usual no clues as to the yardage, but it was 60% wool, 40% courtelle (acrylic). Disclaimer
|
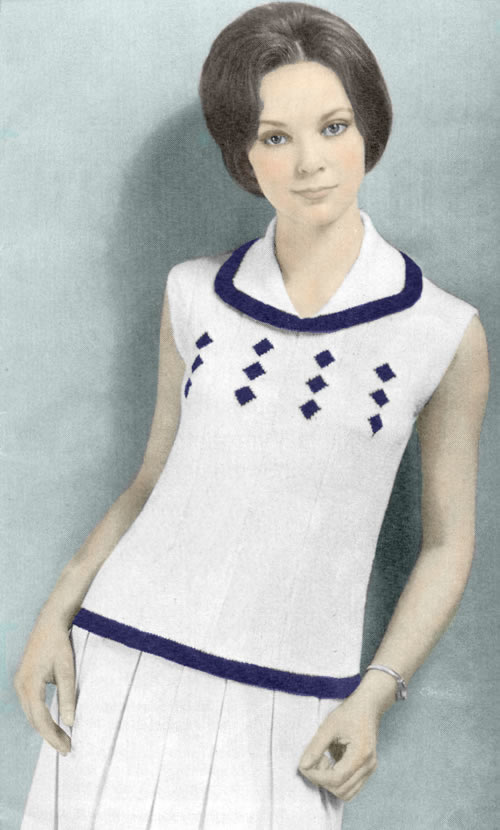
An irresistible summer top in clean cut navy an white.
As well as the understated pattern of navy diamonds, there is a subtle vertical line of patterning within the white body of the top, which draws the eye to emphasise the flattering shape.
Instructions. Instructions for larger sizes are given in brackets. Where one set of
figures is given this applies to all sizes. Back** Next row: Purl. [Editor's note: This row forms a ridge for the hem line.] Work a further 9 rows in stocking stitch starting with a purl row, increasing
2 (6 : 10)
stitches evenly across last row. Break B. With right side facing, change to No 10 needles and yarn W; pattern as follows: 1st row: k14 (18
: 22), *
p2, k21; repeat from * 3 times more,
p2, k14 (18 : 22). These 2 rows form the pattern. With right side facing, shape sides by increasing 1 stitch at each end
of the next and every following 12th row until there are 132 (140
: 148) stitches. Work straight until back measures 14 inches from purl ridge. With right side facing, shape armholes by decreasing 1 stitch
at each end of the next and following 5 (6
: 7) alternate rows. [120 (126
: 132) sts]. With right side facing, shape shoulders by casting off 6 stitches
at the beginning of the next 12 rows, then 5 (7
: 9) stitches at the beginning of the next
2 rows. FrontWork as for back from ** to **.
[132 (140 : 148)
sts] Wind off 4 small balls of yarn B. With right side facing, introduce diamond motifs, joining in a separate ball of B for each diamond. 1st row: k19 (23
: 27) W, p2 W, *
k10 W, join in B and k1 B, k10 W, p2 W; repeat from *
3 times more, k19 (23 : 27)
W. Now keep armhole edge straight but continue working diamond motifs until
3 complete patterns have been done. With right side facing, shape neck as follows: Next row: pattern 58 (61
: 64), k2tog, turn and leave remaining stitches
on a spare needle. With right side facing, shape shoulder by casting off 6 stitches at the beginning of the next and following 5 alternate rows. Next row: in pattern, cast off remaining 5 (7 : 9) stitches. With right side facing, rejoin wool to remaining stitches, k2tog, pattern to end, and finish to correspond with first side. CollarWith No 10 needles and yarn B, cast on 179 (181 : 189) stitches. Next row: k35, knit twice in the
next stitch, k2, knit twice in the next stitch, k101 (103
: 111), knit twice in the next stitch,, k2,
knit twice in the next stitch, k35. Next row: k38, k2tog, k2, k2tog tbl,
k107(109 : 117),
k2tog, k2, k2tog tbl, k38. With right side facing, change to W and continue as follows: Making UpPress parts lightly on wrong side under a damp cloth Turn under the 9 rows of stocking stitch to wrong side up to the purl
hem line all round the lower edge and slip-hem in position. Press all seams and hems. |
Materials
|
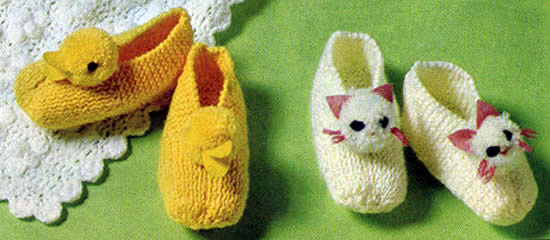
Cute little slippers with ducklings, or kittens.
Easy and quick to knit, with their very effective little pom-pom heads.
[I'm guessing that with a little adaptation you could close in the top of the slippers and stuff them to make tiny duckling toys - if you are feeling adventurous....?!]
InstructionsThere are two sizes with instructions for the second size given in brackets. Both versions:Using either yellow (for duckling) or white (for kitten) and No 9 needles, cast on 20 (26) stitches and work as follows: 1st row (wrong side facing): sl1,
k8(11), p2, k9(12) 2nd size only Both sizes - continue as follows: 1st row: sl1, knit to end. Repeat the last 2 rows until work measures 2½ (3) inches ending with a 1st row. Next row: sl1, {m1, k3}, 2(3)
times, m1, k2, p1, {k2, m1} 3(4) times,
k 2(3), p1, k2, {m1, k3} 2(3)
times, m1, k1. [37(49) sts] Repeat the last 2 rows until work measures 4½ (5½) inches ending with right side facing. Next row: k1, {k2tog} 5(7) times, p1, k1 p1, {k2tog} 1(2) times,rib 5, {k2tog} 1(2) times, p1, k1 p1, {k2tog} 5(7) times, k1. Next row: rib 1(2), {p2tog} 3(4) times, rib 1, {p2tog} twice, rib 1, {p2tog} twice, p1, {p2tog} 3(4) times, rib 1(2). Next row: {k2tog} 3(2) times, {k3tog} 1(3) times, {k2tog} 3 times. [7(8) sts] Break yarn and thread through remaining stitches; draw up tightly and
fasten off securely. Completing the Duckling version:Make 2 pom-poms with remaining yellow yarn, each 1½ inches in diameter.
Trim to neaten and sew one to the front of each slipper. Completing the Kitten version:Make 2 pom-poms with remaining white yarn each 1½ inches in diameter.
Trim to neaten and sew one to the front of each slipper.  |
Materials
|
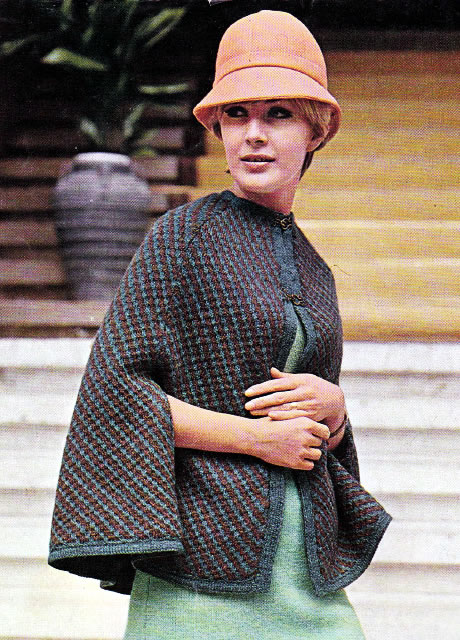
This is an earlier version of a knitted cape and includes a (knitted) lining - so potentially nice and warm. I thought it was a good option to publish alongside the seventies version.
The lining is knitted but if you did not want to commit to all that knitting I think it might be simple enough to cut out the shapes in fabric to create the lining - as long as you choose a material that's not too stiff or thick, although the cape as shown seems to be styled with quite a firm structure.
Of course you could easily knit the cape in a plain stitch instead of the pattern illustrated.
Instructions.Instructions for only one medium size - could be adapted by using a thicker
yarn and bigger needles - but do work out your tension to check the size. Cape section (make 6)With No 7 (4½mm) needles and D, cast on 80 stitches and work in pattern as follows: 1st row (right side facing): in B
k5, * with wool at back, slip 2 purlwise,
k4; repeat from * to last 3 stitches,
slip 2 purlwise, k1. These 12 rows form the pattern. Keeping pattern correct and keeping a knit stitch at each end of every purl row, as before, shape sides by decreasing 1 stitch at each end of the next and every following 10th row, until 46 stitches remain. Now decrease 1 stitch at each end of every following 6th row until 34 stitches remain, then at each end of every 4th row until 20 stitches remain. Work 1 row. Make 5 more sections in same way. Lining section (make 6)With No 10 (3½mm) needles cast on 70 stitches and work 5 rows in stocking stitch, starting with a knit row. Next row: knit. Work a further 5 rows in stocking stitch, starting with a knit row. Change to No 8 (4mm) needles and continue in stocking stitch for a further
38 rows. Make 5 more sections in the same way. To Make Up Use a large tapestry needle and 12 inch lengths of wool for sewing,
Press parts very lightly on wrong side under a damp cloth. Now join one of the 2 remaining sections to one side of cape as follows
(to make armhole slits at the front): Join the lining in the same way, measuring the 4 inches up to the arm
slits from the purl ridge. Pin cape to lining, wrong sides together, lower edge of cape in line
with markers on lining ; tack in position. Right Front Border: With No 10 (3¼mm) needles and D, cast
on 13 stitches. Repeat these 2 rows until strip fits up right front edge when stretched,
ending with right side facing. Next row: cast off 7, knit to end. Slip stitches on a safety pin. Left Front Border: Work as for right border, ending with wrong
side facing. Sew one edge of border in position to cape, from lower edge to 9 inches
below neck, without stretching. Now ease the last 9 inches of the front
edge on to the remainder of the band. Neck Border: With right side of cape facing, No 10 (3¼mm) needles and D, k6 stitches of right border, pick up and knit 14 stitches from the top of each section, k6 border stitches. [96 sts] Work 5 rows stocking stitch, starting with a purl row. Work a further 4 rows in stocking stitch, starting with a purl row. Fold the neck border in half at the ridge, and slip-hem in position to
the lining. Sew on fastenings as in photo. |
Materials
|
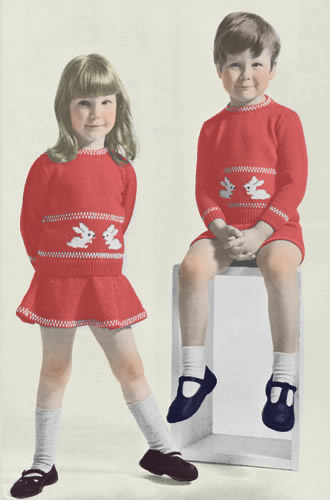
Cute little sweaters with rabbit motifs. Also supplies a pattern for a skirt and little shorts.
"Small girls and boys will love these Bunny Rabbit sets. Hers has a cute flared skirt, and his, neat little trousers. We knitted them in vivid red and white for tough wear."
Instructions.Instructions for one size given for jumper, cardigan, shorts, and skirt. JumperFront** [Editor's note: I used to work twisted rib a little differently to the one described here. I would knit into the back of the knit stitches on right side rows, and purl into the back of the purl stitches on wrong side rows. This leads to very rigidly defined columns of knit stitches on the right side. It looks very attractive but it is less elastic than normal ribbing. ] Change to No 10 (3¼mm). Next row: Knit. Change to No 9 (3¾mm) and, joining in contrast white (W), work the two clour pattern rows 1-4 as follows: 1st row (right side facing): Knit:
* 1R, 1W; repeat from *
to end. Change back to No 10 (3¼mm) needles and work 4 rows stocking-stitch
in R, starting with a knit row. [Editor's note: You might need a second bobbin of red here - if you read later on they suggest you work with 3 bobbins as above and two balls of red - it depends which you find easier..] Continue in stocking-stitch working from chart
over the centre 44 stitches, reading odd rows knit from right to left,
and even rows purl from left to right. 1st row (right side facing): Knit
21 R.; work centre 44 stitches from chart thus:
4 R, join in W bobbin, 10 W, join in R bobbin, 16 R, join in 2nd bobbin
W, 10W., join in a second ball R, 4 R; then knit remaining 21 R. With right side facing, continue in R over all stitches and work 4 rows stocking-stitch. Change to No 9 (3¾mm) needles, join in W and work the two-colour pattern rows 1-4 as before. Break W. Change back to No 10 (3¼mm) needles and continue in stocking-stitch in R, until front measures 8½ inches down centre. With right side facing, shape armholes by casting off 4 stitches at the begining of the next 2 rows, then decrease 1 stitch at each end of every row until 66 stitches remain. Work straight until front measures 11½ inches. With right side facing, shape neck: Next row: Knit 26; turn and leave
remaining stitches on a spare needle. Continue on first 26 stitches, decreasing 1 stitch at the neck edge on every row until 16 stitches remain. Work a few rows straight until front measures 13 ins. With right side facing, shape shoulder by casting off 6 stitches at the begining of the next row, then 5 stitches at the begining of the following 2 alternate rows. With right side facing, slip the centre 14 stitches on to a spare needle. BackWork as for front from **
to **
With right side facing, divide for back opening. Next row: Knit 33, turn and leave remaining stitches on a spare needle. Continue on first 33 stitches until back matches front at armhole edge.
With right side facing, rejoin wool to remaining stitches, and finish
to correspond with first side, reversing shapings. SleevesWith No 11 (3mm) needles and main wool (R) cast on 44 stitches and work 11 rows in k1/p1 rib, knitting into the back of each knit stitch on every row to form a twisted rib. Change to No 10 (3¼mm). Next row: Knit, increasing 1 stitch
at each end of the row. Change to No 9 (3¾mm) needles, join in W, and work two-colour pattern rows 1-4 inclusive again. Break W. Change back to No 10 (3¼mm) needles and continue in stocking- stitch
in R, shaping sides by increasing 1 stitch at each end of the next and
every following 6th row until there are 60 stitches. With right side facing, shape top by casting off 4 stitches at the beginning
of the next 2 rows, then decrease 1 stitch at each end of the next and
every alternate row until 32 stitches remain. Neck borderJoin shoulder seams. Working backwards and forwards (not in the round), continue as follows: Change to No 10 (3¼mm) needles and two-colour pattern. 1st row (wrong side facing): Purl:
* 1R, 1W; repeat from *
to end. Change back to No 11 (3mm) needles and work 7 rows stocking stitch in R, starting with a purl row. Cast off loosely using a bigger needle. To Make UpPress parts on wrong side under a damp cloth, avoiding ribbing. Buttonhole Band Join side and sleeve seams; insert sleeves. TrousersRight HalfWith No 11 (3mm) needles and main wool (R), cast on 82 stitches loosely and work 12 rows stocking-stitch, starting with knit row. Make a hem on the next row by folding the work in half, purl side inside,
and knitting 1 stitch from the needle together with 1 stitch from the
cast-on edge all along. With right side facing, shape back as follows using short row shaping: Next 2 rows: K10, turn and purl back.
Work straight until front seam (short edge) measures 8 ins. With right side facing, shape leg by decreasing 1 stitch at each
end of every row until 76 stitches remain. 1st row (right side facing): Knit:
* 1R, 1W; repeat from *
to end. Change to No 11 (3mm) needles and work 9 rows stocking-stitch. Cast off loosely using a bigger needle. Left HalfWork as for right half, reversing back shaping, i.e. having wrong instead
of right side facing. Your first two rows will read :- To Make UpPress parts lightly on wrong side under a damp cloth. SkirtBack and front alikeWith No 11 (3mm) needles and R wool, cast on 154 stitches loosely, and
work 6 rows stocking-stitch, starting with a knit row. Change to No 10 (3¼) needles and join in W. 1st row (right side facing): Knit:
* 1R, 1W; repeat from *
to end. Change back to No 11 (3mm) needles. Next row: Knit. Make a hem on next row by folding work in half, purl side inside, and knitting 1 stitch from needle together with 1 st. from cast-on edge all along. Next row: Purl, increasing 1 stitch at each end of the row. [155 sts] With right side facing, shape as follows: Next row (1st decrease row): K14,
(slip 1, k2tog, pass slipped stitch over, k28) 4 times, slip 1, k2tog,
pass slipped stitch over, k14. [145 sts] Next row (2nd decrease row): K13,
(slip 1, k2tog, pass slipped stitch over, k26) 4 times, slip 1, k2tog,
pass slipped stitch over, k13. [135 sts] Continue decreasing 10 stitches thus on next and every following 12th
row until 6th decrease row has been worked, and 95 stitches remain. Now shape skirt by decreasing 10 stitches as before but on on next and
following 6th row [75 sts]. Change to k1/p1 rib and work 1 inch, knitting into the back of each knit
stitch on every row to form a twisted rib. To Make UpPress work lightly on wrong side under a damp cloth, avoiding ribbing
at waistband. |
Materials
|
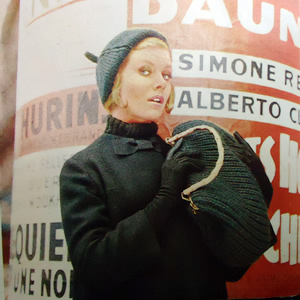
Elegantly modelled on location in the Boulevard des Capucines for Paris in Focus showing "hand knits from Paris: top fashion to knit in bulky wool"
InstructionsThe bag is knitted in a variation on fisherman's rib, or brioche stitch, while the beret is plain. BeretCast on 72 stitches and work 2½ ins. k1, p1 rib, working into the back of every stitch to give a twisted rib. Shape crown as follows: 1st row:
* k8, increase 1 by picking up horizontal
thread lying before next stitch and knitting into back of it; repeat from
* last 8 stitches, k8. [80 sts] 8th row:
(k1, p1, increase 1 by picking up horizontal thread lying before next
stitch and purling into back of it, p13, increase 1 as before, p1) 5 times:
90 stitches 15th row:
(k2togtbl, k13, k2tog, p1) 5 times. 20th row:
(k1, p15) 5 times. Continue decreasing 2 stitches thus in each stocking-stitch panel until
20 stitches remain. Break wool, thread through remaining stitches, draw up and fasten off. Stalk: Cast on 7 stitches and work 4 rows stocking-stitch; cast
off. Making up - beretPress beret lightly on wrong side under a damp cloth, avoiding ribbing.
Bag Sides (make two)Starting at base edge, cast on 60 stitches and work 1 row k1, p1 rib. Change to fancy rib pattern as follows:- Next Row: slip 1 knitwise, *
p1, knit into next stitch but through loop of row below at the same time
slipping stitch above off needle; repeat from *
to last stitch, p1. Repeat this row until piece measures 10 ins. Make another piece the same. Base:Cast on 14 stitches and work in rib pattern exactly as for main part
until piece measures 12 ins, slightly stretched. Making up - bagMake a hem across each piece of main part by folding over narrow piece
at top to wrong side. |
MaterialsBeret: 2 hanks Patons Big Ben Knitting. One pair of number 4 (6mm) needles. Lining material for bag approximately 21 inches square. Cardboard or stiffening for base 12x3½ inches; 9½
inch bag frame. TensionEquivalent to a basic tension of 15 stitches to 4 inches in stocking-stitch on No 4 needles. Size mattersBeret: average size. Abbreviationsk2tog: decrease by knitting 2 sts together. k2togtbl: decrease by knitting 2 sts together through back loops, sometimes called ssk (slip 1 knitwise, slip 1 knitwise, place 2 sts back on left needle and knit 2 slipped sts together through back loops). A Word on the WoolI don't know the size of the Big Ben hanks, but I am guessing they were at least 2oz (around 50g). My experience with chunky weight yarn bags leads me to guess that at least 6 50g balls might be required. Disclaimer
|
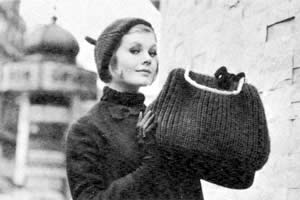
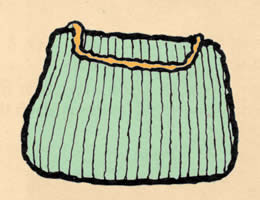
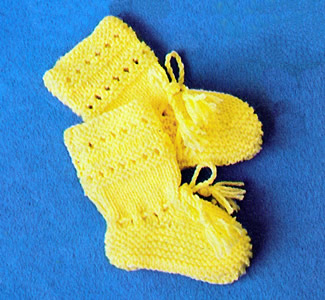
Well - it's so much talked about I could not let it pass without a little commemoration could I?
Just make sure you make them for your own special baby - I am sure the Palace is exploding with little woolly items (and in one of the hottest month's on record...).
This is the knitted set which is fairly plain with a discreet eyelet pattern, and should be quite simple to make.
Bootees (make 2)With No 10 needles, cast on 33 sts. and knit 1 row. 1st - 4th rows: Knit. Repeat the last 2 rows 4 times more. Next row: as 5th row. Work 14 rows in stocking stitch on these 13 sts. Rejoin yarn to inside edge of 10 sts, then knit up 10 sts along side
of foot; knit across 13 sts on needle, knit up 10 sts from other side
of foot, finally knit across remaining 10 sts. [53 sts] Shape toe: 1st row: (k1, k2tog, k21, k2tog)
twice; k1. Cast off. Make UpPress lightly on wrong side. Join seam. |
Materials
|
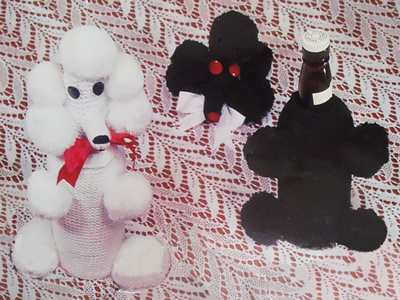
How very 1950s! How very French!.
How could I resist?
At first glance I assumed this was the more usual toilet roll cover (because nobody wants their spare toilet rolls exposed to the world do they?) - but no! It is a "bottle" cover. How much better to have a knitted poodle gracing the dining table rather than leaving your Castle Lafite Rothschild labels tastelessly speaking for themselves. [Actually I think it looks like it's designed for the sherry bottle - perhaps to hide the little nip you need to get through the housework.]
Alternatively you can wimp out and knit it as a toy - provided your child is also into retro 1950s toys, (did I mention that as a kid my favourite toy was a poodle ? ... he wasn't knitted though ..... Pom Pom .... ‹closes eyes in reminiscence›)
[Please note: This has not been knitted up to test the pattern but is provided as per the original. The shapes are very simple and the main effort is in the making up.]
Instructions.The poodle is knitted mainly in garter stitch with some eyelet rows to
carry elastic and drawstring. I think the two methods of assembly have
not been quite thought through in the original pattern, so you need to
use your common sense and refer to the picture when sewing it together. BodyWith No 8 needles cast on 49 stitches, and knit 2 rows. Next row: * k1, wf, k2tog; repeat from * to last stitch, k1. Continue in garter stitch (every row knit) until work measures 7½ inches from the beginning. Next row: *
k5, k2tog; repeat from * to end. [42 sts] Next row: *
k4, k2tog; repeat from * to end. [35 sts] Next row: *
k3, k2tog; repeat from * to end. [28 sts] Next row: *
k2, k2tog; repeat from * to end. [21 sts] Next row: K1; *
k2tog; repeat from * to end. [11 sts] Thread wool through remaining stitches, draw up and fasten off securely. [Editor's note: I think there is a bit of an implied error here - this is the neck, so only draw up to the degree that the neck of the bottle will fit...] HeadCast on 49 stitches, and knit 3 rows. Next row: *
k5, k2tog; repeat from * to end. [42 sts] Next row: * k1, wf, k2tog; repeat from * to last stitch, k1. Continue without any shaping for 3 inches. Next row: *
k2tog; repeat from * to end. [14 sts] Thread wool through remaining stitches, draw up and fasten off securely. NoseCast on 12 stitches, and work 1½ inches in garter stitch. Next row: *
k1, k2tog; repeat from * to end. [8 sts] Thread wool through remaining stitches, draw up and fasten off securely. Pom-PomsMake 8 pom-poms, 2½ inches in diameter. Cut 2 pieces of cardboard the diameter of the finished pom-pom; cut a ½ inch diameter hole in the centre. Wind wool over the rings until the centre hole is filled. With a sharp pair of scissors, cut through the wool at the outer edge. With double wool, bind round the centre of the pom-pom between the two pieces of cardboard; tie a knot and fasten off securely. Remove the cardboard. Fluff out and trim. To Make UpJoin back seam. Take 4 strands of light coloured wool and thread through holes at neck
and secure with a small knot. Tie in a bow. To Make Up the Poodle as a ToyFollow the instructions for the Bottle Cover. [Editor's note: After this there are a few inconsistencies which you need to work out as you go.] Assemble as the bottle cover. Insert a circle of cardboard 3 inches in diameter into the bottom of
the body. Make a roll of stuffing 13 inches long and insert this into
the base firmly, leaving excess sticking out for the head to fit over. Fluff out the stuffing slightly and fit head over it; pull down and stitch
over body. |
Materials
|
How to make pom-poms.
This is a different method which I ran across while looking for the simple tutorial above. It's less relevent for making our Poodle maybe but good if you want to make a load of these for a scarf or a necklace (ok - bit dated perhaps - think of your own project!)
|
|
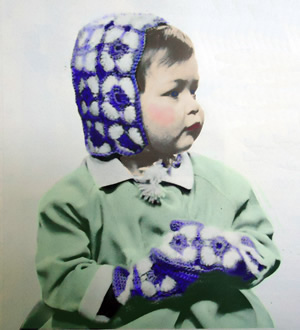
This looks like a little Victorian cherub, though the pattern is much later. It uses a combination of smooth and fluffy 4 ply yarns in a relatively simple crochet motif.
I think the bonnet is particularly cute.
Instructions:The items are made by piecing together a basic motif: Using blue colour (B), make 8 chain and join into a ring with a slip
stitch. Bonnet:Make 14 motifs the same and join together as shown in diagram.
Back of bonnet: 1st row: 1 dc into 2nd ch from hook,
1 dc into each of next 27 ch Continue in dc increasing 1 stitch at each end of every 4th row until
there are 36 dc. Making up the Bonnet: Pin one edge of front piece up sides and all round top edge of back piece.
With right side of work facing and B, crochet the 2 pieces together but
working 4 dc into edge of back piece only between motifs Fasten off. Mitts:Starting with the front of the mitts: Using B, make 21 ch Now work the back of the mitts: Work 2 motifs as given for bonnet and join together as before. With right side of motifs facing, start in corner and work along one
long edge as follows:- Turn and work 9th and 10th rows as given for front of mitt. Thumb: Using B, make 2 ch. Join thumb seam from top down as far as marker. Making up the mitts: Make another mitt in the same way but inserting thumb on opposite side
to first mitt when making up. |
Materials2 ozs 4 ply, in Powder Blue and One No 12 (2¾mm) crochet hook. TensionEach motif measures about 2 inches square. 6½ dc to an inch over
plain dc. Size mattersBonnet: All round front edge measures 15½ inches. Crochet abbreviations:ch: chain [Editor's note: Remember these are English crochet instructions where dc is equivalent to US single crochet - see "Terminology" in the side bar.] A word on the wool.Original yarn was Patons Beehive 4ply and Fuzzy Wuzzy angora. Disclaimer
|
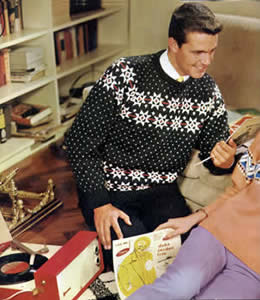
"Carefree and colourful sweater for him uses sparkling motif designs to wear out and about over the week-end when the sun shines"
Carefree it may be.. but a double knitting fair-isle for Spring? That's a novel idea. However, I'm sure "a thick sweater to wear on a wet Spring weekend" is also a suitable maxim, so here we are.
[Editor's note: Here we are indeed.... I wrote this at the end of February - and now on March 11th we have sub-zero temperatures and blizzards raging in the South of England (and the Channel Islands). So this sweater choice.... "just perfick" for March.]
The main picture is a low resolution photo that does not quite show the pattern detail to the full; this is because I just had to include the wonderful backdrop to the sweater with record player and vinyl albums. These cool cats are from the early sixties but are listening to 1950s American jazz. You can see more clearly how the pattern looks in the chart at the end.
InstructionsTwo sizes are given, with the larger size created by using a larger sized
needle. Do check your tension with whatever yarn type you use, as the
fair-isle patterning will tend to make the knitted fabric tighter than
normal. Back:** [Editor's note: The original instructions are written out line by line as reproduced below. I have created a chart which you can see at the end of the pattern.] Change to No 8 (4mm) [7 (4½mm)] needles, join in white (W), and star pattern as follows: 1st row (right side facing):
knit: 1W; * 5C, 1W; repeat from *
to end. Break C and join in Nasturtium Red (N). 8th row: purl: *
5N, 3W, 3N, 3W, 4N; repeat from *
to last stitch, 1N. Repeat rows 7 through to 1 inclusive, in that order. (That is, the reverse
of what you just knitted). Rejoin W and continue as follows:- 19th row: knit: , *
3C, 1W, 2C, repeat from * to last
stitch, 1C Break C and join in N Break N and rejoin C repeat rows 26 - 19 inclusive in that order (that
is, reversed as in previous sequence) Continue in snowflake pattern as follows:- 1st row: purl. Rejoin W Rejoin W Repeat the last 8 rows 5 [4 or 5] times more, then rows 1-5 inclusive again. Shape armholes: Cast off 8 sts. at the beginning of the next 2 rows. Rejoin W. 1st row: k2tog W; knit: 5C,
* 1W, 5C; repeat from *
to last 2 stitches, k2tog W. 8th row: purl: 2N, *
3W, 3N, 3W, 9N; repeat from * to last
11 stitches, 3W, 3N, 3W, 2N. 9th row: k2tog, knit: 1W, *
(1C, 2W) 3 times, 7C, 2W; repeat from *
to last 10 stitches, (1C, 2W) twice, 1C, 1W, k2tog. 16th row: purl. Next row: k2tog W, knit: 5C, *
1W, 5C; repeat from * to
last 2 stitches, k2tog W. Next row: purl. Next row: purl. Keeping continuity of pattern continue decreasing 1 stitch at each end of every alternate row until 47 stitches remain. Pattern back and leave stitches on a spare needle. Front:Work as for back from ** to **. Shape neck: Next row: k2tog, k16, k2tog, turn and leave remaining stitches on a spare needle. Continue in pattern on first 18 stitches, decreasing 1 stitch at each end of every knit row until 2 stitches remain. K2tog and fasten off. With right side facing, return to remaining stitches, slip centre 25 stitches, on a spare needle, rejoin wool to last 20 stitches, k2tog., pattern to last 2 stitches, k2tog. Finish to correspond with first side. Sleeves:With No 10 needles and C, cast on 56 stitches and work 3 inches k1, p1 rib. Next row: *
k2, knit twice in next stitch, repeat from *
to last 2 stitches, k1, knit twice in last stitch. [75 sts] Change to No. 8 [7] needles, join in W and continue in snowflake pattern as follows:- 1st row: knit:
1C, 1W, * 5C, 1W; repeat from *
to last stitch, 1C. 2nd row: purl. 5th row: knit: 5C, *
1W, 5C; repeat from * to end. 6th row: purl. Keeping continuity of pattern increase 1 stitch at each end of the next and every following 6th row until there are 109 stitches. Work straight until 13 complete patterns and 2 rows of 14th have been done from start. Now shape top working as for back from †† to †† : 55 stitches remain. Next row: purl. Keeping continuity of snowflake pattern decrease 1 stitch at each end of every row until 5 stitches remain. Leave these stitches on a spare needle. To Make UpPress parts on wrong side under a damp cloth, avoiding ribbing. Join remaining raglan seam. Press all seams, avoiding ribbing. |
Materials
|
Chart of the first pattern section as given for the Back. This shows the pattern detail not fully visible in the main photo.
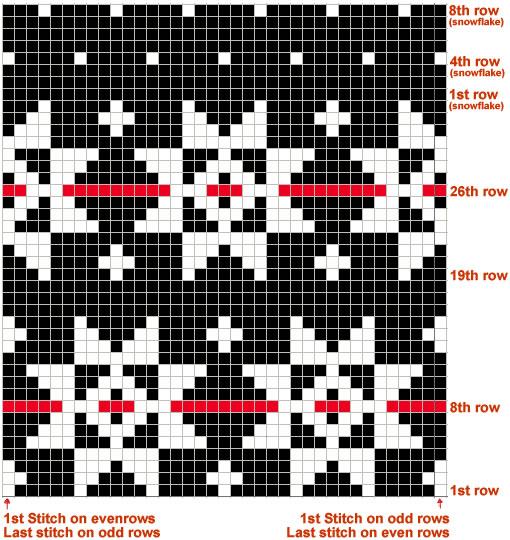
From the original photo I can just make out the records in the foreground - the ones on the sofa behind the models defeat me...

The Duke Jordan Trio look like they are on the turntable (if not our model's companion is bending the vinyl in the sleeve to an ill-advised angle). The album was recorded on January 28th 1954. Tracks are: Jordu, Scotch Blues, Wait And See, Darn That Dream, Embraceable You, Just One Of Those Things, They Can't Take That Away From Me, and, Confirmation.
Next up for consideration (our model is reading the sleeve notes) is "Krupa and Rich" - both drummers - with an eponymous recording from 1956.
Examples of the music can be found on You Tube.
It has to be a Dansette doesn't it?
I have to admit I was totally ignorant about this famous brand until very recently. I can't exactly say they were before my time, as they were manufactured between 1952 and 1969, and we did have a record player in that era which was likely to have been a Dansette, but I cannot remember it well enough to say one way or the other.
As to the model in the picture - it looks a bit like the "Bermuda" shown on this fabulous site, though there are some differences. It seems likely as Julie says: "The Dansette Bermuda is by far the model we have the most of in all colours".
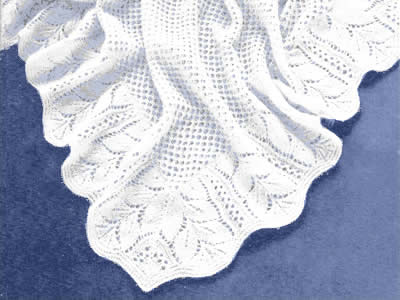
A lace baby shawl made in a 3 ply fingering weight, which makes it a bit more feasible to contemplate as a viable project than the traditional 2 ply, while yet remaining fine and lacey. Added to that, it is made up in sections, rather than a single piece which makes it easier to handle, with all the decreasing lace stitches.
Note added September 2018: since I first transposed this pattern I have had a number of queries so I have recently checked the pattern by knitting it myself from the instructions, and as a consequence corrected some scripting errors (random capital letters and typos), plus I have added the number of stitches after each alternate pattern row on the border pieces. I hope this will help, because despite the fact that the stitches overall are gradually decreasing, on some rows the stitch count increases.
I hope I have caught all the remaining issues, but, as ever, I always welcome anyone sharing any problems they may encounter while knitting it.
InstructionsThe shawl is made in 5 pieces: first a centre square, and then 4 mitred borders that are sewn on each side of the centre. Centre SquareWith No 8 needles, cast on 162 stitches. 1st row: knit. Repeat the last 4 rows until work measures 21 inches. Borders (make 4)With No 9 needles, cast on 206 stitches. 1st row: knit. Repeat 2nd and 3rd rows twice more [200 sts]. Change to pattern as follows:- 1st row: p2tog, p4, k2tog, wrn, p2,
* (k1, wfd) twice, k2, k2tog, p1,
sl1, k1, psso, k1, k2tog, p1, sl1, k1, psso, k1, k2tog, p1, sl1, k1, psso,
k2, (wfd, k1) twice, p2, k2tog, wrn, p2; repeat from *
5 times more, p2, p2tog. [186 sts] Cast off 162 stitches. Make 3 more pieces the same. To Make UpPin parts out and press very lightly under a damp cloth (so not to flatten the pattern stitches too much). |
Materials
|
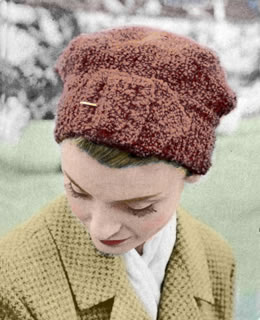
Charming retro hat with decorative band and buckle.
I learned from the Debbie Bliss Magazine Autumn/Winter 2012 that one of my favourite designers, Louisa Harding, has been facing up, with her husband, to his challenge of being treated for lymphoma. In appreciation for the help of Macmillan nurses, Louisa is taking part in Macmillan's Nepal Hiking Challenge and seems well on her way to raising her goal of £5000.
To help achieve the target She has put together a series of seven knitting patterns called 'Himalayan Hiking Hats'. She will have her photo taken wearing each one of the hats on the first 6 days of the trek. The seventh hat pattern in the series will be knitted 'en route' and photographed on the 7th (last) trekking day.
Download the hat patterns from her site and show your support by sending a donation.
Instructions.The main hat is knitted in reverse stocking stitch, with the band in garter stitch. The design is intended for a textured yarn. CrownUsing the 5 No 10 needles, cast on 8 stitches, placing 2 stitches on each of 4 needles. 1st (and every alternate) round:
purl 6th round: *
k2, knit twice in next stitch; repeat from *
all round. [32 sts] Continue increasing 8 stitches thus on every alternate round until there
are 36 stitches on each needle. [144 stitches] Next round: *
k16, k2tog; repeat from * all round.
[136 sts] Cast off. BandCast on 16 stitches, and work a strip in garter-stitch (every row knit)
22 inches long - or length required to fit round head with 3 inches to
spare. Now decrease 1 stitch at each end of the next and every alternate
row until 2 stitches remain; k2tog and fasten off. This forms a point. Stitch the cast-on edge of the band to the buckle, then slot the shaped end through the buckle pulling it through until the band fits round the head snugly. To Make UpPin band in position evenly all round crown noting that the purl side
of the crown is the right side. |
Materials
|
A word on the wool.Patons Rimple was a softly textured bouclé yarn, (97% wool, 3% nylon), which knitted to a double knitting tension. This hat is knitted on finer needles than usual so the knitted fabric will be denser and stiffer, giving the hat more body. There are a few double knitting bouclé yarns available though many tend to be chunky weight. Debbie Bliss seems to have discontinued the Cashmerino Astrakhan but you can still obtain it at some outlets on the internet (and often discounted). Rowan have recently brought out a British Sheep Breeds "fine" bouclé but this still seems to knit up to a chunkier tension. You can try and obtain the right tension with finer needles - and I think this would produce an excellent knitted fabric for the hat - but be warned that knitting bouclé tightly on small needles is very hard work. I cannot supply the yardage of Rimple, and can only guess that "Harlequin" was a multi-coloured tweed. | |

This is almost a guernsey style man's sweater. The "chequered pattern" is similar to the "Jacob's Ladder" in the guernsey tradition, although the raglan sleeve would not be traditional, and the double knitting yarn is a little heavier than the usual 5 ply.
I particularly like the change to to the ridged pattern for the yoke, and the raglan sleeves. I guess if you were up to a challenge, you could thread all the stitches for the yoke sections on one circular needle, and knit in the round as one piece, avoiding any potential bulky seaming. If I ever knit this, I may try that, but you do need to work it out first, as the decreasing for the sleeve sections is usually in a different sequence from the backs and fronts.
"...typical "man appeal" style that will make it a winner..."
InstructionsThese 8 rows form ridge pattern: Back:Using No 10 (3¼mm)needles cast on 104(108)stitches and work 2½ inches in k2, p2 rib, increasing 10(12)stitches evenly across the last row: [114(120)stitches] Change to No 8 (4mm)needles and pattern: 1st row (right side facing): knit. These 16 rows form pattern. With right side facing, shape raglans by casting off 5(5)stitches
at the beginning of the next 2 rows, then decrease 1 stitch at each end
of the next and every following 4th row until 90(96)stitches
remain. With right side facing, change to ridge pattern as given at the beginning,
and work 2 rows straight, then continue decreasing 1 stitch at each end
of the next and every following 4th row until 76(86)stitches
remain. Work 3 rows straight. Front:Work exactly as for the back until 54(56)stitches remain in raglan. Work 1 row in pattern. With right side facing, divide for neck as follows:- Next row: k2tog, pattern 15(15),
turn, and leave remaining stitches on a spare needle. With right side facing, slip centre 20(22)stitches on a spare needle, rejoin wool to remaining stitches, and pattern to the last 2 stitches; k2tog. Finish to correspond with first side. Sleeves:With No 10 needles, cast on 52(52)stitches and work 2½ inches k2, p2 rib, increasing 6 stitches evenly across the last row: [58 (58)stitches] Change to No 8 needles and work in pattern. 1st row (right side facing):
knit. Continue in pattern shaping sides by increasing 1 stitch at each end of the 5th and every following 6th row until there are 86(86)stitches. Work straight until sleeve seam measures about 19½ inches, ending with same pattern row as you did when you started the raglan on the back. With right side facing, shape raglan top by casting off 4(4)stitches
at the begining of the next 2 rows, then decrease 1 stitch at each end
of the next and every following 4th row until 64(64)
stitches remain. With right side facing, change to ridge pattern as for back and work
2 rows straight, then continue decreasing 1 stitch at each end of the
next and every following 4th row until 50(50)
stitches remain. Now decrease 1 stitch at each end of the next and every following alternate
row until 10(10) stitches remain.
Neck Band:Join raglan seams matching patterns carefully. With the set of 4 No 10 needles and right side facing, start at left
raglan seam on front and pick up and knit 18 stitches down left
side of neck; Work in rounds of k2, p2 rib for 2½ ins. To Make UpPress parts lightly on wrong side under a damp cloth. |
Materials
|
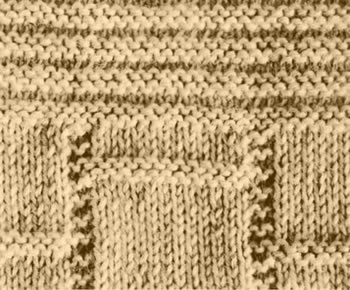
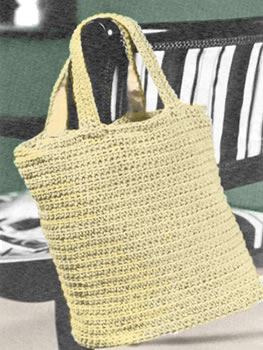
A crochet "holdall" or "tote" made in dishcloth cotton (subsequently re-branded craft cotton). This one is lined and the craft cotton is soft and flexible. You could make it from a coarser type of jute, (I would use a larger hook), and leave it unlined, to use as a vegetable or market bag. I have also seen some excellent bags and bowls made from Herdwick yarn; these are crocheted very tightly to create a rigid fabric so the bags will keep their shape unsupported.
InstructionsThe bag is made in one piece starting at the base, and the straps are then attached separately. Bag Start at the base and make 21 ch. 1st round: Work 3 dc into 2nd ch
from hook; 1 dc in each of next 18 ch; work 3 dc into last ch; then continue
along other side of ch by working 1 dc in next 18 ch; join with slip stitch
to first dc of round. [42 sts] Increase round: (inc1, 8 dc) 8 times. [80 sts] Work in ridge pattern as follows:- 1st round: Work 1 dc in each dc. Repeat last 2 rounds until work measures 11½ ins. from the the first
ridge worked at completion of base. Straps (Make 2)Make 49 ch and work in rows. 1st row: 1 dc in 2nd ch from hook,
1 dc in next 47 ch , I ch , turn. To Make Up:Cut piece of card to fit base. Cut lining, 18 x 24 inches (this lines the depth of bag and allows for gathered top as well). From remainder of material, cut two strips for lining handles, 15 x 2 inches, and for base, draw round the card shape on material and cut out about 1 in. away from pencil outline. Cover one side of card with lining, folding over and sticking surplus
material onto the other side. Join the 2 side edges of lining to make a tube. Top Finish: Fold over top edge of lining to wrong side to make
3½ inch hem, and stitch in position. ¼ inch down from top folded
edge. make 2 rows of stitching, ½ inch apart, for draw-string. Open
seam between the 2 rows and insert tape. Slip lining into bag and stitch into position by catching the 3½ inch hemline behind crochet (about ½ inch down from top of edge of crochet). Catch lining to base. Line handles and stitch on each side of bag. Draw up tape and tie. |
Materials2 x 4oz. hanks Dishcloth Cotton. Crochet abbreviations:ch: = chain Tension3 stitches to 1 inch in width. Size mattersDepth: 11½ inches; Oval base: 9½ x 4½ inches. A Word on the WoolThere are a number of brands sold as "dishcloth cotton" or "craft cotton" but it's a little pot luck with the thickness - you will have to experiment with the tension and how you want the bag to look. You are looking for an Aran weight yarn with a yardage of about 75m to 50g. Lion Brand Cotton is fairly common in the US and would be suitable if you can obtain it (and comes in exciting colours too...). You can literally use balls of string for this kind of bag but I've always found that works out surprisingly expensive. Disclaimer
|
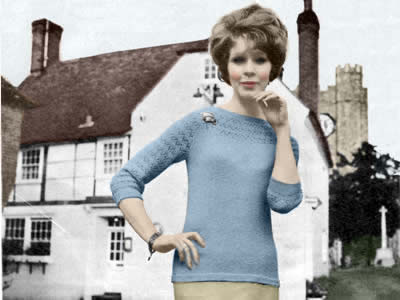
For an even cooler trend for summer - which seems all too possible this year in the UK - another early sixties light woollen top with bracelet length sleeves (my favourite). This design seems very representative of the 1960s to me, with its plain simplicity and straight body-line, combined with heavier design work emphasising the sleeve.
"...decorative stitches and scooped necklines make pretty tops to wear on summer days..."
Note: I have not knitted this pattern, so if you have a problem with it, then please let me know so I can try and help.
InstructionsInstructions are for 3 sizes with the larger sizes; where one set of
figures is given this applies to both sizes. Back and Front alike.With No 12 (2¾mm) needles cast on 132/140/148
stitches loosely and work 24 rows in stocking-stitch, starting with a
knit row. With right side facing, change to No 11 (3mm) needles and continue in stocking stitch, starting with a knit row, and work straight until work measures 14 ins. down centre, ending with a purl row. Shape armholes: by casting off' 7/5/9 stitches at beg. of next 2 rows, then decrease 1 stitch at the beginning of every row until 96 stitches remain. Shape neck: Next row(right side facing): k2tog,
k16, turn, and leave remaining stitches on a spare needle. Repeat the last 2 rows until 2 stitches remain; p2, then k2tog and fasten off. With right side facing, slip centre 60 stitches on a spare needle, rejoin wool to remaining stitches, k16, k2tog. Next row: purl to last 2 stitches,
p2tog. Finish to correspond with first side. SleevesWith No. 11 needles, cast on 99/111/111 stitches. 1st row: knit. Shape top as follows: 1st row: cast off 9, purl to end.
YokeJoin raglan seams. Stitches for yoke are arranged on the circular needle for easy working but pattern is worked backwards and forwards with a backopening. Using a spare No 11 needle, divide 60 stitches at back onto 2 needles. With right side facing and using the circular No 11 needle, knit 30 stitches from left side of back, pick up and knit 11 stitches up shaped edge, purl 45 sleeve stitches, pick up and knit 11 stitches down shaped edge of front, k60 stitches from spare needle, pick up and knit 10 stitches up shaped edge, purl 45 sleeve stitches, pick up and knit 11 stitches down shaped edge of back, then knit remaining 30 stitches: 253 stitches Next row: knit. Continue as follows:- 1st row: k6, *
wfd, k2tog, k4; repeat from * to last
stitch, k1. Repeat rows 1-11 inclusive once. Repeat rows 1-11 inclusive once. Change to No 12 needles and work 20 rows stocking stitch, starting with a knit row. Cast off loosely. CuffsWith No 12 needles and right side facing, pick up and knit 60/66/66 stitches along each sleeve edge. Work 37 rows stocking stitch, starting with a purl row. Cast off loosely. To Make UpPress parts lightly on wrong side under a damp cloth. |
MaterialsOriginal materials called for: 8/9/9
ozs Patons Beehive Fin- A pair each Nos 11 and 12 (3mm and 2¾mm) needles, and a circular No 11 needle for the yoke. 6 small buttons. Tension32 sts and 40 rows to 4 inches over stocking-stitch on No 11 needles. Size mattersOriginal sized for bust 32-33/34-35/36-37
inches; Abbreviationswfd: "wool forward": make a stitch by bringing the wool to the front of the work and then passing the yarn over the needle when you make the next stitch. sl1: slip one stitch. psso: pass the slipped stitch over. k2tog or p2tog: knit or purl 2 sts together (decrease one stitch). A word on the wool.This is a good time to look for fine yarns as all the main companies seem to be offering them in a wider range of qualities and colours. 3 ply weight might be a bit harder to find (outside baby wools) - but
I believe you could get the right tension by varying needle sizes and
using the laceweight yarns such as Rowan
Fine Lace (80% baby alpaca, 20% merino; 400m per 50g) or Debbie
Bliss Rialto Lace (100% merino; 390m per 50g). Jamiesons have an excellent range of colours in "2ply laceweight" which states: This yarn can be used in vintage patterns which call for "3ply yarns". . Disclaimer
|
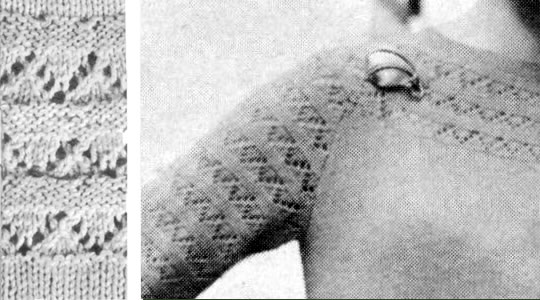
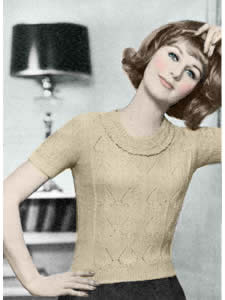
Well we certainly have a cooler trend for summer here in the UK, so this early sixties short sleeved light woollen top might be just the right thing. For myself, I prefer either sleeveless or three-quarter sleeves, (which might prove a relatively simple adaptation), but I think the collar is a very pretty and original design.
"...designs for the warm spells use fine wools and feminine touches for trimming..."
Note: I have not knitted this pattern, so if you have a problem with it, then please let me know so I can try and help.
InstructionsInstructions are for 2 sizes with the larger size given in brackets, (bold blue); where one set of figures is given this applies to both sizes. Front** Change to No 10 (3¼mm) needles and pattern as follows: 1st row (right side facing): P21
(25) *
k2, p7, p2tog, m1k, k1, m1k, p2tog, p7; repeat from *
to last 23 (27) sts; k2, p21 (25). These 30 rows form the pattern. Continue straight in pattern until 3 patterns and 20 rows have been completed. With right side facing, continue in pattern and
shape armholes by casting off 5 sts at beg, of next 2 rows,
then decrease 1 stitch. at each end of the next and every following alternate
row until 100 (104) sts remain. Work
one more row in pattern. With right side facing, shape neck as follows:- Next row: pattern 43 (45),
turn and leave remaining stitches on a spare needle. With right side facing, shape shoulder by casting off 9 (10) sts at the beginning of the next and following alternate row, then 10 (10) sts at the beginning of the following alternate row. With right side facing, rejoin wool to remaining stitches, cast off centre 14 sts, pattern to end. Finish to correspond with first shoulder. BACK SLEEVES BackWork as for front from ** to**
; [100 (104)] sts SleevesWith No 12 needles, cast on 80 (80) sts and work 1¼ inches in k1/p1 rib, increasing 4 sts evenly across on last row. [84(84) sts] Change to No 10 needles and pattern arranging stitches as follows: 1st row (right side facing): p20,
[k2, p7, p2tog, m1k, k1, m1k, p2tog, P7] twice, k2, P20. Continue thus keeping continuity of lace pattern until 20 rows have been completed. With right side facing, continue in pattern and shape top by casting
off 3 sts at the beginning of the next 2 rows, then decrease 1 stitch
at each end of the next and every following alternate row until 38 sts
remain. Work one row. Neck FrillWith No 12 needles, cast on 16 sts. 1st row (right side facing): k5,
p6, k5. Repeat rows 5-28 inclusive 16 times more, then rows 5-20 once. Cast off. With No. 12 needles, cast on 5 sts and work 23 ins. k1, p1 rib, rows on right side having a k1 at each end. Cast off. To Make UpPress work very lightly under a damp cloth.. Join neck frill neatly; pin into position all round neck so that garter- stitch in the centre of the border and the frill overlap on to main work. Catch down neck edge just below top frill on wrong side, then catch down other edge to main work at garter-stitch border at back of lower frill, (so stitching is hidden by the frill). Thread ribbed strip through slots in neck border and join neatly.  Press all seams. |
MaterialsOriginal materials called for: 8 (9) ozs
Patons Nylox Knitting 4-ply in "Palamino" A pair each Nos 12 and 10 (2¾mm and 3¼) needles. Tension28 sts and 36 rows to 4 inches over stocking-stitch on No 10 needles. Size mattersOriginal sized for bust 34-35 (36-37)
inches; length from top of shoulders: 20½ (21½)
inches; sleeve seam: 3½ (3½)
inches. Abbreviationsm1p: pick up loop lying before next stitch and purl into back of it. m1k: pick up loop lying before next stitch and knit into back of it. psso: pass the slipped stitch over. k2tog or p2tog: knit or purl 2 sts together (decrease one stitch). A word on the wool.Patons Nylox was designed as a sock wool with 25% nylon as the name implies.
It was quickly appropriated for children's items as it was hard wearing
and fine weight. By the 1960s, nylon was the material of choice, producing
almost indestructable knitwear in brilliant non-fade colours - so this
versatile nylon-rich wool was an ideal choice for lighter-weight summer
clothes. Any standard 4ply yarn is suitable, and currently there are a lot of them about in a good range of colours for grown-ups, such as Debbie Bliss Rialto 4ply, Rowan Pure Wool 4ply, and Susan Crawford's Excelana 4ply aimed at vintage knitters. Disclaimer
|
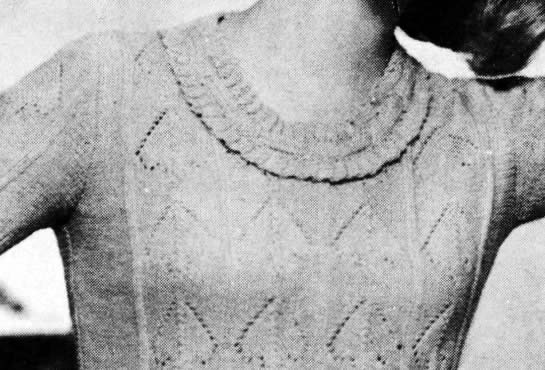
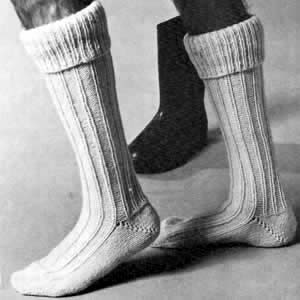
It may seem unseasonal to feature thick woolley socks in May but it's been the wettest April for many decades apparently, so it seemed appropriate.
This is a useful pattern for a couple of reasons. One is that it's knitted in Aran weight yarn - though you need several balls so not exactly good for using up scraps; the other is that they are perfect socks for Wellingtons (see the photo - try not to be frightened by the model's excessive yet manly body hair!).
They should be hard wearing as they are knitted to a firm tension, and I have knitted a couple of highly successful pairs in the past (now given away as gifts, so not illustrated).
Instructions.Cast on 60 sts, 20 on each of three needles. Next round: *
p3, k1, p1; repeat from * to end of
round. Shape ankle1st round: Pattern 10, p2tog; pattern
8, p2tog; pattern to end of round. [58 sts] Next round: Pattern 5, p2tog; pattern
16, p2tog; pattern to end of round. [56 sts] Slip the first 28 stitches on the first needle for the heel, and continue to work with these for the heel. Divide remaining stitches on two needles and leave for instep. Shape heel 1st row: k27, turn. Continue thus, working one stitch less on every row until the row ‘p10, turn’ has been worked. Next row: k10; pick up the loop which
lies immediately below the next stitch and knit it together with the next
stitch, turn. Continue thus working one stitch more on every row until all the stitches are worked onto one needle again. [28 sts] Next row: k14, thus completing heel. Slip the instep stitches back onto one needle again, so you have the
stitches distributed over the 3 needles 14/28/14, and you are ready to
start he next round. Shape toe 1st round (1st needle): knit to
the last 3 sts; k2tog, k1. Making upGraft or cast off the stitches from two needles together. |
Materials7 x 50g balls Aran weight yarn. One set of four No 9 (3¾mm) needles, pointed at both ends. Tension21sts x 29 rows to 4ins over stocking stitches. Size mattersLength of foot: 11 inches (adjustable). Abbreviationsk2tog: work 2 sts together to decrease. k2tog tbl: knit 2 together through back loops (also known as "ssk"; or slip1, knit1, pass the slipped stitch over). A Word
|
|
|
|
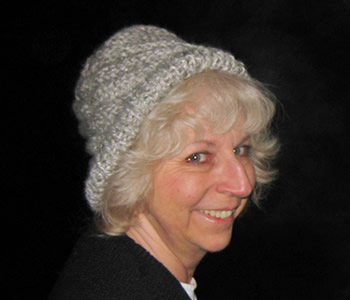
This is a very flattering hat - speaking as one who has difficulty with hats, which always leads to sartorial dilemmas in weather such as we have in the UK at the moment. However, not only flattering and warm, but amazingly speedy to knit, which can be very useful at this time of year. I completed it in one afternoon.
Instructions.The main part of the hat is a simple six-row pattern where you increase at the beginning and decrease at the end of every alternate row to create the diagonal effect. At the same time you alternate 3-row bands of stocking stitch and reverse sticking stitch. SideCast on 20sts. 1st row: Knit These 6 rows form the pattern. BrimWith right side facing, pick up and knit 72sts along one edge of the
side piece - that is 3 sts to each knit and purl stripe. Work 10 rows in k1/p1 rib, and then cast off in rib. Join side piece and brim neatly with a flat seam. Press seam lightly. CrownCast on 14sts, and work in stocking stitch, starting with a purl row (this is right side of work), and increasing at each end of the first and every alternate row until there are 28 sts. Knit one row. Then continue, decreasing at each end of next and every following alternate row until 14sts remain. Cast off. To Make UpPin crown in position to side of hat on wrong side, so that purl side
of crown is on the outside. Back stitch in position very neatly on wrong
side with a tailored seam Fold ribbed brim in half to wrong side and slip stitch in position round lower edge. Place on head. Wrap in Christmas paper. Put under tree. |
Materials
|
|
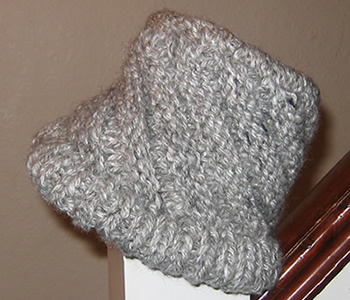
|
Handspun YarnI bought some Spelsau
fleece at Woolfest in 2009; there was a workshop on knitting direct from
the fleece but I intended to spin my sample. I made a 2 ply yarn which
was softer than I had expected, but kempy (as I had not attempted to remove
the coarser fibres). There was only a small amount - I did not measure
the yardage, but I started with 100g, the yarn was chunky weight, and
I knitted 2 strands of yarn together by combining it with an aran-weight
handspun merino/silk blend to achive the bulky weight required. As you
can see, the fleece was a lovely combination of natural grey tones. The description of the Spelsau fleece is as follows (taken from the reference above):
|

A minimalist 1960s design "carry-all" bag. The sides are meant to be rigid and incorporate cardboard (or plastic) supports. Yet another perfect project bag.
InstructionsCast on 54 stitches. Work in bands of garter stitch (every row knit)
and stocking stitch (knit one row, purl one row) as follows: 1st band:
3 inches in garter stitch (20 rows) Place markers at each end of the last row. [Editor's note: You
are about to knit the base of the bag.] Now work back of bag to match front, ie as 5th to 1st band in this order. Cast off loosely. Side panels(Make two the same) cast on 22sts, and work in bands of garter stitch and stocking stitch as for front. Cast off. Handles(Make two the same) cast on 8sts and work 13 inches in garter stitch. Making upPress pieces lightly on the wrong side. 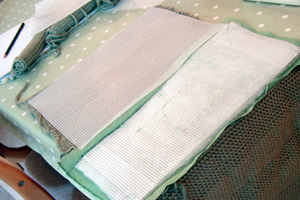 Join lining and place inside the bag with seams inside. Back the handles with petersham ribbon, then sew to top of bag 2½ inches from side seams. Turn in raw edges at top of lining and slip-stitch hem neatly in position. A Word on the Wool.I substituted 100g balls (each 75m/81yards) Debbie Bliss Cashmerino super chunky in Leaf green (colour 16022), knitted on number 5½mm needles, and this took double the stated requirement of the original yarn. I think you would require at least 5 balls of this wool to make the bag as written. I favoured a plain colour but the simplicity of the pattern would probably suit wilder colours. Debbie Bliss Cashmerino is a rather high quality smooth wool (it was on sale). As the size of a bag is not critical, substitute any superchunky with good results (checking your tension). It is suggested to support the sides with cardboard, but it may also be a good idea to use a smaller needle size than normally recommended for the yarn, so that the knitted fabric is firm - note that I did not do this. Adapting the Bag.As I used sale wool, I had only 4 x 100g balls, and in consequence I adapted the bag significantly to make it work. I made fabric handles and a fabric base (6 inches in length and matching the width of the bag). The handles are robust webbing covered in fabric. I sewed the handles
firmly to the plastic canvas side supports - so the handles and the plastic
canvas lining will take all the weight of the bag contents.  I made the base using plastic canvas (7 count) cut to size, and covered with some wadding plus the fabric, and then quilted through all layers, using the canvas as my guide. 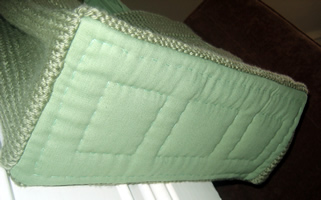 I machine sewed the sides of the bag to the base before hand sewing the knitted pieces up the sides using mattress stitch from the outside of the bag. Finally, in case you are tempted to try this as a felted bag - be warned:
felting garter stitch produces different results from stocking stitch
and your bag may end up a funny shape - or funnier than you intended.... |
MaterialsOriginal pattern calls for 6 x 50g balls of Patons Camelot which was
a bouclé yarn (in colour Corncob). See "a
word on the wool". One pair of number 7 (4½mm) needles. Fabric for lining. Cardboard or plastic canvas to support the sides. TensionOriginal tension 15sts x 21rows to 4 inches (10cm) on No 7 (4½mm) over stocking stitch. [My tension using Debbie Bliss yarn and number 5 (5½mm) needles is 14sts x 20rows to 4 inches over stocking stitch.] Size mattersOriginal bag is approximately 14in by 11in and 6in deep at the sides.
Disclaimer
|
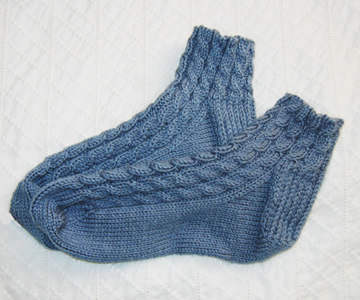
Father George recently handed back his bedsocks as they had holes in the heels. I dutifully mended them, but thought this a good excuse to give him another pair.
These socks are one size, but easily stretch to fit comfortably around a man's foot, as well as fitting round my own foot (small lady's), albeit loosely. If you want cosy house socks for a female foot then simply adjust the length. These are intentionally short at the ankle, but again you can easily knit them longer for the size you need.
InstructionsWith No. 9 needles, cast on 60 stitches loosely, and arrange over 3 needles. 1st round: *
K4, p2; repeat from * to end of round. These are the six basic pattern rounds. Repeat these six rounds twice more, (or as many times as you need to
lengthen the sock at the ankle), and then the first round once again. Divide for heel flap. Next Row: Knit the first 28 sts of the round on to one needle to work for the heel. Divide the remaining 32 sts across 2 needles, and leave to work the instep later. If you have worked the pattern correctly there will be a symmetrical set of complete cables across the 32 instep sts, starting and ending with p2. Return to your heel sts, and turn the work so that you can work back and forth across the heel sts using 2 needles. Next Row: Slip1 purlwise then purl
across the remaining 27 sts. [28 sts]. Repeat the last 2 rows 12 times more. Turn the heel. Work short rows as follows: Next Row: Slip1 purlwise then purl
across 15sts, p2tog, p1. Turn Continue working in this way until all the sts have been incorporated [16sts], ending with a knit row, and right side facing. Continuing to work onto the same needle (needle 1), pick up and knit
15 sts along side of heel. [Editor's note: I
am not one to encourage a sloppy attitude to knitting, but... Shape the instep: 1st round:
1st needle: knit to the last 3sts, k2tog, k1. Repeat these two rounds until 60sts remain (14 on the first needle, 32 on the second needle, 14 on the third needle). Continue on these sts, (continuing the cable pattern on the upper foot
as set), until you have completed 12 cable patterns from the very beginning
of the work, or until work measures 2 inches less than the desired foot
length. Shape toe: Continue in stocking stitch only (no more cables), as follows: knit the sts from Needle 1, then knit the first st from Needle 2 and put it on Needle 1. Knit 30 sts from Needle 2, then place the last st onto Needle 3. Knit across 15 sts on Needle 3. 1st round:
1st needle: knit to the last 3sts, k2tog, k1. Repeat these 2 rounds until 32 sts remain, ending with 1st round. Then repeat round 1 twice more [24 sts]. Making up. Knit the sts from needle one, break the thread leaving a long tail. Graft
the two sets of 12 sts together. Make a second sock to match. |
MaterialsAbout 1 x 50g skein (139 metres) Phildar
Oxygene, colour 38, Neptune. One set of 4 No. 9 (3½mm) double- pointed needles. Tension23 sts x 30 rows to 4 inches measured over stocking stitch on No 9 (3½mm) needles. Size mattersThe pattern as written should fit a foot of 11 inches in length. AbbreviationsC4B: "cable 4 back"; slip the next 2sts onto a cable
needle and leave at the back of the work, k2, then k2 from cable needle. psso: pass the slipped stitch over. Effectively you are "knitting
2 together through back loops" Disclaimer
|
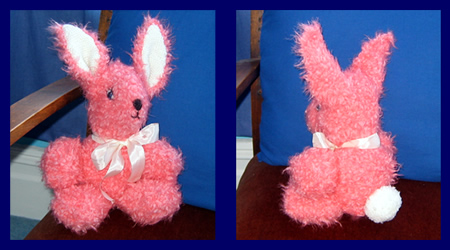
"Who could resist this adorable dressed bunny?"
Well, I for one can resist the dressed part. I am not very fond of dressed animals (even stuffed ones). However, the dress is very pretty, and it would tone down the effect of the rather strong pink colour I have chosen for the rabbit. The Phildar yarn makes for a really soft effect; the pink is discontinued but there is a white, which I think would be very cute.
"So cuddly, a small child would love her at once. Very easily and quickly knitted in garter stitch throughout."
Instructions:Bunny is worked throughout on No 8 needles and garter stitch (ever row knit). When making up, all seams are joined on the right side. Body (work two pieces alike): 1st row: Knit Base: 1st row: Knit Making up the body: Front Legs (work four pieces alike): 3rd row: Knit twice in first stitch;
knit to last st, and knit twice in last st [13 sts] Making up the front legs: Back Legs (work four pieces alike): Making up the back legs: Tail (work 2 pieces alike): Making up the tail: Head (work 2 pieces alike):
* Knit the next 8 rows. Cast off 3 sts. Making up the head: Features (embroidered): Ears (work 2 alike): Repeat these 4 rows 5 times more until there are 15 sts. Knit the next 12 rows. 37th row: K2 tog; knit to last 2
sts, and k2tog. [13 sts] Cast off 11 (this is the edge sewn to the head). Ears Linings (work 2 alike): Repeat these 4 rows 7 times more until there are 20 sts. 53rd row: K2 tog; knit to last 2
sts, and k2tog. [18 sts] Making up the ears: |
MaterialsOriginal: 3 x 2oz hanks of Big Ben Knitting in Oystershell (main colour); Example shown is knitted in 2 x 50g ball Phildar
"Neige" (65 yds/60m per 50g ball), colour Oeillet (0013
discontinued). One pair each of No. 8 (4mm) and No 11 (3 mm) needles. TensionBig Ben was a chunky wool and worked to a tension of approx. 14sts and 18rows to 4 inches on No 3 (6½mm) needles in stocking stitch. The Phildar Neige tension is 11sts and 18 rows to 4 inches on No 5 (5½mm)
needles in stocking stitch. Size mattersOriginal instructions and yarn made a 12½ inch rabbit (including ears). A word on the woolBig Ben is a chunky wool similar in gauge to the Phildar I used but knits
up very differently on the smaller needles. I used a lurid pink for the rabbit - but wouldn't she be nice in white with pink ear linings? Disclaimer
|
Bunny ClothesI chose just to put a ribbon on the bunny. You could make the knitted
tie instead or go for the whole dressed bunny look. The dress is pretty
and allows you to see the cute little tail. Neck tie: Dress: Rejoin yarn to centre 18 sts, and knit 14 rows. Next row: Knit 4; cast off 10; knit
last 4 sts. Continue to work on the last 4 sts and knit 25 rows. Dress Frills: Make another frill the same and sew in place half an inch above the first frill. Put dress on bunny and gather up waist edge to fit. |
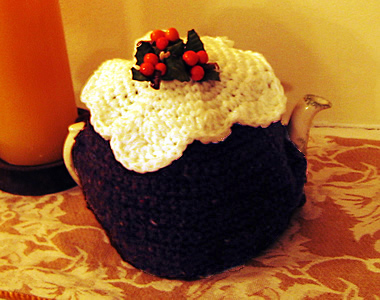
A last minute novelty gift from 1960.
It is crocheted with a double thickness of wool; this can be a nuisance but it is a good way to get that tweedy pudding-mix effect.
"Quick-as-lightening fillers for amusing family presents."
InstructionsThe pattern includes a tea-cosy in the shape of a Christmas Pudding, and a tea-pot stand in the shape of a plate. CosyUsing wool double, with No 7 hook and using the brown and tan wools together (to make a tweedy effect), make 4 chain and join into a ring with a slip stitch. Work 8dc into ring. 1st round: (2dc into each dc) 8 times
[16 dc] Start opening for handle by turning the work and working backwards and forwards in rows. 12th row: with wrong side facing
1dc in next dc all across to back to start of round [56 dc]. Turn with
1ch. Start opening for spout, working each side of cosy separately. †† [Editor's note: Here's a picture of the cosy with one side worked, showing the coloured thread marking the early rounds.]
Rejoin wool at spout end to work the other side of the cosy. With right side facing, repeat from †† to ††. Join spout opening with one slip stitch. 1ch; turn the work. With right side facing, return to working in rounds. Work 3 rounds of dc, joining handle opening in first round. Turn the work, and crochet one round of slip stitches. Fasten off.
IcingWith number 7 hook and white bouclé wool used single, work as for first 6 increase rounds of the plate, [56dc]. Next round: * 1dc in next dc; 4 tr in next dc; 1dc into each of the next 3dc; repeat from * 9 times. Fasten off. [Editor's note: I extemporised with the crochet here. You can form "realistic" icing/snow either with extra rows of long and short crochet stitches, or by adding embroidery when you stitch the icing in place on the cosy.] Making up:Stitch icing to top of cosy, and use white bouclé wool to embroider
irregular shapes round edge of icing. Using black wool embroider spots
on cosy to represent currants as required. Sew in all ends. Plate (not shown)Using wool double, with No 7 hook and white, make 4 chain and join into a ring with a slip stitch. 1st round: 1ch, 8dc into ring; 1
slip stitch into top of 1st dc. Continue increasing in this way, 8 sts in every round, until 8 rounds
have been worked from the start [64 dc]. Next round: *
2 dc in next dc; repeat from * to end of
round [128 dc]. Work 2 rounds without shaping. Join in red, and work 1 round. Fasten off red wool. Turn the work and with wrong side facing, using white wool double, work 1 round of slip stitches into last round of dc. Fasten off white wool. Press plate lightly. Thread a length of white wool through last round of base - that is before the start of the rim - and fasten off securely. This will retain the shape of the plate. |
|
Materials50g balls each in dark brown and tan double knitting wool, (used double throughout), and one ball of a white bouclé double knitting wool for the icing. Scraps of red and black for stripes on the plate. Holly sprig decorations in paper or plastic. One each Nos. 7 (4.5mm) and 10 (3¼mm) crochet hooks. Crochet abbreviations:ch = chain Remember these are English crochet instructions where dc is equivalent to US single crochet - see "Terminology" in the side bar. Tension4dc to an inch. Size mattersIntended to fit a 2 pint pot (that's UK pints which are each 20 fluid ounces not 16). Check out the diagram with the dimensions of my cosy. A word on the wool.I used a vintage tweed DK (used double) which was a perfect "pudding"
colour, being a rich brown and having flecks of different colours, so
I did not need to use two different colours to work together. Disclaimer
|
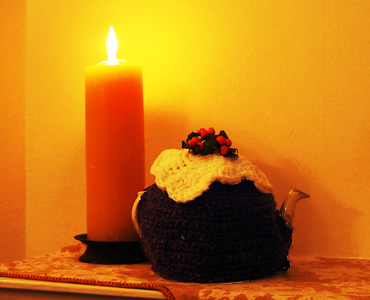
If you would prefer to make a knitted cosy for the main body rather than crochet then here are some instructions for a ribbed cosy. You can still make the white top and holly using crochet as before, and fasten it only in the centre on top of the cosy, which will allow the ribs to adapt nicely to the shape of the teapot.
The cosy is worked in double knitting wool used singly on No 8 (4mm) needles. [The crocheted cosy is worked with two different coloured DK wools worked together to give a tweedy "pudding" effect. I used a flecked wool for my cosy which would work well for this knitted pattern.].
Measurements: width all tround 16 inches, height 6 inches.
Tension: 12 sts and 17 rows to 2 inches measured over pattern.
Instructions:
**
Cast on 47 sts and work in pattern as follows:
1st row: K3, *
p2, k2; repeat from * to end
2nd row: K1, *
p2, k2; repeat from * to last 2 sts, p1,
k1.
These two rows form the pattern. Continue until work measures 5 inches,
ending with a second row.
Shape Top:
1st row: *
K2tog, k1, p1; repeat from * to last 3 sts,
k2tog, k1. [35 sts]
2nd row: K1, *
p1, k2; repeat from * to last stitch, k1.
3rd row: K2, *
p1,k2; repeat from * to end.
4th row: as second row.
5th row: *
K1, p2tog; repeat from * to last 2sts, k2.
[24 sts]
6th-8th rows: *
K1, p1; repeat from * to last 2sts, k2.
9th row: K1,*
k2tog; repeat from * to last stitch, k1.
[13 sts]
10th row: K1, purl to last stitch,
k1.
11th row: K2tog 6 times, k1. [7 sts]
**
Break yarn and leave sts on a safety pin.
Work a second piece from ** to **.
Break yarn and leaving an end. Thread through sts on needle and then through
the 7 sts on the safety pin. Draw up tightly and fasten off.
Sew up the sides, leaving an opening for handle and spout.
[Editor's note: This
design allows you to sew the front an back seams, and allow handle and
spout openings to exactly match your teapot.]
Decorate with the crochet icing and holly as desired, but leave edges of icing free.
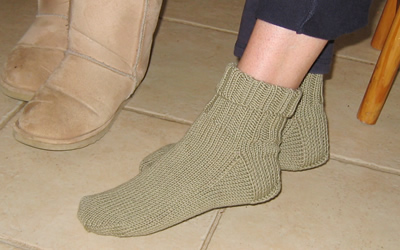
My sister was going on a summer trekking holiday and wanted some suitable socks to wear in her riding boots. I have created these simple socks in soft wool/cotton double knitting to meet the needs for a thick summer sock. I can't say how well the wool/cotton will wear as a sock wool, but the double knitting weight means they take about 5 minutes to knit (OK maybe a bit longer...).
I made the largest size for my sister (UK shoe size 5 or 6) - the smaller sizes are intended for children. You can wear the tops extended if used under riding boots, or rolled down if, perhaps, wearing shorts with heavy hiking boots.
Instructions (work 2 alike).Cast on 36 (40;44;48) stitches loosely; divide over 3 needles and join in a round. Work 35 rounds in k2, p2 rib (or required length). Next Round: K1, make 1 by picking up bar between sts and knitting into the back of it; knit to last st; make 1, k1. [38 (42;46;50) sts] Knit 5 rounds straight. Divide for heelNext Round: K9 (10;11;12), and then slip the last 10 sts of the round onto the other end of the same needle - these 19 (21;23;25) sts are for the heel. Divide the remaining sts between two needles, and leave for the instep. Commence Heel1st Row: Slip 1 purlwise, purl to end. 2nd Row: Slip 1 knitwise. * K1, keeping yarn at back of work, slip 1 purlwise; repeat from * to last 2 sts; k2. Repeat these 2 rows 8 (9;10;11) times more, then the first row again. Turn Heel1st Row: K13 (14;15;16) sts, slip 1, k1, psso (pass the slipped stitch over), turn. 2nd Row: Slip 1, p7, p2tog, turn. 3rd Row: Slip 1, k7, slip 1, k1, psso, turn. Repeat the 2nd and 3rd rows 3 (4;5;6) times more, then the 2nd row once. K5, thus completing the heel. 4 sts remain unworked on the left-hand needle. Using spare needle, knit 4 heel sts, pick up and knit 10 (12;14;16) sts along side of heel. Slip all instep sts on to one needle, and using 2nd needle knit across instep sts. Using 3rd needle, pick up and knit 10 (12;14;16) sts along side of heel, then knit 5 heel sts. [48 (54;60;66) sts]. Shape instep:1st round: Knit. 2nd round: 1st needle: knit
to the last 3sts, k2tog, k1. Repeat these two rounds until 38 (42;46;50) sts remain. Continue on these sts until work measures 4¼(5;5¾;6½) inches, or desired length, from where sts were knitted up at the heel. Shape Toe:1st round: 1st needle: knit
to the last 3sts, k2tog, k1. 2nd round: Knit. Repeat these 2 rounds until 18 sts remain. Making UpKnit sts from 1st needle on to end of 3rd needle. |
Materials2 x 50g balls Rowan Wool Cotton , shade 930, "Riviera". One set of 4 number 9 (3¾mm) needles. Tension24st and 32 rows to four inches on No 9 needles. Size mattersLength of foot approximately 7½(8½;9½;10½) inches (adjustable). A word on the wool.Wool Cotton is possibly my favourite Rowan yarn; a 50/50 blend of soft
Merino wool and cotton. I am not sure how well it will stand up to wear
and tear in a sock, but the cotton should improve durability. Disclaimer
|
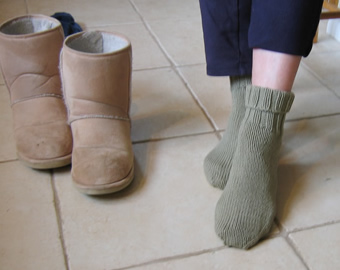
Here's a picture of the socks "in use". Left to right - my sister at the rear on the grey, Susanna, Liz, and leading on the palamino, Tom, the guide.

Llanthony Riding and Trekking is based at Court Farm, next to Llanthony Priory; here's the full picture (from which the detail above is taken) showing the fabulous scenery and environment in Wales. Lyn strongly recommends the bed and breakfast accommodation that she enjoyed at Pen-y-dre Farm
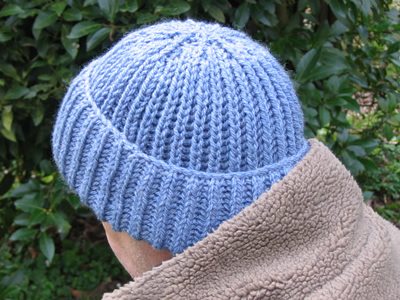
This is my favourite hat of the three this month. It's simple, warm, comfortable, and looks like a serious seafarer's hat! Even though I don't like knitting rib that much, and Fisherman's rib means you have to put in a lot more knitting to get the length you need.... it was nonetheless very satisfying.
InstructionsWith No. 6 (5mm) circular needle cast on 68 stitches, and join into a
round, and purl the first round. Place a stitch marker to mark the beginning
of the round. 1st round: *
K1B (knit one below, by knitting into the stitch below the next stitch,
and slipping both sts off the needle together); p1. Repeat from *
to end of round. These 2 rounds form the pattern. Continue in pattern until work measures 9inches from the beginning, ending with round 2. Shape Crown as follows, keeping continuity of the pattern: Next round: (K3tog; p1,k1,p1) 11
times; k2tog. [45 sts] Break yarn, thread through remaining sts; draw up and fasten off securely. Making up: Changing the hat size, or substituting the wool.You may want to alter the size (circumference) of your hat, or compensate for a different gauge. Simply work out how many sts you need to cast on according to your own
gauge eg divide the number of sts by 16 and multiply by the number of
sts you knit to 4 inches. A word on the wool.If you work in pure wool you may need more than my stated quantities of yarn. Fisherman's rib is a very yarn-hungry stitch which produces a satisfying elasticated bulky fabric, by effectively knitting the yarn double, (nice and warm!). Original pattern called for 3 x 50g balls Patons Husky Chunky, which
is a pure wool chunky; the blend I used, no doubt, has a better yardage. |
MaterialsExample shown is knitted in 3 x 40g balls of vintage Argyll Ferndale Shetland Chunky (an acrylic and wool blend). Size 6 (5mm) and circular needle - short length suitable for a hat. TensionApprox. 8st to 2 inches on No 6 (5mm) needles. Size mattersThere is a lot of give in the ribbed stitch, making the sizing very flexible. Disclaimer
|
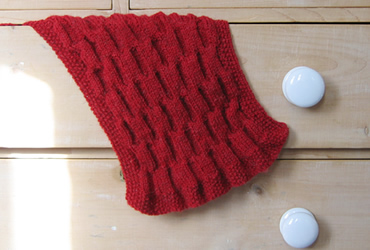
"Reversible scarf for the cold days ahead". This is a very pleasing pattern from October 1963, and is a suggestion for "pre-Christmas plans". The pattern is the same on both sides, so great for a scarf, and can be knitted in basically any wool weight; ensure you use needles a couple of sizes larger than normal for whichever weight you choose, and do a proportional calculation on the gauge, so your scarf is not too wide.
InstructionsCast on 73 stitches. First row: K1, * p1, k1; repeat from * to end. Repeat this row for the moss stitch border 8 times more. 10th (increase) row: Moss 8, (increase in the next st, moss 6) 8 times; increase in the next st, moss 8. [82 sts] Change to pattern rows as follows: 1st row: moss 5, p3, *k6,
p6; repeat from * to last 14sts; k6, p3,
moss 5. 11th row: moss 5; *slip
the next 3 sts on to a cable needle to the back of the work; k3, p3 from
cable needle; slip the next 3 sts on to a cable needle to the front of
the work; p3, then k3 from cable needle; repeat from *
to last 5sts; moss 5. 23rd row: moss 5; *slip
the next 3 sts on to a cable needle to the front of the work; p3, then
k3 from cable needle; slip the next 3 sts on to a cable needle to the
back of the work; k3, p3 from cable needle; repeat from *
to last 5sts; moss 5. These 24 rows form the pattern. Continue straight until the work measures 46 ins, ending with a 12th or 24th pattern row. Next (decrease) row: moss 8 *k2tog; (p1, k1) 3 times; p2tog, repeat from * 3 times more; k2tog; (p1, k1) 4 times. [73sts]. Work 9 rows moss stitch over all stitches. Finishing - Press work very lighty, taking care not to spoil th texture of the patttern. Cut the remainig wool into 7½ inch lengths; take 3 lengths of wool together each time, fold in half, and, with a crochet hook, knot through short ends to make a fringe. Trim fringe. Substituting the wool - I used a vintage wool,
Phildar Brisants. This is a fine double knitting, which is normally knitted
on no. 9 (3¾mm) needles. The cabling make for a tighter tension,
and the recommended needles (UK No 6) are 2 sizes larger than usual for
a DK. I went with no. 8 needles, instead of 9s, but should have gone larger
I think. If you want to use chunkier wool, then decrease the number of sts proportionally. The pattern is worked over 12sts. |
MaterialsOriginal call for 9oz of Patons Moorland Double Knitting Example shown is knitted in Phildar Brisants. One pair of No. 6 (5mm) needles. TensionEquivalent to 20st and 26rows to 4 inches (10cm) measured over stocking
stitch. Size mattersWidth: 12 inches A word on the wool.This pattern is for double knitting wool, and from memory Moorland DK
was slightly heavy-weight. Disclaimer
|
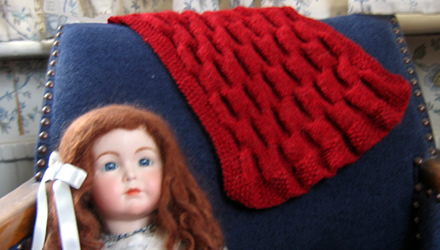
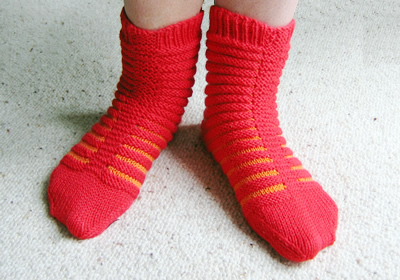
Three offerings this month: this first pattern from 1968 is very similar in design (and the principle of the stretchy fit) to the second offering, Boudoir Boots; however these socks are knitted in a different (more conventional) orientation. They particularly appeal to me, being very jolly, knitted in stripes, (although, as a general rule, I prefer my socks wide awake...).
InstructionsMake two socks alike. Main body - With main shade (M) cast on 56 stitches, and arrange across 3 needles (19 on each). Work as follows: Rib round: k5, * p1, k1; repeat from
* to last stitch, p1. Repeat this round 10 times more. ** Repeat from ** to ** 13 times more, and then work the 12th, 13th and 14th pattern rows again Break C. Work the toe - Continuing in M only, re-arrange the sts over the
3 double pointed needles as follows: You now have 56 sts in the round. Next round: knit to the last 3 sts on the first needle, sl1, k1,
psso, k1. Beginning the second needle, k1, k2tog, knit to the last 3 sts
on the second needle, sl1, k1, psso, k1. Beginning the third needle, k1,
k2tog, knit to end of round, [52 sts]. Continue to decrease on every alternate round in this way until 24 sts
remain. [8 on the first needle, 12 on the second needle, 4 on the third
needle]. Making up - slip the last 4sts of the round on to the first needle
and graft
the two sets of 12 sts together to make the toe. 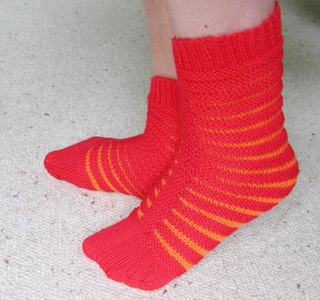 |
MaterialsOriginal pattern calls for a total of 2 (1oz) balls of 4ply - 1 ball in each colour. One set of 4 double pointed No 11 needles. Tension30st and 38 rows to 4 inches (10cm). Size mattersOne size fits all. A word on the wool.Original knitted in Patons 101 Courtelle Crepe in "Venus blue" and "Starlight white". Example knitted in Phildar Lambswool (51% wool, 49% acrylic), colours rouge and melon. |
Third and final pattern is totally untested, from a magazine dated November 1968 [ "Ideas for Gifts"]. They really are called "boudoir slippers" which, apart from any other consideration, makes me feel that the pattern dates from longer ago than 1968. As a teenager, I would have found these indescribably awful; however, luckily, I did not have relatives who were handy with the old needles.
Likely to remain untested as a girl can have only so many bedsocks.
[Should any readers admit to making this pattern, please submit a photo of the result for me to display here!]
InstructionsEach sock is worked in one piece. Make two alike. Cast on 76 stitches, and work as follows: Row 1: k3, * p2, k2; repeat from
* to last stitch, k1. Repeat these rows for 6½ inches. Change to No. 12 needles. Work 6 rows in k1, p1 rib. Making up - Fold cast-on edge to cast-off edge and join side seams. (Seams form heel and toe). Crochet edging - Starting at the heel, crochet eyelets all around the edge as follows: - 3ch, * 1dc in next stitch, 1ch, miss next st; repeat from * all round. Join with slip stitch to 3ch at the beginning. Then work a row of picots thus: - * 3ch, 1 slip st into the first of these chain, 1 slip st into the 1ch space of the previous round; repeat from * all round. Fasten off With wool double, crochet a chain cord for each sock and thread through holes; make and sew a small tassel to each end. |
MaterialsOriginal pattern calls for 1 (1oz) ball of Patons Beehive Baby Wool in 3ply. One pair of number 11 needles. Tension32st and 40 rows to 4 inches (10cm). Size mattersOne size fits all. A word on the wool.It is fairly easy to acquire 3ply Baby wool to knit up to this tension. |
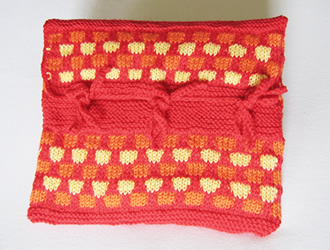
This is my modern version of a hot-water bottle cover. The cover is designed to fit a microwavable hot pad - link for this under "materials". The pads are conveniently small, and much safer (to lie on) than a hot-water bottle.
The pattern stitch from 1968 was used for a tea-cosy (colours Jade, Pink, and White), and a cushion cover (colours Brown, Amber, and White). I think the cushion cover, (style and colour scheme), is more authentically late 60s that the cosy. Although a tea cosy was de rigeur in our house, I think tea bags with and without the use of tea pots was becoming more prevalent by that time.
InstructionsWith No. 11 needles and main colour (red), cast on 58 stitches. **Change to number 10 needles and commence pattern as follows, using second colour (orange): Row 1: (right side) *K4, slip 2;
repeat from * to last 4 sts, K4. Rows 13-24: repeat rows 1-12. Change to number 11 needles and continue in garter stitch for 15 rows. Purl one row.** Repeat from ** to ** three times, then rows 1-30 again. Change to number 11 needles and work in garter stitch for 4 rows. Cast off.
Crochet edging - Using the main colour, (red), work a dc edge around the flap of the cover with ties as follows: With right side facing, starting at the side edge, work 6 dc up edge
of the garter st band, 15 dc up the honeycomb edge, 2dc up to corner,
3 dc into the corner st. Work 3 more ties by making 40 chain, then working 1 row of dc into each
chain. Sew the ties on to the cover to match the positions of the ties
on the flap. |
MaterialsOriginal pattern calls for three contrast colours, (red, orange and yellow). One pair each of number 10, an No 11 needles. One hot water bottle "replacement
core", (available to order on the web). TensionThe wool should knit to a basic tension over st st of 28st to 4 inches (10cm) on No 10 (3¼mm) needles. Size mattersOne size. A word on the wool.I used Phildar Lambswool (a 4 ply wool/acrylic mix) left over from another project. |
Here is a version adapted for a light worsted cotton yarn (Rowan Cotton Glace). For this version, cast on 52 sts.
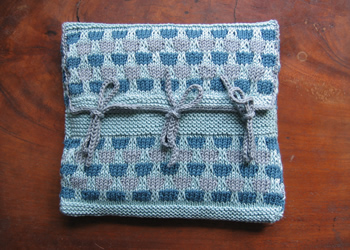
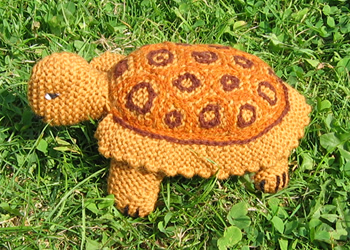
I do enjoy unusual knitted toys - and I had a succession of pet tortoises as a child (when it was legal...) - so this seems a natural choice. I am very pleased with the way he worked out, and he was not as fiddly to make as I had expected; probably about 2 evenings work in all.
InstructionsThe tortoise is knitted in garter stitch (every row knit) throughout. ShellCast on 11 stitches, and knit 1 row. [Editor's note: To increase, I work into the front and back of the first st, knit to the last two sts, then work into the front and back of the next st, then knit the last st. This avoids a stepped effect at the end of the row. If you increase in a different way - for example, picking up the loop between sts - then you may not have this problem. Make sure you know how the pattern instuctions intend you to work an increase by looking at the abbreviations. There is usually an implied difference between "increase in the next st" and "make 1".] Knit 32 rows straight, then decrease 1 st at each end of the next and
every alternate row until there are 11 sts remaining. Make another piece the same. [Editor's note: I embroidered the top half of the shell before sewing up. The tension of the embroidery encouraged the shell-shape of the piece.] Join the two halves together leaving an opening for stuffing. Stuff firmly and sew up opening. Embroidery on top half: outer circles in light brown chain-stitch with
smaller dark brown circles inside. [Editor's note: I am not very good at free-form embroidery, so was a bit worried about this - but it worked out OK. You can see that what I did was very lop-sided, but despite that it looks fine I think...] 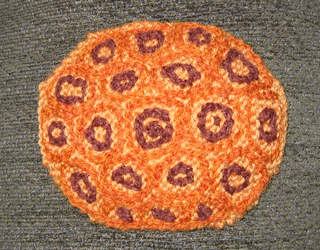 HeadStart at neck edge and cast on 10 sts. Next row: Knit to the last 2 sts; inc in next st, k1. Next row: Inc in the first st; knit to the last 2 sts; inc in next st, k1. [15 sts]. Knit 5 rows. Next row: K2tog; knit to the last 2 sts; k2tog. Next row: K2tog.; knit to the last 2 sts; k2tog. Make another piece the same. Sew halves together leaving neck end open
for stuffing. Features: Eyes - black and white straight stitches; mouth - long black straight stitch. Front feetCast on 4 sts. Shape thus: Next row: k2, turn, k back; Next row: Inc in the first st; knit to the last 2 sts; inc in
next st, k1. Now dec. 1st at each end of the next 3 rows. Make 3 more pieces the same. Sew each pair together, leaving cast off
edges open for stuffing. Back feetCast on 16 sts, and knit 7 rows. Next row: Inc in the first st; (k4; inc in the next st.) 3 times.
[20 sts]. Sew the short sides together to form a cylinder shape. Make another piece the same. Pads: Cast on 3 sts. Dec 1 st at each end of the next and following alternate row. Make another pad piece in the same way. Sew pads to cast off ends of
back feet. Stuff firmly; sew open ends to back on underside of shell about
1 inch apart. Mark claws with 4 black straight stitches on each foot. TailCast on 17 sts. Sew together along edges to make a cone shape; flatten slightly into a traingle, along line of increases; stuff lightly and sew the wider, open end to the shell at the back, (in line with the head), and so that the seam is underneath. Edging around shellCast on 7 sts. * Knit 2 rows. [Editor's note: Again
I altered the pattern here omitting one of the 5 st short rows, making
the shell edge less frilly - this is what I did: Sew straight edge around the seam of the shell, finishing on either side of the head. Work a line of light brown chain stitch over the join, then a second line in dark brown 2 sts away. Using an oddment of bright coloured wool, cut into 3 strands and tie round neck. [Editor's note: ...or use a ribbon...] |
MaterialsOriginal pattern calls for 2oz of DK in French Mustard. One pair of number 11 needles. Toy stuffing. TensionNot given - but DK wool usually knits to approximately 22st to 4 inches
(10cm) on No. 8 (4mm) needles over st. st. Size mattersTortoise measures 8 inches in length and 6 inches across width of shell. A word on the wool.I had some difficulty in finding what I thought a satisfactory colour. Eventually I bought some 4ply from eBay and used it knitted double. I use 4ply oddments for the embroidery. Disclaimer
|
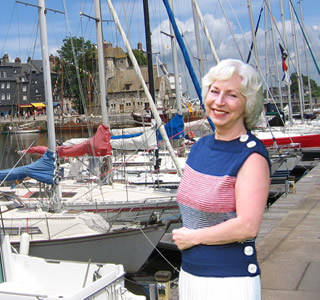
Casual sailing sweater, (designed in Italy, apparently), for that 1950s holiday mood. I think this is an outfit for the boathouse, or for the yacht where the chap does all the sailing stuff! I can't say how it would look covered in a life jacket, but it really is a delightful little sweater. The fit (smaller size) is excellent on me (a chubby UK size 12, US size 6), and it looks great despite the rules about short people and horizontal striping.
InstructionsBack and front are mainly knitted alike, but there is some additional
detail on the welt at the front. BackWith No. 12 needles, cast on 112 (120) stitches in navy, and work 2 inches (20 rows) in k1, p1 rib. ** Join in white and continue in st st stripes as follows: Row 1: right side facing, knit in white. Do not turn the work,
but slip the sts back to other end of the needle. Continue in the striped pattern, and shape the sides by increasing 1
st at each end of the next and every following 6th row, until there are
134 (142) sts. Shape armholes as follows: Shape shoulder as follows (right side facing): Next row: Rib to end, picking up loop where row was turned each
time and knitting it together with the the next st to avoid a hole Cast off right across very loosely in rib. FrontWith No. 12 needles, cast on 140 (148) stitches in navy, and work 2 inches
(20 rows) in k1, p1 rib. Work as for back from ** to **. [Editor's note: I adapted the front neck to give it some additional shaping. See "Adapting the Front Neck" section] To make upPress parts carefully on wrong side under a damp cloth. With navy wool
and number 12 needles, continue in rib on each of the sets of 14 sts on
safety pins until piece measures 5 inches from start. Cast off in rib.
Join these ribbed pieces to sides of front. [Editor's note: This is to stop the edges of the armholes from curling over, as there is no additional knitted edging.] Now fold neck edge of front over to back along shoulder edges by ½ inch. Sew two buttons on each shoulder through double thickness to secure shoulders. Press seams. |
MaterialsOriginal pattern calls for 4oz of 3ply in light navy and 1 oz each in
lipstick red and white. One pair of No 12 double pointed needles (or a circular needle) and one pair No 11 needles. 8 large pearl buttons and bias binding. Tension32st and 40 rows to 4 inches (10cm) on No 12 (2½ mm) needles,
using the 4 ply wool. (original pattern calls for No 11 needles and 3ply). Size mattersInstructions for two slim fitting sizes: 34-35 (36-37) inch bust; length from top of shoulders 20½ (20½) inches. A word on the wool.For the navy and white I used a vintage Hayfield soft cotton 4ply, and
for the red I used Jaeger Sienna (also a pure cotton 4ply). I used 11
and 12 needles which are a size smaller needles than stated in the original
pattern, and with these I managed to achieve the required tension. Disclaimer
|
The original pattern is a slash neck, the same at the back as the front. I adapted the front neck to lower it slightly and add shaping. [Editor's note: This adaptation used slightly less wool that the slash neck version where I had only inches left, knitting the smaller size. Adapting the neckline left me with just enough to sew up!]
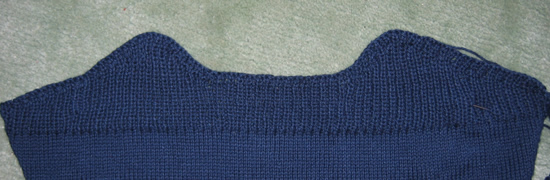
Replace the shoulder shaping section for the front as follows:
Shape shoulder (front adaptation) as follows (right side facing):
Next 2 rows: Rib to the last 4 sts, turn; rib to the last 4 sts,
turn.
Next 2 rows: Rib to the last 8 sts, turn; rib to the last 8 sts,
turn.
Next 2 rows: Rib to the last 12 sts, turn; rib to the last 12 sts,
turn.
Divide for neck as follows:
Next row: Rib 40(42) sts; turn and leaving the rest of the sts
on a spare needle. Complete each side of the neck separately.
Next row: K2tog; rib to the last 16 sts, turn.
Next row: Rib to the last 2sts; k2tog; turn.
Next row: K2tog; rib to the last 20sts, turn.
Next row: Rib to the last 2sts; k2tog; turn.
Next row: K2tog; rib to the last 24sts, turn.
Continue thus, turning 4 stitches short of the shoulder edge each time
as for the back, and decreasing at neck edge on every row, until you complete
the row:
Next row: Rib to the last 36 sts, turn. Then:
Next row: Rib to the last 2sts; k2tog; break wool.
Rejoin the wool to the sts on the spare needle at centre neck. Rib across
all sts on spare needle to the last 16 sts, turn.
Next row: Rib 38(40) sts, k2tog; turn, and complete this side of
the neck separately, leaving the centre 28 (30) sts on a spare needle.
Next row: K2tog; rib to the last 20sts, turn.
Next row: Rib to the last 2sts; k2tog; turn.
Next row: K2tog; rib to the last 24sts, turn.
Continue thus, turning 4 stitches short of the shoulder edge each time
as for the back, and decreasing at neck edge on every row, until you complete
the row:
Next row: Rib to the last 36 sts, turn. Then:
Next row: (wrong side facing) rib across right shoulder to the last 2sts; k2tog; do not break wool.
Pick up and rib all sts across the neck: pick up the approximately 12
sts** down
right side of neck, rib across centre 28 (30) sts, pick up approximately
12 sts** up
left hand side of neck; then rib across all sts of right shoulder, picking
up loop where row was turned each time and knitting it together with the
the next st to avoid a hole.
[**Editor's note:
make sure you pick up the right number of sts down sides of neck to ensure
continuity if the k1 p1 rib - that is and even or an odd number.]
Next row: Rib back across all sts, picking up loop where row was
turned each time and knitting it together with the the next st as before,
across the right shoulder..
Cast off right across very loosely in rib.
I have not tried this myself, but it seems to me that it would be moderately easy to adapt the size by simply adding stitches. To adjust the length, make additional stripes in the navy and the red striped sections evenly, both above and below the armhole decreasing, as required. To gauge how much to increase, you can use a sleeveless top that fits you well and measure the overall length, as well as the length of the armhole.
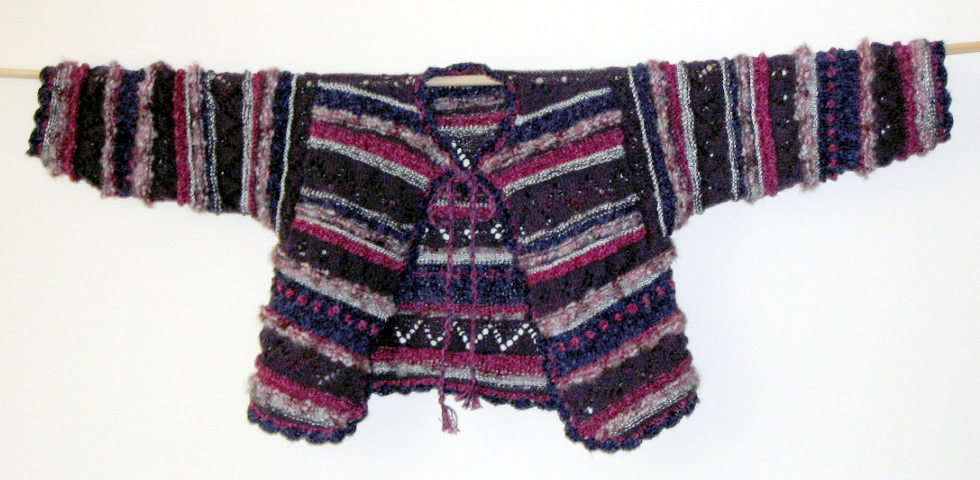
Knitted in a combination of wools, ribbon, and a linen yarn, of various weights using the basic shape of a double knitting pattern. The length is short to allow for sitting in bed.
InstructionsKnitted to a basic shape as follows: Back - cast
on 88 sts. Knit in your own pattern for 7 or 8 inches. Right front
- cast on 36 sts. Knit to pattern increasing 1st at the beginning of every
alternate row until there are 44 sts. (This forms a curved front edge).
Left front - work to match the right front, reversing all shapings. Sleeves - cast on 56 sts and work for 2 inches, then increase 1 st at each end of next and every following 6th row to 76 sts. Work straight to 15 inches from beginning. Cast off. Crochet border - a simple row of double crochet and then a crochet shell pattern (1 dc; miss 2; 5 tr into next stitch; miss 2; then repeat). Make up - sew
shoulders and side seams. Set sleeves into the armholes, placing 2 ins
at the sleeve top to the cast off sts at the underarm, and sewing up the
sleeve seams. |
MaterialsSelf-styled free form pattern, knitting a mixture of rows in plain and purl, using wools from 4ply through to a chunky boucle and including ribbon yarn. Tie made from twisted cord or ribbon. Size mattersTension (average over different yarn weights): |
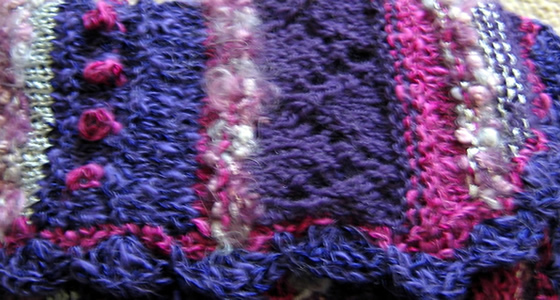
© Christina Coutts 2007
![]()

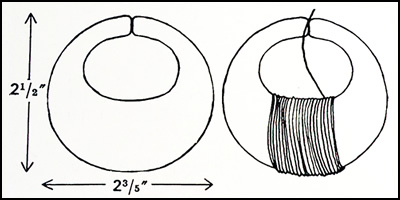
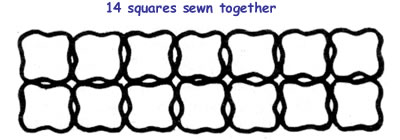
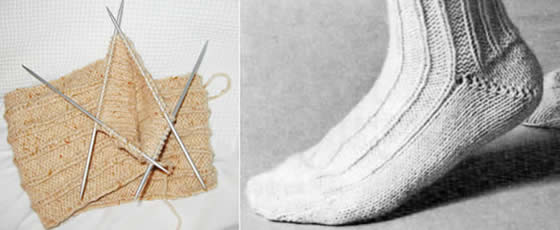
 The Spaelsau is a direct ancestor to
the Old Norwegian Sheep.They were tough sheep supplying their masters
with meat, milk, wool, skin - even the sails that carried the ships over
the oceans were made of their wool. Today, a thousand years later, the
wool of the Spaelsau still consists of a rough cover to protect against
the wind and the rain, and under this a much softer layer close to the
skin as protection against the cold.
The Spaelsau is a direct ancestor to
the Old Norwegian Sheep.They were tough sheep supplying their masters
with meat, milk, wool, skin - even the sails that carried the ships over
the oceans were made of their wool. Today, a thousand years later, the
wool of the Spaelsau still consists of a rough cover to protect against
the wind and the rain, and under this a much softer layer close to the
skin as protection against the cold. 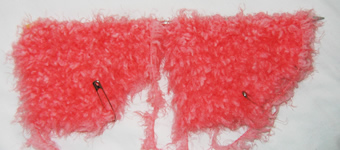
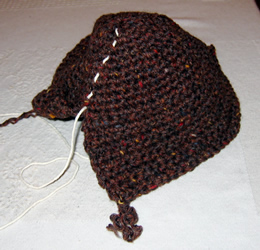
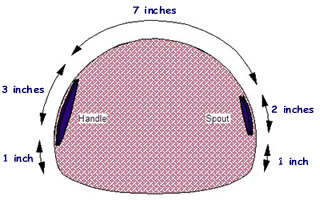
 Making up - Press the piece lightly on the wrong side under a
damp cloth with a hot iron.
Making up - Press the piece lightly on the wrong side under a
damp cloth with a hot iron.