Plain Jane (or John) Layette
More....
Please note:
Patterns are for
Personal Use Only
You may freely circulate patterns with the Copyright Statement Preserved.
See terms of use.
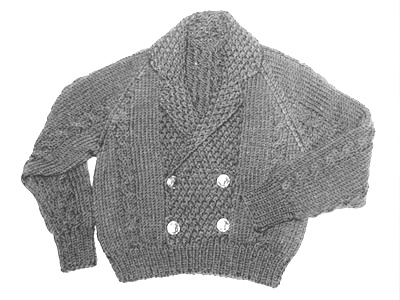
Delightfully plain and simple outfit for a new baby. Cardigans are (I am told) the most useful for small babies - trousers optional - and the bootees - well, they are always just impossibly cute aren't they? (even if they rarely stay attached to the baby!).
Instructions.The cardigan is worked as one piece, starting with the two front, pieces worked separately, then joining them to complete the lower back Cardigan left front:Using No 11 (3mm) needles, cast on 34 stitches and knit 2 rows. Shape front hem, by working short rows as given below, noting that after the first 8 rows in garter stitch (every row knitted), you start to work in stocking stitch (right-side rows knitted, wrong-side rows in purl) on the first 27 stitches, and keep the last 7 front edge stitches (the curved edge) in garter stitch to form the front band Next row: k26. Turn, knit back to
end. Continue straight, with the 7 front edge stitches in garter stitch and
the 27 side edge stitches in stocking stitch, until work measures 4¾
inches from the start of the stocking stitch, (about 46 rows), ending
with a wrong side row. Shape neck, by casting off stitches at the front edge as follows: Next row (wrong side facing): cast
off 7 stitches at the front edge, work to end of row. Continue straight, as set, keeping the sleeve cuff in garter stitch, until work
measures 7¾ inches (about 76 rows), ending with right side facing
for the next row. Cardigan right front:Work as for the left front, reversing all shapings, and placing 3 buttonholes
at the front edge on the 4th, 30th, and 56th row of the stocking stitch. When you have completed the 76 rows on the right front, join the two fronts together to knit the back: Cardigan backNext (joining) row (right side facing):
knit 54 stitches from the left front; cast on 22 stitches for the back
neck; knit 54 stitches from the right front. [130 sts]. Continue straight for 31 rows, keeping the 7 stitches at each end in garter stitch, for the two sleeve cuffs. Cast off 34 stitches at the beginning of the next 2 rows. [62 sts]. CollarUsing No 11 needles, cast on 11 stitches and knit 2 rows. Next row: k4. Turn, knit back to
end. Shape collar: Next row: k3. Turn, knit back to
end. Next row: k3. Turn, knit back to
end. Cast off. Making up the cardiganJoin side and sleeve seams. |
Materials4ply fingering yarn in 50g balls: Nos 11 (3mm) needles. Tension28sts x 32 rows to 4 inches over stocking stitch. Size mattersTo fit one size up to 3 months. Abbreviationsk2tog: decrease by knitting 2 stitches together. A word on the wool.Original yarn was a synthetic mix of acrylic and rayon (which gave it
a ply of a silky thread), and a small percentage of wool. Disclaimer
|

Trousers Front* Using No 11 (3mm) needles, cast
on 27 stitches, and work in garter stitch for 8 rows. Make a second leg by repeating these instructions from * to *. Then join the two legs by knitting across these 27 stitches from the
second leg, cast on 8 stitches, and knit across the 27 stitches from the
first leg. [62 sts] Work straight on these 62 stitches in stocking stitch for 5½ inches ending with wrong side facing for next row. Next row: knit. Starting with a knit row, work 8 rows in stocking stitch as before. Trousers BackWork as for Front from * to **.
Shape top by working as follows: Next row: Work to the last 3 stitches.
Turn. Work 3 rows across all 62 stitches, ending with wrong side facing for next row. Next row: knit. Making up the trousersJoin side and leg seams. 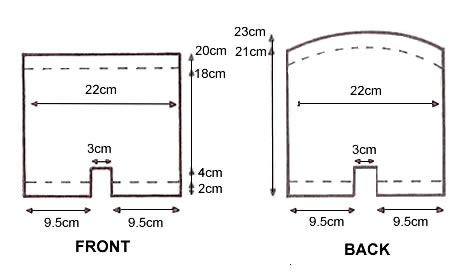
BooteesUsing No 11 (3mm) needles, cast on 38 stitches, and work for 8 rows in
garter stitch. Next row: k2, *
k2tog, yon; repeat from * to last
2 stitches, k2. Next row: k24. Turn, and leave the
remaining stitches on a spare needle. Continue on these 10 stitches for a further 16 rows in stocking stitch,
ending with right side facing for next row. With right side facing, rejoin yarn and knit 14 stitches from spare needle; knit up 12 stitches along the side of the rows just worked; knit across 10 stitches from spare needle; knit 12 stitches down the other side of the rows just worked; knit across 14 stitches from spare needle. [62 sts] Work 8 rows in garter stitch, ending with right side facing for next
row. Shape Sole: Slip the first 26 stitches on to the right hand needle (or "working" needle if you are left handed), and rejoin yarn to work the centre 10 sole stitches; knit 9, k2tog, turn. Cast off. Finishing: Join back seam, and join sole at the back. Make a cord by cast on 100 stitches; knit one row, then cast off. Make a second bootee in the same way. |
|
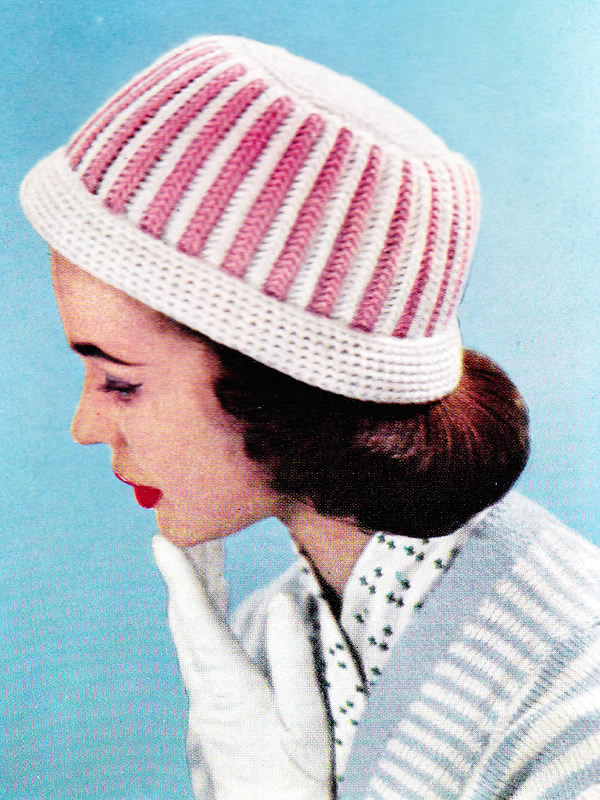
Knitting and crochet combine in this eye-catching candy floss striped hat which can be quickly put together in double knitting weight yarn.
This hat was designed for smart summer holidays (in the UK) in the 1950s, though it's hard to imagine wearing a woolly hat in the summer these days (even in the UK) - which is more a comment on fashion than global warming. However - easy to adapt the colour scheme for autumn and winter days.
Instructions.The main part of the hat is knitted in a fancy striped stitch (which is easier to do than to describe - see below); the top of the crown and brim are in simple double crochet. CrownBegin with the striped part: with pink wool, on No 10 needles, cast on 33 stitches and work in pattern thus: 1st row: k1, *
insert needle into next stitch and knit, winding wool twice round needle;
repeat from * to end. Next row: As 3rd in white. 3rd row forms pattern and this row is now repeated throughout, working
two rows in each shade, ie your next 2 rows will be in pink Continue thus until you have 26 pink stripes. Next 2 rows: in white. Cast off in white as follows: With No 8 hook and white wool, make 3 chain, join into a ring with a 1st round: *
2 dc in 1 dc; repeat from * to end.
[12 dc] Fasten off. Brim:With white wool and No 5 hook, make 101 chain fairly loosely. Join into
a ring with a slip stitch. Next round: *
1 dc in 1 dc but going through the back loop only of each dc; repeat from
* to end. To Make UpPress top of crown only. Don hat with best frock and cotton gloves, and go for a promenade on the sea front. |
Materials
|
Instructions.Note: Yarn is used double throughout. Make 5 chain, join in a ring with slip stitch (ss) in 1st chain. Repeat the last round 13 times more. Make row of holes for cord as follows: Brim23rd round: ss in next st, 1 dc in
this st, * 2 ch, 1 dc in next ch sp,
2 ch, 1 dc in 2nd htr of previous round; repeat from *
ending last repeat, 2 ch, ss in 1st dc. To Make UpTo prevent heavy pressing and use of an iron, either
of which could be injurious to fabric, some yarns state that they should
not be pressed. Light pressing is suitable as follows:
|
Materials
|
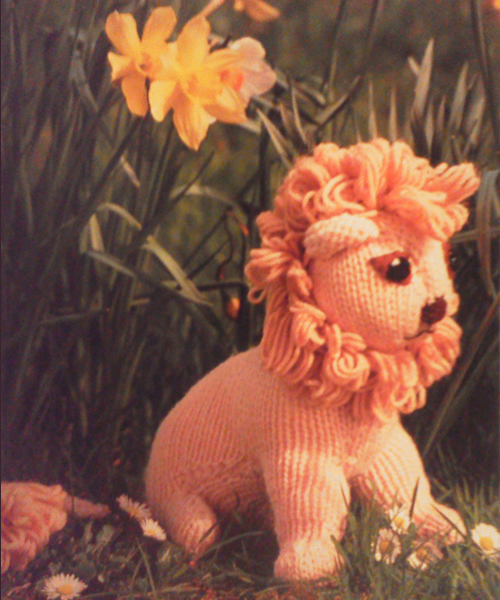
So says 17th century weather-watching folklore in respect of March. So here are a couple of delightful toy patterns to herald the change of season.
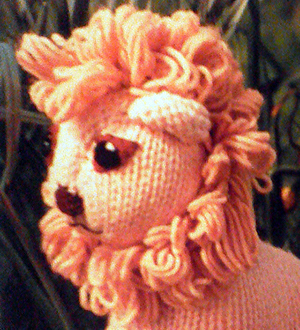
LION INSTRUCTIONS.Note that: the lion is knitted with the yarn doubled (2 strands held together). Front Legs (make 2 mirror image)Using 2 strands of main colour (M), and 5½mm needles, cast on 19
stitches. 5th row: k4, (k2tog) twice, k3, (sl1,
k1, psso) twice, k4. 13th row: k1, m1, k4, m1, k1, m1,
k4, m1, k1. [15 sts] 19th row: k1, m1, knit to last stitch,
m1, k1. 23rd row: k1, m1, knit to last stitch,
m1, k1. Cast off 9 stitches, knit to end of row, and leave remaining 10 stitches on a stitch holder. Work a second leg the same way, omitting the last purl row and working the cast off row on a purl row to reverse the shaping. Body Using 2 strands of main colour (M), and 5½mm needles, cast on 44
stitches. Cast off 12 stitches at the beginning of the next 2 rows for back legs. Increase 1 stitch at each end of the next and following 2 alternate rows. Repeat the last 2 rows twice. Cut yarn. Join in Front Legs: Next row: k18, (k2tog) twice, k2,
(sl1, k1, psso) twice, k18. [42 sts]. Next row: k1, m1, k17, k2tog, k2,
(sl1, k1, psso), k17, m1, k1. Next row: k18, k2tog, k2, (sl1, k1,
psso), k18. [40 sts]. Next row: k1, m1, k16, k2tog, k2,
(sl1, k1, psso), k16, m1, k1. Next row: k15, (k2tog) twice, k2,
(sl1, k1, psso) twice, k15. [36 sts]. Next row: k1, (sl1, k1, psso), k10,
(k2tog) twice, k2, (sl1, k1, psso) twice, k10, k2tog, k1. [30 sts]. Next row: k1, (sl1, k1, psso), k7,
(k2tog) twice, k2, (sl1, k1, psso) twice, k7, k2tog, k1. [24 sts]. Next row: k7, (k2tog) twice, k2,
(sl1, k1, psso) twice, k7. [20 sts]. Divide for head and face1st row: k1, m1, k6, k2tog, k1. Turn. 5th row: (k1, m1) 6 times, k5, k2tog,
k1. 7th row: k4, (m1, k1) twice, k10,
k2tog, k1. 9th row: k17, k2tog, k1. 11th row: k1, (sl1, k1, psso), knit
to last 3 stitches, k2tog,k1. Repeat the last 2 rows twice more. Cast off 3 stitches at the beginning of the next 2 rows. With right side of work facing, rejoin yarn to remaining 10 stitches on the stitch holder, and work the other side of the head to correspond with the first side, reversing shaping. To reverse shaping, read rows from end to beginning, or, rejoin yarn with wrong side of work facing and then read knit for purl, and purl for knit. Front GussetUsing 2 strands of main colour (M) and 5½mm needles, cast on 6 stitches. Place marker threads and the end of the last row. Next row: k3, (k2tog) twice, k2,
(sl1, k1, psso) twice, k3. [12 sts]. Next row: k3, k2tog, k2, sl1, k1,
psso, k3. [10 sts]. Next row: k2, (k2tog) 3 times, k2.
[7 sts]. Next row: k2, k3tog, k2. [5 sts]. Next row: k1, k3tog, k1. [3 sts].
Last row: k3tog, and finish off by drawing yarn through last stitch. Head GussetUsing 2 strands of main colour (M) and 5½mm needles, cast on 4 stitches
for base of nose. 9th row: k1, m1, knit to the last
2 stitches, m1, k1. 15th row: (k1, m1) twice, knit to
the last 2 stitches, (m1, k1) twice. Decrease 1 stitch at each end of the next and every following 4th row until 2 stitches remain. Work 3 rows. Last row: k2tog, and draw end of yarn through last stitch. Mane Using 2 strands of contrast colour (C) and 5½mm needles, cast on
33 stitches. 1st row: knit. Ears (make 2)Using 2 strands of main colour (M) and 5½mm needles, cast on 9 stitches. TailUsing 2 strands of main colour (M) and 5½mm needles, cast on 30
stitches. Tail tipUsing 2 strands of contrast colour (C) and 5½mm needles, cast on
9 stitches. To make upFold front legs in half and seam along cast-on edges and up leg to cast-off
edge. Stuff each section as it is seamed. |
Materials
|
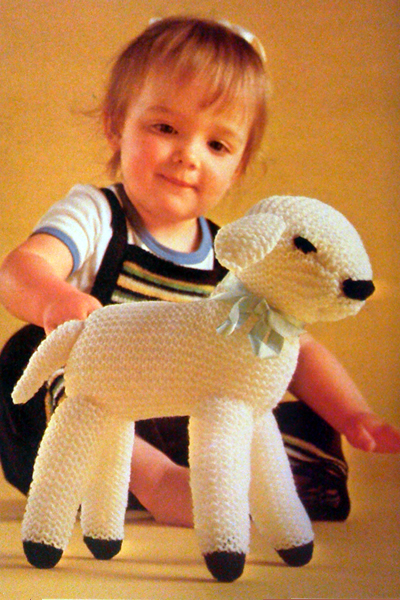
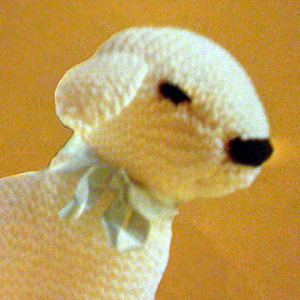
LAMB INSTRUCTIONS.This pretty toy is simply knitted in garter stitch (every row knitted). You use only the basic increasing and decreasing stitches to shape the body. This shows the shape of the pieces:
Body (make 2)With white yarn cast on 28 stitches. 1st row: k1, increase in next stitch,
knit to the last 2 stitches, increase in next stitch, k1. Divide for neck: Rejoin yarn for back to neck edge of remaining 19 stitches from stitch
holder, an knit 4 rows. Head GussetWith white cast on 3 stitches. Knit 9 rows. Ears (make 2)With white cast on 9 stitches. Legs (make 4)With white cast on 17 stitches.
TailWith white, cast on 12 stitches. Next row: k1, k2tog, knit to the
last 3 stitches, k2tog, k1. Thread yarn through remaining 8 stitches and draw up tight. To make upSeam or graft body pieces together along back. |
Materials
|
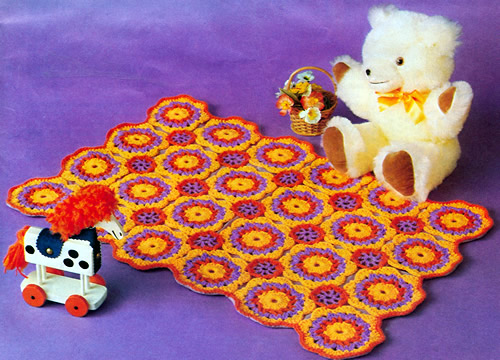
There maybe just enough time to crochet a simple cover if you can get over the lurid sixties colour schemes. [I'm sure you can choose your own combinations which would be less traumatic for a baby].
InstructionsThe crochet blanket is made up of a number of large motifs sewn together and then joined with smaller motifs which are integrated as you work. Large Motif (make 24)Using No 7 (4½mm) hook and DK in Light colour (L) make 6ch loosely and join in a ring using a slip stitch. 1st round: 3 chain, work 23tr into
the ring and join with a slip stitch to top of 3ch. [24 sts]. This completes the motif. To Make UpUsing L, join motifs by stitching centre stitches of each motif together,
and making 6 rows of 4 motifs. Work 15 small motifs to fill the spaces formed by the larger motifs and join together as follows: Small Motif (make 15 - joining as you work)The smaller motifs are worked in 4 ply. 1st round: 6 chain, work (1tr, 3ch)
7 times into the ring and join with a slip stitch to 3rd of 6 ch. This completes the motif - work the other 14 in the same way. FinishingWith right side facing, Using No 7 (4½mm) hook and M in DK, work
1 round of dc around scalloped edge of cover. Block the blanket by pinning it out and dampening; leave to dry. You can press very lightly with a damp cloth - just hold the iron above the cloth so it heats it but do not press down. You want to leave the texture of the stitches in place, so do not press heavily. Cut the lining material to fit around the scalloped edges. Turn in the edges and catch down all around the scallops inside the dc border. |
Materials
|
The original yarn was bri-nylon - famous for its hard wearing properties and luminous colour ranges. Although "bri-nylon" is not very marketable now, modern acrylic yarns are a worthy replacement being soft yet robust with a wide choice of colours.
Stylecraft have a good range of acrylics with equivalent colours available in DK and 4ply.
There maybe just enough time to knit a simple cover if you can get over the dramatic sixties colour scheme. [I'm sure you can choose your own combinations].
InstructionsThe pattern uses DK weight yarn with 2 strands held together. Motif (make 12)Using main shade (M) cast on 96 stitches and work 11 rows in garter stitch (every row knit but slip the first stitch of every row). Next row: Sl1, k7, slip these 8 stitches on to a thread; k4, increase in the next stitch, (k9, increase in next stitch) 7 times; k5; slip the next 8 stitches on to a thread (88 sts). Joining in contrast (C) as required and work in pattern as follows: 1st row: Sl1, k2C, *
k4M, k2C, repeat from * to last stitch,
k1M. These 8 rows form the pattern. Continue in pattern until main part measures approximately 26½ inches
ending with a 2nd pattern row. Borders and finishingWith wrong side facing, rejoin M to the 8 border stitches on left
side and work in garter stitch until Border measures 26 inches from cast-on
edge, ending with wrong side facing. Sew remaining Border in position. |
Materials
|
The original yarn was bri-nylon - famous for its hard wearing properties and luminous colour ranges. Although "bri-nylon" is not very marketable now, modern acrylic yarns are a worthy replacement being soft yet robust with a wide choice of colours.
You could also consider knitting a single strand in a heavier weight yarn - Aran, worsted, even chunky. However you would need to knit a tension square in the pattern stitches.
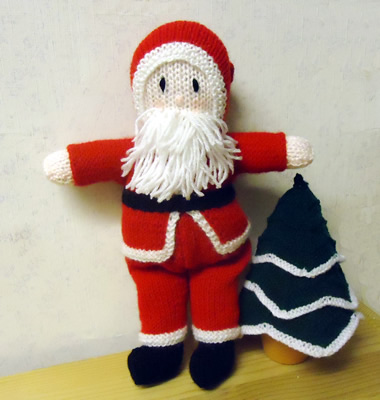
So is he a "Santa Claus" or is he a "Father Christmas"? I never thought much about this until my friend Louise (an American) suggested there was a difference; in the ensuing discussion, it seems my guess did not gel with her view. I think she told me that Father Christmas is the traditional old chap and that Santa Claus is one in red with the white trim.
Anyway - which ever he is, I'm sure he'll make a nice little seasonal knitted toy.
This example knitted by my friend Jennie, and if you live around Ewell in Surrey in the UK you can find her work for sale at local craft fares .
Instructions.Note that: the body is knitted with the yarn doubled (2 strands held together), and the clothes are single. BodyWith white yarn (W) and 3mm needles and yarn used double, cast on 20 stitches and work 3½ inches in stocking stitch (1 row knit, 1 row purl). Shape shoulders by casting Off 5 stitches at the beginning of
the next 2 rows. [10 sts]. Now increase 1 stitch at each end of every row until there are 18 stitches. Work 14 rows straight for back of head. Now decrease 1 stitch at each end of every row until 8 stitches remain. Join the two halves together and stuff firmly. Arms (Make 2)With yarn C, cast on 14 stitches, and work 1 inch in stocking stitch, ending with a purl row. Break off C. Join in W, and continue until work measures 2½ inches. Fold in half lengthways and join seam, leaving top open for stuffing. Stuff and sew to body. Legs (Make 2)With yarn B, cast on 24 stitches, and work 1 inch in stocking stitch, ending with a purl row. Next row: k8, cast off 8, k8 [16 sts] Work across these 16 stitches for 1 inch, leaving 8 cast-off stitches for toe of boot. Break off B. Join in yarn W, and continue straight until work measures 3½ in.
Coat (Fronts)For the left front: with yarn W, cast on 16 stitches, and knit 4 rows. Break off W. Continue in red (R) and white (W) thus: Cast on 10 stitches at the beginning of the next row for the sleeve,
then work 1 inch straight on these 26 stitches, ending at the neck edge.
Work the right front to correspond, reversing all shaping. Coat (Back)With yarn R, p19 stitches from the from right front, cast on 10 stitches, then p19 from left front. Continue in stocking stitch for l inch Cast off 10 stitches at the beginning of the next 2 rows, then work 2½ inches, finishing with 4 rows of garter stitch in white (W). Join side and sleeve seams of coat and fit on body, then join the front edges in white from neck to waist. Trousers (Make 2)With yarn W, cast on 30 stitches and k4 rows. Break off W. Join in yarn R, and work in stocking stitch until piece measures 2½
inches, then increase 1 stitch at each end of the next and every alternate
Continue straight until work measures 5 inches from the start. Join seams and fit on body. Attach garments to body stitching round neck, wrists, waist of trousers and top of boots. HoodWith yarn W, cast on 36 stitches, and knit 4 rows. Join in R, and work straight in stocking stitch until piece measures
3½ inches. Then k2tog at the beginning of every row until 4 stitches
remain. Fold in half lengthways and join seam from point to start of shaping.
Embroider featuresTaking photo as a guide use blue for eyes and black for eyebrows and nose. Make moustache and beard with loops of white, sewing in position. Belt With yarn B, cast on 4 stitches, and work 5 inches in garter stitch,
(every row knit). Cast Off. Sack (not shown in photo)With white (or any colour of your choosing), cast on 34 stitches and
work 3 inches in stocking stitch. Cast off. With double yarn (or make a 2-ply twisted rope) gather up sack and sling round shoulder and under arm. |
Materials
|
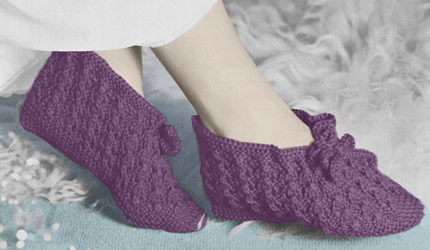
A lovely old-fashioned pair of knitted slippers. Make them using a luxury yarn in a striking colour for a quickly knitted Christmas gift.
InstructionsInstructions in 3 sizes, each size separated by forward slash (/). Both slippers are worked alike. Slipper (make 2)With No 11 needles, cast on 90/95/100
stitches and work 12 rows in garter stitch (that is: every row knitted). Change to pattern as follows: 1st row: k4, *
p2, k3; repeat from * to last 6 stitches,
p2, k4. 3rd row: k1, *
wfwd, slip 1, k2tog, psso, wrn, p2, *
to last 4 stitches, wfwd, slip 1, k2tog, psso, wrn, k1. Repeat these 4 rows 3 times more, then rows 1-3 inclusive again: 19 pattern rows. Work 5 rows in garter stitch. Cast off. Make a second slipper in the same way. To Make UpPress parts lightly on wrong side under a damp cloth. Fold foot pieces in half and join centre back and foot seams neatly with a flat seam. Thread ties through holes made in 19th row of the patterning. Press seams. Note: |
Materials
|
An extra Christmas gift just for you. Don't bother to thank me - it's priceless I think you'll agree.
Perfect if you are thinking of elf-themed fancy dress this Christmas - and I can recommend that you use any left-over felt to make a matching elfish pointy collar.
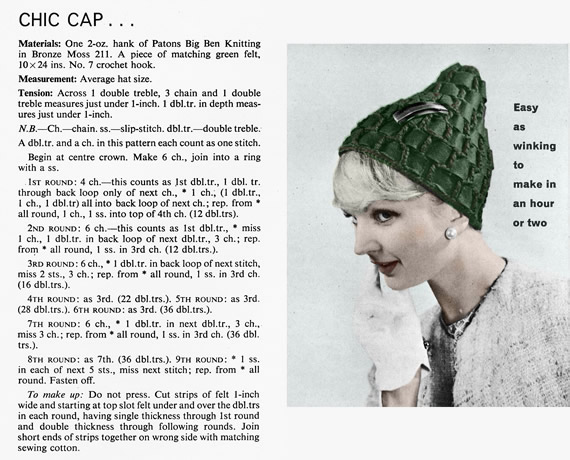
They miss out the key instruction at the end of the making up section .... "Do not wear".
Joking apart, this method of threading ribbon or fabric strips through a crocheted mesh base is a good technique for creating an interesting textured fabric to work with. I have seen it used to good effect making, for example, an evening clutch bag, using more luxurious starting materials.
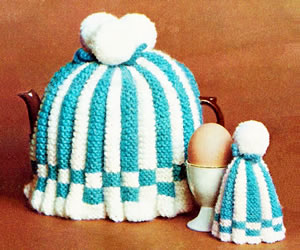
The archetypal cosy design (maybe with a few too many pom-poms for historical verisimilitude but who's counting?). And - no idea why the British are quite so obsessed with hats for their eggs, but it does seem that there is always a matching egg cosy* to complete the set.
*
I think with very fine wool and a bit of adaptation these could become knitted hats for the Big Knit - a campaign from Innocent Smoothies, who are again putting knitted hats on their bottles this year in aid of Age UK (helping older folk face the winter). The advertising says "knit a hat this November" however unfortunately the deadline for knitting is past as the campaign aims to have the hats in place during November - so maybe next year....
However, you can still join in by designing your own virtual hat and sharing on Facebook (10p donation from Innocent), or by buying a smoothie with a hat (25p donation by Innocent), or with a direct donation. Have a look on their website - there are free mini-hat patterns!
InstructionsThe pleats are formed by each colour being drawn up across the back of the colour just used and keeping all the strands to the wrong side of the work throughout. Tea Cosy (make 2 pieces)With No 8 needles and light colour (L), cast on 98sts and knit 5 rows. Join in Dark colour (D) and proceed in pattern as follows: 1st row: k1L, k6D; *
k7L, k7D; repeat from * to last 7
stitches, k6L, k1D. Repeat 1st and 2nd rows until work measures 6 inches from beginning finishing at the end of 2nd row. Shape top as follows: Break off wool, thread end of Light colour through the remaining stitches,
draw up and fasten off securely. Make another piece in same manner. To Make Up the Tea CosyStitch side and top seams leaving openings for handle and spout. Egg Cosy (make 1 piece)With No 10 needles and light colour (L) in 3 ply, cast on 72sts and knit 3 rows. Join in Dark colour (D) and proceed in pattern as follows: 1st row: k1L, k5D; *
k6L, k6D; repeat from * to last 6
stitches, k5L, k1D. Repeat 1st and 2nd rows until work measures 2¾ inches from beginning finishing at the end of 2nd row. Shape top as follows: Work from ‡ to ‡
as on Tea Cosy. To Make Up the Egg CosyStitch side seam. |
Materials
|

Well - it's so much talked about I could not let it pass without a little commemoration could I?
Just make sure you make them for your own special baby - I am sure the Palace is exploding with little woolly items (and in one of the hottest month's on record...).
This crochet pattern is a staggered shell, which I found a little tricky to follow, so use the detail photo at the end for guidance as to what it should look like.
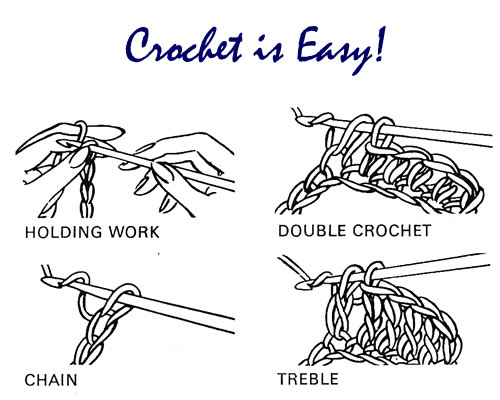
Instructions.Special pattern stitch: And a reminder of English crochet stitches: Double crochet: draw a loop through next stitch, draw a loop
through both loops on hook. [American single]. Bootees (make 2)Beginning at the sole: make 15(17;20;23)ch loosely. 1st round: Miss 3 ch, 3 tr in next
ch, 1 tr in each of next 1(1;2;2)
ch, 1 htr in next ch, 1 dc in each of next 2 ch, 1 htr in next ch, 1 tr
in each of next 2(3;3;4)
ch, 1 d tr in each of next 3(4;6;8)
ch, 9 dtr in last ch. 2nd round: 3 ch, "inc", 1 tr in next st, "inc", 1 tr in each of next 10(12;15;18) sts, ("inc", 1 tr in next st) 4 times, "inc", 1 tr in each of next 10(12;15;18) sts, ("inc", 1 tr in next st) twice, sl st in 3rd ch at beginning. You now have 46(50;56;62) tr, counting the initial 3 ch as 1 tr. 3rd round: Working into the back loops only (leaves a ridge to mark sole): 3 ch, 1 tr in each tr to end; sl st in 3rd ch at beginning. 4th round: 3 ch, 1 tr in each tr to end; sl st in 3rd ch at beg. Repeat the 4th round 0(0;1;1) time(s). Shape InstepYou are now going to work back and forth across the instep in rows. 1st row: 3 ch, 1 tr in each of next
28(30;33;36)
tr, miss next tr, sl st across next 2 tr. Turn. Repeat the 2nd row 4(4;4;6) times. Next row: Miss 2 sl st, 1 tr in each of next 10 tr, 1 tr in each tr to end; sl st in 3rd ch at beg of 1st row to rejoin the round. You now have 28(32;38;38) tr. Next round: 4 ch, miss 1(1;2;2) tr, 1 tr in next tr, * 1 ch, miss 1 tr, 1 tr in next tr, repeat from * to last 1(1;2;2) sts, miss last 1(1;2;2) sts, sl st in 3rd of 4 ch to join the round. You now have 14(16;18;18) holes. Next round: 1 ch, 1 dc in same place
as sl st, * 1 dc in next 1 ch sp,
1 dc in next tr, repeat from * to
last ch sp, 1 dc in 1 ch sp, 1 dc in same place as first dc, DO NOT
JOIN the round. Turn, and work in rows as follows: First size only: 1st row (wrong side): 1 ch, 2 dc in first dc, * 3 ch, miss 3 dc, (1 dc, 3 ch, 3 tr) in next dc, miss 2 dc, (1 dc, 1 ch, 1 dc) in next dc, repeat from * ending last repeat with 2 dc in last dc instead of (1 dc, 1 ch, 1 dc). 2nd, 3rd and 4th sizes: 1st row (wrong side): 1 ch, 2 dc in first dc, * 3 ch, miss 3 dc, (1 dc, 3 ch, 3 tr) in next dc, miss 2 dc, (1 dc, 1 ch, 1 dc) in next dc *; repeat from * to * (0;1;1) times; 3ch, miss (2;3;3) dc, (1 dc, 3 ch, 3 tr) in next dc, miss (2;3;3) dc, (1 dc, 1 ch, 1 dc) in next dc (3;1;1) times; repeat from * to * (1;2;2) times, ending last repeat with 2 dc in last dc instead of (1 dc, 1 ch, 1 dc). All sizes: You now have 4(5;5;5) patterns. 2nd row: (3 ch, 1 tr) in first dc, * 3 ch, (1 dc, 3 ch, 3 tr) in next 3 ch sp, miss next 3 ch sp, (1 tr, 1 ch, 1 tr) in next 1 ch sp, repeat from * ending last repeat with 2 tr in last dc instead of (1 tr, 1 ch, 1 tr). 3rd row: (3 ch, 1 tr) in first tr, * 3 ch, (1 dc, 3 ch, 3 tr) in next 3 ch sp, miss next 3 ch sp, (1 tr, 1 ch, 1 tr) in next 1 ch sp, repeat from * ending last repeat with 2 tr in top of turning ch instead of (1 tr, 1 ch, 1 tr). Repeat the 3rd row 1(1;3;3) times. Next row: (3 ch, 1 tr) in first tr, * 3 ch, 1 dc in next 3 ch sp, 3 ch, miss 1 sp, (1 tr, 1 ch, 1 tr) in next 1 ch sp, repeat from * ending last repeat with 2 tr in top of turning ch instead of (1 tr, 1 ch, 1 tr). Next row: (3 ch, 2 tr) in first tr, * miss 1 sp, (3 tr, "Picot", 3 tr) in next dc, miss 1 sp, (3 tr, "Picot", 3 tr) in next 1 ch sp, repeat from * to last pattern, miss 1 sp, (3 tr, "Picot", 3 tr) in next dc, miss 1 sp, 3 tr in top of turning ch, "Picot". Fasten off. Make UpUsing a flat seam, join back seam. |
Materials
|
Picture of pattern detail:
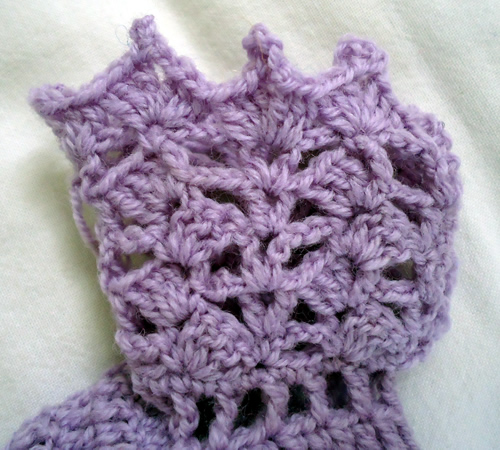
Well - it's so much talked about I could not let it pass without a little commemoration could I?
Just make sure you make them for your own special baby - I am sure the Palace is exploding with little woolly items (and in one of the hottest month's on record...).
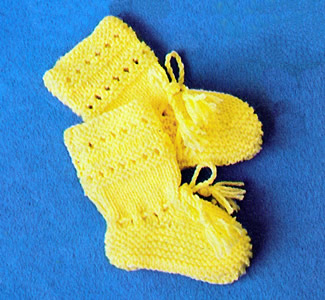
This is the knitted set which is fairly plain with a discreet eyelet pattern, and should be quite simple to make.
Bootees (make 2)With No 10 needles, cast on 33 sts. and knit 1 row. 1st - 4th rows: Knit. Repeat the last 2 rows 4 times more. Next row: as 5th row. Work 14 rows in stocking stitch on these 13 sts. Rejoin yarn to inside edge of 10 sts, then knit up 10 sts along side
of foot; knit across 13 sts on needle, knit up 10 sts from other side
of foot, finally knit across remaining 10 sts. [53 sts] Shape toe: 1st row: (k1, k2tog, k21, k2tog)
twice; k1. Cast off. Make UpPress lightly on wrong side. Join seam. |
Materials
|
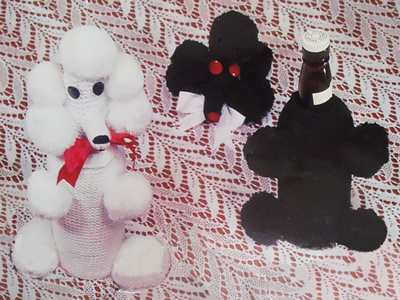
How very 1950s! How very French!.
How could I resist?
At first glance I assumed this was the more usual toilet roll cover (because nobody wants their spare toilet rolls exposed to the world do they?) - but no! It is a "bottle" cover. How much better to have a knitted poodle gracing the dining table rather than leaving your Castle Lafite Rothschild labels tastelessly speaking for themselves. [Actually I think it looks like it's designed for the sherry bottle - perhaps to hide the little nip you need to get through the housework.]
Alternatively you can wimp out and knit it as a toy - provided your child is also into retro 1950s toys, (did I mention that as a kid my favourite toy was a poodle ? ... he wasn't knitted though ..... Pom Pom .... ‹closes eyes in reminiscence›)
[Please note: This has not been knitted up to test the pattern but is provided as per the original. The shapes are very simple and the main effort is in the making up.]
Instructions.The poodle is knitted mainly in garter stitch with some eyelet rows to
carry elastic and drawstring. I think the two methods of assembly have
not been quite thought through in the original pattern, so you need to
use your common sense and refer to the picture when sewing it together. BodyWith No 8 needles cast on 49 stitches, and knit 2 rows. Next row: * k1, wf, k2tog; repeat from * to last stitch, k1. Continue in garter stitch (every row knit) until work measures 7½ inches from the beginning. Next row: *
k5, k2tog; repeat from * to end. [42 sts] Next row: *
k4, k2tog; repeat from * to end. [35 sts] Next row: *
k3, k2tog; repeat from * to end. [28 sts] Next row: *
k2, k2tog; repeat from * to end. [21 sts] Next row: K1; *
k2tog; repeat from * to end. [11 sts] Thread wool through remaining stitches, draw up and fasten off securely. [Editor's note: I think there is a bit of an implied error here - this is the neck, so only draw up to the degree that the neck of the bottle will fit...] HeadCast on 49 stitches, and knit 3 rows. Next row: *
k5, k2tog; repeat from * to end. [42 sts] Next row: * k1, wf, k2tog; repeat from * to last stitch, k1. Continue without any shaping for 3 inches. Next row: *
k2tog; repeat from * to end. [14 sts] Thread wool through remaining stitches, draw up and fasten off securely. NoseCast on 12 stitches, and work 1½ inches in garter stitch. Next row: *
k1, k2tog; repeat from * to end. [8 sts] Thread wool through remaining stitches, draw up and fasten off securely. Pom-PomsMake 8 pom-poms, 2½ inches in diameter. Cut 2 pieces of cardboard the diameter of the finished pom-pom; cut a ½ inch diameter hole in the centre. Wind wool over the rings until the centre hole is filled. With a sharp pair of scissors, cut through the wool at the outer edge. With double wool, bind round the centre of the pom-pom between the two pieces of cardboard; tie a knot and fasten off securely. Remove the cardboard. Fluff out and trim. To Make UpJoin back seam. Take 4 strands of light coloured wool and thread through holes at neck
and secure with a small knot. Tie in a bow. To Make Up the Poodle as a ToyFollow the instructions for the Bottle Cover. [Editor's note: After this there are a few inconsistencies which you need to work out as you go.] Assemble as the bottle cover. Insert a circle of cardboard 3 inches in diameter into the bottom of
the body. Make a roll of stuffing 13 inches long and insert this into
the base firmly, leaving excess sticking out for the head to fit over. Fluff out the stuffing slightly and fit head over it; pull down and stitch
over body. |
Materials
|
How to make pom-poms.
This is a different method which I ran across while looking for the simple tutorial above. It's less relevent for making our Poodle maybe but good if you want to make a load of these for a scarf or a necklace (ok - bit dated perhaps - think of your own project!)
|
|
Toddler slippers for a quickly knitted Christmas gift. The top of each slipper is knitted, and is designed to be attached to a purchased leather sole. You could make your own out of leather (but be prepared to line it - perhaps with quilt batting and fabric, fleece fabric, or a shaped piece of knitting. If you design your own knitted sole you can make it non-slip by sewing on sole-shaped cut-outs from cushioned fabric ("slip-a-grip"); various brand options can be purchased on a roll from kitchen suppliers, or you can buy specialist sewing fabrics for this purpose.
Below I've added a great You Tube link for instructions on how to make your own non-slip soles.
InstructionsBoth slippers are worked alike. The following special abbreviation is used throughout the pattern, making a wide ribbed cable. Tie 5: Insert right-hand needle between 5th and 6th stitches from point of left-hand needle, draw loop through and place on point of left-hand needle, then k2tog, p1, k1, p1, k1.
Slipper (make 2)With No 11 needles, cast on 45 stitches and work 2½ inches in k1/p1
rib, rows on right side having a k1 at each end. Slip first and last 6 stitches on safety-pins for heel. With right side facing, rejoin wool to the centre 33 stitches and with No 9 needles continue in pattern for instep as follows:- 1st row: p4, (rib 5, p5) twice, rib
5, p4. Repeat the last 2 rows once more. 5th row: p4, tie 5, p5, rib 5, p5,
tie 5, p.4. Repeat 1st and 2nd rows twice more. 11th row: p4, rib 5, p5, tie 5, p5,
rib 5, p4. These 12 rows form pattern. Repeat, them once more, then rows 1-6 inclusive again. Continue in pattern decreasing 1 stitch at each end of next and following 2 alternate rows: 27 stitches remain. Now decrease 1 stitch at each end of every row until 15 stitches remain. Cast off. Join side edges of ribbing to form back seam. For the heel: Next row: p twice in 1st Stitch,
p to last stitch, p twice in last stitch. FinishingPin out patterned part and heel of each slipper and press on wrong side
under a damp cloth, avoiding ribbing. Pin tops to slipper soles and sew firmly in position. |
Materials
|
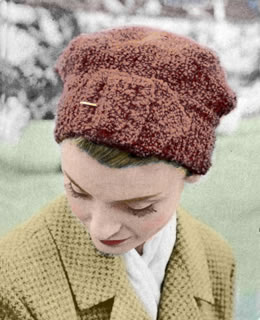
Charming retro hat with decorative band and buckle.
I learned from the Debbie Bliss Magazine Autumn/Winter 2012 that one of my favourite designers, Louisa Harding, has been facing up, with her husband, to his challenge of being treated for lymphoma. In appreciation for the help of Macmillan nurses, Louisa is taking part in Macmillan's Nepal Hiking Challenge and seems well on her way to raising her goal of £5000.
To help achieve the target She has put together a series of seven knitting patterns called 'Himalayan Hiking Hats'. She will have her photo taken wearing each one of the hats on the first 6 days of the trek. The seventh hat pattern in the series will be knitted 'en route' and photographed on the 7th (last) trekking day.
Download the hat patterns from her site and show your support by sending a donation.
Instructions.The main hat is knitted in reverse stocking stitch, with the band in garter stitch. The design is intended for a textured yarn. CrownUsing the 5 No 10 needles, cast on 8 stitches, placing 2 stitches on each of 4 needles. 1st (and every alternate) round:
purl 6th round: *
k2, knit twice in next stitch; repeat from *
all round. [32 sts] Continue increasing 8 stitches thus on every alternate round until there
are 36 stitches on each needle. [144 stitches] Next round: *
k16, k2tog; repeat from * all round.
[136 sts] Cast off. BandCast on 16 stitches, and work a strip in garter-stitch (every row knit)
22 inches long - or length required to fit round head with 3 inches to
spare. Now decrease 1 stitch at each end of the next and every alternate
row until 2 stitches remain; k2tog and fasten off. This forms a point. Stitch the cast-on edge of the band to the buckle, then slot the shaped end through the buckle pulling it through until the band fits round the head snugly. To Make UpPin band in position evenly all round crown noting that the purl side
of the crown is the right side. |
Materials
|
A word on the wool.Patons Rimple was a softly textured bouclé yarn, (97% wool, 3% nylon), which knitted to a double knitting tension. This hat is knitted on finer needles than usual so the knitted fabric will be denser and stiffer, giving the hat more body. There are a few double knitting bouclé yarns available though many tend to be chunky weight. Debbie Bliss seems to have discontinued the Cashmerino Astrakhan but you can still obtain it at some outlets on the internet (and often discounted). Rowan have recently brought out a British Sheep Breeds "fine" bouclé but this still seems to knit up to a chunkier tension. You can try and obtain the right tension with finer needles - and I think this would produce an excellent knitted fabric for the hat - but be warned that knitting bouclé tightly on small needles is very hard work. I cannot supply the yardage of Rimple, and can only guess that "Harlequin" was a multi-coloured tweed. | |
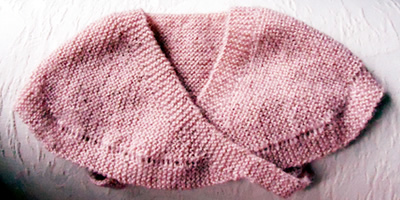
This is so very easy to knit and looks so cute over a (Liberty?) cotton baby frock. No idea how practical it is to keep in place, but it has secure back fastening straps and is perfect as a gift or for that special summer baby occasion.
InstructionsThe shawlette is worked in garter stitch (every row knitted) throughout. You start your knitting at the bottom of the back and work up towards the neck, where you divide and complete each front section separately. It is designed to cross over at the front, and button into place at the back. Using No 12 needles, cast on 50 sts and work in garter stitch for ½ inch (approximately 8-9 rows). Next row(make eyelets): K6; **
wrn, k2tog; repeat from ** to last
6 sts; k6. Start to shape the back as follows: 1st row: K6, wrn; knit to last 6 sts; wrn, k6. Repeat these two rows, (increasing 2 sts on each alternate row), until there are 115 sts. Your work then measures approximately 5¾ inches from the beginning. Now start to shape the right front, working each side of the neck separately. Next row: K6, wrn, k40, turn. Working only on these 47sts: 1st row: Knit. Repeat these two rows, (decreasing 1 stitch on each alternate row), until 15 sts remain. Next row: K6, wrn, k3tog, k6 Repeat the last 2 rows until 6 sts remain (your last decrease row will be "k2tog, k5"). Work strap, buy continuing to knit on these 6sts for 2¼ inches. Next row (make buttonhole): K2, cast
off 2, knit 2. Now pick up the sts left on the spare needle and join yarn to neck edge where you left off. Cast off 23 sts then, start to shape the left front, by knitting to the last 6sts, wrn, k6 [47 sts]. Working only on these 47sts: 1st row: Knit. Repeat these two rows, (decreasing 1 stitch on each alternate row), until 15 sts remain. Next row: K6, s2,k1,pass 2 slipped
sts over; wrn, k6 Repeat the last 2 rows until 6 sts remain (your last decrease row will be "k5, s1,k1,psso"). Work strap, buy continuing to knit on these 6sts for 2¼ inches, and finishing with a buttonhole as for the right front. To Make UpDo not block or press. |
Materials
|
Here's a view showing you the back.
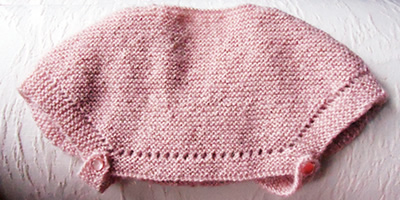
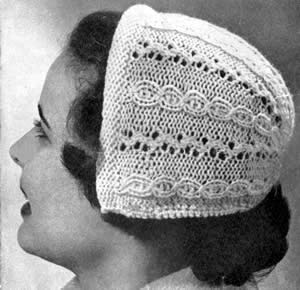
This type of bonnet was very popular in the 1950s - at least it was much favoured by Paton and Baldwin, using their Fuzzy Wuzzy angora**. I think, following the 1940s roll, it went with the more modern shorter hairstyles, and was possibly the half-way house to what was essentially the demise of the hat for everyday wear. Anyway - I am sure they explored every possible variation on this basic style.
**Perhaps not the best marketing brand for today's knitters.... However, angora wool is very light weight and was sold in half ounce balls; this gives you the clue that it was relatively expensive, so a tiny little cap - or perhaps bolero - was ideally affordable. (And did I mention fluffy? even I - never allergic to anything - am prone to fits of sneezing when wearing angora).
Note that there are two versions of the bonnet for different yarn weights.
Instructions for the double knitting bonnetPattern stitch is worked over 6 rows: 1st row (right side facing): *
p3, k3, p3; leave wool forward (wfd), k2tog; repeat from *
to last 9 sts; p3, k3, p3. [Editor's note: The above pattern repeat of 6 rows is as given in the original instructions. If you compare the photo below with my version, you will see the eyelet arrangement is slightly different between the two. I worked (k2tog, wrn) and then (wrn, k2tog) alternately on the right side rows; this does not fit with the 6 row repeat of the mock cables. I have not written out my resulting 12 row repeat for you, but if you want to do this it is quite simple to keep track of the two patterns as you knit, one having a 4 row repeat, and the other, a 6 row repeat. Knit to the correct number of rows overall, and make sure you keep it consistent when you get to the decrease rows. ]
To Make:Cast on cast on 64sts using the knit cast-on method to give a loose edge.
Work 9 rows in stocking stitch (one row knit, one row purl), ending with
a knit row. Now make the hem for the hair-band casing as follows: Hem row (purl side facing, which is the
right side of the work): Fold the hem so that the cast on edge
is aligned at the back of the needle containing your working sts; *
knit one stitch on the needle with one loop from the cast on edge; repeat
from * to end. Now commence the pattern - work the 6 pattern rows five times. Start the shaping: 31st row (first shaping row): p3,
k3, p3; * leave wfd, k2tog, p2tog,
p1, k3, p1, p2tog; repeat from * to
last 11sts; leave wfd, k2tog, p3, k3, p3. [56sts] 37th row (second shaping row): p3,
k3, p3; * leave wfd, k2tog, p2tog,
k3, p2tog; repeat from * to last 11sts;
leave wfd, k2tog, p3, k3, p3. [48sts] 43rd row (third shaping row): p3,
k3, p3; * leave wfd, k3tog, k2, sl1,
k1, psso; repeat from * to last 11sts;
leave wfd, k2tog, p3, k3, p3. [40sts] Next row: Cast off 9sts; knit to
the last 9sts; cast off 9 and fasten off. To CompletePin out and press the work lightly on the wrong side with a warm iron
over a damp cloth. With the right side of the bonnet facing you, join the wool to one side
edge, at the inner edge of the hem (ie do not crochet the ends of the
hem together, as you need to thread your plastic hair band into it), and
work one row of double crochet all around the neck edge, finishing atthe
same position on the opposite side of the front. Draw the edge in slightly
as you work. Slip the hair band through the front casing, and then seam the short ends to close it off. Sew in and neaten all ends. |
MaterialsOriginal materials called for: 2 ozs double knitting wool. One pair of No 7 (4½mm) needles. One No 11 (3mm) crochet hook. 1½ yards elastic thread. A plastic hair band. Tension21 sts and 29 rows to 4 inches. Size mattersTo fit "an average head". Abbreviationsinc: increase by working into the front and back of the next stitch. dc: double crochet. A word on the wool.Original yarn Sirdar Majestic. I used Phildar Partner 6 in a lovely red shade, (50% nylon, 25% wool,
25% acrylic).
Disclaimer
|
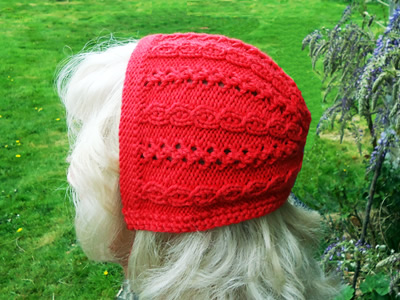
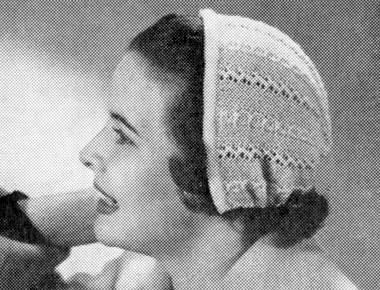
Here is the same bonnet in a finer yarn. Normally, I would say finer yarns make a better result, (I know: "it depends"...). However, I actually prefer the double knit version of this style which seems better proportioned.
Instructions for the 3-ply bonnetPattern stitch is worked over 6 rows: 1st row (right side facing): *
p5, k3, p5; leave wool forward (wfd), k2tog; repeat from *
to last 13sts; p5, k3, p5. To Make:Cast on cast on 103sts using the knit cast-on method to give a loose
edge. Work 11 rows in stocking stitch (one row knit, one row purl), ending
with a knit row. Now make the hem for the hair-band casing as follows: Hem row (purl side facing, which is the
right side of the work): Fold the hem so that the cast on edge
is aligned at the back of the needle containing your working sts; *
knit one stitch on the needle with one loop from the cast on edge; repeat
from * to end. Now commence the pattern - work the 6 pattern rows eight times. Start the shaping: 49th row (first shaping row): p5,
k3, p5; * leave wfd, k2tog, p2tog,
p3, k3, p3, p2tog; repeat from * to
last 15sts; leave wfd, k2tog, p5, k3, p5. [93sts] 55th row (second shaping row): p5,
k3, p5; * leave wfd, k2tog, p2tog,
p2, k3, p2, p2tog; repeat from * to
last 15sts; leave wfd, k2tog, p5, k3, p5. [83sts] 61st row (third shaping row): p5,
k3, p5; * leave wfd, k2tog, p2tog,
p1, k3, p1, p2tog; repeat from * to
last 15sts; leave wfd, k2tog, p5, k3, p5. [73sts] 67th row (fourth shaping row): p5,
k3, p5; * leave wfd, k2tog, p2tog,
k3, p2tog; repeat from * to last 15sts;
leave wfd, k2tog, p5, k3, p5. [63sts] 73rd row (fifth shaping row): p5,
k3, p5; * leave wfd, k2tog, k1, k3tog,
k1; repeat from * to last 15sts; leave
wfd, k2tog, p5, k3, p5. [53sts] Next row: Cast off 13sts; knit to
the last 13sts; cast off 13 and fasten off. To CompletePress and complete as for the double knitting version of the bonnet. |
MaterialsOriginal materials called for: 1oz of 3-ply fingering wool. One pair of No 11 (3mm) needles. 1½ yards elastic thread. A plastic hair band. Tension30 sts and 44 rows to 4 inches. Size mattersTo fit "an average head". Abbreviationsinc: increase by working into the front and back of the next stitch. dc: double crochet. A word on the wool.Original yarn Sirdar Majestic. Disclaimer
|
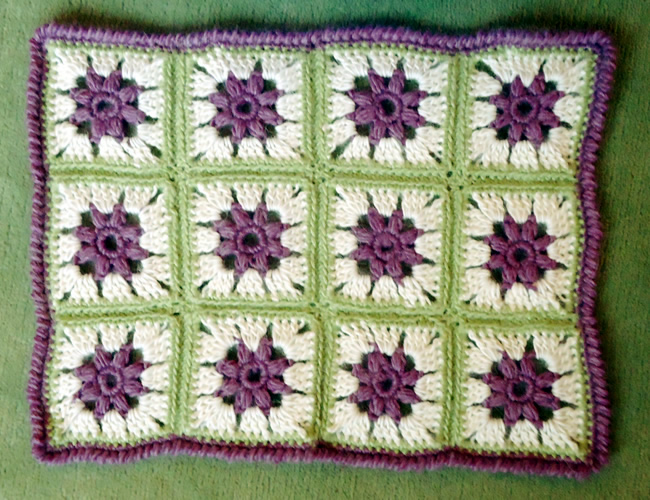
This is small blanket or cot cover made from 12 crochet squares in chunky yarn (so quick to make). It's based the usual granny-square principle, but a very pretty example of it incorporating the central flower motif.
InstructionsThere are a couple of new stitches used in this pattern, as well as basic chain, dc, and treble. There is a "cluster" used in making the central flower, and crab stitch for the edging. Make cluster: Working all into the same stitch, **yoh,
draw through loop **; repeat from
** to **
4 times (9 loops on hook); yoh, draw loop through all loops on hook; yoh,
draw loop through stitch on hook. Crab stitch is worked exactly as you do double crochet - but from right to left instead of left to right. It seems very awkward but just force yourself to do it; push the hook through the stitch to the right of your needle, pull through a loop, then yoh and pull through both loops on hook. It creates a very attractive twisted ribbed edge. There a is you tube extract inserted at end of this item - or go search the web for "crab stitch" for a variety of explanations. Motif (make 12)Starting at the centre of the square: using 7mm hook and first contrast, (plum), make 6ch and join in a ring using a slip stitch. 1st round: 8dc into the ring and
join with a slip stitch to top of first dc. Fasten off. This completes the motif. 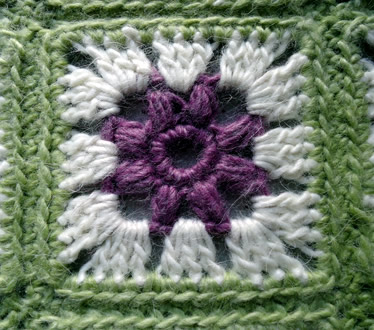 To Make UpMake 12 squares altogether. With 7mm hook and 3rd contrast (lime), join 2 squares together; hold
right sides together and slip stitch through the back loop of each dc,
leaving the front loops exposed as a decorative ridge on the right side
(see photos). Join 3 squares in a row, then join the 4 rows together. Finally, using first contrast (plum) and right side facing, work a row of dc all around the blanket, and work 2 or 3sts into the 4 corner sts, to make it curve properly. Then, keeping the right side facing you, change to a 6mm hook and go back the way you came, working one row of crab stitch right to left. Sew in all ends. Block the blanket by pinning it out and dampening; leave to dry. You can press very lightly with a damp cloth - just hold the iron above the cloth so it heats it but do not press down. You want to leave the texture of the stitches in place, so do not press heavily. |
Materials
|
Here is a You Tube item showing how to do crab stitch,
(a picture painting a thousand words and so on).
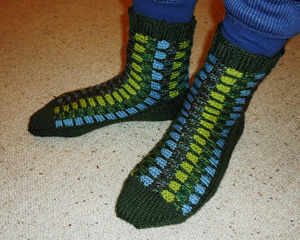
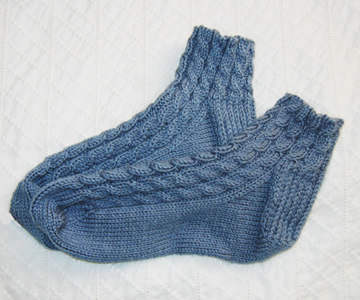
Father George: so fond of his bedsocks that they get worn out. [Since he is not bedridden I can only surmise he does not restrict their use to the bedroom!] Hence - by request - here are some more.
The patterned section of the sock is knitted sideways using a variation of a honeycomb stitch; it's an opportunity to use up really small amounts of double knitting yarn. I rotated 4 contrast colours but you could use a different colour for every set of rows; the key is to keep some consistency in the main colour.
Instructions.The first section of these socks is knitted sideways making a "T"
shape where the upright of the "T" is the upper foot, and the
cross bar curls around the leg to form the cuff, meeting at the back seam. First section (knit 2)Starting at the back leg seam, with main shade (M) cast on 23 sts on 2 needles and knit one row. Commence pattern. Join in contrasts (C1, C2 etc): Repeat rows 1-10 using different contrasts, once more. Next row(wrong side facing): Cast
on 40 sts, and then work across them and all sts, as for 1st row of pattern. [63sts] Continue to work the pattern on these 63 sts, working rows 1-10 three
times, and then rows 1-4. Next row(wrong side facing): Using main shade, cast off 40 sts, and purl across remainder. [23sts] Continue to work the pattern on these 23 sts, working rows 6-10, then
rows 1-10 once, times, and then rows 1-4. Second section (heel and sole).The remainder of the socks are worked entirely in the main shade. For the heel: with right side of the first section facing, oriented like an upside down "T" pick up 11 sts from each side of the instep:
Pick up and knit 11 sts from the left side first, ending at the cast on edge (which will be the centre back, and then turn the work over and bend round the second side, and pick up 11sts from the right side. The sock cuff now forms a circle with the back seams together, but not yet sewn.
Turn and purl 1 row across these 22 sts. Next row(right side facing): *
Sl1, k1, repeat from * to end. Repeat the last 2 rows 10 times more. Turn the heel: Next row: Sl1, k12, k2tog, k1. Turn. Continue to work short rows and decrease in this way until all sts have been incorporated. [14sts]. Next row(right side facing): Sl1,
k13, pick up and knit 13 sts down side of heel. Turn. Now work the instep decreases and sole: Next row: K1, sl1, k1, psso; knit
to last 3 sts, k2tog k1. Turn. Repeat the last 2 rows until 22 sts remain. Continue to work a further 50 rows to make the sole - upper and lower
foot sections should be about the same length. ToeNow we move to working in the round. Knit 11 sts on first double-pointed needle, 11sts on second, then with
right side facing, using third needle, pick up and knit 24 sts across
the toe edge of the first section. Next round: K1, sl1, k1, psso; knit to last 3 sts on third needle, k2tog k1. Complete the round by knitting the 11 sts on each of the first and second needles. [44 sts] Next round: K1, sl1, k1, psso; knit
to last 3 sts on third needle, k2tog k1; on first needle, k1, sl1, k1
psso; knit to end; on second needle, knit to last 3 sts, k2tog k1. Repeat the last 2 rounds until 16sts remain. Making upSew seams on each side of the sole, using a flat seam technique (not mattress stitch for example). Using double pointed needles and main shade, pick up 60-66 sts round top of sock and knit a k3/p3 rib for about 8 rows (or as long as you want), to form the welt. Cast off loosely. Sew in all ends. |
Materials2 x 50g balls of double knitting yarn, and a variety of left over DK colours. One pair and one set of four No 8 (4mm) needles, pointed at both ends. Tension22 stitches = 4ins Size mattersLength of foot, 9 inches (adjustable). AbbreviationsM is main shade (olive). sl1: slip the next stitch k2tog or p2tog: work 2 sts together to decrease. psso: pass the slipped stitch over, (also known as "ssk"; effectively you are "knitting 2 together through back loops") A Word
|
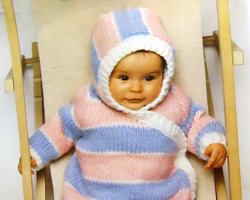
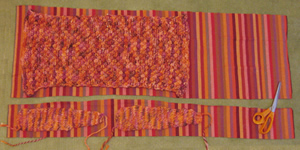
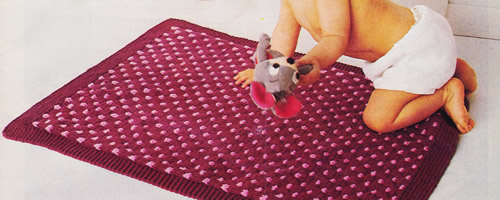
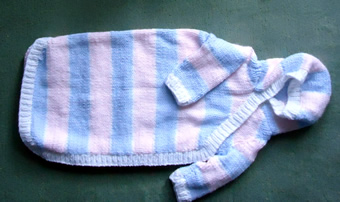
This is a vintage baby-bag pattern probably intended for babies up to 3 months in age. It's very simple to knit and fastened around the edge with easy poppers. It's tempting to knit this in beautiful, soft, lofty yarns - however, it does need to be washable, if not so very hard wearing.
OK - maybe not so many colours - but so cute!
InstructionsThe striped pattern is worked as follows: 1st row: Knit in main shade These 22 rows are repeated to form the striped pattern. BodyThe body is worked in one piece; you start off knitting short, shaped pieces for the back and front separately then join them both onto one needle. The pattern as written should work out that the stripes match up when you join them together - make sure they do - and you may want to use a circular needle for the 86 stitches in chunky yarn. Back: With No 4 (6mm) needles and second contrast (Pink), cast on 25 sts and
purl one row. 1st row(right side): Cast on 3, knit
to end. Change to white yarn for 1 row: Change to blue yarn for 9 rows: Change to white yarn for 1 row: Change to pink yarn and work in sts for 5 rows starting with a purl row. Front: With No 4 (6mm) needles and first contrast (Sky Blue), cast on 23 sts
and purl one row. 1st row(right side): Cast on 3, knit
to end. Change to white yarn for 1 row: Change to pink yarn: [Editor's note: You have ended with right side facing about to start your 6th row in pink yarn.] Right side facing, continuing in pink yarn, knit 41sts from front, and then 45 sts from back (stitches on holder). [86 sts] Continue straight until work measures 20 inches (51cm) - (measure the
back segment), ending with a wrong side row. Right side facing, tie coloured thread or place marker, between the 41st and 42nd sts and between the 84th and 85th sts. Next row (right side facing): Cast
off 4sts, work to end, and increase (cast on) 3 sts. [85sts] [Editor's note: You are now about to start the raglan shaping on the front, having completed 7 rows in colour blue with right side facing to begin 8th row in blue.] Next row(right side facing and keeping striped sequence correct): Cast off 3 sts, k 33 (34sts on needle). Turn, leaving remaining 48sts on a spare needle. 2nd row: Cast off 2 sts, purl to
end. [32sts] Change to white yarn for 1 row: Change to pink yarn for 10 rows: Change to white yarn for 1 row: Change to blue yarn for rest of front: The front should now measure 4¾ins (12cm) from beginning of raglan
shaping, and 2 sts remain. Back raglan shaping: With right side facing, take up 43sts of the back and leave the remaing
5 sts at the end of the row on a holder. Keeping striped sequence correct work as follows: cast off 2 sts at the
beginning of the next 6 rows, and one stitch at the beginning of the next
16 rows. With right side facing, take up the remaining 5 sts on the holder, and
keeping striped sequence correct work as follows: 1st row (right side facing): Cast
off 2 sts, knit to end. Change to white yarn for 1 row: Change to pink yarn for 10 rows: Change to blue yarn to complete: The work should now measure 4¾ins (12cm) from beginning of raglan
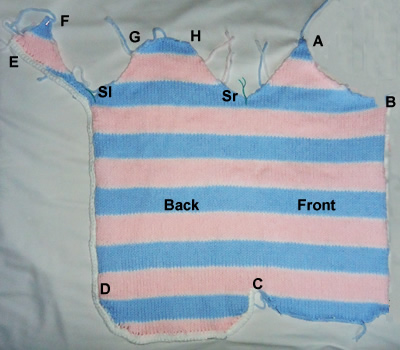
shaping, and 2 sts remain. Here's a photo of what it looks like (Figure 1):
Sleeves:With No 6 (5mm) needles and main shade, cast on 26sts. and work 4 rows in k1/p1 rib, ending with a wrong side row. Change to No 4 (6mm) needles and striped stocking stitch starting with 1 row of main shade (White). Then work in blue as follows: 2nd - 10th row: Stocking stitch in
blue yarn 12th row: Purl one row in white. 13th - 20th row: Stocking stitch
in blue yarn 23rd row: Knit one row in white. Work 7 rows straight in blue. Work measures 7ins (18cm), ending with
right side facing to start raglan shaping. Shape raglan by casting off 3sts at the beginning of the next 2 rows, 1st at each end of every following 3rd row, twice, 6 sts remain. Cast off. HoodWith No 4 (6mm) needles and first contrast, cast on 17 sts and work in
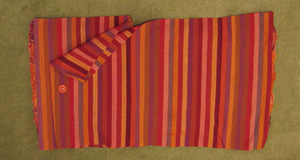
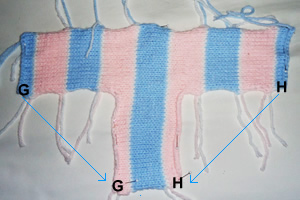
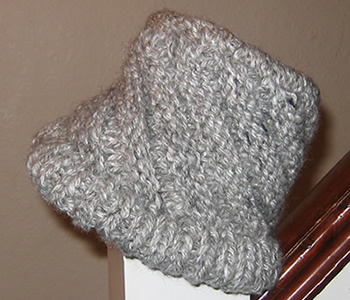
striped pattern starting with 3 rows of the first contrast. Cast on 22sts at the beginning of the next right side row. [39 sts] Continue straight until work measures until work measures 11½ins (29cm), ending with wrong side row, and 2 rows of second contrast. Cast off 22sts at the beginning of the next right side row. [17 sts] Continue straight until work measures until work measures 18ins (46cm), ending with wrong side row, and 2 rows of first contrast. Cast off. Here's a photo showing how the hood looks (Figure 2):
Front and Hood Band:With No 6 (5mm) needles and main shade, cast on 211sts and work 4 rows in k1/p1 rib, arranged as follows: 1st row: K2 *
p1, k1, repeat from * to last stitch;
k1. End with a wrong side row. Next row: Knit and leave sts on a holder. To Make UpSew up sleeve seams, and sew raglan seams together. Sew up hood seams, bringing together points G and H to make the hood
shape as shown in Figure 2 and then sew the back of
the hood to the back neck of the body between points G and H in Figure
1. With No 6 (5mm) hook and main shade work 2 rows dc along edge of sleeping
bag back from E to D and all around to C (refer back to Figure
1), working tightly across the bottom of the back section so that
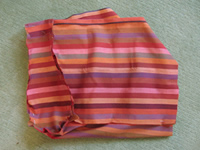
it is slightly gathered and curls up to form the bottom of the bag. Here's a photo of the bottom section of the back of the bag (Figure 3):
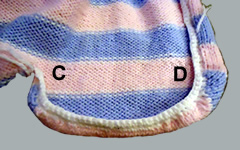
Sew on front and hood band stitch by stitch from C all around to A and then around edge of hood from A to E fitting the edge of the band into the corner by the edge of the hood, at point E. Sew on snap fasteners evenly from C to D to E on right side of work and from A to B to C on wrong side edge of front. Press all seams heartily. (That is: carefully with a damp cloth). Sew on decorative buttons if required. |
Materials
|
|

This is a very flattering hat - speaking as one who has difficulty with hats, which always leads to sartorial dilemmas in weather such as we have in the UK at the moment. However, not only flattering and warm, but amazingly speedy to knit, which can be very useful at this time of year. I completed it in one afternoon.
Instructions.The main part of the hat is a simple six-row pattern where you increase at the beginning and decrease at the end of every alternate row to create the diagonal effect. At the same time you alternate 3-row bands of stocking stitch and reverse sticking stitch. SideCast on 20sts. 1st row: Knit These 6 rows form the pattern. BrimWith right side facing, pick up and knit 72sts along one edge of the
side piece - that is 3 sts to each knit and purl stripe. Work 10 rows in k1/p1 rib, and then cast off in rib. Join side piece and brim neatly with a flat seam. Press seam lightly. CrownCast on 14sts, and work in stocking stitch, starting with a purl row (this is right side of work), and increasing at each end of the first and every alternate row until there are 28 sts. Knit one row. Then continue, decreasing at each end of next and every following alternate row until 14sts remain. Cast off. To Make UpPin crown in position to side of hat on wrong side, so that purl side
of crown is on the outside. Back stitch in position very neatly on wrong
side with a tailored seam Fold ribbed brim in half to wrong side and slip stitch in position round lower edge. Place on head. Wrap in Christmas paper. Put under tree. |
Materials
|
|
|
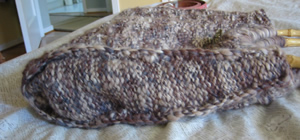
Handspun YarnI bought some Spelsau
fleece at Woolfest in 2009; there was a workshop on knitting direct from
the fleece but I intended to spin my sample. I made a 2 ply yarn which
was softer than I had expected, but kempy (as I had not attempted to remove
the coarser fibres). There was only a small amount - I did not measure
the yardage, but I started with 100g, the yarn was chunky weight, and
I knitted 2 strands of yarn together by combining it with an aran-weight
handspun merino/silk blend to achive the bulky weight required. As you
can see, the fleece was a lovely combination of natural grey tones. The description of the Spelsau fleece is as follows (taken from the reference above):
|

A minimalist 1960s design "carry-all" bag. The sides are meant to be rigid and incorporate cardboard (or plastic) supports. Yet another perfect project bag.
InstructionsCast on 54 stitches. Work in bands of garter stitch (every row knit)
and stocking stitch (knit one row, purl one row) as follows: 1st band:
3 inches in garter stitch (20 rows) Place markers at each end of the last row. [Editor's note: You
are about to knit the base of the bag.] Now work back of bag to match front, ie as 5th to 1st band in this order. Cast off loosely. Side panels(Make two the same) cast on 22sts, and work in bands of garter stitch and stocking stitch as for front. Cast off. Handles(Make two the same) cast on 8sts and work 13 inches in garter stitch. Making upPress pieces lightly on the wrong side. 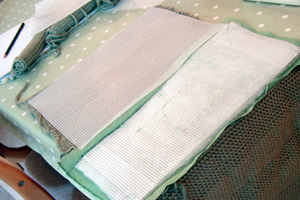 Join lining and place inside the bag with seams inside. Back the handles with petersham ribbon, then sew to top of bag 2½ inches from side seams. Turn in raw edges at top of lining and slip-stitch hem neatly in position. A Word on the Wool.I substituted 100g balls (each 75m/81yards) Debbie Bliss Cashmerino super chunky in Leaf green (colour 16022), knitted on number 5½mm needles, and this took double the stated requirement of the original yarn. I think you would require at least 5 balls of this wool to make the bag as written. I favoured a plain colour but the simplicity of the pattern would probably suit wilder colours. Debbie Bliss Cashmerino is a rather high quality smooth wool (it was on sale). As the size of a bag is not critical, substitute any superchunky with good results (checking your tension). It is suggested to support the sides with cardboard, but it may also be a good idea to use a smaller needle size than normally recommended for the yarn, so that the knitted fabric is firm - note that I did not do this. Adapting the Bag.As I used sale wool, I had only 4 x 100g balls, and in consequence I adapted the bag significantly to make it work. I made fabric handles and a fabric base (6 inches in length and matching the width of the bag). The handles are robust webbing covered in fabric. I sewed the handles
firmly to the plastic canvas side supports - so the handles and the plastic
canvas lining will take all the weight of the bag contents.  I made the base using plastic canvas (7 count) cut to size, and covered with some wadding plus the fabric, and then quilted through all layers, using the canvas as my guide. 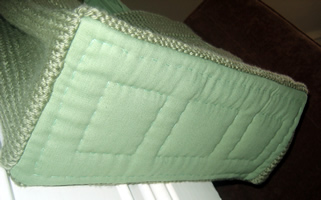 I machine sewed the sides of the bag to the base before hand sewing the knitted pieces up the sides using mattress stitch from the outside of the bag. Finally, in case you are tempted to try this as a felted bag - be warned:
felting garter stitch produces different results from stocking stitch
and your bag may end up a funny shape - or funnier than you intended.... |
MaterialsOriginal pattern calls for 6 x 50g balls of Patons Camelot which was
a bouclé yarn (in colour Corncob). See "a
word on the wool". One pair of number 7 (4½mm) needles. Fabric for lining. Cardboard or plastic canvas to support the sides. TensionOriginal tension 15sts x 21rows to 4 inches (10cm) on No 7 (4½mm) over stocking stitch. [My tension using Debbie Bliss yarn and number 5 (5½mm) needles is 14sts x 20rows to 4 inches over stocking stitch.] Size mattersOriginal bag is approximately 14in by 11in and 6in deep at the sides.
Disclaimer
|
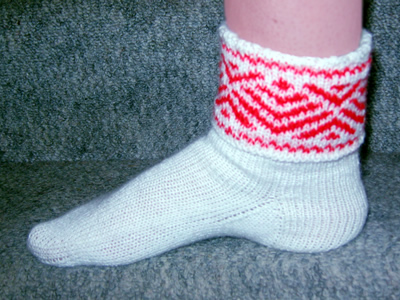
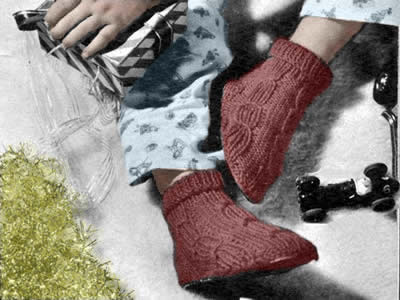
As the nail-biting tournament in South Africa dominates this month, here we have: 1940s sport socks.
I thought they were nicely in England's colours, but not exactly football socks -
I think they mean a nice decorous sport like tennis, don't you?
Red and white is the original colour scheme from the 1940s. (Possibly the original did not include quite such a Dayglo shade of red.) However, the pattern seems vaguely Scandinavian and wintery to me - I could see them perhaps in Christmas colours of a more muted red with green.
Meanwhile... Ingerland, Ingerland, Ingerland...
Instructions.Starting at top with the cuff, using the main colour, cast on
64 stitches on three needles (21,22, 21). 3rd Round: *
k1 contrast (C), k1 main (M); repeat from *
to end of round.
This completes the cuff. Break colour C and continue in main colour only.
Turn the work inside out to make a fold-over cuff and start to work the rounds in the opposite direction. Work in k2, p2 rib for 3 inches [Editor's note: about 30 rows.], decreasing 8 stitches in the last round only, by knitting together every 7th and 8th stitch. Next Round: k2tog, knit to last 2 stitches, k2tog. [54 stitches] Now work in stocking-stitch (knit every round) for 2 inches. HeelKnit 13 stitches of first needle on to third needle (this is the heel needle), then turn and purl back 26 stitches; divide the remaining 28 stitches equally onto the other two needles. Work back and forth over heel needles as follows: 1st Row: slip 1 stitch knitwise, knit
across remaining stitches. Next Row (right side facing): knit across first 16 stitches, k2tog; turn. Next Row: p7, p2tog; turn. Next Round: needle 1: knit across
heel needle, then pick up 14 stitches down left side of heel; needle 2:
knit across next two, needles (thus transferring these stitches on to
one needle); needle 3: pick up 14 stitches across other side of heel and
k4, from needle 1. Hereafter, work in rounds of stocking stitch but, on every other round, k2tog at end of first needle, and (s1, k1, psso) at beginning of third needle until 54 stitches remain. Work straight until piece measures 2 inches less than that required for overall foot length. [Editor's note: This was about 50 rows for my UK size 4 foot. (EU 37, US 6½.] ToeThere should be 13 stitches on first needle, 28 on the second needle, and 13 on the third needle. End of round is centre of sole. Work 1 round, decreasing at each end of second needle, then one round straight. Now there are 13 stitches on first needle, 26 on the second needle, and 13 on the third needle. Next Round: knit to within 3 stitches
of the end of the first needle, k2tog, k1; on second needle, k1, (s1,
k1, psso), knit to within last 3 stitches, then k2tog, k1; on third needle,
k1, (s1, k1, psso), knit to end of round. Repeat the last 2 rounds until 16 stitches remain. Graft the stitches together. Making upSew in all ends. Fold down cuff. |
Materials3ozs Patons Real Shetland Wool. A set of four No 11 needles, pointed at both ends. Tension30 stitches = 4ins Size mattersLength of foot, 9 inches (adjustable). AbbreviationsM is main shade (white). psso: pass the slipped stitch over, (also known as "ssk"; effectively you are "knitting 2 together through back loops"). A Word
|
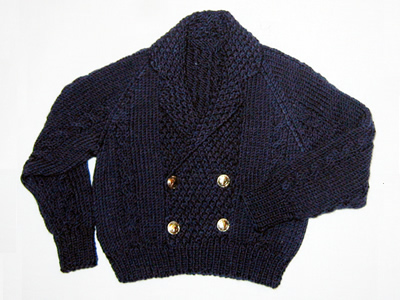
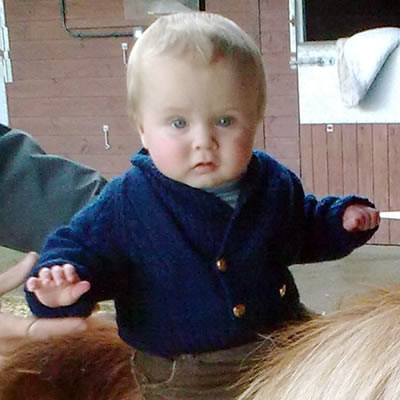
Here is a cute little knitted reefer for a small child (6-24months). It dates from pre 1960s where children's knitwear was not inspiring, but as soon as I saw this I wanted to make it - I am a sucker for any nautical theme, especially for kids (and dolls...)
Instructions.This pattern is given for 2 size options - the instructions for the larger
size are blue bold type in curly brackets. BackWith No 10 (3¼mm) needles cast on cast on cast on 55{61}
sts and work rib as follows: 12th rib row: Rib 3{6}, (increase in next st, rib 6) 7 times, increase in next st, rib to end. [63{69}sts] Change to No 8 (4mm) needles and proceed in cable pattern as follows: 1st row (right side facing): K9{10};
p1, k4, p1; k11{13}; (p1, k4, ) twice,
p1; k11{13}; p1, k4, p1; k9{10}. Continue in pattern until you have completed row 28{32}. Shape raglan: (keep continuity of pattern as you work these rows). [Editor's note: you should be about to begin Row 5 of the pattern sequence for the smaller size and Row 3 (a cable row) for the larger size.] Next row: Cast off 3sts, work to
end. Repeat last 2 rows 18{20} times,
[19{21}sts] FrontWith No 10 (3¼mm) needles cast on cast on cast on 55{61} sts and work rib for the first 11 rows as you did for the back. 12th rib row: Rib 3{6}, (increase in next st, rib 7) 6 times, increase in next st, rib to end. [62{68}sts] Change to No 8 (4mm) needles and proceed as follows: 1st row (right side facing): K9{10}; p1, k4, p1; k8{9}; (p1, k1, ) 8{9} times; k1. Turn and continue working on these 40{44}sts to make the left front (these instructions are intended for a boy - see editor's note below) and slip remaining 22{24} sts on to a stitch holder and leave to work later. [Editor's note: If you want to make this for a girl - maybe in white? - then you will perhaps want to reverse these instructions by working the first 22{24} sts, casting on 20sts and working on these 40{44} sts as written, omitting the button holes. Pick up the rest of the sts to work the right front - and don't forget to work the buttonholes on the right front!] 2nd row: (K1, p1) 9{10} times; purl to the last st, k1. [Editor's note: The centre panel on each of the front pieces is worked in double moss stitch, and I found it convenient to put a stitch marker after I had worked the first 18{20} sts of row 2, to show the limit of this section.] 3rd row: K9{10};
p1, C2B, p1; k7{8}; *
p1, k1; repeat from * to end. Keeping cable and moss stitch panel correct throughout, work 16{20} rows, working buttonholes as before on the 9th of these rows (row 21 for both sizes). Shape raglan: (keep continuity of pattern across the cables and
the centre moss stitch panel as you work these rows). Next row: Cast off 3sts, work to
end. Repeat last 2 rows 10{11} times,
[26{29}sts] ** Keeping continuity of the pattern,
continue to decrease at the armhole edge as before until 18{20}
sts remain of the moss stitch panel. Completing the other side to make the right front: Slip the sts from the stitch holder on to a No 10 needle, point facing
centre of work (right side facing you), and cast on 18{20}sts.
[40{44}sts]. 1st row (right side facing): K2;
(p1, k1) 8{9} times; k7{8};
p1, k4, p1; k9{10}. Shape raglan: (keep continuity of pattern across the cables and the centre moss stitch panel as you work these rows). Next row (wrong side facing): Cast
off 3sts, work to end. Repeat the last 2 rows 10{11} times, [26{29}sts] Next row: Cast off 5sts, work across
in pattern to the last 3 sts, k2tog, k1. Complete to match the left side of front, working from ** to end. Right sleeve:Using No 10 needles, cast on 32{34}sts. Work 13{15} rows in k1, p1 rib. Next row: Rib 3{4}; (increase in next st, rib 4) 5 times; increase in next st, rib to end. [38{40}sts] Change to No 8 needles and proceed in stocking stitch with cable panels set as follows: 1st row (right side facing): K3{3};
(p1, k4, p1, k7{8}) twice; p1, k4,
p1; k3{3}. Continue in pattern as on last 6 rows, increasing 1 st at both ends of
next and every following 6th row, until there are 50{54}sts;
work the extra sts in stocking stitch. Shape raglan by working rows as you did for the back: Next row: Cast off 3sts, work to
end. Repeat last 2 rows 18{20} times,
[6{6}sts] Right sleeve:Work as for the right sleeve, but working C2F instead of C2B. [Editor's note: The sleeves are identical apart from the way the cables twist, and obviously you can choose to sew them into the Reefer in whatever orientation you prefer.] To Make UpBlock each piece from the wrong side, pressing very lightly using a warm iron and a damp cloth, omitting the ribbing. Join side, raglan, and sleeve seams using a flat seam. Stitch down the 20 cast-on stitches at the waist on the inside. |
Materials
|
|
|
|
|
|
|
|
|

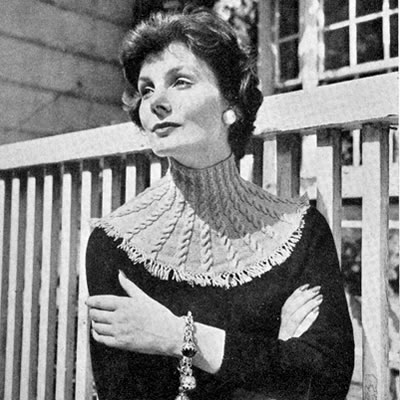
Knitted in a light weight yarn and originally designed in the 1950s to wear under or over a sweater with a lower neckline. The original is a "fringed cable yoke" (in case you want to show it off over the sweater) but I have omitted the fringing; I wear it as a convenient alternative to a scarf. The yarn I used is more a 4ply than a 3ply weight so my version is very slightly bulkier and longer than the original.
Instructions.Cables are worked as follows: Cable 8: Slip next 4sts. onto a cable
needle and leave at back of work; k4, then k4 from cable needle. Now begin the yoke, which is worked in one piece. Cast on 288 sts fairly loosely and work in cable pattern as follows: 1st row (right side facing): P4,
* k8, p8; repeat from *
to last 12 sts, k8, p4. Repeat the 1st and 2nd rows 3 times more. 9th row: P4, *
cable8, p8; repeat from * to last
12 sts, cable8, p4. Work 5 rows straight keeping the continuity of the cable rib pattern. 24th row (decrease row): K4, *
p7, k3, k2tog, k2; repeat from * to
last 11 sts, p7, k4. [236 sts] Work 4 rows straight keeping the continuity of the cable rib pattern. 30th row (decrease row): K4, * p3, k2tog, p2, k6; repeat from * to last 11 sts, p3, p2tog, p2, k4. [218 sts] Work 2 rows straight keeping the continuity of the cable rib pattern. 33rd row: P4, * cable6, p6; repeat from * to last 10 sts, cable6, p4. Work a further 2 rows straight keeping pattern as before. Continue thus, working a cable on every 8th row from previous cable, at the same time decreasing alternately in the knit and then in the purl panels, that is: decrease 1 stitch in each of the 15 knit panels on next row, then 1 stitch in each of the 17 purl panels on the following 6th row, omitting the 4 border stitches at each end. Repeat these 2 decrease rows with 5 rows straight between each and always keeping continuity of cable rib pattern until you have worked 10 decrease rows in all, when 113 sts remain and 3 sts remain in each of the knit and purl panels with the 4 border stitches at each end. Work a further 4 rows straight. Next row: P4, * cable3; repeat from * to last 7 sts., cable 3, p. 4. Work a further 5 rows straight in rib, then work another row cabling across the 3 knit stitches as before. Repeat last 6 rows until work measures 8 inches, then work a further 2 rows in rib. Cast off. To work the buttonholes: Optional fringing: To Make UpSew in all ends. |
MaterialsOriginal materials called for: 2 ozs. Patons Beehive Fingering 3-ply. ** A pair of No 12 (2¾mm) needles. TensionOriginal yarn knits 34sts x 42 rows to four inches over stocking stitch on No 12 needles. Substitute yarn knits 27sts x 38 rows to four inches on 2½mm needles. Size mattersOne size. Depth: 8 inches, excluding fringe. **A word on the wool.I used a vintage Phildar yarn called Anouchka (80% acrylic 16%, mohair, 4% wool), in a bright red. It knits to a tension of 27sts x 38 rows on 2½mm needles, and I used No 13 (2¼mm) regardless of tension. CrochetDouble crochet in the UK is equivalent to US single crochet - see "Terminology" in the side bar. Disclaimer
|
 |
|
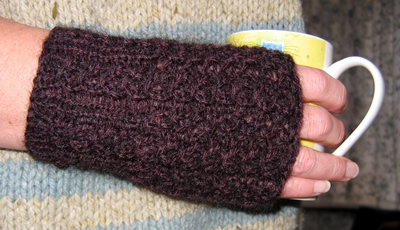
In need of an additional gift that you can speedily knit? - then this is for you. (Unless you live in the tropics, when it would probably never be for you).
I made these mittens to go with the beret Featherbed by Louisa Harding from her book Little Cake. I like Louisa's work, and yarns; however, I made her beret in Rowan Kid Classic as I needed a particular colour, and in consequence had sufficient left to make mittens, using a similar stitch pattern.
Using Kid Classic was fine but made for an even more lightweight beret - I think I would like to try the recommended yarn for a slightly bulkier feel as intended.
The mittens are lovely and warm and .... feathery.
Instructions:(Make two gloves alike) Cast on 36 stitches, arrange evenly over 3 needles. 1st round: *
K3, p1, k1, p1; repeat from * 6 times to
end of round. 5th round: *
Slip1, k2, then pass the slipped stitch over the 2 knitted sts; p1, k1,
p1; repeat from * 6 times to end of round.
[30sts] Repeat rounds 5 through 8 four times more times. 21st round: as 5th. 23rd round: *
K3, p1, k2, p1; repeat from * 6 times to
end of round. 39th round: *
K3, p1, k2, p1; repeat from * 5 times. 40th round: Begin the next round continuing with the waste yarn, and k5. Slip these 5 sts back onto the left needle and knit them again using working yarn. Then finish the round as follows: k1, yon, p1; * k3, p1, k2tog, yon, p1; repeat from * 5 times to end of round. [43sts] 41st round: Slip1, k2, then pass the slipped stitch over the 2 knitted sts; p1, k2tog, k1, p1; * slip1, k2, then pass the slipped stitch over the 2 knitted sts; p1, k2, p1; repeat from * 5 times to end of round. [36sts] 42nd round: * K1, yon, k1; p1, yon; slip1, k1, psso; p1; repeat from * 6 times to end of round. [42 sts] Repeat rounds 23 through 26 twice more. Cast off 42 sts (not too tightly). Work the thumb. Go back to the waste yarn and carefully remove it, placing the resulting
live sts on two double-point needles; there will be 7 Now set off working in a round; starting with the 7 sts below the opening, arrange the sts as follows: Place the first 2 sts on a needle and leave for the end of the round. Join in the yarn and using another needle, k3, p1, then k2tog (the last
of the 7 lower sts and the first of the 8 upper sts), yon, then purl the
second stitch from the upper needle. This is "needle one" and
has 7 sts. 1st round: *
Slip1, k2, then pass the slipped stitch over the 2 knitted sts;
p1, k2, p1; repeat from * once to end of
round. [12sts] Cast off 14 thumb sts loosely. Making up: |
Materials1 x 50g ball Rowan Kid Classic. Small length of waste yarn in contrasting colour, (something slippery like cotton preferably). One set of 4 No. 8 (4 mm) needles. TensionKid Classic knits to a tension of 18sts and 24 rows to 4 inches on 6mm
needles. Size mattersWidth all round above thumb, 7 ins. To alter the size use larger or smaller needles as required. Abbreviationsyon: yarn over needle - makes an extra stitch which forms a small pattern hole when knitted on the next row. psso: pass the slipped stitch over. Effectively you are "knitting
2 together through back loops" Disclaimer
|
Father George recently handed back his bedsocks as they had holes in the heels. I dutifully mended them, but thought this a good excuse to give him another pair.
These socks are one size, but easily stretch to fit comfortably around a man's foot, as well as fitting round my own foot (small lady's), albeit loosely. If you want cosy house socks for a female foot then simply adjust the length. These are intentionally short at the ankle, but again you can easily knit them longer for the size you need.
InstructionsWith No. 9 needles, cast on 60 stitches loosely, and arrange over 3 needles. 1st round: *
K4, p2; repeat from * to end of round. These are the six basic pattern rounds. Repeat these six rounds twice more, (or as many times as you need to
lengthen the sock at the ankle), and then the first round once again. Divide for heel flap. Next Row: Knit the first 28 sts of the round on to one needle to work for the heel. Divide the remaining 32 sts across 2 needles, and leave to work the instep later. If you have worked the pattern correctly there will be a symmetrical set of complete cables across the 32 instep sts, starting and ending with p2. Return to your heel sts, and turn the work so that you can work back and forth across the heel sts using 2 needles. Next Row: Slip1 purlwise then purl
across the remaining 27 sts. [28 sts]. Repeat the last 2 rows 12 times more. Turn the heel. Work short rows as follows: Next Row: Slip1 purlwise then purl
across 15sts, p2tog, p1. Turn Continue working in this way until all the sts have been incorporated [16sts], ending with a knit row, and right side facing. Continuing to work onto the same needle (needle 1), pick up and knit
15 sts along side of heel. [Editor's note: I
am not one to encourage a sloppy attitude to knitting, but... Shape the instep: 1st round:
1st needle: knit to the last 3sts, k2tog, k1. Repeat these two rounds until 60sts remain (14 on the first needle, 32 on the second needle, 14 on the third needle). Continue on these sts, (continuing the cable pattern on the upper foot
as set), until you have completed 12 cable patterns from the very beginning
of the work, or until work measures 2 inches less than the desired foot
length. Shape toe: Continue in stocking stitch only (no more cables), as follows: knit the sts from Needle 1, then knit the first st from Needle 2 and put it on Needle 1. Knit 30 sts from Needle 2, then place the last st onto Needle 3. Knit across 15 sts on Needle 3. 1st round:
1st needle: knit to the last 3sts, k2tog, k1. Repeat these 2 rounds until 32 sts remain, ending with 1st round. Then repeat round 1 twice more [24 sts]. Making up. Knit the sts from needle one, break the thread leaving a long tail. Graft
the two sets of 12 sts together. Make a second sock to match. |
MaterialsAbout 1 x 50g skein (139 metres) Phildar
Oxygene, colour 38, Neptune. One set of 4 No. 9 (3½mm) double- pointed needles. Tension23 sts x 30 rows to 4 inches measured over stocking stitch on No 9 (3½mm) needles. Size mattersThe pattern as written should fit a foot of 11 inches in length. AbbreviationsC4B: "cable 4 back"; slip the next 2sts onto a cable
needle and leave at the back of the work, k2, then k2 from cable needle. psso: pass the slipped stitch over. Effectively you are "knitting
2 together through back loops" Disclaimer
|
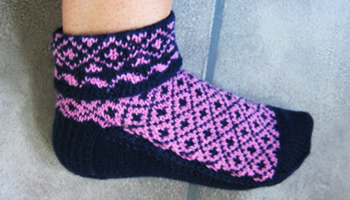
Early 1950s tennis socks originally knitted in crisp navy and white wool. I love cuffed socks but detect that some others (my sister) clearly do not. These have the design made specifically to fold down though - so there's no way out.
Instructions.The pattern works the instep and the sole separately on two needles to enable you to work the fair isle pattern across the instep only. It is not possible to achieve this in the round. However, you join the two together as you knit. Using No 12 needles with main shade (M), cast on 59 sts loosely and join in a round. Work 4 rounds in moss (also known as seed) stitch [every row k1 p1]. Next Round (increasing): K3; (m1, k8) 7 times. [66 sts] Cuff border:Change to No 11 needles and join in contrast (C) and work wave pattern border by repeating the 6 stitch pattern 10 times:
1st Round: *
k3 contrast (C), k3 navy (N); repeat from *
to end. Now continue with cuff diamond pattern, repeating the 8 stitch pattern 8 times across one round:
6th Round: *
k1(C), k2(N), k1(C), k2(N), k2(C); repeat from *
to end. Now break off C and continue with N only; change to No 12 needles and work 7 rounds knitting. Then turn the work so you are working the rounds in the other direction. This reverses the work to allow the cuff to fold over with the right side visible. Work 8 more rounds knitting; at the end of the first round knit into
the stitch below the first stitch of the round and knit it together with
the last stitch of the round to avoid a small hole in the work. Join in C, working main diamond pattern, repeating the 8 stitch pattern 8 times:
1st Round: *
k1(N), k2(C), k1(N), k2(C), k2(N), ; repeat from *
to end. These 8 rows form the pattern. Continue with N only and divide for the heel, however do not break off C. Divide for heelNext Row: Using navy wool only, knit the next 31 stitches on to one needle to work for the heel. Divide the remaining 33 sts across 2 needles, and leave to work the instep later. If you have worked the pattern correctly there will be a symmetrical set of complete patterns across the 33 instep sts. Make sure that it looks like this (you will have just completed row 5, the middle row in the picture):
[ Editor's note: If it doesn't look like this... you can compensate by knitting more or fewer sts for the heel flap until you get to the pattern boundary. Then when you purl back on the row below, follow the instructions as set to get your 30 sts. You should have your instep sts set correctly as above. If you still haven't then there is likely a mistake in your fair isle pattern.] Return to your heel sts, and turn the work so that you can work back and forth across the heel sts using 2 needles. Next Row: Purl back across 15 sts,
p2 together, purl remaining 14 sts. [30 sts]. Heel flapNext Row: *
Slip 1, knit 1; repeat from * across
all 30 sts. Repeat last 2 rows 13 times more. Turn heelTurn the heel by working short rows: Next Row: Slip the first stitch,
p16, p2tog, p1; turn. Continue in this way until all the sts have been incorporated in the row, ending with a knit row. [18 sts] Turn. Purl one row. Pick up and purl 16 sts down side of heel flap to bring the navy wool back to work the patterned instep. Leave these 16 sts along with the 18 heel sts, on a spare needle or stitch holder. Upper foot panelTake 33 sts left on needles 1 and 2, and slip them on to one needle. Continue to use the navy yarn and pick up the contrast C, which should
be waiting for you at the beginning of a purl side instep row (row 6 of
the pattern). Begin working back and forth across these 33 sts, keeping
the continuity of the pattern starting with a purl row and working from
row 6 of the chart where you left off; work alternate rows in knit and
purl. Continue for 5½ inches or 4 inches less than overall desired foot
length, ending with a knit row. Break contrast yarn, and continue in navy only. Turn the work and purl across 15 sts; p2tog; p16. Continue with wrong side facing, using another No 12 needle, pick up
and purl about 27sts from the slipped sts down the right side of the upper
foot panel, and from the edges of the first 5 rows you knitted. Using the same No 12 working needle, pick up and purl 17 sts from side of heel flap, then purl 9 sts from the heel. Using another No 12 working needle, purl the 9 remaining heel sts, and then purl the 16 sts you already picked up from the other side of the heel flap. Mark the stitch with a piece of waste wool, as before. Continuing with this needle, purl along the left side of the upper foot panel, picking up 27 sts from the edges of the first 6 rows you knitted and from the slipped edge sts.
The work is arranged on 3 needles. The picture shows the working needle
in the process of knitting across the sole,
and the waste wool markers in white. Purl across the 32 sts at the top of the panel. Then using one of the
spare needles, purl down the right side of the panel again, as far as
the stitch marker.] Do not turn the work. SoleUsing the No 12 working needles, you are going to knit back and forth across the sole (between the markers) in stocking stitch, knitting the last stitch from each row together with one stitch from the upper foot panel. 1st Row: (Wrong side facing) Slip1,
p24 from first needle, (16 sts up side of heel and 9 sts from heel flap),
then purl 24 sts from second needle, up to 1 stitch before the stitch
marker. Purl the last stitch of the sole section together with the first
of the instep sts. [50sts between the markers] 2nd Row: (Right side facing) Pass
the waste wool marker between the sts. Slip 1, ssk2tog; knit to the last
3 sts before the marker; k2tog, ssk the last stitch of the row together
with the next instep stitch as before. [48sts between the markers] Turn. Repeat 2nd and 3rd rows, shaping the sole by decreasing 2 sts on the knit rows, until 28 sole sts remain between the markers. Then continue without shaping as follows (continuing to weave in the markers as before): Next Row: Slip 1, purl to the last
stitch before the marker; purl together the last of the sole sts with
the first instep stitch as before. Repeat the last 2 rows until all the sts from the sides of the upper
foot have been joined to the sole. Do not join any of the sole sts to
the 32 sts left on the 4th needle at the end of the panel. ToeNow you continue to work the sole and upper foot sts together in a round, as follows: With right side facing, using your working needle (needle 1), knit across
32 sts from the upper foot. Knit the next 14 sts from the sole on to the
next needle (needle 2), and knit the final 14 sts from the sole on to
the next needle (needle 3). You have 60 sts arranged with 30 sts on needle 1, and 15 sts on each off needles 2 and 3. Continue to work in rounds as follows: [ Editor's note: This is where you can adjust the length of the foot if your feet have not grown to a multiple of half inches. Work a couple of extra plain rounds here before starting the decreasing.] 1st Round: Needle 1: k1, ssk2tog;
knit to the last 3 sts; k2tog, k1. Repeat rounds 1 and 2 until 24 sts remain. Slip the sts from needles 1 and 2 on to one needle and graft together with the sts on needle 3. Making upSew in all ends. Fold down cuff. |
Materials4 ply: 2 ozs navy, 1 oz contrast colour. One set each of 4 double pointed needles (dpns) size 11 (3mm) and 12
(2¾mm). Tension30 stitches and 32 rows to 4 inches over pattern. Size mattersLength from top to bottom of heel, top turned down, 5 inches; length of foot 9 inches (adjustable). AbbreviationsN is main shade (navy). m1: make one by picking up the loop between sts and knitting into the back of it ssk/ssk2tog: (slip, slip, knit) - or (slip1, knit 1, pass the slipped stitch over). Effectively you are "knitting 2 together through back loops".
A Word
|
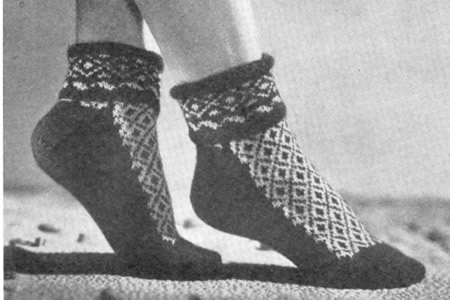
Original photo from Stitchcraft April 1950, constructed using a different pattern on 2 needles with seam under sole. Generally, seams in socks are avoided so they are more comfortable to wear; a seam right under the ball of the foot cannot be ideal as sportswear. I imagine these socks were for visual impact rather than practicality.
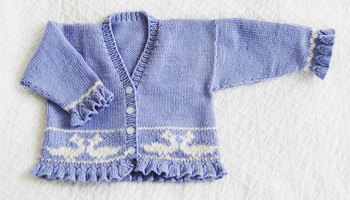
Cute cardigan for a little girl with folk pattern of birds. Acceptable enough for a baby boy using a "masculine" colour (blue?!) and adapting the welts from their frilly form to a conventional rib.
Instructions:The body of the cardigan is knitted in one piece. There are options for a plain welt as well as the frilled version - perhaps to better suit a boy. Frilled welt: 1st row: *
P2, k7; repeat from *to last 2 sts;
p2. Alternative plain ribbed welt: 9th row: K31, place marker; k62, place marker; k31. Duckling border: Starting with wrong side facing, set the 31 stitch pattern across the
row as follows: Row 1: *p1 in blue, p29 in white, p1 in blue*; p0; repeat from * to * twice; p0; repeat from * to *.
Row 15: as row 1. Next row: (right side facing) Knit
in main shade. Continue with main shade only stocking stitch until work measures 6 inches,
including the frill, ending with a purl row and right side facing for
next row. Divide for fronts and back: Next row: Purl. Repeat the last 4 rows, decreasing at front edge only until 21 sts remain.
Continue without shaping until armhole edge measures 5 inches, ending
with a purl row. Left front: Next row: Knit. Repeat the last 4 rows, decreasing at front edge only until 21 sts remain.
Complete to match the right front, ending with a knit row. Back: Work straight in stocking stitch until back matches fronts at armhole edge, ending with a purl row. Next row: K21, cast off 20, k21. Join shoulders. Sleeves (both alike): 1st row: *
P2, k7; repeat from *to last 2 sts;
p2. Alternative plain ribbed welt: Now join in contrast and work 3 rows as follows. Continuing in main shade only, increase one stitch at each end of the next and every following 4th row, until there are 61sts. Work straight until sleeve is 8 inches long (including the frill), or to required length. Cast off loosely, using one size larger needle. Work second sleeve the same. Button border: [Editor's note: My
method for picking up sts evenly is to pick up 2 sts for every 3 row ends.
I use a double pointed needle and slip it into all the alternate row ends
- the ones that tend to stick out more as little bumps. Then using my
working needle, I knit into 2 bumps from the dpn and then pick up an extra
stitch in between the bumps. Next row: Slip the first stitch;*
k1; p1; repeat from * to last st;
k1. Work one more row in rib, then cast off loosely in rib, using a larger size needle if required. Making up: Press lightly with a damp cloth. |
Materials 3 x 50g balls Debbie
Bliss Baby Cashmerino (125m per 50g ball), in main shade (colour shown
Lavender 605). One circular No 9 (3½mm) needle. Tension24sts and 32 rows to 4 inches on No 9 (3½mm) needles in stocking
stitch. Size mattersInstructions for 6-12 months size. A word on the woolDebbie Bliss Baby Cashmerino is a lovely yarn, (55% merino wool, 33%
microfibre, 12% cashmere). Disclaimer
|
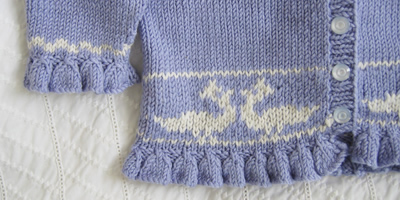
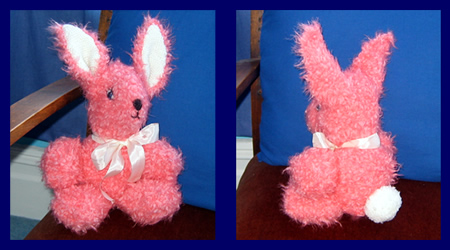
"Who could resist this adorable dressed bunny?"
Well, I for one can resist the dressed part. I am not very fond of dressed animals (even stuffed ones). However, the dress is very pretty, and it would tone down the effect of the rather strong pink colour I have chosen for the rabbit. The Phildar yarn makes for a really soft effect; the pink is discontinued but there is a white, which I think would be very cute.
"So cuddly, a small child would love her at once. Very easily and quickly knitted in garter stitch throughout."
Instructions:Bunny is worked throughout on No 8 needles and garter stitch (ever row knit). When making up, all seams are joined on the right side. Body (work two pieces alike): 1st row: Knit Base: 1st row: Knit Making up the body: Front Legs (work four pieces alike): 3rd row: Knit twice in first stitch;
knit to last st, and knit twice in last st [13 sts] Making up the front legs: Back Legs (work four pieces alike): Making up the back legs: Tail (work 2 pieces alike): Making up the tail: Head (work 2 pieces alike):
* Knit the next 8 rows. Cast off 3 sts. Making up the head: Features (embroidered): Ears (work 2 alike): Repeat these 4 rows 5 times more until there are 15 sts. Knit the next 12 rows. 37th row: K2 tog; knit to last 2
sts, and k2tog. [13 sts] Cast off 11 (this is the edge sewn to the head). Ears Linings (work 2 alike): Repeat these 4 rows 7 times more until there are 20 sts. 53rd row: K2 tog; knit to last 2
sts, and k2tog. [18 sts] Making up the ears: |
MaterialsOriginal: 3 x 2oz hanks of Big Ben Knitting in Oystershell (main colour); Example shown is knitted in 2 x 50g ball Phildar
"Neige" (65 yds/60m per 50g ball), colour Oeillet (0013
discontinued). One pair each of No. 8 (4mm) and No 11 (3 mm) needles. TensionBig Ben was a chunky wool and worked to a tension of approx. 14sts and 18rows to 4 inches on No 3 (6½mm) needles in stocking stitch. The Phildar Neige tension is 11sts and 18 rows to 4 inches on No 5 (5½mm)
needles in stocking stitch. Size mattersOriginal instructions and yarn made a 12½ inch rabbit (including ears). A word on the woolBig Ben is a chunky wool similar in gauge to the Phildar I used but knits
up very differently on the smaller needles. I used a lurid pink for the rabbit - but wouldn't she be nice in white with pink ear linings? Disclaimer
|
Bunny ClothesI chose just to put a ribbon on the bunny. You could make the knitted
tie instead or go for the whole dressed bunny look. The dress is pretty
and allows you to see the cute little tail. Neck tie: Dress: Rejoin yarn to centre 18 sts, and knit 14 rows. Next row: Knit 4; cast off 10; knit
last 4 sts. Continue to work on the last 4 sts and knit 25 rows. Dress Frills: Make another frill the same and sew in place half an inch above the first frill. Put dress on bunny and gather up waist edge to fit. |
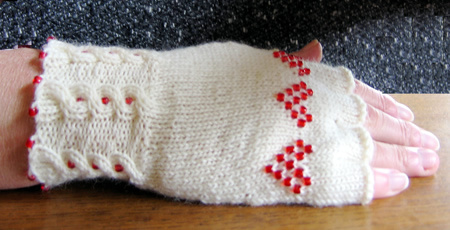
I was inspired to make these mitten patterns by brightly coloured offerings from 1975. This is the posh version, even cuter than the intarsia version I think.
They are a close fit on my hands, but though my hands are small, I tend to have short fingers only; the measurement around my hand is just over 7 inches.
Instructions:Begin working the RIGHT GLOVE: Thread 12 beads on to the yarn. Cast on 48 stitches, using "backward loop method" as follows: loop 2, slide a bead up next to the loops; loop 4, slide next bead into place; slide next bead into place; and so on to the last bead and then end with loop 2 [48 loops].
Knit one row. Begin fancy rib as follows: 1st round: *
P1, k2, p1, k2, p2; repeat from * to end
of round. 6th (cable) round: *
P1, CB5 (cable over 5 sts "back" by slipping the next 3 sts
on to a cable needle and leaving at the back of the work; k2, then (p1,
k2) from cable needle), p2; repeat from *
to end of round. Thumb gusset 1st round: K24, p1, k2, p1, k20. Now set aside the thumb stitches and continue with the main glove - at the same time work the first row of the pattern from the chart, setting the position of the beaded hearts as follows, repeating the 9 pattern sts 3 times: Row 1: K4; hook bead and slip this
beaded st, passing the yarn behind, and pulling it firmly as you go into
the next st; (k8, hook bead) twice; k5; slip the next 18 sts on to a safety
pin; cast on 2 sts, k24 to complete the round. [54 sts]
Continue straight, working from the chart for the 9 rows, and completing the three hearts. Row 10: K1, m1, k52, m1, k1. [56 sts] Work 4 rows straight. Divide for fingers Next round (forefinger): Knit
the first 20 sts of the round and place on a stitch holder; place the
last 20sts of the round on a second stitch holder; Knit 16; cast on 2
sts. [18 sts] Next round (middle finger):
Slip the last 7sts on the first stitch holder (the ones nearest to the
forefinger) onto a needle and knit them; pick up and knit 2 from the cast
on sts at the base of the forefinger; slip the first 7sts on the second
stitch holder (the ones nearest to the forefinger) onto a needle and knit
them; cast on 2 sts. [18 sts]. Next round (third finger): Work and complete as for middle finger. Next round (little finger):
Pick up 2 sts at the base third finger; slip the remaining 6 sts on the
second stitch holder onto a needle and knit them; slip the remaining 6
sts on the first stitch holder onto a needle and knit them. [14sts] Thumb: LEFT GLOVE: Thread 12 beads on to the yarn, cast on 48 stitches, and knit one row,
as for right glove. Begin fancy rib as follows: 1st round: *
P2, k2, p1, k2, p1; repeat from * to end
of round. 6th (cable) round: *
P2, CF5 (cable over 5 sts "forward" by slipping the next 2sts
on to a cable needle and leaving at the front of the work; k2, p1, then
k2 from cable needle), p1; repeat from *
to end of round. Thumb gusset You work the thumb gusset in the same way as you did for the right glove, but set the position of the thumb differently as follows: 1st round: K20, p1, k2, p1, k24. Continue in this way as for right glove, but following the stitch layout as set until you reach row 25. 25th and 26th rounds: K23, p1, k18, p1, k27. [70 sts] Now set aside the thumb stitches and continue with the main glove - at the same time work the first row of the pattern from the chart, setting the position of the beaded hearts as follows, repeating the 9 pattern sts 3 times: Row 1: K24; slip the next 18 sts
on to a safety pin; cast on 2 sts; k5; hook bead and slip this beaded
st, passing the yarn behind, and pulling it firmly as you go into the
next st; (k8, hook bead) twice; k4. [54 sts] Once you have set the position of the thumb and the bead hearts, you can work the rest of the left glove exactly as for the right glove. Making up: |
MaterialsExample shown is knitted in 1 x 50g ball Sunbeam St Ives 4 ply in cream 3103. One set of 4 No. 12 (2½ mm) needles. A tiny crochet hook for placing the beads. 66 beads size 6/0 TensionApprox. 32sts and 44 rows to 4 inches on No 12 needles. Size mattersWidth all round above thumb, 7 ins. To alter the size use larger or smaller
needles as required. A word on the woolThe wool I used was from my store room. BeadingFor those of you who think "Less is More" you might prefer to work a single bead heart, positioned on row 20, with the first bead on the 7th st from the edge. Disclaimer
|
Cast on loop method |
|
Hooking Beads.This method means you don't have to pre-string the beads on your yarn - I think it is good for placing a few beads amid a lot of knitting, when you don't want to carry just a few beads across miles of yarn before you use them, and you also don't want to break your thread. This information appeared in Knitty.com. (Spring 2006 edition) in an article by Sivia Harding.
|

I was inspired to make these mitten patterns by brightly coloured offerings from 1975. By the time I had tried out a number of versions - and had many more examples of right-hand gloves than I want or need - my final designs differ substantially from the original. But they are cute aren't they?
They are a close fit on my hands, but though my hands are small, I tend to have short fingers only; the measurement around my hand is just over 7 inches.
Instructions:Begin working the RIGHT GLOVE: Using contrast colour, cast on 48 stitches; purl one row, and join into a round. Change to main colour and knit one row. Thumb gusset 1st round: K24, p1, k2, p1, k20. Now set aside the thumb stitches and continue with the main glove as
follows: Work 2 rounds straight. Cut 6 lengths of contrast wool, about 28 inches in length, and 6 of main
shade; do not use bobbins, just the lengths of wool.
Row 1: K4 from the ball of main shade, k1 using first strand of contrast yarn, k8 using first strand of main shade, k1 contrast using second strand of contrast, k8 using second strand of main shade, and so on the the last 4 sts; k3 in last strand of main shade, slip the last st. Still using the last working needle, pick up the st below the first st of the round and knit into it, then pass the slipped st over this st. Turn the work.
[Editor's note: Use the pop-up from the above picture for more detailed photos of this technique.] Row 2: P3 in main shade, p3 in contrast,
p6 in main shade, and so on; use the intarsia method
and twist the two yarns together when you change colour. Continue in this
way until you get to the last stitch in the row, and slip this stitch.
Still using the first working needle, pick up the st below the last st
of the round and purl into it, then pass the slipped st over this st.
Turn the work. Now go back to working in the round, and continue in main shade only,
using the main ball of wool. Divide for fingers Next round (forefinger):
Knit the first 20 sts of the round and place on a stitch holder; place
the last 20sts of the round on a second stitch holder; Knit 16; cast on
2 sts. [18 sts] Next round (middle finger):
Slip the last 7sts on the first stitch holder (the ones nearest to the
forefinger) onto a needle and knit them; pick up and knit 2 from the cast
on sts at the base of the forefinger; slip the first 7sts on the second
stitch holder (the ones nearest to the forefinger) onto a needle and knit
them; cast on 2 sts. [18 sts]. Next round (third finger): Work and complete as for middle finger. Next round (little finger):
Pick up 2 sts at the base third finger; slip the remaining 6 sts on the
second stitch holder onto a needle and knit them; slip the remaining 6
sts on the first stitch holder onto a needle and knit them. [14sts] Thumb: LEFT GLOVE: 1st round: K20, p1, k2, p1, k24. Continue in this way as for right glove, but following the stitch layout as set until you reach row 25. 25th and 26th rounds: K23, p1, k18, p1, k27. [70 sts] Now set aside the thumb stitches and continue with the main glove as
follows: Once you have set the position of the thumb, you can work the rest of the left glove exactly as for the right glove. Making up: |
MaterialsExample shown is knitted in 1 x 50g ball 4 ply in main shade, and small amount of contast colour. One set of 4 No. 12 (2½ mm) needles. TensionApprox. 32sts and 44 rows to 4 inches on No 12 needles. Size mattersWidth all round above thumb, 7 ins. To alter the size use larger or smaller needles as required. A word on the woolThe wool I used was from my store room. IntarsiaHere is a nice little video clip about intarsia knitting. Don't be put off by her continental knitting method. Disclaimer
|
|
Intarsia.Text and Pictures taken from Ethknits "How to knit" page. Hold the working yarn in your right hand and the yarn to be woven in your left. |
|
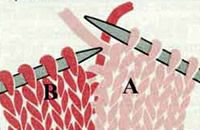 |
 |
|
Changing on a knit row: Knit with yarn A until you want to change. Pull yarn A over to the left and wrap yarn B across the back of A as you knit the next stitch. |
Changing on a purl row: Purl with yarn A until you want to change. Pull yarn A over to left and wrap yarn B under A as you bring it across to purl the next stitch. |
|
You can see from the purl row picture that the edge resembles a sideways knitted row as on each row you cross the yarns over. This way you should get no holes. Don't worry if you see holes where the yarn is loose in some places. When you finish your work you will have lots of ends to sew in and you can pull these tight and sew up any holes that still appear. |
|
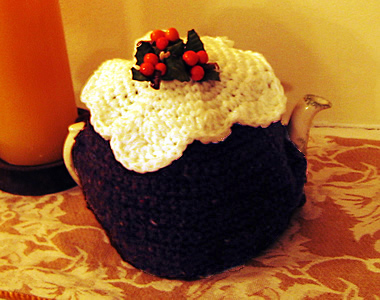
A last minute novelty gift from 1960.
It is crocheted with a double thickness of wool; this can be a nuisance but it is a good way to get that tweedy pudding-mix effect.
"Quick-as-lightening fillers for amusing family presents."
InstructionsThe pattern includes a tea-cosy in the shape of a Christmas Pudding, and a tea-pot stand in the shape of a plate. CosyUsing wool double, with No 7 hook and using the brown and tan wools together (to make a tweedy effect), make 4 chain and join into a ring with a slip stitch. Work 8dc into ring. 1st round: (2dc into each dc) 8 times
[16 dc] Start opening for handle by turning the work and working backwards and forwards in rows. 12th row: with wrong side facing
1dc in next dc all across to back to start of round [56 dc]. Turn with
1ch. Start opening for spout, working each side of cosy separately. †† [Editor's note: Here's a picture of the cosy with one side worked, showing the coloured thread marking the early rounds.]
Rejoin wool at spout end to work the other side of the cosy. With right side facing, repeat from †† to ††. Join spout opening with one slip stitch. 1ch; turn the work. With right side facing, return to working in rounds. Work 3 rounds of dc, joining handle opening in first round. Turn the work, and crochet one round of slip stitches. Fasten off.
IcingWith number 7 hook and white bouclé wool used single, work as for first 6 increase rounds of the plate, [56dc]. Next round: * 1dc in next dc; 4 tr in next dc; 1dc into each of the next 3dc; repeat from * 9 times. Fasten off. [Editor's note: I extemporised with the crochet here. You can form "realistic" icing/snow either with extra rows of long and short crochet stitches, or by adding embroidery when you stitch the icing in place on the cosy.] Making up:Stitch icing to top of cosy, and use white bouclé wool to embroider
irregular shapes round edge of icing. Using black wool embroider spots
on cosy to represent currants as required. Sew in all ends. Plate (not shown)Using wool double, with No 7 hook and white, make 4 chain and join into a ring with a slip stitch. 1st round: 1ch, 8dc into ring; 1
slip stitch into top of 1st dc. Continue increasing in this way, 8 sts in every round, until 8 rounds
have been worked from the start [64 dc]. Next round: *
2 dc in next dc; repeat from * to end of
round [128 dc]. Work 2 rounds without shaping. Join in red, and work 1 round. Fasten off red wool. Turn the work and with wrong side facing, using white wool double, work 1 round of slip stitches into last round of dc. Fasten off white wool. Press plate lightly. Thread a length of white wool through last round of base - that is before the start of the rim - and fasten off securely. This will retain the shape of the plate. |
|
Materials50g balls each in dark brown and tan double knitting wool, (used double throughout), and one ball of a white bouclé double knitting wool for the icing. Scraps of red and black for stripes on the plate. Holly sprig decorations in paper or plastic. One each Nos. 7 (4.5mm) and 10 (3¼mm) crochet hooks. Crochet abbreviations:ch = chain Remember these are English crochet instructions where dc is equivalent to US single crochet - see "Terminology" in the side bar. Tension4dc to an inch. Size mattersIntended to fit a 2 pint pot (that's UK pints which are each 20 fluid ounces not 16). Check out the diagram with the dimensions of my cosy. A word on the wool.I used a vintage tweed DK (used double) which was a perfect "pudding"
colour, being a rich brown and having flecks of different colours, so
I did not need to use two different colours to work together. Disclaimer
|
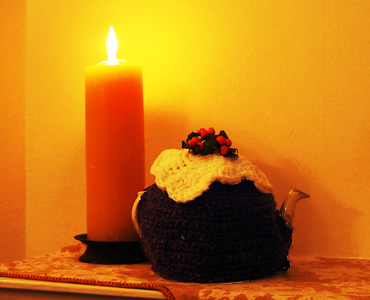
If you would prefer to make a knitted cosy for the main body rather than crochet then here are some instructions for a ribbed cosy. You can still make the white top and holly using crochet as before, and fasten it only in the centre on top of the cosy, which will allow the ribs to adapt nicely to the shape of the teapot.
The cosy is worked in double knitting wool used singly on No 8 (4mm) needles. [The crocheted cosy is worked with two different coloured DK wools worked together to give a tweedy "pudding" effect. I used a flecked wool for my cosy which would work well for this knitted pattern.].
Measurements: width all tround 16 inches, height 6 inches.
Tension: 12 sts and 17 rows to 2 inches measured over pattern.
Instructions:
**
Cast on 47 sts and work in pattern as follows:
1st row: K3, *
p2, k2; repeat from * to end
2nd row: K1, *
p2, k2; repeat from * to last 2 sts, p1,
k1.
These two rows form the pattern. Continue until work measures 5 inches,
ending with a second row.
Shape Top:
1st row: *
K2tog, k1, p1; repeat from * to last 3 sts,
k2tog, k1. [35 sts]
2nd row: K1, *
p1, k2; repeat from * to last stitch, k1.
3rd row: K2, *
p1,k2; repeat from * to end.
4th row: as second row.
5th row: *
K1, p2tog; repeat from * to last 2sts, k2.
[24 sts]
6th-8th rows: *
K1, p1; repeat from * to last 2sts, k2.
9th row: K1,*
k2tog; repeat from * to last stitch, k1.
[13 sts]
10th row: K1, purl to last stitch,
k1.
11th row: K2tog 6 times, k1. [7 sts]
**
Break yarn and leave sts on a safety pin.
Work a second piece from ** to **.
Break yarn and leaving an end. Thread through sts on needle and then through
the 7 sts on the safety pin. Draw up tightly and fasten off.
Sew up the sides, leaving an opening for handle and spout.
[Editor's note: This
design allows you to sew the front an back seams, and allow handle and
spout openings to exactly match your teapot.]
Decorate with the crochet icing and holly as desired, but leave edges of icing free.
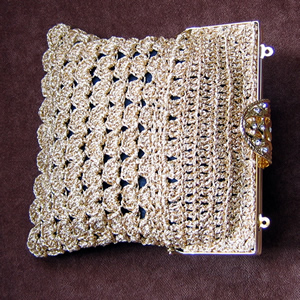
From November 1940:
"This pretty gold mesh bag will rejoice the hearts of those can still enjoy a little social life. Personally we are at this moment sitting in an air-raid shelter!"
One wonders if that was literally true - but I am sure the editorial team spent a lot of their time in shelters in this period of history in the UK.
InstructionsStarting at the top make 37 chain. 1st row: Miss 2 ch; 35tr; turn with
2ch. Now make a second piece exactly the same, and at the end of the final row, make 5ch, and then join the two pieces together by working across the first piece to end of 5ch in slipstitch, then slipstitch across 2nd piece, making a round. Now change to pattern and work backwards and forwards in rows,
1st row: 1ch; 3dc into 3rd of 5 ch; 3dc into first space * miss 2 spaces; 3 dc into next space; repeat from * across all trebles; then 3dc into 3rd of 5 ch; work across the other side as for the first [27 groups]. Slipstitch into the middle of 3dc made on the 5ch. Turn. 2nd row: (1dc, 1tr, 1dc) into middle of each group of 3dc. Turn with a slipstitch to the next treble. 3rd row: 1dc into same treble as
slipstitch, * (1dc, 3tr, 1dc) into next group,
1dc into centre of next group, * repeat from
* to * once. 4th row: (1dc, 5tr, 1dc) into the
middle of each group; turn with a slipstitch into second treble. 6th row: (1dc, 7tr, 1dc) into the
middle of each group; turn with a slipstitch into second treble. Now pinch the two sides of the bag together at the bottom edge and slipstitch
across from one side to the other, taking two outside scallops together,
to join. The scallops that were on the "side" of the bag are
twisted slightly to accomplish this, joining 9 full scallops and avoiding
a half-scallop at the sides of this edge. Making up:Sew in all ends. If your frame has fasteners designed for a cord handle, make a cord or buy a fine chain to form the handle. I made a kumihimo cord, as this is a current interest of mine. |
MaterialsExample shown is made from 2 balls of Twilleys Goldfingering. Bag handles from Bags
of Handles One No. 11 (3mm) crochet hook. Fabric remnant for lining. Crochet abbreviations:ch = chain Remember these are English crochet instructions where dc is equivalent to US single crochet - see "Terminology" in the side bar. TensionNo tension given - my 37 treble worked out to 5 inches when not eased
out on frame. Size mattersFits 5¼ inch width handle. Disclaimer
|
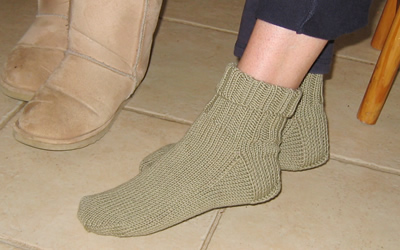
My sister was going on a summer trekking holiday and wanted some suitable socks to wear in her riding boots. I have created these simple socks in soft wool/cotton double knitting to meet the needs for a thick summer sock. I can't say how well the wool/cotton will wear as a sock wool, but the double knitting weight means they take about 5 minutes to knit (OK maybe a bit longer...).
I made the largest size for my sister (UK shoe size 5 or 6) - the smaller sizes are intended for children. You can wear the tops extended if used under riding boots, or rolled down if, perhaps, wearing shorts with heavy hiking boots.
Instructions (work 2 alike).Cast on 36 (40;44;48) stitches loosely; divide over 3 needles and join in a round. Work 35 rounds in k2, p2 rib (or required length). Next Round: K1, make 1 by picking up bar between sts and knitting into the back of it; knit to last st; make 1, k1. [38 (42;46;50) sts] Knit 5 rounds straight. Divide for heelNext Round: K9 (10;11;12), and then slip the last 10 sts of the round onto the other end of the same needle - these 19 (21;23;25) sts are for the heel. Divide the remaining sts between two needles, and leave for the instep. Commence Heel1st Row: Slip 1 purlwise, purl to end. 2nd Row: Slip 1 knitwise. * K1, keeping yarn at back of work, slip 1 purlwise; repeat from * to last 2 sts; k2. Repeat these 2 rows 8 (9;10;11) times more, then the first row again. Turn Heel1st Row: K13 (14;15;16) sts, slip 1, k1, psso (pass the slipped stitch over), turn. 2nd Row: Slip 1, p7, p2tog, turn. 3rd Row: Slip 1, k7, slip 1, k1, psso, turn. Repeat the 2nd and 3rd rows 3 (4;5;6) times more, then the 2nd row once. K5, thus completing the heel. 4 sts remain unworked on the left-hand needle. Using spare needle, knit 4 heel sts, pick up and knit 10 (12;14;16) sts along side of heel. Slip all instep sts on to one needle, and using 2nd needle knit across instep sts. Using 3rd needle, pick up and knit 10 (12;14;16) sts along side of heel, then knit 5 heel sts. [48 (54;60;66) sts]. Shape instep:1st round: Knit. 2nd round: 1st needle: knit
to the last 3sts, k2tog, k1. Repeat these two rounds until 38 (42;46;50) sts remain. Continue on these sts until work measures 4¼(5;5¾;6½) inches, or desired length, from where sts were knitted up at the heel. Shape Toe:1st round: 1st needle: knit
to the last 3sts, k2tog, k1. 2nd round: Knit. Repeat these 2 rounds until 18 sts remain. Making UpKnit sts from 1st needle on to end of 3rd needle. |
Materials2 x 50g balls Rowan Wool Cotton , shade 930, "Riviera". One set of 4 number 9 (3¾mm) needles. Tension24st and 32 rows to four inches on No 9 needles. Size mattersLength of foot approximately 7½(8½;9½;10½) inches (adjustable). A word on the wool.Wool Cotton is possibly my favourite Rowan yarn; a 50/50 blend of soft
Merino wool and cotton. I am not sure how well it will stand up to wear
and tear in a sock, but the cotton should improve durability. Disclaimer
|
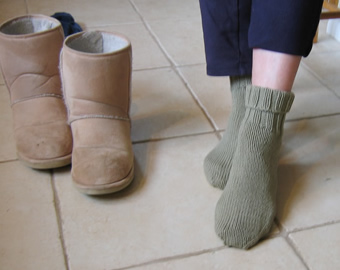
Here's a picture of the socks "in use". Left to right - my sister at the rear on the grey, Susanna, Liz, and leading on the palamino, Tom, the guide.

Llanthony Riding and Trekking is based at Court Farm, next to Llanthony Priory; here's the full picture (from which the detail above is taken) showing the fabulous scenery and environment in Wales. Lyn strongly recommends the bed and breakfast accommodation that she enjoyed at Pen-y-dre Farm
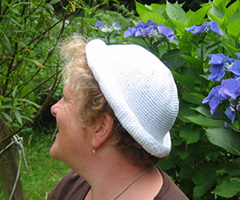
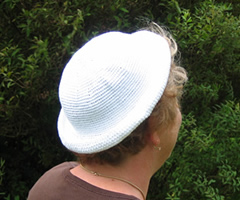
"Capped to catch the eye" in 1952.
This cap can be "worn with a purpose on windy days for cliff-top walks or out at sea,
or just for extra prettiness at any time".
"Leave it plain or dot with beads" - and - "for teenagers only - roll up the brim in jaunty sailor style".
Luvvly.
Instructions.Instructions are for 2 versions - one plain and one with striped brim. Crown 1st Round: *
2 dc in 1 dc; repeat from * to end. 5th Round: *
(1 dc in 1 dc) three times, 2 dc in 1 dc; repeat from *
to end. [40 dc] 7th Round: *
(1 dc in 1 dc) four times, 2 dc in 1 dc; repeat from *
to end. [60 dc] 12th Round: *
(1 dc in 1 dc) fourteen times, 2 dc in 1 dc; repeat from *
to last 10 dc; (1 dc in 1 dc) ten times. [106 dc] 19th-34th Round: As 18th round. This completes the crown. Striped BrimWith number 11 hook, and white yarn, make 23 chain, turn. Miss 1 ch 1 dc in each of 22 ch. †† Join in contrast. Continue repeating from †† to †† until strip fits all round the lower edge of the crown. Do not stretch this strip but allow it to fit comfortably. End with 2 rows of contrast colour. Fasten off. Finishing: Plain BrimThis is worked with the yarn doubled. Sew in ends and optionally embroider 5 rows of beads around the crown, as shown in
the photograph. |
MaterialsPlain: 2 x 50g ball Phildar
Phil Crochet, in white, (100% cotton, 201yards). Striped: 1 x 50g ball 3 balls (2 in white) made both hat versions. Nos. 11 (3mm) and 10 (3¼mm) crochet hooks. Crochet abbreviations:ch = chain Remember these are English crochet instructions where dc is equivalent
to US single crochet, and so on - see "Terminology" in the side
bar. Tension7 dc to an inch. Check the tension and your head measurement carefully; the original was made in angora which is more stretchy than pure cotton. Size mattersTo fit "an average head". However, the hat size can vary quite a lot according to your tension. A word on the wool.Original specified 2 x ½oz balls of Patons Fuzzy Wuzzy Angora. Disclaimer
|
Striped-brim version, and modelled original:


I was so taken with the another seaside idea on the same page as the hat that I felt compelled to share it with you here as well.
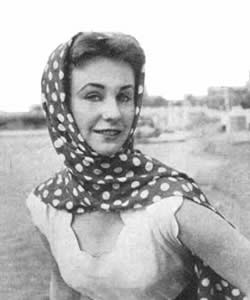
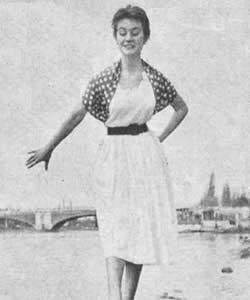
.....TIED AT THE BACK it makes a snug bolero....
As a change from the everlasting headsquare, buy a yard of rayon or silk -
ours was a yard of spotted rayon at 5/6d,
[Editor's note: For you
whipper snappers out there, that's 27½p or about 60 cents.]
but silk is best if you can afford it, as it's less slippery - cut it in half
lengthways, join the short ends neatly, slip hem the long raw edges, and you
have a manoueverable long stole, which can be worn in all sorts of ways and
is so much prettier and smarter than a triangle tied under your chin.
[Editor's note: I'm with
them on that one.]
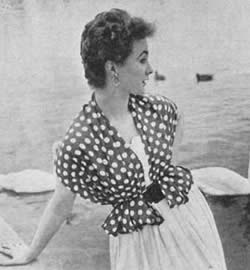
AS A CARDIGAN - round your shoulders, ends tucked up and over your belt in two comfortable pockets.
Carry it around on holiday and it will be a godsend for those chilly moments,
and less bother to carry than a cardigan. Tie it round tyour waist as a sash
when you don't want to carry it.
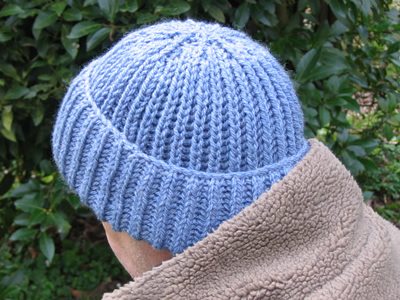
This is my favourite hat of the three this month. It's simple, warm, comfortable, and looks like a serious seafarer's hat! Even though I don't like knitting rib that much, and Fisherman's rib means you have to put in a lot more knitting to get the length you need.... it was nonetheless very satisfying.
InstructionsWith No. 6 (5mm) circular needle cast on 68 stitches, and join into a
round, and purl the first round. Place a stitch marker to mark the beginning
of the round. 1st round: *
K1B (knit one below, by knitting into the stitch below the next stitch,
and slipping both sts off the needle together); p1. Repeat from *
to end of round. These 2 rounds form the pattern. Continue in pattern until work measures 9inches from the beginning, ending with round 2. Shape Crown as follows, keeping continuity of the pattern: Next round: (K3tog; p1,k1,p1) 11
times; k2tog. [45 sts] Break yarn, thread through remaining sts; draw up and fasten off securely. Making up: Changing the hat size, or substituting the wool.You may want to alter the size (circumference) of your hat, or compensate for a different gauge. Simply work out how many sts you need to cast on according to your own
gauge eg divide the number of sts by 16 and multiply by the number of
sts you knit to 4 inches. A word on the wool.If you work in pure wool you may need more than my stated quantities of yarn. Fisherman's rib is a very yarn-hungry stitch which produces a satisfying elasticated bulky fabric, by effectively knitting the yarn double, (nice and warm!). Original pattern called for 3 x 50g balls Patons Husky Chunky, which
is a pure wool chunky; the blend I used, no doubt, has a better yardage. |
MaterialsExample shown is knitted in 3 x 40g balls of vintage Argyll Ferndale Shetland Chunky (an acrylic and wool blend). Size 6 (5mm) and circular needle - short length suitable for a hat. TensionApprox. 8st to 2 inches on No 6 (5mm) needles. Size mattersThere is a lot of give in the ribbed stitch, making the sizing very flexible. Disclaimer
|

A 1970s hat using blackberry stitch, with a moss stitch brim. George did not think this was very "manly", but I leave that artistic decision to you, [George has also had experience of "life on the ocean wave" and says that as long as it's warm it will be welcome].
InstructionsWith No. 6 (5mm) circular needle cast on 89 stitches, and work in rounds of k1, p1, moss stitch for 3 inches. Increase 7sts evenly across the last row. [96 sts] Change to No. 4 (6mm) circular needle and work pattern as follows: [Editor's note: this pattern (blackberry stitch) is worked over groups of 4 sts, and the hat is knitted up from the wrong side throughout.] 1st round: (wrong side) Knit. These 4 rows form the pattern. Continue in pattern until work measures 8½ inches from the beginning, ending with round 4. Shape Top as follows, keeping continuity of the pattern: Next round: K1 *k2,
k2tog. Repeat from * to last st., k1. [72
sts] Next round: *K2tog,
k1. Repeat from * to end of round. [48 sts] Break yarn, thread through remaining sts; draw up and fasten off securely. Making up: Changing the hat size, or substituting the wool.You may want to alter the size (circumference) of your hat, or compensate for a different gauge. Simply work out how many sts you need to cast on according to your own
gauge eg divide the number of sts by 18 and multiply by the number of
sts you knit to 4 inches. Do the same calculation when increasing for the blackberry stitch, taking note that your number of sts needs to be divisible by 4. Example:
I have a gauge of 18 sts to 4 inches on no UK 6 (5mm) needles. Cast on 89 sts becomes 89/18*15 = 74, and you cast on 75, as it needs to be an odd number. Increase evenly to 96 sts becomes 96/18*15 = 80. |
MaterialsExample shown is knitted in 2x 50g balls of vintage Richard Poppleton Emmerdale Chunky Tweed (an acrylic and wool blend). Size 6 (5mm) and size 4 (6mm) circular needles - short length suitable
for a hat. TensionApprox. 9st to 2 inches on No 6 needles. Size mattersThis hat worked out to about 22 inches head circumference. My estimate
is that "to fit an average sized head" means 22/23 inches for
a man's size and 20-22 inches for a woman's size. A word on the wool.Original pattern called for Patons Husky Chunky, which was, I think a
pure wool chunky, somewhat bulkier than the one I used. Disclaimer
|
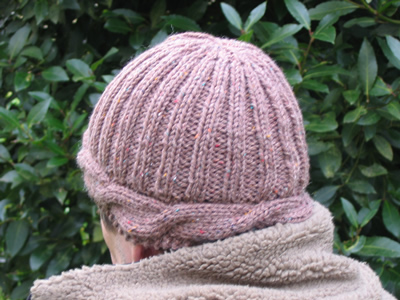
This 1970s style hat is constructed by knitting a cabled band and then picking up stitches to knit the rest of the hat - which in this example is ribbed. This version is is not intended to have a turned back brim; if you want one, then you must knit the rib section longer; you will not have to reverse any workings as the rib section is reversible, so could be worn either way out. The single layer construction is very economic on yarn; For my wool/acrylic blend, I used 58g.
InstructionsWith No. 5 (5½mm) needles cast on 11 stitches, and work in cable
pattern as follows: 1st row: (wrong side) K3, p6, k2. 9th - 14th rows: Repeat 1st and second rows 3 times. Repeat 1st - 14th rows 8 times more (9 patterns in all) ending with row 13. Graft the sts to the cast-on edge to form a circular band, [or cast off the 11 sts and sew the cast-on to the cast-off edge]. [Editor's note: If you want to alter the size (circumference) of your hat, now is the time to do it. Lengthen or shorten this band to the circumference you want to achieve. See "altering the size" below.] One edge of the band has a neat "finished" garter st edging
and the other has a reverse stocking stitch edge, which you will use to
continue knitting the hat in the round. Work in rounds of k2, p2 rib for 5 inches (about 28) rows. Shape Crown as follows: 1st round: *K2tog,
p2. Repeat from * to end of round. Repeat rounds 2 five times more. 8th round: *K1,
p2tog. Repeat from * to end of round. Break yarn, thread through remaining sts; draw up and fasten off securely. Making up: Changing the hat size, or substituting the wool.You may want to alter the size (circumference) of your hat, or compensate for a different gauge. This pattern relies on making an even number of cables around the hat, so to lengthen or shorten the band, you can either add in whole or partial pattern repeats, or, if you feel up to it, you could alter the number of rows in the pattern repeat of the cable. Test your gauge before you start and work out how many rows you need to make your chosen head circumference size. Start by dividing the number of rows you calculate by 14, and then try some other numbers, eg 12, 16, 13, or 15, until you are close to getting an exact number of patterns. [Note that if you choose to work to an uneven number of rows in the repeat, then you will end up doing your cable operations on purl rows, which is quite feasible, but approach with caution if your are a beginner in this field!] If the above all sounds hopeless to you, then just knit until the band is the length you require, and just sew the ends of the band together rather than trying to graft it. You could even work the hat on two needles instead of in the round, by picking up the stitches from the band before you sew it up, - and then, when you have finished, you sew a side seam into the hat, including the band. Finally if you are altering the size, or compensating for a different
gauge, you will probably need to pick up a different number of stitches
from the band. I usually pick up a number of stitches equal to three quarters
of the number of rows I have knitted. |
MaterialsExample shown is knitted in 2x 50g balls of vintage Richard Poppleton Emmerdale Chunky Tweed (an acrylic and wool blend). Two size 5 (5½mm) needles and a size 6 (5mm) circular needle - short
length suitable for a hat. TensionApprox. 9st to 2 inches on No 6 needles. Size mattersThis hat worked out to about 22 inches head circumference. My estimate
is that "to fit an average sized head" means 22/23 inches for
a man's size and 20-22 inches for a woman's size. A word on the wool.Original pattern called for Patons Double plus, which was a double knitting
wool, and the instructions were to knit the yarn double, producing a tension
of 7.5sts and 10 rows to 2 inches. Disclaimer
|
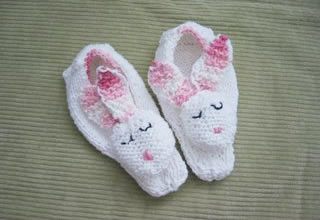
A charming pattern from Alison for a pair of child's slippers, first knitted for her niece, Nancy.
InstructionsWork two slippers the same as follows: Sole and foot - Cast on 28 sts in white At start of toes k1p1 rib for 2 inches Next row: p2 tog across entire row
(14 sts) Heel - Pick up 10 stitches from middle of cast on row, leaving 18sts (9 on each side of the 10 you have picked up). You will pick up and incorporate these 18 sts as you work the back of the heel. Work 15 rows on these 10 sts in stockinette as follows: Row 1: K9; pick up the next st of
the cast-on row and knit it together with the last st of the row. Turn. Continue in this way for 12 rows in all. Bind off remaining 6 stitches. In sewing the toe centre seam, and working the heel you have pulled up the sides to form the slipper shape. [Editor's note: If the 'cuff' of the slipper is loose you can work a row of single crochet around the edge of the slipper and pull in the shape a little. I used the pink for this.]. Head - knit 2 in white. Cast on 10 sts. Using spare yarn, embroider a pink nose, and crescent shapes for closed eyes, using the picture as a guide. Loosely stuff head and use long tail to sew around edge and pull in making
a small flat ball. Ears - knit 4 in white and 4 in pink Cast on 2 sts. Sew a white to a pink ear using blanket stitch. Finishing - Sew ears firmly to back of head at jaunty angle. Tail - (optional) make 2 small pompoms and attach to heels of slipper. |
MaterialsDishcloth cotton - white and pink (Lily Sugar n'Cream cotton.). 1 pair 5mm needles. . Tension20 sts and 26 rows to 4 inches measured over stocking stitch on 4½mm needles. Size mattersFits feet 7" long (age 4 or so). Disclaimer
|
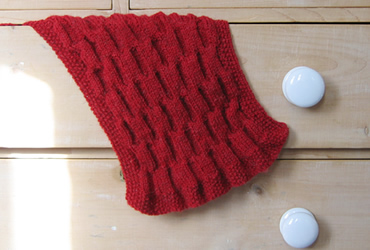
"Reversible scarf for the cold days ahead". This is a very pleasing pattern from October 1963, and is a suggestion for "pre-Christmas plans". The pattern is the same on both sides, so great for a scarf, and can be knitted in basically any wool weight; ensure you use needles a couple of sizes larger than normal for whichever weight you choose, and do a proportional calculation on the gauge, so your scarf is not too wide.
InstructionsCast on 73 stitches. First row: K1, * p1, k1; repeat from * to end. Repeat this row for the moss stitch border 8 times more. 10th (increase) row: Moss 8, (increase in the next st, moss 6) 8 times; increase in the next st, moss 8. [82 sts] Change to pattern rows as follows: 1st row: moss 5, p3, *k6,
p6; repeat from * to last 14sts; k6, p3,
moss 5. 11th row: moss 5; *slip
the next 3 sts on to a cable needle to the back of the work; k3, p3 from
cable needle; slip the next 3 sts on to a cable needle to the front of
the work; p3, then k3 from cable needle; repeat from *
to last 5sts; moss 5. 23rd row: moss 5; *slip
the next 3 sts on to a cable needle to the front of the work; p3, then
k3 from cable needle; slip the next 3 sts on to a cable needle to the
back of the work; k3, p3 from cable needle; repeat from *
to last 5sts; moss 5. These 24 rows form the pattern. Continue straight until the work measures 46 ins, ending with a 12th or 24th pattern row. Next (decrease) row: moss 8 *k2tog; (p1, k1) 3 times; p2tog, repeat from * 3 times more; k2tog; (p1, k1) 4 times. [73sts]. Work 9 rows moss stitch over all stitches. Finishing - Press work very lighty, taking care not to spoil th texture of the patttern. Cut the remainig wool into 7½ inch lengths; take 3 lengths of wool together each time, fold in half, and, with a crochet hook, knot through short ends to make a fringe. Trim fringe. Substituting the wool - I used a vintage wool,
Phildar Brisants. This is a fine double knitting, which is normally knitted
on no. 9 (3¾mm) needles. The cabling make for a tighter tension,
and the recommended needles (UK No 6) are 2 sizes larger than usual for
a DK. I went with no. 8 needles, instead of 9s, but should have gone larger
I think. If you want to use chunkier wool, then decrease the number of sts proportionally. The pattern is worked over 12sts. |
MaterialsOriginal call for 9oz of Patons Moorland Double Knitting Example shown is knitted in Phildar Brisants. One pair of No. 6 (5mm) needles. TensionEquivalent to 20st and 26rows to 4 inches (10cm) measured over stocking
stitch. Size mattersWidth: 12 inches A word on the wool.This pattern is for double knitting wool, and from memory Moorland DK
was slightly heavy-weight. Disclaimer
|
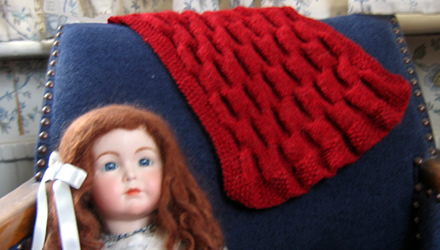
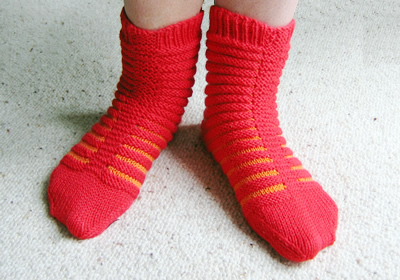
Three offerings this month: this first pattern from 1968 is very similar in design (and the principle of the stretchy fit) to the second offering, Boudoir Boots; however these socks are knitted in a different (more conventional) orientation. They particularly appeal to me, being very jolly, knitted in stripes, (although, as a general rule, I prefer my socks wide awake...).
InstructionsMake two socks alike. Main body - With main shade (M) cast on 56 stitches, and arrange across 3 needles (19 on each). Work as follows: Rib round: k5, * p1, k1; repeat from
* to last stitch, p1. Repeat this round 10 times more. ** Repeat from ** to ** 13 times more, and then work the 12th, 13th and 14th pattern rows again Break C. Work the toe - Continuing in M only, re-arrange the sts over the
3 double pointed needles as follows: You now have 56 sts in the round. Next round: knit to the last 3 sts on the first needle, sl1, k1,
psso, k1. Beginning the second needle, k1, k2tog, knit to the last 3 sts
on the second needle, sl1, k1, psso, k1. Beginning the third needle, k1,
k2tog, knit to end of round, [52 sts]. Continue to decrease on every alternate round in this way until 24 sts
remain. [8 on the first needle, 12 on the second needle, 4 on the third
needle]. Making up - slip the last 4sts of the round on to the first needle
and graft
the two sets of 12 sts together to make the toe. 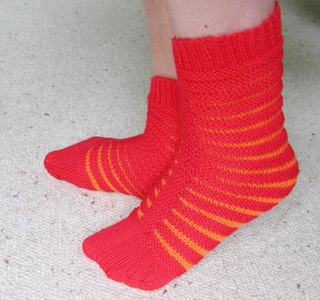 |
MaterialsOriginal pattern calls for a total of 2 (1oz) balls of 4ply - 1 ball in each colour. One set of 4 double pointed No 11 needles. Tension30st and 38 rows to 4 inches (10cm). Size mattersOne size fits all. A word on the wool.Original knitted in Patons 101 Courtelle Crepe in "Venus blue" and "Starlight white". Example knitted in Phildar Lambswool (51% wool, 49% acrylic), colours rouge and melon. |
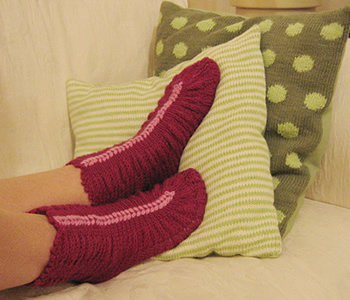
Second pattern this month from an "Oddments" leaflet for "using up old Scraps of Wool", dating anywhere between the 1930s and the 1950s. Described originally as Lady's Bedsocks*, I hope they will prove to be the perfect partner for Boudoir Bedjacket.
*One of the other patterns was called "Bedroom Boots" and I couldn't resist the alliteration; however, this pattern described here makes footwear that is much more elegant than either "bedsocks" or "boots" implies. They look at their best when on the feet, (as opposed to just after you have knitted them, when they look like a pair of unattractive caterpillars). It is hard for me to date the design, as many patterns were reproduced out of their true era; possibly an expert on publishing could be more accurate.
InstructionsEach sock is worked in one piece. Make two alike. Commence at the front edge. Using No. 12 needles, cast on 64 stitches,
and work 6 rows in k1, p1 rib. ** Change to No. 12 needles. Work 6 rows in k1, p1 rib. Making up - Press each piece lightly on the wrong side under
a damp cloth with a hot iron. Crochet edging - Using the main colour, work a picot edge all around the top of each of the socks, as follows: One slip st to secure the yarn to the top front edge. Embroidery |
MaterialsOriginal pattern calls for 2oz of 4ply, and a small quantity of contrast
for embroidery. One pair each of number 12, an No 6 needles. Tension20st to 4 inches (10cm) on No 6 (5mm) needles. Size mattersOne size fits all. A word on the wool.Baby Cashmerino is heavier than a 4ply, knitting to a tension of 25st and 34 rows to 4 inches. Thus I used more yarn than the original pattern. Each 50g is 125m, and I used 90g. |
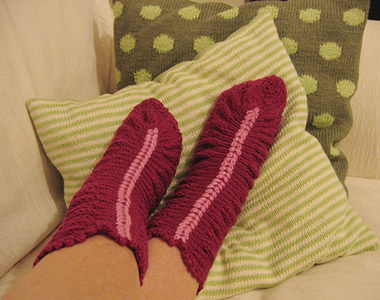
As a variation (or to "use up old scraps of wool") you might choose to make the picot edging in the contrast colour to match the embroidery - I believe this would work better if the contrast were darker than the main colour.
Alternatively, if you are not confident in your embroidery skills (I found it harder than I had imagined) you could stick with a single colour and embroider in the main yarn; this provides a more sophisticated look - if indeed a bedsock can be said in any way to contribute to a sophisticated look!
Third and final pattern is totally untested, from a magazine dated November 1968 [ "Ideas for Gifts"]. They really are called "boudoir slippers" which, apart from any other consideration, makes me feel that the pattern dates from longer ago than 1968. As a teenager, I would have found these indescribably awful; however, luckily, I did not have relatives who were handy with the old needles.
Likely to remain untested as a girl can have only so many bedsocks.
[Should any readers admit to making this pattern, please submit a photo of the result for me to display here!]
InstructionsEach sock is worked in one piece. Make two alike. Cast on 76 stitches, and work as follows: Row 1: k3, * p2, k2; repeat from
* to last stitch, k1. Repeat these rows for 6½ inches. Change to No. 12 needles. Work 6 rows in k1, p1 rib. Making up - Fold cast-on edge to cast-off edge and join side seams. (Seams form heel and toe). Crochet edging - Starting at the heel, crochet eyelets all around the edge as follows: - 3ch, * 1dc in next stitch, 1ch, miss next st; repeat from * all round. Join with slip stitch to 3ch at the beginning. Then work a row of picots thus: - * 3ch, 1 slip st into the first of these chain, 1 slip st into the 1ch space of the previous round; repeat from * all round. Fasten off With wool double, crochet a chain cord for each sock and thread through holes; make and sew a small tassel to each end. |
MaterialsOriginal pattern calls for 1 (1oz) ball of Patons Beehive Baby Wool in 3ply. One pair of number 11 needles. Tension32st and 40 rows to 4 inches (10cm). Size mattersOne size fits all. A word on the wool.It is fairly easy to acquire 3ply Baby wool to knit up to this tension. |
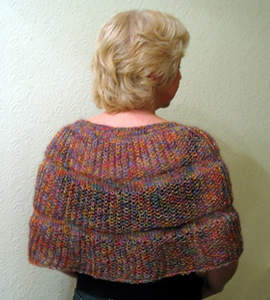
Adapted from an original idea for sleepwear, this has transformed itself into a glamorous stole.
Whether or not it sparkles obviously depends on the type of wool you choose. I used a fabulous Italian yarn, which was a bit brighter once knitted up, than I had imagined from the ball, but has made a lovely item. The original pattern (from the 1970s but probably revamped from a much earlier design) called for 4 ply wool - about 8 ounces - but my version is not only in much lighter weight man-made fibres with a consequent good yardage, but also designed to be shorter than the original.
I think you could feasibly wear this in the evening with a skimpy evening top or as a decorative addition over a plain black roll-neck sweater.
[Note: we noticed that this colourway works particularly well with dark brown].
InstructionsUsing No. 6 (5mm) needles cast on 72 stitches, and work 6 rows k1, p1 rib. Increase row: K5, * m1 (make one st by picking up the loop between the stitches and knitting into the back of it), k4; repeat from * to the last 6sts, m1, k5. [88 sts]. **
Right side of work facing, change to No. 3 (6½mm) needles and commence pattern. Next pattern row: *
K1, k1b; repeat from * to end. Work 25 rows in the pattern. Change to number 6 (5mm) needles and work 3 rows in stocking stitch,
starting with a purl row. Increase row: K6, * m1, k4; repeat from * to the last 6sts, m1, k6. [108 sts]. Make a second pattern band by repeating from ** to **. Increase row: K4, * m1, k4; repeat from * to the last 4sts, m1, k4. [134 sts]. Make a third pattern band by repeating from ** to **, but omit the final three st st rows, and, on this last segment, continue on the No. 3 needles and knit a further 5 pattern rows. Cast off very loosely using a large gauge needle. End panels - Using No. 7 (4½mm) needles, and wrong side of work facing, pick up and knit 56 sts purlwise. Next row: (right side facing) K6,
*k2tog, repeat from *
to last 6 sts, k6. [34 sts]. Continue to decrease at the centre in this way until 6 sts remain. Repeat for the other side. Finishing - Press the stocking-stitch end pieces lighty on the
wrong side, using a warm iron and a damp cloth. [Editor's notes: The original pattern had 5 segments. If you want to do that, work in the same way, with each pattern band at 25 rows and the following additional increase rows: Increase row for fourth pattern band:
K5, * m1, k5; repeat from
* to the last 4sts, m1, k4. [160 sts]. ..and for the side panels pick up and knit 80 sts instead of 56, and decrease to 50 sts in the first decrease row.] |
MaterialsExample shown is knitted in 2 x 50g balls of an S. Charles Collezione yarn "Ritratto" - shade 64 One pair each of numbers 3, 6 and 7 (UK size) needles. Fancy clasp available on the web from TextileGarden, or Purlescence, or Nordic Fiber Arts. TensionApprox. 16st and 32rows to 4 inches (10cm) measured over pattern using
No 3 (6½mm) needles. Size mattersWidth around lower edge: 60 inches A word on the wool."Ritratto" is a man-made fibre with 28% mohair; knits 22sts to 10cm on No 6 (5mm) needles; 50g ball is 198 yards and I used about 1½ balls for the project.
I think this would work out well using Rowan Kidsilk Haze (or Night or Splash), or in Rowan Damask, which has a slightly shiny silk thread running through the yarn. Disclaimer
|
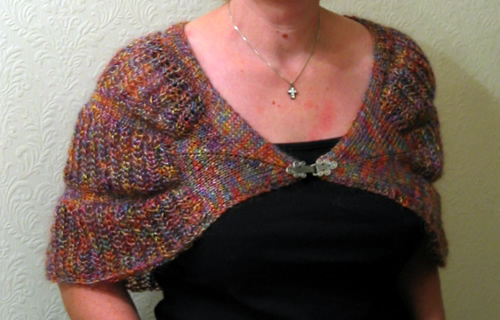
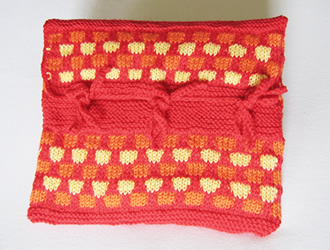
This is my modern version of a hot-water bottle cover. The cover is designed to fit a microwavable hot pad - link for this under "materials". The pads are conveniently small, and much safer (to lie on) than a hot-water bottle.
The pattern stitch from 1968 was used for a tea-cosy (colours Jade, Pink, and White), and a cushion cover (colours Brown, Amber, and White). I think the cushion cover, (style and colour scheme), is more authentically late 60s that the cosy. Although a tea cosy was de rigeur in our house, I think tea bags with and without the use of tea pots was becoming more prevalent by that time.
InstructionsWith No. 11 needles and main colour (red), cast on 58 stitches. **Change to number 10 needles and commence pattern as follows, using second colour (orange): Row 1: (right side) *K4, slip 2;
repeat from * to last 4 sts, K4. Rows 13-24: repeat rows 1-12. Change to number 11 needles and continue in garter stitch for 15 rows. Purl one row.** Repeat from ** to ** three times, then rows 1-30 again. Change to number 11 needles and work in garter stitch for 4 rows. Cast off.
Crochet edging - Using the main colour, (red), work a dc edge around the flap of the cover with ties as follows: With right side facing, starting at the side edge, work 6 dc up edge
of the garter st band, 15 dc up the honeycomb edge, 2dc up to corner,
3 dc into the corner st. Work 3 more ties by making 40 chain, then working 1 row of dc into each
chain. Sew the ties on to the cover to match the positions of the ties
on the flap. |
MaterialsOriginal pattern calls for three contrast colours, (red, orange and yellow). One pair each of number 10, an No 11 needles. One hot water bottle "replacement
core", (available to order on the web). TensionThe wool should knit to a basic tension over st st of 28st to 4 inches (10cm) on No 10 (3¼mm) needles. Size mattersOne size. A word on the wool.I used Phildar Lambswool (a 4 ply wool/acrylic mix) left over from another project. |
Here is a version adapted for a light worsted cotton yarn (Rowan Cotton Glace). For this version, cast on 52 sts.
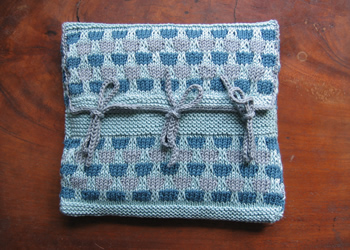
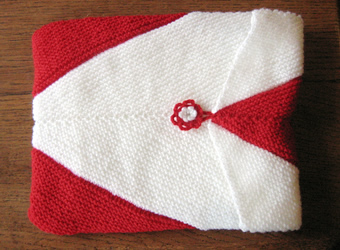
This is a pattern from 1956 "reversible bottle-cover" (sic) - though why the quotes, why the hyphen, and why the description reversible, I really am not sure. Originally a cover for a hot-water bottle, I have adapted it to fit a microwavable pad. The knitting turned out to be an interesting shape, and in consequence made for an interesting pattern, (probably not as intended). I used a bright red and white combination, which reminded me of a 1950s accessory set. The original recommended colours were "powder blue and white".
In the days when pattern illustrations were not in colour, the colour names were much more vivid and descriptive; modern names tend to try and evoke an emotion rather than a colour. I do love reading these old patterns with the colours - "lipstick red" "primrose yellow" "mimosa" "frosty lime" - you could just eat them - a feast for the mind's eye.
InstructionsFirst piece - with No. 11 needles and first colour, cast on 4 stitches. Row 1: Inc in every st (8 sts) With the right side facing for row 7 place a row marker on this side of the work, to mark it as the right side of the work.
Then continue working as before, increasing at both ends of the row, and in the middle, on odd (right side) rows; increase only in the middle on even (wrong side) rows. After a while, the stitches will become crowded and the shape hard to manage on just 2 needles. At this point, spread the sts evenly across two needles, discarding the centre st marker; continue to work back and forth across the needles using a third needle.
The work will take on a triangular, or arrow shape. Continue working until you have 105 sts on each side of the centre. Second piece - work a second triangle (or arrow) in the contrast colour. Lay the pieces out with the point of one arrow to the base corner of the other arrow, (see picture below).
Continue working with one of the available colours (I used the red). Cast off the two rows of knitting together, using a "three-needle cast off"(see picture below), fairly tightly.
[Editor's note: You put your working needle into the first st on the front needle and the first st on the second needle behind; you pull your loop through and knit both sts off the needles together. You have one st on your working (usually right hand) needle. You repeat so there are two sts on your working needle. You pass the first st you knitted over the second; continue casting off in this way.] This is how it looks half way through; ideally the work should lie flat at the cast off edge:
Next you put the other two edges together - again the point of one arrow is next to the base corner of the other arrow, (see picture below):
Cast off the two rows together. You are left with a sort of tube; turn it so that the cast off edges are inside. The next picture shows a hot water bottle placed in the tube. 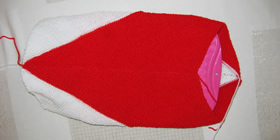 The arrow points are arranged centre front and back.
Crochet flower - begin by making a slip loop with your first colour as if you were starting a crochet chain, and crochet into this loop for your first round. Ensure that the loop "slips" (can be tightened) from the tail end of your work, not the working end. Round 1: using the first colour, crochet 8 dc into
your loop; adjust the slip loop until the stitches fit nicely. Make a second flower in the second colour. Round 1: using the second colour, crochet 8 dc into
your loop; adjust the slip loop until the sts fit nicely. Place second flower on top of first, and sew through both layers, onto the cover at the marked position for the button. |
MaterialsOriginal pattern calls for 2 oz each of two contrast colours in 3ply. One pair of number 11 needles, with a spare pair (or set or 4) to aid
in the construction. One hot water bottle "replacement
core", (available to order on the web). TensionGarter stitch is difficult to measure but the wool should knit to a basic tension over st st of 28st to 4 inches (10cm) on No 11 (3mm) needles. Size mattersOne size. A word on the wool.I used an acrylic 4ply; not ideal, but these covers can take some wear and tear. |
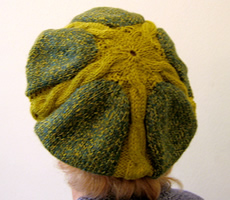
Hats are not my thing but I am fond of berets. Here is an irresistible 1970's two-tone design - the original in two glaring shades of gold and yellow. Consider also making it in orange with a strawberry or coffee contrast - I can vouch for this as a popular contemporary combination and you can view it as part of Southwest airlines hostess uniforms from the same period (although the colour of the uniforms is possibly not as striking as the hot pants and knee boots of the period...).
Alternatively just stick with more reserved single colour in traditional white Aran, understated and letting the pattern speak for itself.
Cable PatternRow 1: P3, k6, p3. These 10 rows form the pattern. Special note: Wind 5 small balls of yarn in each colour. Use a separate ball for each cable and panel, and twist the colours where they meet to avoid gaps in work ("intarsia method"). InstructionsUsing No. 10 needles and medium colour (M), cast on 106 stitches, and work 9 rows k1, p1 rib. [Editor's note: If you work the beret in 2 colours then work over 2 needles as described. If you work in a single colour, you could work this in the round, reversing knit and purl sts on wrong side rows.] Next row: (p1, p into front and back of next st) twice, * p2, p into front and back of next st, p1, p into front and back of next st; repeat from * to the last 7sts, (p1, p into front and back of next st) 3 times; p into front and back of last st. [150 sts]. Change to No 7 needles. Next row: (right side) *
k22 in M; join in light (L), k2, (k into front and back of next st) 4
time, k2; repeat from * to end. [170 sts]. Continue in stocking stitch and cable pattern, until work measures 5½ inches from beginning, finishing with right side facing for the next row. Shape crown as follows: Next row: *
(k2tog, k7, k2tog tbl) twice in M; pattern 12 L; repeat from *
to end. [150 sts]. Next row: K3, *
p6, k2, (p2tog) twice, k2; repeat from *
to last 11sts; p6, k2, p3tog. [60 sts]. Break off wool leaving end. Thread end through remaining sts and draw up tightly. Fasten off securely. Making up - Press lighty on the wrong side, using a warm iron and a damp cloth. Join seam, using a fine back stitch. Press seam. |
MaterialsOriginal pattern calls for 3oz of medium colour and 1oz light in an Aran
weight yarn. One pair each of numbers 10 and 7 needles. Tension20st and 25 rows to 4 inches (10cm) on No 7 (4½mm) needles. Size mattersInstructions to fit an "average" head (!). A word on the wool.I used Phildar yarns Oxygene (a DK) which knits 23st to 4 inches; and Frénésie (a heavy DK) which knits 19st to 4 inches. Disclaimer
|
Yet another object of my admiration is Southwest airlines. They don't really have any visibility outside the US, so I was suitably surprised on my first journey with them. (It was the night of October 31st flying to Tucson in 1994, and they sure had some fun with us passengers...). I have also been impressed at their impromptu organisation of party games to try and occupy a hot and fractious plane load of souls during an hours delay at LA. (See the wikipedia entry: "Southwest is known for colourful boarding announcements and crews that burst out in song. The singing is unusual, and is quite popular among customers, but has been noted by some travel critics as being offensive and intrusive." huh - what do they know?!)
They had their 25th anniversary in 1996, and had an exhibition that I must have caught somewhere (perhaps a magazine article) which showed their uniform designs over the years. Sadly I can't find any trace of this on the web now - just these photos:
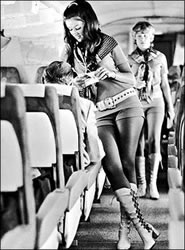
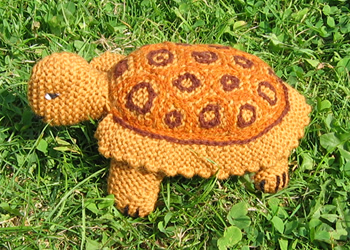
I do enjoy unusual knitted toys - and I had a succession of pet tortoises as a child (when it was legal...) - so this seems a natural choice. I am very pleased with the way he worked out, and he was not as fiddly to make as I had expected; probably about 2 evenings work in all.
InstructionsThe tortoise is knitted in garter stitch (every row knit) throughout. ShellCast on 11 stitches, and knit 1 row. [Editor's note: To increase, I work into the front and back of the first st, knit to the last two sts, then work into the front and back of the next st, then knit the last st. This avoids a stepped effect at the end of the row. If you increase in a different way - for example, picking up the loop between sts - then you may not have this problem. Make sure you know how the pattern instuctions intend you to work an increase by looking at the abbreviations. There is usually an implied difference between "increase in the next st" and "make 1".] Knit 32 rows straight, then decrease 1 st at each end of the next and
every alternate row until there are 11 sts remaining. Make another piece the same. [Editor's note: I embroidered the top half of the shell before sewing up. The tension of the embroidery encouraged the shell-shape of the piece.] Join the two halves together leaving an opening for stuffing. Stuff firmly and sew up opening. Embroidery on top half: outer circles in light brown chain-stitch with
smaller dark brown circles inside. [Editor's note: I am not very good at free-form embroidery, so was a bit worried about this - but it worked out OK. You can see that what I did was very lop-sided, but despite that it looks fine I think...] 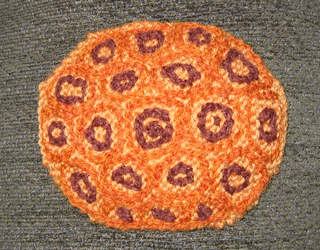 HeadStart at neck edge and cast on 10 sts. Next row: Knit to the last 2 sts; inc in next st, k1. Next row: Inc in the first st; knit to the last 2 sts; inc in next st, k1. [15 sts]. Knit 5 rows. Next row: K2tog; knit to the last 2 sts; k2tog. Next row: K2tog.; knit to the last 2 sts; k2tog. Make another piece the same. Sew halves together leaving neck end open
for stuffing. Features: Eyes - black and white straight stitches; mouth - long black straight stitch. Front feetCast on 4 sts. Shape thus: Next row: k2, turn, k back; Next row: Inc in the first st; knit to the last 2 sts; inc in
next st, k1. Now dec. 1st at each end of the next 3 rows. Make 3 more pieces the same. Sew each pair together, leaving cast off
edges open for stuffing. Back feetCast on 16 sts, and knit 7 rows. Next row: Inc in the first st; (k4; inc in the next st.) 3 times.
[20 sts]. Sew the short sides together to form a cylinder shape. Make another piece the same. Pads: Cast on 3 sts. Dec 1 st at each end of the next and following alternate row. Make another pad piece in the same way. Sew pads to cast off ends of
back feet. Stuff firmly; sew open ends to back on underside of shell about
1 inch apart. Mark claws with 4 black straight stitches on each foot. TailCast on 17 sts. Sew together along edges to make a cone shape; flatten slightly into a traingle, along line of increases; stuff lightly and sew the wider, open end to the shell at the back, (in line with the head), and so that the seam is underneath. Edging around shellCast on 7 sts. * Knit 2 rows. [Editor's note: Again
I altered the pattern here omitting one of the 5 st short rows, making
the shell edge less frilly - this is what I did: Sew straight edge around the seam of the shell, finishing on either side of the head. Work a line of light brown chain stitch over the join, then a second line in dark brown 2 sts away. Using an oddment of bright coloured wool, cut into 3 strands and tie round neck. [Editor's note: ...or use a ribbon...] |
MaterialsOriginal pattern calls for 2oz of DK in French Mustard. One pair of number 11 needles. Toy stuffing. TensionNot given - but DK wool usually knits to approximately 22st to 4 inches
(10cm) on No. 8 (4mm) needles over st. st. Size mattersTortoise measures 8 inches in length and 6 inches across width of shell. A word on the wool.I had some difficulty in finding what I thought a satisfactory colour. Eventually I bought some 4ply from eBay and used it knitted double. I use 4ply oddments for the embroidery. Disclaimer
|
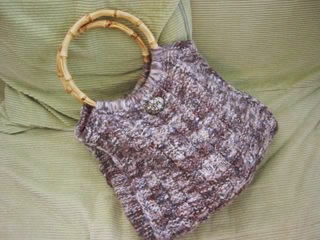
I intended to knit this bag from a pattern where the designer confessed she had been forced to change her mind half way through knitting a hat, and call it a bag. I did not go ahead with my plan, and my pattern is now far removed from that original idea, (except for the handles!). The colours in this wool remind me of the stoney flint beaches on the south coast of England, where I was born and brought up.
InstructionsWith No. 3 needles, cast on 51 stitches, and work 5 rows stocking stitch
starting with a knit row. With right side facing, commence pattern as follows: Row 1: P4, K3, (P5, K3) 5 times, P4
[Editor's note: I chose a textured stitch to best suit the random and nubbly texture of Chunky Print. The muted stone colourway works well, I think, with this basket-weave stitch. If you have a more 'romantic' colourway you may prefer a different pattern. See "blackberry stitch" section below for an alternative four-row pattern to substitute here if you like]. Repeat the six-row pattern 20 times or to desired length, and then the
first 3 rows again. Next row: wrong side facing, Knit to end. Side panels (make 2 the same): Cast on 10sts and work as follows in reverse stocking stitch throughout. Row 1: P10 Continue in reverse st st for 28 more rows. Making up - Cut and construct the lining before sewing the bag
sections together. Construct the lining - do this before attaching the sides to the
bag. Cut the fabric to the width of the bag, using the body section as a guide, and remembering to leave enough for the seams at the edges. Do not cut the fabric to length at this point, unless you are making a simple pocket style bag (see "adapting the pattern"). Press the side panels lightly using a damp cloth. Using the side panels as pattern pieces, cut two fabric side pieces from the fabric you have left over, not forgetting to leave a seam allowance. Fold over the top edge on each piece.
[Editor's note: A lining does not have to be too exact, (the knitting outside is stretchy); it should support the contents of the bag and protect the bag from distorting - I try and make it err just slightly larger than the knitted bag "at rest".] Form the internal pocket section in the lining as follows:
Pin and sew the side panel lining pieces to the main body of the lining.
Inserting the side panels - and completing the bag.
Sew the lining into the bag, slipstitching around the handles and bag mouth. Do not pull your stitches too tight.
Adapting the patternYou may wish to adapt the bag by omitting the sides altogether, either
for simplicity, or to save on wool. Blackberry stitchAn alternative four-row pattern to use in place of the six-row basket weave pattern. [Editor's note: Because of its "one-from-three, three-from-one" nature, this stitch is also know in the Irish tradition as Trinity stitch.]
The four-row pattern is worked over 50 sts using number 2 needles: To complete the main section of the bag, repeat the four-row pattern
26 times or to desired length, and then the first 3 rows again. |
Materials3 x 100g balls (each 100m/109yards) Rowan Chunky Print, colour 078, Pebble Dash, or 081 Shriek. One pair of number 3 needles. Two bamboo-style round handles. Half a metre (or half a yard) of cotton fabric for lining. 1 exotic button oddment (about ¾-1 inch in size.) Tension14sts x 18rows to 4 inches (10cm) on No 3 (6½mm) needles over basket-weave
pattern. CrochetRemember these instructions use UK terms. Double crochet is equivalent to US "single crochet". Size mattersBag is approximately 14in by 12in and 2in deep at the sides. A word on the wool.Chunky Print has been discontinued by Rowan (sadly, as it seemed to have
a pleasing colour range, and knit up quickly and economically). Quilting
fabrics are ideal for the lining; they are inexpensive and come in
a fabulous range of colours. |
Here is my completed Pebbles bag, in the Shriek colourway with blackberry stitch. As a decoration I used a brooch that Alison gave me years ago - the idea being that it was a heart for me to "wear on my sleeve". The lining is an old Kaffe Fassett quilt fabric which turned out to be an improbably good match.

Here is the original Pebbles bag in the Pebble Beach colourway with basket weave stitch. The brooch decoration, like the heart above, tones so well with the wool that it provides a very subtle effect on the bag.
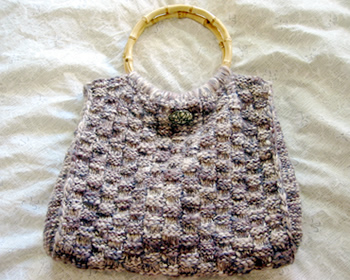
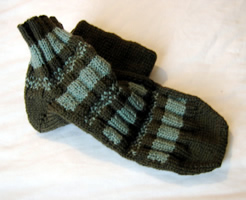 Men's slippersocks in 2 colours. I have also knitted a 3 colour version to use up wool oddments. I did try to knit these completely in the round to avoid seams but found it almost impossibly complex to do the fair-isle over only half the round - so I would stick to the instructions as given |
InstructionsWith No. 12 needles and main shade (M) cast on 60 stitches loosely, and
arrange over 3 needles. Commence pattern as follows: Rnd 1: Change to contrast colour (C) and knit all sts. These 20 Rows form the pattern. Work top of foot as follows: Break off M and slip the first 16 sts of the round on to a spare dpn,
and slip the last 13 sts on to a second spare dpn. [Editor's
note: these can be your No. 12 needles if required]. Row 1: Using C knit all sts. Now work one more pattern set of 20 rows, and then the first 8 rows again,
decreasing 1st at the end of the last row, (30 sts). Shape toe: Using M only, continue in stocking stitch, (one row knit, one row purl), decreasing 1 st (k2 tog) at each end of the next, and every alternate row, until 14 sts remain. Leave these sts on a safety pin. Make the heel: Return to the remaining 29sts; place both sets together on one needle,
and continue to work on them in st st, using colour M. Continue in st st until the foot is the same length as the top. Making up. Graft
the two sets of 14 sts together. Make a second sock to match. |
Materials2 x 50g skeins of main shade and 1 x 50g contrast in double knitting wool. Two sets of 4 double pointed needles, Nos. 10 and 12. Tension24 sts to 4 inches measured over stocking stitch on No 10 (3¼mm) needles. Size mattersThe pattern as written should fit a foot of 11 inches in length. |
© Christina Coutts 2007
![]()
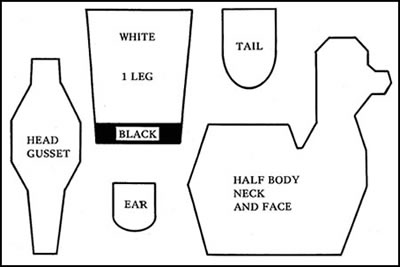
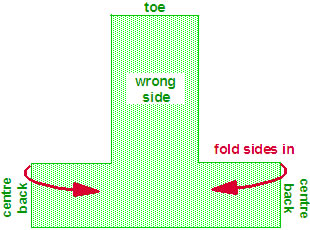
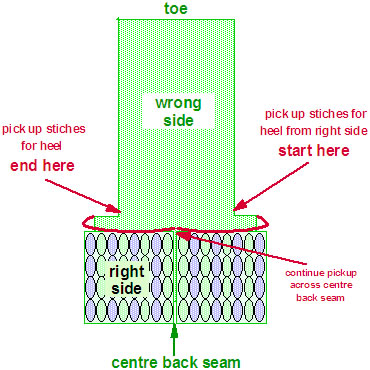
 The Spaelsau is a direct ancestor to
the Old Norwegian Sheep.They were tough sheep supplying their masters
with meat, milk, wool, skin - even the sails that carried the ships over
the oceans were made of their wool. Today, a thousand years later, the
wool of the Spaelsau still consists of a rough cover to protect against
the wind and the rain, and under this a much softer layer close to the
skin as protection against the cold.
The Spaelsau is a direct ancestor to
the Old Norwegian Sheep.They were tough sheep supplying their masters
with meat, milk, wool, skin - even the sails that carried the ships over
the oceans were made of their wool. Today, a thousand years later, the
wool of the Spaelsau still consists of a rough cover to protect against
the wind and the rain, and under this a much softer layer close to the
skin as protection against the cold. 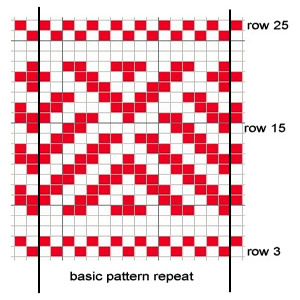

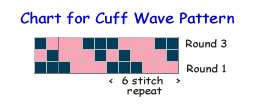
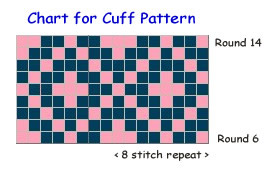
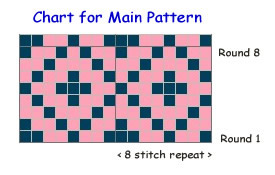
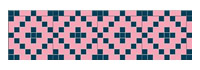
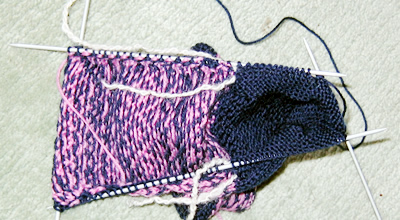

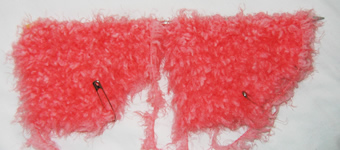
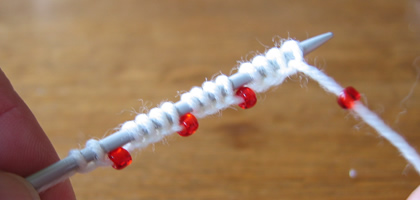
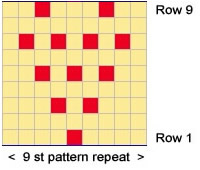
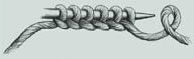
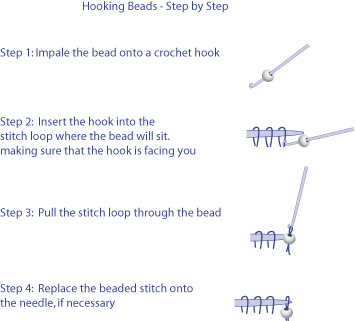
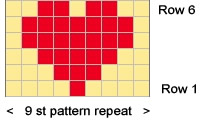


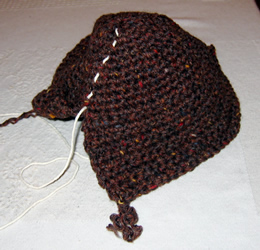
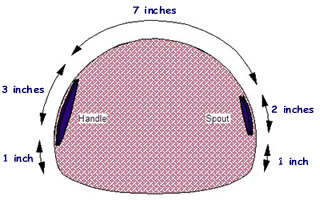


 Making up - Press the piece lightly on the wrong side under a
damp cloth with a hot iron.
Making up - Press the piece lightly on the wrong side under a
damp cloth with a hot iron.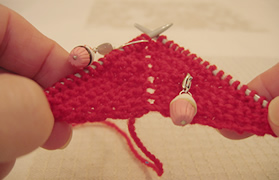
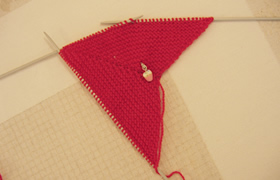

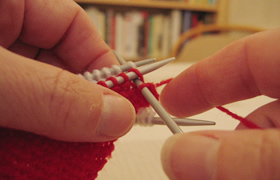
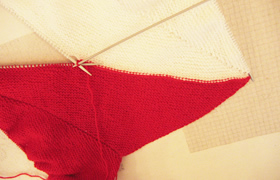
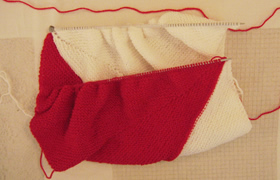
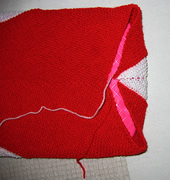 Fold up one of the ends and sew the diagonal seams in place from the wrong
side. (I sewed the tip of my white arrow for the closed end). At the other
end, make a chain using the crochet hook and sew in place as a loop for
the button at the (red) arrow tip.
Fold up one of the ends and sew the diagonal seams in place from the wrong
side. (I sewed the tip of my white arrow for the closed end). At the other
end, make a chain using the crochet hook and sew in place as a loop for
the button at the (red) arrow tip.