Adaptable design... (for a "modern" chair)
This is a needlepoint design with instructions below. However, needlepoint charts can be used for colourwork in knitting, so I also discuss the possibility of adapting it to use for a "modern" cushion cover.
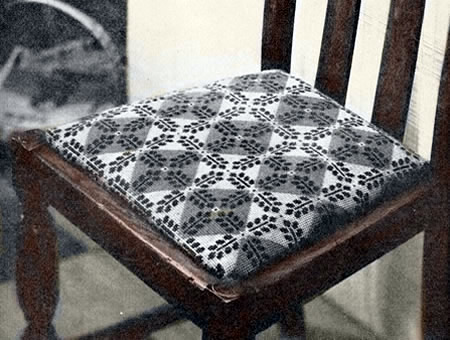
This chair on which the cover is shown seems far from modern for the 1950s when this pattern was published, but this might have been a way to try an update it. They reassure us: "you can extend this design as required to fit any chair or stool top; with careful colour choosing the pattern would suit period pieces as well as modern furniture".
This particular chair seems very similar to my Mother's dining set purchased in 1938, where the seat is wider at the front that the back (so not quite square), but the chair's construction seems a bit more solid, so it is probably a little older.
Sadly, his type of brown furniture is even less popular today than it was when this was first published - but upcycling with chalk paint and a colourful fabric is always a possibility.
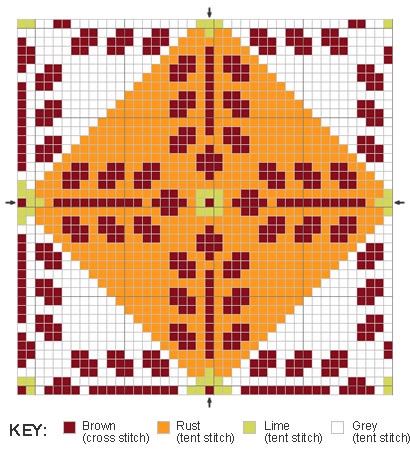
Needlepoint embroidery instructions.As I said in the introduction - these are the instructions for needlepoint, with notes on using the chart for a knitted cushion at the end. Make a paper pattern of seat, and draw round the outline, centring the
pattern, on the canvas. Mark the centre line in each direction and start
the diamond pattern on the centre point.
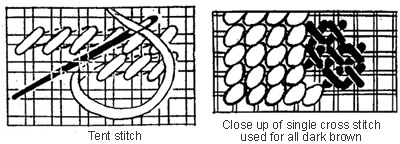
The main design is worked in tent-stitch (a slanting-stitch over one
Press, stretch and mount finished tapestry as required. Mounting TapestryBefore mounting your work, press it carefully on wrong side under a lightly
damped cloth. If, through not working in a frame, the tapestry has got
out of shape, pin out face downwards on a clean cloth, stretching it to
the correct shape; press the wrong side carefully under a damp cloth,
and leave pinned out for 24 hours. To mount, lay the tapestry flat, wrong side up, then place the seat pad
on top. Bring tapestry up sides of padded cushion part and fix temporarily
with lots of ordinary sewing pins, turning to the front again and again
to check the correct positioning of the design. When it is firmly held with pins all round, fold the surplus edges of
the canvas over the wooden frame of the pad, and nail firmly in position
with tacks and a hammer, or use a staple gun, mitreing the corners as
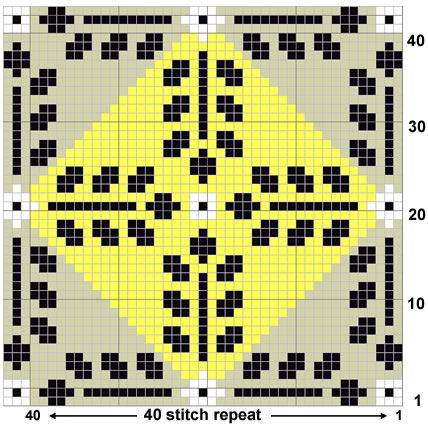
neatly as possible. Charted cushion adaptation.You can easily use an embroidery chart as a colourwork chart for knitting.
So here is the chart in some nice shades of yellow and grey.
Assuming you are familiar with the idea of working from charts, as usual, the charts show the right, or knitted, side of the work, reading knit rows from right to left; every alternate row worked in purl and read from left to right. The yarn not in use is carried loosely across the back of the fabric all the time, so it will be taken behind the stitches on a knitted row and in front of them on a purled row. Ideally you need to keep within a maximum of about five or six stitches
in each colour so that you don't have to carry the yarn not in use across
too many stitches at the back of the work. It is feasible to carry the
yarn across a greater number of stitches as long as you don't pull the
yarn so tightly that it puckers your work.
Finally - here's a roughly square cushion made up of 3 x 4 distorted motifs showing what it might actually look like:
Making upFor a cushion you need two identical pieces. You could make two knitted
pattern pieces, or make one of them in plain knitting, or back the cushion
with fabric, cut to the right size (don't forget to allow extra on the
fabric to turn in the raw edges). The size (and shape) of the resulting cushion cover will depend on the yarn you choose to work with. For a standard double knitting yarn, a 3 x 4 motif should work out to a size of about 22 inches wide and x 23 inches high. |
Materials
|