Fancy Rib Jacket
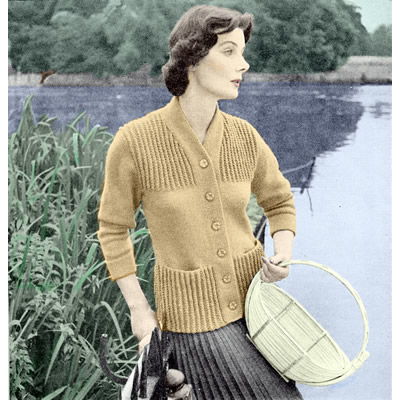
This is a lovely 1950s Autumn jacket which is defined as "chunky" though this means "not fine" in modern parlance, as the wool weight is a pretty standard double knitting.
I love this style and always meant to make for myself but have not yet done so - hence it is untested, and the original instructions are available in only one size. The instructions are not intended for a beginner - you need to keep your eye on right and wrong sides, and preserving the button band stitches - but having said that, I think it is fairly clearly explained.
Instructions.Fancy rib pattern worked as follows: 1st row (wrong side facing): *
k2, p3tog; repeat from * to last 2 sts, k2 These 2 rows form pattern. BackWith No 8 (4mm) needles cast on 90 stitches loosely and work 4 inches
in stocking stitch, ending with a purl row. Next row: Purl, increasing 3 sts, evenly across the row [93 sts] Work straight in stocking stitch until back measures 7 inches from lower edge. With right side facing continue in stocking-stitch, shaping waist as
follows: Next row: k2tog, k25, k2tog, k27;
sl1, k1, psso; k25; k2tog. [81 sts] With right side facing continue shaping as follows: Next row: Increase in 1st stitch,
k26; increase 1 by picking up horizontal thread before next stitch and
knitting into back of it; k31; increase 1 as before; k26; increase in
last stitch [89 sts] Next row: Increase in 1st stitch,
k27; increase 1 by picking up horizontal thread before next stitch and
knitting into back of it; k33; increase 1 as before; k27; increase in
last stitch [93 sts] Next row: Increase in 1st stitch,
k28; increase 1 by picking up horizontal thread before next stitch and
knitting into back of it; k35; increase 1 as before; k28; increase in
last stitch [97 sts] Next row: Increase in 1st stitch,
knit to last stitch, increase in last stitch [99 sts] Next row (wrong side facing): P9; * purl twice in next stitch, p6; repeat from * to end [89 sts] Next row (right side facing): * p2, wrn, p1, wrn; repeat from * to last 2 sts, p2. [147 sts] With wrong side facing. change to fancy rib pattern, starting with 1st
pattern row and work straight until back measure 23½ inches down
centre ending with 1st pattern row [89 sts] Pocket LiningsWith No 8 needles, cast on 26 sts and work 6 inches in stocking stitch
ending with a knit row. Make second pocket in the same way. Left FrontWith No 8 needles, cast on 95sts and work as follows: Next row (right side facing): purl to last 23 sts; k11, sl1 purlways, k11. Change to pattern with button border in stocking stitch and remainder
in pattern as follows: 1st row (wrong side facing): p23;
* k2, p3tog; repeat from *
to last 2 sts, k2 Repeat these 2 rows until front measures 7 inches, ending with 1st pattern
row [67 sts] Next row: K5; increase 1, k4, cast off 26, k20 sl1 purlways, k11. Next row: P32, pur1 across one set of 26 pocket stitches in place of those cast off; p10 [68 sts]
Next row: K2tog, k27. k2tog, knit
to end. Next row: K2tog, k26. k2tog, knit
to end. Next row: K2tog, k25. k2tog, knit
to end. [62 sts] With right side facing, continue shaping as follows: Next row: Increase in 1st stitch,
k 25, increase 1, knit to end. Next row: Increase in 1st stitch,
k 26, increase 1, knit to end. Next row: Increase in 1st stitch,
k 27, increase 1, knit to end. Next row: Increase in 1st stitch,
k 28, increase 1, knit to end. Next row: Increase in 1st stitch, knit to end [71 sts] Work straight until front measures same as back at side edge. With right side facing, shape armhole by casting off 6 sts at the beginning of the next row, then k2tog at this edge on the following 4 alternate rows [61 sts] Next row: Purl. Next row: * p2, wrn, p1, wrn; repeat from * to last to last 25 sts; p2, k11, sl1 purlways, k11. [85 sts] With wrong side facing, continue in fancy rib pattern as follows: 1st row (wrong side facing): P23;
* k2, p3tog; repeat from *
to last 2 sts, k2 Repeat these 2 rows until front measures 20 inches, ending with 1st pattern row. Shape neck as follows: Next row: * p2, wool round needle, p1, wool round needle; repeat from * to last 25 sts; p2tog, k11, sl1 purlways, k11. Continue decreasing thus inside the 23 border sts on the following 10 alternate rows. Pattern back (1st pattern row). [50sts] Work a few rows straight in pattern, until back measures same as front
ending with 1st pattern row. With right side facing, continue in p2/k1 rib keeping stocking-stitch border as before, and shape shoulder by casting off 9 sts at the beginning of the next and following 2 alternate rows - armhole edge. Leave remaining 23 sts on a spare needle or stitch holder. Right FrontWith No 8 needles, cast on 95sts and work as follows: Next row (right side facing): K11, sl1 purlways, k11, purl to end. Change to pattern as follows (button border in stocking stitch as before): 1st row (wrong side facing): *
k2, p3tog; repeat from * to last 25sts; k2,
p23. Repeat these 2 rows for 1½ inches, ending with 1st pattern row. With right side facing, make double buttonhole in next 2 rows as follows: k4, cast off 3, k4, sl1, k4, cast off 3, k4, work to end and back, casting on 3 sts over those cast off Finish as for left front reversing all shapings, making another 5 double buttonholes as above at 3-inch intervals. Your pocket row will read: SleevesWith No 10 needles, cast on 48 sts loosely and work 5 inches in stocking stitch, ending with a purl row. With right side facing, change to No 8 needles and continue in stocking-stitch,
shaping sides by increasing 1 stitch at end of 3rd and every following
6th row until there are 78 sts. With right side facing, shape top by casting off 4 sts at the beginning of the next 2 rows, then k2tog at the beginning of every row until 40 sts remain; then k2tog at each end of every row until 20 sts remain. Cast off. To Make UpPress stocking-stitch parts only under a damp cloth. Join shoulder, side and sleeve seams; insert sleeves. Now with No 8 needles, k23 border sts. from spare needle at top of right
front and work straight on these sts, slipping centre stitch as before
until border fits to centre back of neck. Cast off. Oversew round double buttonholes. |
Materials
|
