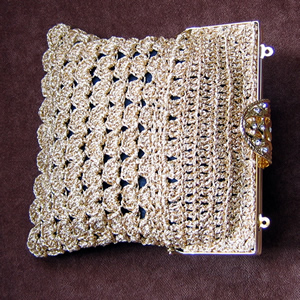
Home

Weblog

Pattern of
the Month

On the Needles
(...and Off the Needles)

Knitalong

Stitchcraft

Vintage Patterns

About the
Idle Hands


Archive entry for November 2008

« October 2008 | Main | December 2008 »

November 2008

Gold Mesh Bag

GoldBag.jpg

From November 1940:
"This pretty gold mesh bag will rejoice the hearts of those can still enjoy a little social life. Personally we are at this moment sitting in an air-raid shelter!"
One wonders if that was literally true - but I am sure the editorial team spent a lot of their time in shelters in this period of history in the UK.

Instructions

Starting at the top make 37 chain.

1st row: Miss 2 ch; 35tr; turn with 2ch.
2nd row: 35tr, working into the front of each st; turn with 2ch.
3rd row: 35tr, working into the back of each st (right side facing); turn with 2ch.
4th row: as second, but make 5ch at the end of this row; pull through thread and fasten off. Cut the thread.
[Editor's note: This is the piece of work that fits into the metal frame. Your 35 treble need to be as wide as the handle frame and your 4 rows need to be as deep as the frame. My frame was roughly 5 x 2 inches; my width was OK but I needed to add in 2 rows to make the length, so I repeated rows 2 and 3 before moving on to row 4 as above, making 6 rows in all. Beware if you make a odd number of rows as there is a "right side" to this work - working into the front and back of the sts makes ribs on the right side.
I thought I would have to
add width as well (the frame size stated as 5¾ins and my work was barely 5); however, once I got the frame it was clear that my work fitted perfectly as the insertion width was about 5¼ins plus you do need the work to be very slightly stretched, not relaxed.
My advice is get the frame in your hot little hand first and make the bag to fit.

Be careful if you do add chain to make the bag wider, as you will need to be able to make the shell pattern fit later on. I varied my crochet hook size until I got a satisfactory tension to achieve the right width, rather than adding in sts.]

Now make a second piece exactly the same, and at the end of the final row, make 5ch, and then join the two pieces together by working across the first piece to end of 5ch in slipstitch, then slipstitch across 2nd piece, making a round.

Now change to pattern and work backwards and forwards in rows,
[Editor's note: This confused me at first - but you are "working backwards and forwards" and slip stitching at the end of each row to join the round.]
working into the back of each stitch as follows:

1st row: 1ch; 3dc into 3rd of 5 ch; 3dc into first space * miss 2 spaces; 3 dc into next space; repeat from * across all trebles; then 3dc into 3rd of 5 ch; work across the other side as for the first [27 groups]. Slipstitch into the middle of 3dc made on the 5ch. Turn.

2nd row: (1dc, 1tr, 1dc) into middle of each group of 3dc. Turn with a slipstitch to the next treble.

3rd row: 1dc into same treble as slipstitch, * (1dc, 3tr, 1dc) into next group, 1dc into centre of next group, * repeat from * to * once.
Work a group of (1dc, 3tr, 1dc) into each of the next 3 groups; repeat from * to * twice.
Work a group of (1dc, 3tr, 1dc) into each of the next 2 groups.
[Editor's note: This completes one "side"; it seems asymmetrical as you have one shell group designed to sit on the side of the bag.]
Work the other side of the bag to correspond.
There should now be 18 shell groups of (1dc, 3tr, 1dc) in all.
Turn with a slipstitch into second treble.

4th row: (1dc, 5tr, 1dc) into the middle of each group; turn with a slipstitch into second treble.
5th row: As 4th.

6th row: (1dc, 7tr, 1dc) into the middle of each group; turn with a slipstitch into second treble.
7th row-10th row: As 6th.

Now pinch the two sides of the bag together at the bottom edge and slipstitch across from one side to the other, taking two outside scallops together, to join. The scallops that were on the "side" of the bag are twisted slightly to accomplish this, joining 9 full scallops and avoiding a half-scallop at the sides of this edge.
Fasten off.

Making up:

Sew in all ends.
Sew bag to frame. You are intended to "draw up the work at the sides" so that it fits over the hinges, but as my work was lightly stretch over the frame - and I think due to the design of the frame - I could not make this work, and the hinges are exposed in the finished bag.
[Editor's note: Some frames have no holes in them for sewing and you are intended to glue the fabric in place; check carefully before you purchase.]
Make a fabric lining; I used a fine corded velvet (a remnant) in black.

If your frame has fasteners designed for a cord handle, make a cord or buy a fine chain to form the handle. I made a kumihimo cord, as this is a current interest of mine.

Materials

Example shown is made from 2 balls of Twilleys Goldfingering.

Bag handles from Bags of Handles
[see under 'frames'].
I used this one.

One No. 11 (3mm) crochet hook.

Fabric remnant for lining.

Crochet abbreviations:

ch = chain
tr = treble crochet
dc = double crochet

Remember these are English crochet instructions where dc is equivalent to US single crochet - see "Terminology" in the side bar.

Tension

No tension given - my 37 treble worked out to 5 inches when not eased out on frame.

Size matters

Fits 5¼ inch width handle.
My advice is get the frame first and make the bag to fit, by varying the hook size or adding stitches.

Disclaimer
(well...almost)

In transposing any patterns it is always a risk that errors will be introduced, in spite of dedicated proof reading.
If you have any problems with this pattern, please and I will try and assist.

© Christina Coutts 2007

Helpful Stuff

Pattern Archive

Categories

Yarn Links

Fabric etc

Stuff to do

  • Little rabbits
  • V&A 1940s Patterns
  • Monkey Socks
  • Necktie Bag
  • Posh Gloves
  • Criss-cross coasters