Just add colour...
More....
Please note:
Patterns are for
Personal Use Only
You may freely circulate patterns with the Copyright Statement Preserved.
See terms of use.
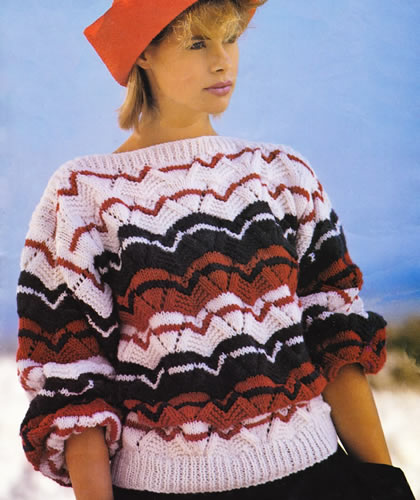
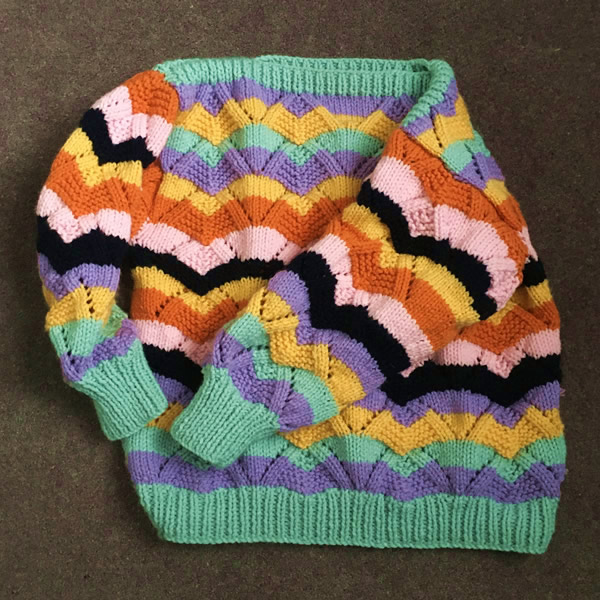
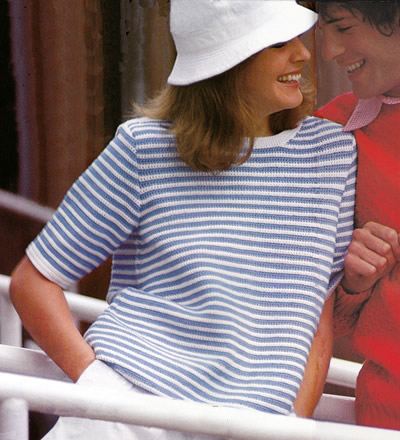
Choose a colourful chunky knit to herald the Spring season to come.
It's still cold enough for a thicker woollen, but you can brighten up the dark days of February with this chunky sweater - which is also quick to knit!
Don't just stick with the naval theme - take inspiration from these Oliver Bonas knits: here, here, or here.
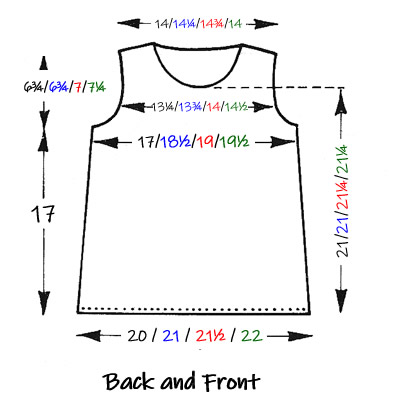
Instructions.Back and Front (alike)Using 4½mm needles, and W (white yarn), cast on 67 (71, 73, 77) stitches, and work 2 (2, 2½, 2½) inches in k1, p1 rib, ending with wrong side facing for increase row. Next row (increase - wrong side facing): rib 5 (7, 5, 7) * increase in next stitch; rib 7 (7, 8, 8); repeat from * to last 6 (8, 5, 7) stitches; increase in the next stitch; rib to end. [75, 79, 81, 85 sts]. Change to 5½ mm needles. Row 1 (right side): knit with main
shade W (white). Editors note: Now you repeat the same pattern sections but change the colours. Rows 15 to 22: As Rows 1 to 8 but
use R instead of W. These 42 Rows form the pattern repeat them once more, then work Rows
1 to 14 again. SleevesUsing 4½mm needles, and W, cast on 37 (37, 39, 39) stitches, and work 2 (2, 2½, 2½) inches in k1, p1 rib, ending with wrong side facing for increase row. Next row (increase - wrong side facing): rib 2; [m1; increase in the next stitch] 5 times; rib 2; [increase in the next stitch] 8 (8, 9, 9) times; [m1; increase in the next stitch] 6 times; rib 2; [increase in the next stitch] 8 (8, 9, 9) times; rib to end. [75, 75, 79, 79 sts] Change to 5½ mm needles. To Make UpSee the yarn ball band for washing and pressing details. Join shoulder seams leaving approximately 9 (9½,
9½, 10) inches open at the centre for
the neck. |
MaterialsChunky yarn: Pair each of No 7 (4½mm) and No 5 (5½mm) needles. Tension17sts and 24 rows to 4 inches over pattern stitch. Size mattersFinished chest measurement: Abbreviations k: knit A word on the wool.Original yarn was: Note that chunky yarns can cover a wide variation in thickness so check your tension and alter the needle size if necessary. Disclaimer
|
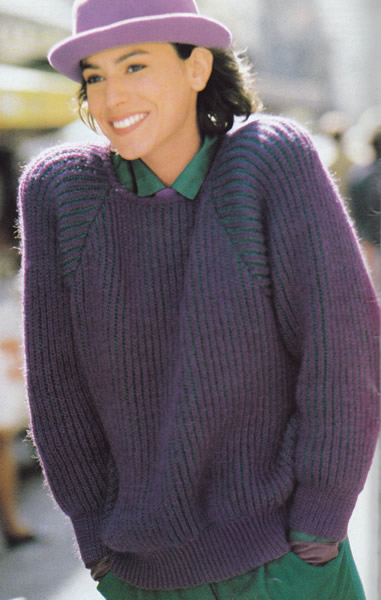
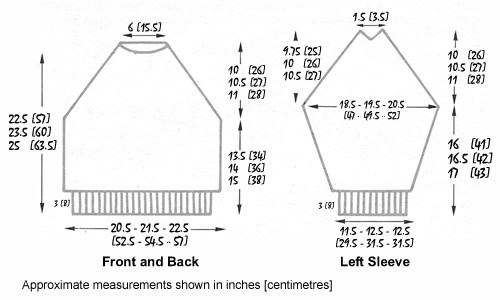
Wonderfully cosy raglan sweater stitched in two vibrant colours. Fisherman's rib - or brioche as it now seems to be called, (no link to French bread as far as I can see) - is fantastically squishy and lovely - well worth the effort.
Instructions 3 sizes - larger sizes are given between brackets - [Editor's note:
If you are not familiar with fisherman rib stitch or brioche worked with
two colours, it should be quite easy to pick up from the instructions
below, once you understand that you do two rows with right side facing
(one in each colour) and then two wrong side rows (one in each colour)
- hence the need for double-pointed needles. Striped Fisherman Rib PatternThe two-colour brioche pattern has to be worked on needles or circular with points at both ends. 1st row (right side): With B, k1;
* p1, slip1pw, yrn; repeat from
* to last 2 stitches, p1, k1. 2nd row (right side): With A, k1;
yft, slip1pw, * yon, knit the next
stitch together with the loop made on the previous row, yft, slip1pw;
repeat from * to last stitch, yon,
k1. 4th row (wrong side): With A, k1,
yft, * slip1pw, yrn, purl the next
stitch together with the loop made on the previous row; repeat from
* to the last 2 stitches, slip1pw, yon,
k1. The last 4 rows from 2nd to 5th inclusive, form the pattern. Important notes on the brioche pattern:
BackUsing No 11 (3mm) needles, and main colour A, cast on 85 (89,
93) stitches and work in single rib: Repeat these two rows until work measures 3 inches (8cm) from the beginning,
ending with 1st rib row. Change to No 9 (3¾mm) needles, join in contrast B, and work in fisherman rib pattern as given above. Continue until work measures 13½ (14, 15) inches from the beginning. Raglan Shaping: Decrease 1 stitch at both ends of every alternate row 9 (10, 12) times, then at both ends of every following 4th row 28 (29, 29) times. Cast off remaining 31 stitches for back neck. FrontWork as for back until 114 (120, 124) rows have been worked from the beginning of the raglan shaping; 39 stitches remain for all sizes, ending with a decrease row. Neck Shaping: Next row: Pattern 13, and leave these
stitches on a holder; cast off the next 13 stitches; pattern to end.
Rejoin the correct colour to the other set of 13 stitches, and complete in the same way, from *** reversing shaping. Note that the front is overall 4 rows shorter than the back. Left SleeveUsing No 11 (3mm) needles, and main colour A, cast on 51 (55, 55) stitches and work as for back welt from ** to **. Increase row: Rib 4 (6, 6), [double increase, rib 13] 3 times, double increase, rib 4 (6, 6). [59 (63, 63) sts] Change to No 9 (3¾mm) needles, join in contrast B, and work in fisherman
rib pattern, but increase 1 stitch at both ends of every following 10th
row 6 (8, 3)
times, then every following 8th row 12 (10,
17) times, working the extra stitches into
the pattern. Continue straight until work measures 16 (16½, 17) inches from the beginning, ending with a 3rd (5th, 5th) pattern row. Raglan Shaping: Decrease 1 stitch at both ends of every alternate row 9 (10,
12) times, then at both ends of every following
4th row 22 (23, 23)
times; for all sizes 33 stitches remain, ending with a 5th pattern row. Neck Opening: 2nd pattern row (right side): Pattern 16 and leave these stitches for the back sleeve section on a spare needle; cast off 1 stitch; pattern to end. Continue on 16 stitches now remaining on the needle for front section
of sleeve. Rejoin the correct colour to the stitches on the spare needle for back
sleeve section. Note that front edge off sleeve is 4 rows shorter than back edge. Right SleeveWork as for left sleeve to ****. Neck Opening: 2nd pattern row (right side): Pattern 16 and leave these stitches on a spare needle for front sleeve section; cast off 1 stitch; pattern to end. Continue on 16 stitches now remaining on the needle for back section of right sleeve, and complete as for back section of left sleeve, reversing shapings. Rejoin the correct colour to the stitches on the spare needle for front sleeve section, and complete as for front section of left sleeve, reversing shapings. Make Up and Neck BordersJoin front raglan seams and right back seam matching vertical stripes.
With right side of work facing and using No 11 (3mm) needles, using main
colour A, pick up and knit 15 stitches along the neck opening at the top
of the left sleeve, 41 stitches round front neck edge, 15 stitches along
neck opening at the top of the right sleeve and 32 stitches
across the back neck. You should not press or iron any of the single or fisherman rib. |
Materials Double Knitting yarn, 50g balls: One pair of No 11 (3mm) needles, and two (long) double pointed needles or circular, No 9 (3¾mm) for working the pattern. Tension20 sts x 50 rows to 4 inches measured over pattern; work a sample on 25 stitches beginning with 2 rows of rib in contrast A then continue in pattern. Size mattersTo fit chest 32-34, (36, 38-40) Abbreviations:k/p: knit/purl A Word on the WoolThe original yarn was a standard double knitting wool (50% ) mix, with acrylic (40%) and mohair (10%). The quoted yardage was 125 meters, (137 yds), per 50g ball. Disclaimer
|
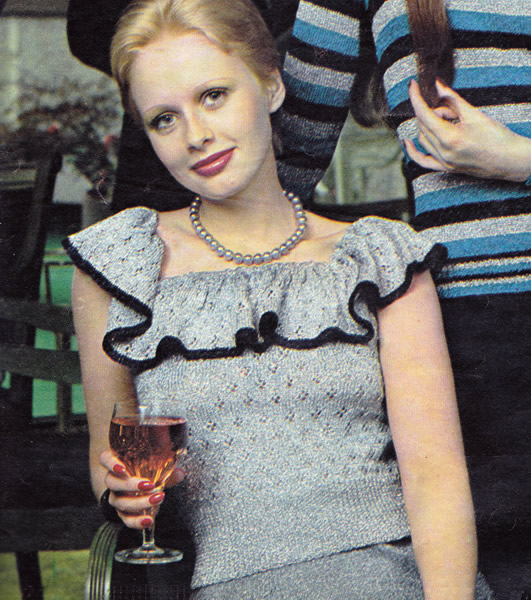
A fun top intended for a metallic yarn, and perfect for the party season. I find metallics a bit scratchy, but there are now quite a lot of sparkly fingering weight yarns for you to choose from. [Always check your tension... I know you do...]
Beautifully shaped sleeveless silver jumper with frill gathered on to deep round neckline.
InstructionsNote: instructions are given for 3 sizes. Back and Front alike:With No 13 (2¼mm) needles cast on 112 / 120
/ 128 stitches, and work 3 inches in k1/p1
rib. Change to No 12 (2¾mm) needles and pattern: 1st row: knit. Armhole Shaping: Cast off 4 / 5
/ 6 stitches at the beginning of the next
4 rows. With right side facing, cast off the centre 28/ 32
/ 36 stitches. Frill (two pieces alike)With No 12 needles and contrast edge colour, cast 168/ 184
/ 200 stitches.
Making UpPress lightly. Join side edges of frill. Fold cast-on edge to wrong side at hemline
and sew down, leaving an opening to insert elastic. |
MaterialsFingering 3 ply weight metallic yarn: Pair each of No 12 (2¾mm), and No 13 (2¼mm) needles. Tension32sts to four inches Size mattersTo fit chest: Abbreviations k: knit Disclaimer
|
A Word on the Wool.The original yarn was Twilleys Goldfingering - available in 25g balls
with a yardage of 100m (109yds), 80% Viscose 20% Metallised Polyester. |
|
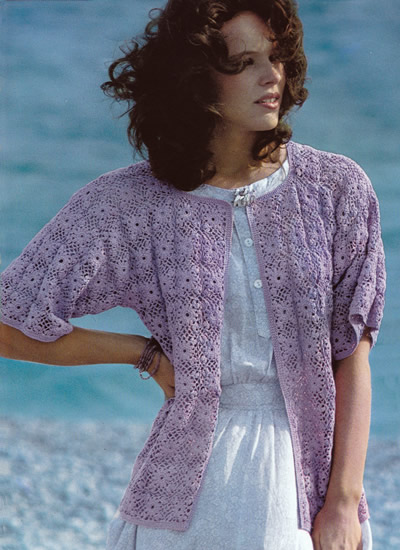
A very feminine coatlet to crochet in cotton for the summer. Its boxy shape gives it a little more edge for styling successfully with jeans and a tee, as well as more conventionally with a breezy summer frock.
The design is constructed from motifs made using in a fairly fine cotton on a 1.5 mm hook, so it might be more of an heirloom project - the month of June always brings weddings to mind.
Instructions. Instructions for 2 sizes, larger size in brackets Special instructions: make clusterThis is a 3 dtr cluster made by working 3 dtr together as follows: * yoh twice, insert hook into stitch
or ch space, yoh, pull 1 loop through, yoh, pull yarn through 2 loops,
yoh, pull yarn through 2 loops, repeat from *
twice more, still working into the same stitch. When working a cluster at the beginning of the round, work as follows: 3ch (counts as first dtr), * yoh
twice, insert hook into same stitch or ch space, yoh, pull 1 loop through,
yoh, pull yarn through 2 loops, yoh, pull yarn through 2 loops, repeat
from * once more, still working into
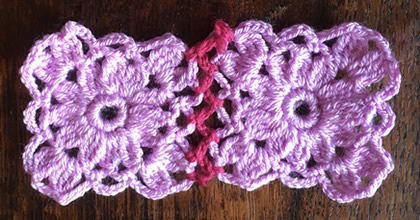
the same stitch. Basic MotifMake 6 ch, close circle with 1 slip stitch. Make 298 (332) identical motifs. These are then joined in strips of various lengths in order the build up the cardigan shape. Joining motifsMake sure the motifs are all the same side up when you start to join them. Work as follows: join to the corner of the second completed motif, then make 2 ch, then 1dc into the loop on the corner of previous motif. Continue thus, with 2 ch, 1 dc into each of the following loops, alternating between each of the two motifs. Below is an example of the motifs with the joining stitches shown in a different colour.
Lower edge of cardigan (back and fronts)Make 7 strips of 18 (20) motifs and then join the strips in same way as for joining motifs. (You have a rectangle 18 (20) by 7 motifs which is the back and fronts worked together up to the armholes). Back (top and sleeves)Make 5 strips of 18 (20) motifs and then join the strips in same way as for joining motifs. (You have a rectangle 18 (20) by 5 motifs which is the back and sleeves worked together from the armholes up to the shoulders). Right front (top and sleeves)Make 3 strips of 9 (10)
motifs and then join them. Left front (top and sleeves)Work in the same way,the opposite way round. Putting it all togetherThe assembly diagram below shows the smaller size, which requires you
to join the bottom of the cardigan to the top sections centred across
an uneven number of squares (9) - so involves joining a "half square".
The larger size has an even number (10).
Join the lower section to the top, joining the centre 9 (10)
motifs for the back - shown in the diagram as between points (a)
and (b) - Join the top of garment across the shoulders and tops of sleeves. (There are 7 (8) motifs each side.) Iron lightly on wrong side of work. Stitch the sleeve seams - shown in the diagram as between points (a) and (g) for the right sleeve and (b) and (h) for the left sleeve. Work 5 rows of dc all round the sweater, working a little tighter round
A Word on the WoolThis is made using cotton 8, which is fine but not that fine. You can find cotton 8 on line as rather expensive fine crochet cotton
by the likes of DMC, or in more budget versions from bulk distributors
such as Hobbii. If you want to make this in a fine wool then laceweights would probably suit (again be sure to try a motif). I implied above that the yardage could be used as an indication of suitable thickness when substituting, but not if you are substituting with wool because it has a different density to cotton. You can use the yardage as a guide to how much yarn to purchase to make this garment, but not for any indication of suitable thickness. |
Materials
|

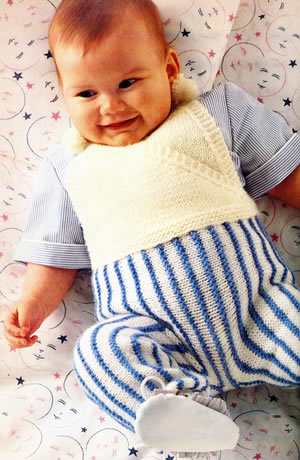
Delightfully plain and simple outfit for a new baby. Cardigans are (I am told) the most useful for small babies - trousers optional - and the bootees - well, they are always just impossibly cute aren't they? (even if they rarely stay attached to the baby!).
Instructions.The cardigan is worked as one piece, starting with the two front, pieces worked separately, then joining them to complete the lower back Cardigan left front:Using No 11 (3mm) needles, cast on 34 stitches and knit 2 rows. Shape front hem, by working short rows as given below, noting that after the first 8 rows in garter stitch (every row knitted), you start to work in stocking stitch (right-side rows knitted, wrong-side rows in purl) on the first 27 stitches, and keep the last 7 front edge stitches (the curved edge) in garter stitch to form the front band Next row: k26. Turn, knit back to
end. Continue straight, with the 7 front edge stitches in garter stitch and
the 27 side edge stitches in stocking stitch, until work measures 4¾
inches from the start of the stocking stitch, (about 46 rows), ending
with a wrong side row. Shape neck, by casting off stitches at the front edge as follows: Next row (wrong side facing): cast
off 7 stitches at the front edge, work to end of row. Continue straight, as set, keeping the sleeve cuff in garter stitch, until work
measures 7¾ inches (about 76 rows), ending with right side facing
for the next row. Cardigan right front:Work as for the left front, reversing all shapings, and placing 3 buttonholes
at the front edge on the 4th, 30th, and 56th row of the stocking stitch. When you have completed the 76 rows on the right front, join the two fronts together to knit the back: Cardigan backNext (joining) row (right side facing):
knit 54 stitches from the left front; cast on 22 stitches for the back
neck; knit 54 stitches from the right front. [130 sts]. Continue straight for 31 rows, keeping the 7 stitches at each end in garter stitch, for the two sleeve cuffs. Cast off 34 stitches at the beginning of the next 2 rows. [62 sts]. CollarUsing No 11 needles, cast on 11 stitches and knit 2 rows. Next row: k4. Turn, knit back to
end. Shape collar: Next row: k3. Turn, knit back to
end. Next row: k3. Turn, knit back to
end. Cast off. Making up the cardiganJoin side and sleeve seams. |
Materials4ply fingering yarn in 50g balls: Nos 11 (3mm) needles. Tension28sts x 32 rows to 4 inches over stocking stitch. Size mattersTo fit one size up to 3 months. Abbreviationsk2tog: decrease by knitting 2 stitches together. A word on the wool.Original yarn was a synthetic mix of acrylic and rayon (which gave it
a ply of a silky thread), and a small percentage of wool. Disclaimer
|

Trousers Front* Using No 11 (3mm) needles, cast
on 27 stitches, and work in garter stitch for 8 rows. Make a second leg by repeating these instructions from * to *. Then join the two legs by knitting across these 27 stitches from the
second leg, cast on 8 stitches, and knit across the 27 stitches from the
first leg. [62 sts] Work straight on these 62 stitches in stocking stitch for 5½ inches ending with wrong side facing for next row. Next row: knit. Starting with a knit row, work 8 rows in stocking stitch as before. Trousers BackWork as for Front from * to **.
Shape top by working as follows: Next row: Work to the last 3 stitches.
Turn. Work 3 rows across all 62 stitches, ending with wrong side facing for next row. Next row: knit. Making up the trousersJoin side and leg seams. 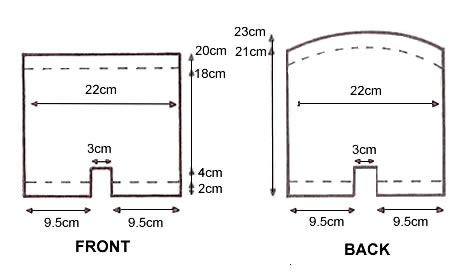
BooteesUsing No 11 (3mm) needles, cast on 38 stitches, and work for 8 rows in
garter stitch. Next row: k2, *
k2tog, yon; repeat from * to last
2 stitches, k2. Next row: k24. Turn, and leave the
remaining stitches on a spare needle. Continue on these 10 stitches for a further 16 rows in stocking stitch,
ending with right side facing for next row. With right side facing, rejoin yarn and knit 14 stitches from spare needle; knit up 12 stitches along the side of the rows just worked; knit across 10 stitches from spare needle; knit 12 stitches down the other side of the rows just worked; knit across 14 stitches from spare needle. [62 sts] Work 8 rows in garter stitch, ending with right side facing for next
row. Shape Sole: Slip the first 26 stitches on to the right hand needle (or "working" needle if you are left handed), and rejoin yarn to work the centre 10 sole stitches; knit 9, k2tog, turn. Cast off. Finishing: Join back seam, and join sole at the back. Make a cord by cast on 100 stitches; knit one row, then cast off. Make a second bootee in the same way. |
|

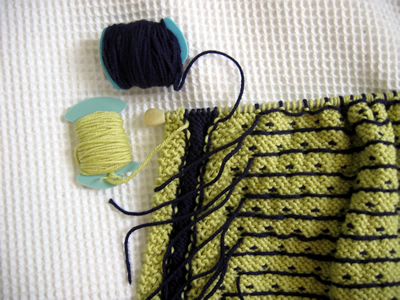
This is another simple (and fairly flat) toy which could go with the baby layette.
It's made in two colours using a slip stitch technique to make the pattern. It looks good with the main colour in white, and might work well using up left over yarns.
InstructionsThe original pattern used two strands held together of a 4ply weight yarn, but you could easily use a single strand of anything from a double knit through to a chunky yarn, which would ultimately only affect the resulting size of the toy. It's nice to have a fairly firm tension for a toy so adjust the needle size as appropriate. Body (2 pieces)Using contrast colour (B), cast on 23 stitches.
These four rows form the colour pattern. Keeping the pattern correct, continue and cast on 2 stitches at the beginning
of the next 2 rows. Repeat the last 4 rows [31 sts]. Decrease 1 stitch at each end of the next and every following 8th row
until 15 stitches remain. Work a second piece in the same way.

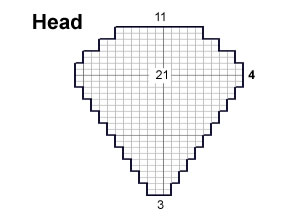
Head (2 pieces)Using white (A), start at the nose and cast on 3 stitches. Decrease 1 stitch at each end of the next row. Work a second piece in the same way.
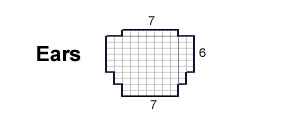
Ears (4 pieces)Using contrast colour (B), cast on 7 stitches, and, starting with a knit
row, work in stocking stitch, increasing 1 stitch at each end of the 3rd
and following alternate row. Work three further pieces in the same way.
Tail (1 piece)The tail can be either a 4-stitch I-cord, or a twisted cord - make it as long as you think suitable for the toy. To Make Up[Editor's note: This toy is designed to have a cotton lining - which I believe is designed to help it keep its flat shape. I stuffed it with concentric layers of flat synthetic quilt padding instead, using the knitted shapes as a guide.] Cut out the body and head in calico, leaving a 1½cm seam allowance, using the knitted pieces as a template. Join the side seams of the body and the outside edges of the head, of both the knitted and calico versions. Turn the calico lining to the right side and sew head to body. Fill and sew up lower edge. Place the lining inside the the knitted version and finish all seams. [Editor's note: I found the instructions a bit vague here - you just have to use the picture as a guide to see how and where to attach the head to the body, and discover how that all works out with a lining! However this is simple toy so it's easy enough to extemporise.] Seam the ears together, noting that the reverse stocking stitch is the right side. Sew the cast-off edges of the ears to the head. Attach the tail to the body. The eyes can be embroidery or buttons as shown in the picture. There is also a tiny embroidered nose. |
Materials
|
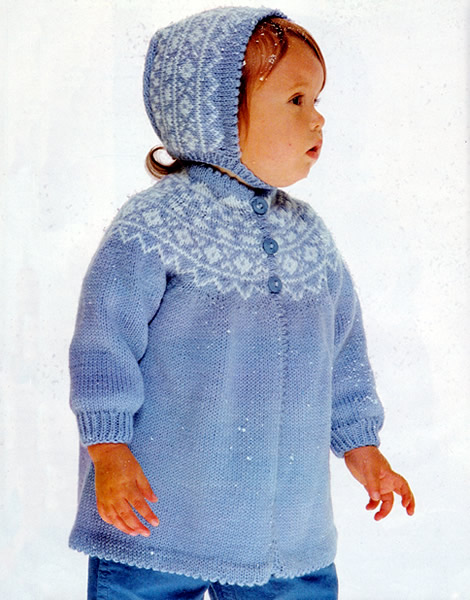
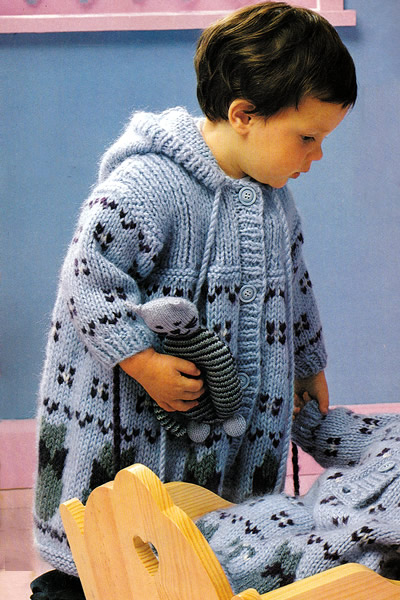
Adorable winter coatigan and bonnet set for a child.
Instructions.Instructions for 2 sizes, larger size in brackets. COATThe body of the coat is made in one piece beginning at the bottom edge. With larger size needles and white colour, cast on 186 (204)
stitches, and, using the blue colour, work in stocking stitch until the work measures
9 (13 ) inches. Coat BackContinue on the centre 94 (104)stitches for the Back only. Shape armholes by decreasing: for size 1: decrease 1 stitch at the beginning of the next 8 rows, (for size 2: decrease
1 stitch at each end of the next row once, then the following 4th row
once, then the following alternate row once, and finally the following
4th row once). Coat - Right Front:With right side facing, pick up 46 (50)
stitches for the on the right and shape the armhole. Leave all 42 (46) stitches remaining on a holder. Coat - Left Front:Work the left front the same as the right front, reversing all shapings. Sleeves (make 2):With smaller size needles and blue colour, cast on 38 stitches and work
1¼ inches in k1/p1 rib. Continue without shaping until work measures 6¾ (8¼)
inches. Yoke:With larger size needles in blue colour, pick up the 278 (300) stitches from the holders: 42 (46) stitches from the right front, 54 (56) stitches from the right sleeve, 86 (96) stitches from the back, 54 (56) stitches from the left sleeve, and finally, 42 (46) stitches from the left front. With right side facing, work 2 rows in stocking stitch decreasing 8 stitches
at the armholes on the first row as follows: The next row decreases a number of stitches evenly across each section of the yoke - work the two sizes as follows: SIZE 1 only Next row (decrease): (k1, k2tog,
k2tog, k1, k2tog) 5 times, k1; SIZE 2 only Next row (decrease): (k1,
k2tog) 15 times; Next row: purl.
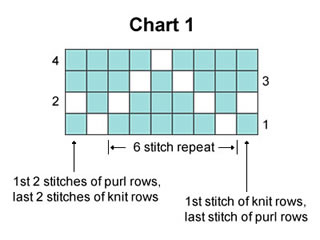
Both sizes: work row 1-4 rows from chart 1 starting with a knit row.
SIZE 1 only: SIZE 2 only: Next row 5 (decrease): Using
blue yarn: k8, *
k2tog, k6, repeat from *
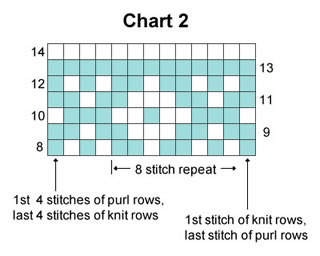
26 times, k3. [193 sts] Both sizes: work 7 rows from chart 2 starting with a purl row.
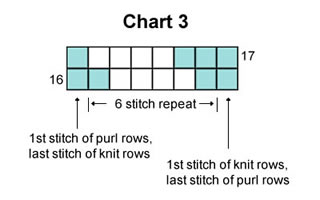
SIZE 1 only: SIZE 2 only: Next row 15 (decrease): Using blue yarn: k7, * k2tog, k4, repeat from * 27 times, k4. [146 sts] Both sizes: work 2 rows from chart 3 starting with a purl row.
SIZE 1 only: SIZE 2 only: Next row 18 (decrease): Using
blue yarn: p6, *
p2tog, p4, repeat from *
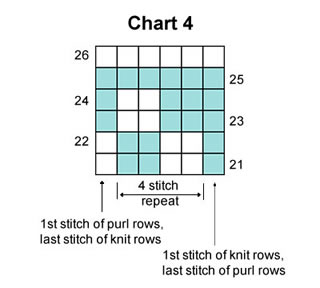
23 times, p2. [123 sts] Both sizes: work 6 rows from chart 4 starting with a knit row.
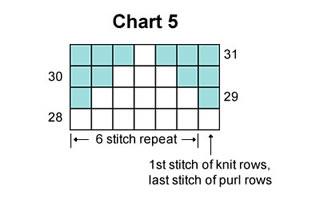
SIZE 1 only: SIZE 2 only: Next row 27 (decrease): Using blue yarn: k2, * k2tog, k2, repeat from * 25 times. [77 sts] Both sizes: work 4 rows from chart 5 starting with a purl row.
Both sizes: purl 1 row in blue, decreasing one stitch at the centre of the work. [60 (76) sts] Place the remaining stitches on a stitch holder. Coat border:Remove the strand of white at the bottom of the work, picking up the
stitches as you go. Work 4 rounds of stocking stitch (every round knitted) and on the 2nd
round on right front edge, make 3 buttonholes 2 stitches wide: cast off
2 stitches, then on the third round, cast on 2 stitches over the spaces. On the 5th round, work 1 round of eyelets: Work a further round, then make 3 buttonholes at same places as first 3 buttonholes. Work a further 2 rounds then cast off all stitches. Finishing the coat:Sew armhole and sleeve seams. |
MaterialsDouble Knitting yarn: Coat: 3 (4) x 50g balls in blue colour plus 1 ball in white. Bonnet: 1 ball in each colour. One pair each of 3mm and 3½mm (or 3¾mm) needles. 3½mm (or 3¾mm) circular needle. Tension23sts x 30 rows to 4 inches Size matters1 / 2 years Abbreviations:k2tog: decrease by knitting 2 stitches together A Word on the Wool.Original yarn was a double knitting with 50/50 wool/acrylic mix and approximately 125m to 50g. Disclaimer
|
BONNETWith larger size needles and blue colour, cast on 89 stitches. On the 5th row, work eyelets: Continue in stocking stitch, and when work measures 1¼ inches, begin the fair-isle pattern following the 35 rows on the chart given at the end.
Then shape the back of the hat by casting off 30 stitches at each
edge of next row. You now have 29 stitches.
Continue on the centre 29 stitches in blue colour, decreasing 1 stitch
at each end of every 4th row 6 times. Finishing the bonnet:Fold the border along the row of eyelets to form the picot edge, and
sew a hem. To make the chin strap, cast on 25 stitches (left side of work, right
side of bonnet), and work 4 rows in k1/p1 rib. On the 2nd make 1 buttonhole
2 stitches wide, as on the coat, placing it 4 stitches from the end of
the strap. Bonnet Chart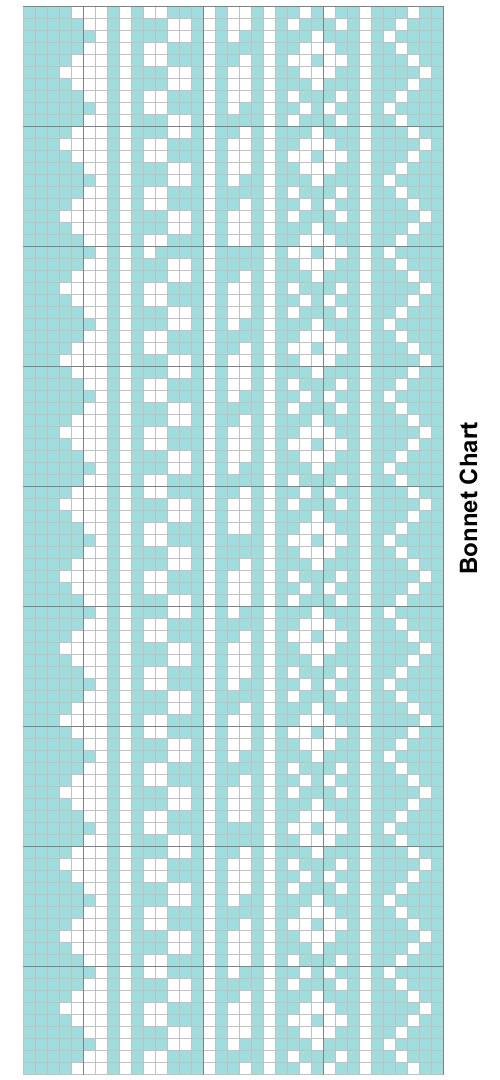 |
|

An easy ribbed slipover for breezier summer days.
Instructions.The main pattern stitch is named as "beaded rib" worked as follows: 1st row and all odd rows (right side facing):
knit BackWith smaller sized needles, cast on 134/140/146/152/158
stitches, and work 2¾ inches in k1/p1 rib. Change to larger needles and work in the "beaded rib" stitch until work measures 14/14/14½/15/15½ inches. Shape armholes, by casting off 3 stitches at the beginning of the
next 4 rows; then cast off 2 stitches at the beginning of the next 4/4/4/6/6
rows; then decrease 1 stitch at each end of the next, and following
4/5/6/5/6
alternate rows. Continue in pattern as set until work measures 22/22½/23½/24½/25½ inches. Shape shoulders and back neck as follows: Cast off 10/9/10/11/11 stitches at the beginning of the next 2 rows. Next row: cast off 9/10/10/10/11,
k18/9/10/11/11,
cast off centre 28/30/32/34/34,
knit to end. Next row: cast off 10 at the neck
edge, knit to end. With wrong side facing, rejoin the yarn to the right back at the neck edge and cast off 10 at the neck edge, purl to end. Turn and cast off the remaining 9/10/10/10/11 and fasten off, thus completing the right shoulder. FrontWork as for back up to the start of the armhole shaping when work measures 14/14/14½/15/15½ inches. Start the armhole shaping, by casting off 3 stitches at the beginning
of the next 4 rows; then cast off 2 stitches at the beginning of the next
4/4/4/6/6
rows. Divide for neck by continuing on the first half of the stitches only and placing the remaining half of the stitches [57/60/63/64/67 sts] on a spare needle. Keeping the pattern correct, decrease 1 stitch at the armhole edge on the next and following 4/5/6/5/6 alternate rows, and, at the same time, decrease 1 stitch at the neck edge on every 5th row 24/25/26/27/27 times. [28/29/30/31/33 sts] Continue straight until work measures 22/22½/23½/24½/25½ inches, then shape shoulders by casting off at the armhole edge on every alternate row, 10/9/10/11/11 stitches once, and 9/10/10/10/11 stitches twice. Rejoin the yarn to the stitches on the spare needle and work the other side of the neck to match, reversing the shapings. To Make UpJoin the shoulder seams. Neck Border: Armhole borders: Sew side seams including the armhole border seams. |
Materials4 ply yarn: Pair each of No 12 (2¾mm) and No 10 (3¼mm) needles. No 12 (2¾mm) double pointed needles or circular. Tension28sts and 60 rows to 4 inches on 3¼mm needles over "beaded
rib" stitch. Size mattersFinished chest measurement: Abbreviations k: knit A word on the wool.Original yarn was an acrylic yarn with a yardage of about 170m per 50g ball. You can use a 4 or 5 ply yarn for this loose fitting design, but check your tension and alter the needle size if necessary. Disclaimer
|
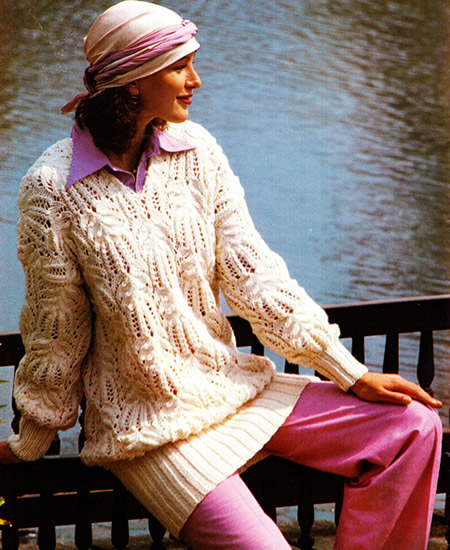
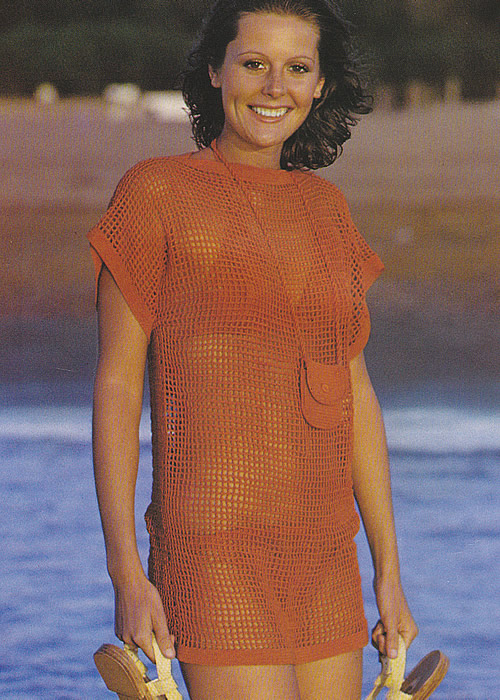
This sweater from the end of the 1970s is a presage of the style that became so ubiquitous in the 1980s - the oversized unisex sweater with drop shoulders and no shaping. It is very simply constructed with wide squared off sleeves and no armhole shaping on the body. The neck opening is formed from a vertical slit, rather like a poncho - all very simple.
This is one of my favourite types of sweater - really long and slouchy with a deep welt - suitable to wear with narrow trousers or leggings. [Clearly I belong in the 1980s.] In addition, the stitch used is an openwork lacy pattern which I find very satisfying to knit. In fact, this particular sweater looks so very long, I might be tempted to knit it shorter for myself (I am not very tall) to keep the style of a tunic rather than a dress.
...the length is mini-skirt, the style blouson. Surprisingly easy to knit, this feminine open lace stitch sweater worked on large size needles adds new dimensions to a sporty Aran...
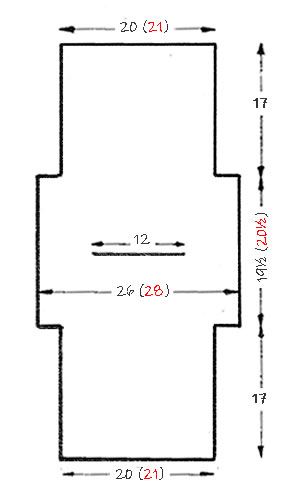
Instructions.The pattern is written for one size only, and at 34 to 38 inches this might be a bit of a limitation. It is designed to be oversized, so the actual measurement should come out at about 41 inches if you achieve the stated tension. [Editor's note: I can see why they would have had difficulty providing a sensible larger size, as the lace pattern is repeated over 34 stitches - so if you added another repeat it would increase the size by at least 12 inches. Having said that, many oversize sweaters, both in the eighties and now, are designed to be in excess of 50 inches as a supposed "one size", and it would be a moderately feasible task to redraft the pattern, due to the lack of shaping - if you had the appetite for it.] Front** With 4mm needles, cast on 88 stitches. 1st row: p1, k2, *
p2, k2; repeat from * to last stitch,
p1. Next row: p6, increase in the next stitch, * p4, increase in the next stitch; repeat from * to the last 6 stitches, p6. [104 sts]. Change to No 5½ mm needles and work in pattern as follows: 5th - 12th rows: Repeat 1st to 4th
rows twice. 17th - 24th rows: Repeat 13th to
16th rows twice. Next row: Pattern 52 stitches, M2, pattern to end. Divide for neck as follows: With wrong side facing, rejoin yarn to remaining stitches at the centre
neck edge, and finish to correspond with first side. BackWork as for Front from ** to **. Divide for neck as follows: With wrong side facing, rejoin yarn to remaining stitches at the centre
neck edge, and finish to correspond with first side. SleevesWith 4mm needles, cast on 36 stitches and work in rib as for Front for
4 inches (10cm), ending with a 1st row. To Make UpOmitting ribbing, press lightly on wrong side following instructions
on the ball band. |
Materials
|
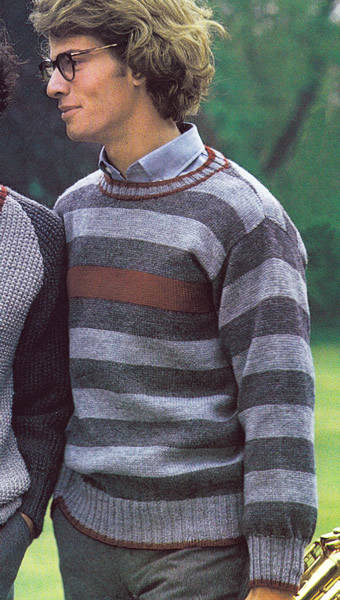
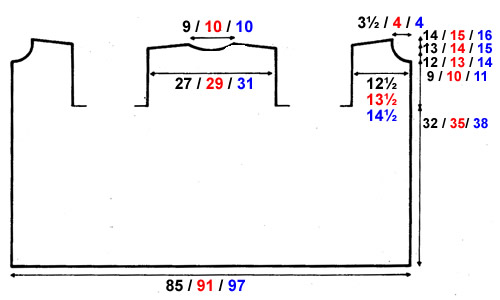
well... they prefer... grey if my experience is anything to go by (whether it's 50 shades or maybe just 2); even the muted coloured stripe is a risk. However, colour choices are easily adapted to the taste of the wearer, and in my case: I love stripes (both wearing and knitting them), whatever the colours.
Otherwise - the greys have it.
Instructions.A man's plain loose sweater in 3 sizes (small medium and large). BackUsing No 11 (3mm) needles and red contrast colour (R), cast on 118/122/126
stitches, and work 3 rows k2/p2 rib. Break yarn. Change to No 9 (3¾mm or 3½mm) needles and join in dark grey
contrast (G) to start working the striped stocking stitch pattern, increasing
2 / 3 / 4
stitches, evenly across the first row. After the first 12 rows of the seventh stripe (which is in in colour G), shape the armholes by casting off 9/10/11 stitches at the beginning of the next 2 rows. [102/105/108 sts]. Change to colour R and work 14 rows for the 8th stripe. Change to colour G and continue in striped stocking stitch alternating
between colours G and M. Cast off 9 stitches at the beginning of the next 2 rows. With wrong side facing, rejoin the yarn to the right back at the neck edge and purl 8/9/10. Turn and cast off the remaining 8/9/10 and fasten off, thus completing the right shoulder FrontWork as for back until work measures 23¼ / 23½ / 24 inches. Keeping continuity of the striped pattern shape neck as follows: At the beginning of the next row cast off 4 stitches. Then at the neck edge on every following alternate row, cast off: 3 stitches once, 2 stitches 3 times, and 1 stitch 4 times. [26/27/28 sts]. Continue straight on these stitches until front matches back to the shoulder.
With wrong side facing, at the armhole edge, shape shoulder by
casting off 9/9/9
stitches on the next and following alternate row. Knit 1 row and then
cast off the remaining 8/9/10
stitches. With wrong side facing, return to the stitches for the right side of
the front, rejoin the yarn to the neck edge, and cast off 4 stitches,
purl to end. Then at the neck edge on every following alternate row cast
off: 3 stitches once, 2 stitches 3 times, and 1 stitch 4 times. [26/27/28
sts]. SleevesUsing No 11 (3mm) needles and red contrast colour (R), cast on 66/70/74
stitches, and work 3 rows k2/p2 rib. Break yarn. With right side facing, change to No 9 (3¾mm or 3½mm) needles
and join in contrast to start working the striped stocking stitch pattern,
increasing 18/19/20
stitches, evenly across the first row. Increase 1 stitch at each end of every following 10th row, 11 times.
Continue until work measures 20 / 20¾
/ 21½ inches from the beginning, [Editor's
note: This should be 126/128/140
rows in stocking stitch.], which should be an exact number of stripes,
ending with the darker grey colour G - for the second (medium) size you
should work 16 rows in colour G on this last stripe. To Make UpPress parts or block lightly under a damp cloth, avoiding ribbing. Neck Border: Sew in sleeves. [Editor's
note: The instructions are not explicit on this point but as the top of
the sleeve is a straight edge, I would be inclined to sew it to the straight
edge of the armhole, and sew the top half inch of the side of the sleeve
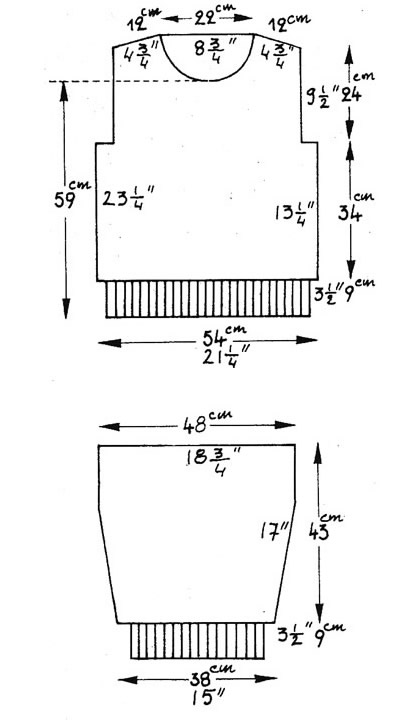
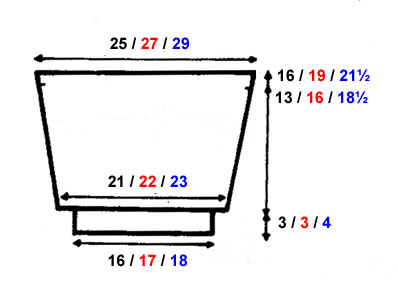
to the cast off stitches of the armhole.] Diagram showing dimensions for smallest size:
|
MaterialsDouble knitting yarn: Pair each of Tension22sts x 30 rows to four inches on 3½mm needles over stocking stitch.
Size mattersTo fit chest: Abbreviations k: knit A word on the wool.Original yarn was mixed fibre double knitting equivalent. Disclaimer
|
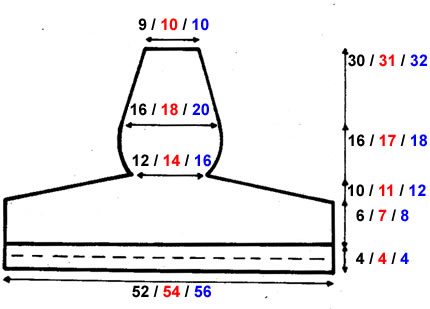
The cutest hooded gown made in a soft chunky yarn - perfect for bedtime, (or other occasions, as it is described as a "coat"). The lower section has a design of kittens - and there is a cute toy cat to match.
InstructionsThe pattern is given in 3 sizes: 12 (18
: 24) months. Where only one set
of instructions is given it applies to all sizes. SleevesWith 5mm needles and main colour (M), cast on 22 (24
: 26) stitches and work 3 (3
: 4) cm in k1/p1 rib, ending with
wrong side facing for next row. Now change to 6mm needles and stocking stitch following the Fair Isle colour pattern in the chart for the sleeve:
For the first size, begin with 1 stitch in black (B) then 1 in main shade
(M); for the second size, begin with 1M, 1B,
1M; for the third size, begin with 4M,
1B, 1M, 1B, 1M. Leave the stitches on a stitch holder or spare needle and work a second sleeve in the same way. Body (knitted as a single piece)Using size 5mm needles and main colour (M), cast on 113 (121 : 129) stitches and work 6 rows in garter stitch. Change to 6mm needles and work 2 (2 : 6) rows in stocking stitch. Continue stocking stitch and follow the Fair-Isle pattern working from the charts.

Work 2 rows as in Chart 1, commencing with 1M, 1B, then repeating the 8 stitch pattern across the row ending 1M, 1B, as indicated.
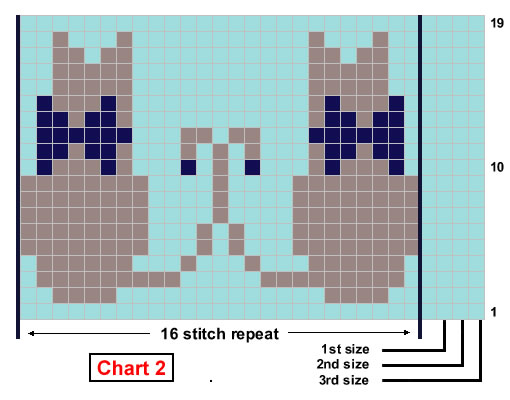
Now work the 19 rows of the cat pattern from Chart 2, 4 times across the row, placing 3 (5 : 7) stitches between each group, and working 2 (3 : 4) stitches in main shade before the first and after the last group.

Work 2 rows as in Chart 3, commencing with 2M, then repeating the 8 stitch pattern across the row ending 1B, 1M, as indicated. Work 4 rows in stocking stitch.
Work 4 rows in stocking stitch. Repeat the 2 rows as in Chart 3, as before, (commencing with 2M, then repeating the 8 stitch pattern across the row ending 1B, 1M, as indicated). Work 3 (2 : 2) rows in stocking stitch, and (wrong side facing) work 4 rows in garter stitch. At this point you have completed 58 (64 : 68) rows and your work should measure 32 (35 : 38) cm. Now you must divide the work and continue knitting the back and fronts separately. Change to 5mm needles and work in k1/p1 rib as follows, casting off some stitches for the armholes, as well as decreasing across the row. Next (right side facing, decrease) row:
k2, (p1, k1) 3 (3
: 3) times, p1, k2tog, (p1, k1) 2
(3 :
4) times, p1, k2tog, (p1, k1) 3 (3
: 3) times, k1; place these 23
(25, 27 ) stitches
on a spare needle or stitch holder...
Upper Left FrontNext row (wrong side facing): p2, * k1, p1, repeat from * to last stitch, p1. [23 (25 : 27) sts] With right side facing, continue in k1/p1 rib for a further 19 (21
: 23) rows, then shape the neck
as follows: cast off 3 (4
: 4) stitches on the next row, then
2 (2 :
2) on the following alternate row. Continue to decrease at the neck edge, and shape shoulders as
follows: Upper Right FrontRejoin yarn to the right front section at the front edge. Next row (right side facing): k2, * p1, k1, repeat from * to last stitch, p1. [23 (25 : 27) sts] With wrong side facing, continue in k1/p1 rib for a further 19 (21
: 23) rows, then shape the neck
as follows: cast off 3 (4
: 4) stitches on the next row, then
2 (2 :
2) on the following alternate row. Continue to decrease at the neck edge, and shape shoulders as
follows: Upper Back sectionWith wrong side facing, rejoin the yarn to the remaining stitches in
the centre. Work a further 26 (28 : 30) rows in k1/p1 rib. Now shape shoulders and back neck by casting off 5 (5 : 6) stitches at the beginning of the next row. Next row (wrong side facing): cast
off 5 (5 :
6) stitches, rib 15 (17
: 19) (including the stitch already
on the needle), cast off 7 stitches, and rib to end. This completes the right side of the Back neck. Rejoin the yarn to the remaining stitches at the neck edge and, right side facing, rib one row. Next row (wrong side facing): cast
off 5 (6 :
6) stitches, rib 10 (11
: 12) (including the stitch already
on the needle). This completes the left side of the Back neck. Button BandUsing 5mm needles, cast on 65 (71 : 77) stitches in main shade (B), and work in k1/p1 rib for 5 rows, keeping the 2 stitches at each end of the row in stocking stitch - like this: Next row: k2,
* p1, k1, repeat from *
to last stitch, k1. And so on for 5 rows in all. Purl one row, then knit 3 rows in stocking stitch using waste yarn of a different colour. Leave these stitches on a spare needle or holder. Make a second (right hand) band in the same way, adding 3 button holes on the 4th row: 4th row: k2,
p1, k1, cast off 2, rib 10 (12
: 13), cast off 2, rib 10 (12
: 13), cast off 2, rib to end. Complete with 3 rows of waste yarn as before. HoodUsing 5mm needles, cast on 69 (73 : 75) stitches in main shade (B), and work in k1/p1 rib for 8 rows. Change to 6mm needles and work 11 (13
: 15) rows in stocking stitch. Wrong side facing, continue in stocking stitch, increasing 1 stitch at
each end of every 4th row 3 times. [21 (23
: 25) sts] Right side facing, continue in stocking stitch, decreasing 1 stitch at
each end of every 6th (6th
: 5th) row 3 (3
: 4) times. [15 (17
: 17) sts] To Make UpSew shoulder and sleeve seams up to the coloured markers. Sew the button band, stitch by stitch, to the right side of the work using back stitch, (undo the rows of waste yarn). Sew up the sides of the hood. Fold the front edge in half inwards and
sew round like a hem to make a channel to thread the cord through. Finish the buttonholes with embroidery if desired, and sew on buttons. |
Materials
|
MittensThis is a pattern for a very simple little pair of mittens in matching colours. The mittens are attached to a cord which is threaded through the armholes of a coat so that they can hang free at the ends of the sleeves if removed (and thus don't get lost). With 5mm needles and dark contrast colour (B), cast on 18 (18
: 20) stitches and work 3 cm in k1/p1
rib. Next row: k1, sl1, k1, psso, k4 (4
: 5), k2tog, sl1, k1, psso, k4 (4
: 5), k2tog, k1.
|
|
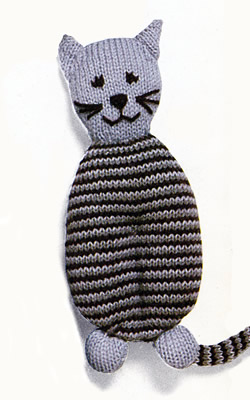
A simple cuddly toy to go with the gown for bedtime.
InstructionsThis is a very simple toy made up of fairly flat ovals, which should not be over-stuffed. Body (2 pieces)Using dark colour (B), cast on 12 stitches and work in striped stocking
stitch following Chart 1 with stripes as follows:
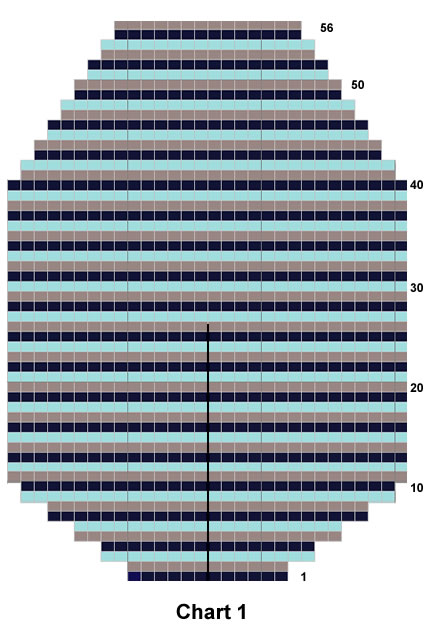
(The chart shows casting on 2 stitches at the end of every row, until there are 28 stitches, then increase 1 stitch at each end of the next row [30 sts]; then working 29 rows straight, before starting to decrease 1 stitch at at each end of the next and every alternate row until 14 stitches remain). Cast off using B. Work a second side in the same way. Head (2 pieces)Using light colour (M), cast on 11 stitches and work in stocking stitch following Chart 2, (which shows increasing 1 stitch at each end of the third and every following alternate row until there are 21 stitches; then working 9 rows straight, before starting to decrease 1 stitch at at each end of the next and every alternate row until 11 stitches remain). 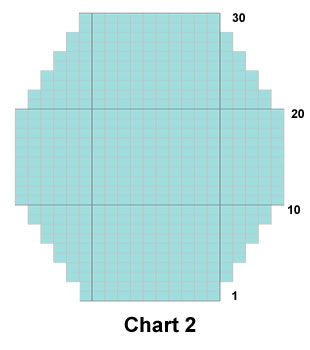 Work a second side in the same way. Ears (2 pieces)Using light colour (M), cast on 8 stitches, and work 10 rows straight. Work a second ear in the same way. Paws (4 pieces)Using light colour (M), cast on 10 stitches and work in stocking stitch following Chart 3, (which shows working 6 rows straight, then decreasing 1 stitch at at each end of the next and every alternate row until 4 stitches remain). 
Cast off. Work a further 3 pieces in the same way. Tail (1 piece)Using dark colour (B), cast on 12 stitches and work 62 rows in striped
stocking stitch as follows: To Make UpAssemble the two faces of the body, the head and the paws. Sew, (right
sides together) leaving an opening. Turn right side out, stuff, and sew
closed. |
Materials
|
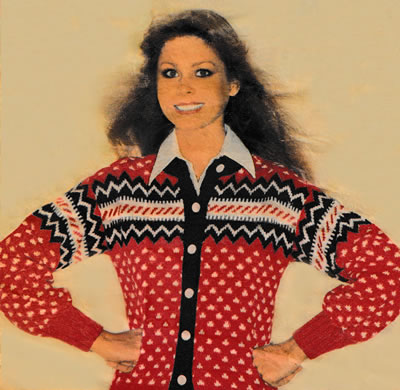
This drop-shoulder design cardigan in cheering Nordic colours is taken from a much-loved and much-handled pattern.
Instructions.Instructions are given for 3 sizes - the larger sizes are shown in brackets. When working the pattern weave the yarns not in use loosely across the wrong side of the work; do not strand the threads over more than 3 stitches at a time in order to keep the fabric elastic, joining in and breaking off colours as required. Back and Fronts (worked in one piece up to the armholes)With No 10 (3¼mm) needles and main shade (R), cast on 194 [206, 218] stitches and work as follows: 1st row: k2, *
p2, k2; repeat from * to end. These two rows form the rib. Work a further 31 rows. Next (increase) row: p9 [12, 4], m1, * p8 [7, 7], m1; repeat from * until p9 [12, 4] stitches remain; purl to end. {217 [233, 249] sts} Change to No 8 (4 mm) needles and join in white (W). Weaving in the yarns not in use, work the 2-colour pattern entirely in stocking stitch, beginning, on the right side of the work, with a knit row. Note: only the colours are specified below. 1st row (knit): 3R, *
3W, 5R; repeat from * ending the last
repeat with 3R instead of 5R.
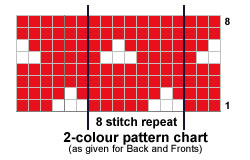
These 8 rows form the 2-colour pattern. Work a further 59 rows, up to the armholes, ending with a 3rd pattern row. Divide to separate back and fronts: With red, (R) p51 [55,
59] stitches; increase in the next stitch
and leave these 53 [57, 61]
stitches on a spare needle or stitch holder to be worked later for the
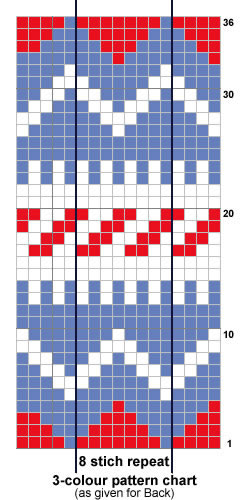
left front; BackOn these 113 [121, 129] stitches work the 36 row 3-colour pattern, weaving in the yarns not in use at the back of the work. Once again, the pattern is worked entirely in stocking stitch beginning with a knit row so only the colour details are shown. Join in blue (B). 1st row (knit): 4R, *
1B, 7R; repeat from * until 5 stitches
remain; 1B, 4R. [Editor's note: Rows 21-36 are a repeat of rows 1-16 worked in exact mirror image so Row 21 is the same as row 16, row 22 is the same as row 15, and so on back to the first row the same as row 36..]
21st row: knit across all stitches
in white (W).
Break off blue and continue in the 2-colour pattern, beginning with the 3rd row. Work 10 [10, 14] rows. Slope shoulders: Cast off 7 [6,
8] stitches at the beginning of the next
2 rows, 7 [7, 8]
stitches at the beginning of the following 2 rows, then cast off 6 [7,
7] stitches at the beginning of the next
8 rows. Left FrontWith right side facing, rejoin the yarns to the the inner (armhole) end of the 53 [57, 61] stitches, and work in the 3 colour pattern as follows. 1st row (knit): 4R, *
1B, 7R; repeat from * until 1 [5,
1] stitches remain; 1B [(1B,
4R), (1B)] . These 4 rows set the position of the 3-colour pattern. Work a further 32 rows in pattern to match the back. Break off blue (B). With red (R) knit 1 row. To shape the neck: 1st row (purl, wrong side facing):
with red (R), cast off 9 [10, 11]
stitches, purl to end. ** Keeping continuity of the 2-colour pattern to match the main part, decrease 1 stitch at the neck edge on the next 5 rows — when working the right front read 6 rows here instead — {38 [41, 44] sts}. Pattern 2 [2, 6] rows. Slope shoulder: Cast off 7 [6,
8] stitches at the beginning of the next
row, then 7 [7, 8]
stitches at the beginning of the following alternate row. Right FrontWith wrong side facing, rejoin red (R) at the the inner (armhole) end, increase in the first stitch, and purl to end. {53 [57, 61] sts} Work in the 3 colour pattern as follows: 1st row (knit): 1B [(4R,
1B), (1B)], *
7R 1B; repeat from * until 4 stitches
remain; 4R. These 4 rows set the position of the 3-colour pattern. Break off blue (B). With red (R) work 2 rows. To shape the neck: 1st row (knit, right side facing): with red (R), cast off 9 [10, 11] stitches; knit k1R [(4R), (2W, 5R)]; * 3W, 5R; repeat from * until 2 stitches remain; 2W. Work as given for left front from ** to end, noting the variation. Sleeves (both alike)With No 10 (3¼mm) needles and main shade R, cast on 48 [48, 52] stitches and work 32 rows in double rib as for main piece. Next (increase) row: k4, m1, * k1, m1; repeat from * until 4 stitches remain;k4. {89 [89, 97] sts} Purl one row in red (R). Change to No 8 (4 mm) needles and work 72 rows in the 2-colour pattern as given on main piece (back and fronts). Work the 36 rows of the 3-colour pattern as given on back. With red (R) knit one row, then cast off. Button BandWith No 10 (3¼mm) needles and blue (B) cast on 13 stitches, and
work 158 [158, 162]
rows in k1/p1 single rib, beginning odd numbered rows with k1, and even
numbered rows with p1. Buttonhole BandWith No 10 (3¼mm) needles and blue (B) cast on 13 stitches, and work 6 [6, 10] rows in k1/p1 single rib, as given for button band. 1st (buttonhole) row: Rib 5, cast
off 3 stitches, rib to end. Repeat the last 26 rows 4 times more, then the 2 buttonhole rows again. Rib 19 more rows, leaving the stitches on the needle. NeckbandJoin shoulder seams. Using the No 10 (3¼mm) needles holding the 13 stitches of the buttonhole band, and continuing the last row, pick up and knit 23 [24, 27] stitches from right neck shaping, knit across 37 [39, 41] stitches from the back, increasing 3 stitches evenly across, pick up and knit 23 [24, 27] stitches from left neck shaping, and finally rib across the 13 stitches (from the safety pin) of the button band. {112 [116, 124] sts} 1st rib row: k1, *
p1, k1; repeat from * 5 times, k2;
** p2, k2; repeat from **
until 13 sts remain; p1, * k1, p1;
repeat from this last * to end. These two rows set the rib. Work 3 rows. 1st (buttonhole) row: Rib 5, cast
off 3 stitches, rib as set to end. Work 12 rows in rib as set, then work the 2 buttonhole rows again. Making UpPress parts lightly on wrong side with a warm iron over a dry cloth, or following any instructions on the ball band. Set sleeves into armholes, and join the sleeve seams. |
Materials 5 [5, 6]
50g balls DK in main shade (R) red, plus Pair each No 8 (4mm) and No 10 (3¼mm) needles. 7 buttons. Tension26 stitches x 27 rows to 4 ins (10cm) over the pattern on No 8 (4mm) needles. Size mattersTo fit chest 34 [36, 38]
inches, (86 [91, 97]
cm); Abbreviationsk2tog or p2tog: knit or purl 2 stitches together (decrease one stitch). stocking stitch: one row knit and one row purl, ("stockinette"). dec: decrease by working 2 stitches together. inc: increase by working twice into the same stitch. m1: make 1 stitch by picking up horizontal A word on the woolThe original design was in Patons Fiona - a yarn I was very fond of, both in quality and rich colour range. It was a standard DK; some information given on the web implies it was slightly thicker and others slightly thinner. In the 1970s it was sold in 50g balls: 175 yds/160m meters); 51% wool, 49% acrylic. In my opinion a similar substitute would be Rowan Felted Tweed DK. "Always check your tension" [Good Advice]. Disclaimer
|
Very practical airy cover-up in a sunny colour. These tops are surprisingly effective as shelter from a hot sun. But always remember, they offer screening against scorching but are not man enough against uv - so never forget to use a good sunscreen lotion, and stay in the shade where you can.
Instructions.Instructions for two sizes as this is intended an "oversized" top - but, with the specified yarn as written, it measures up to 40 inches. However, you can see from the shape and construction method, it would be easy enough to expand, either by adding stitches or experimenting with a slightly less fine thread. Mesh Pattern:Multiple of 3 ch plus 7 ch to turn. Back and FrontThe beach robe is worked in one piece, beginning at the lower front edge.
Work straight. When work measures 26¾(27¼)
inches, using 1 strand of yarn from a separate ball of yarn, make front
neck opening. Now work in mesh pattern across (88(92) dtr and 2 ch spaces. When work measures 9¾(10¼)
inches from neck opening, leave 11(12)
dtr unworked at each end of the row. Work a border of 10 rows in dc at the lower edge of the front and also and around the sleeves. To Make UpPress parts lightly on wrong side under a damp cloth A Word on the WoolThe original yarn was Fil d'Ecosse No 8, now discontinued but sometimes
seen on eBay. This is quite a fine 100% cotton thread probably equivalent
to a 3ply weight in wool. (Make sure you look for "No 8" cotton
- there were other weights for this yarn - the higher the number the thicker
the thread). At the current time of writing: Laughing Hens, Love Crafts, Yeoman Yarns, Yarnoncone |
MaterialsNo 8 crochet cotton. No 14 (2mm) crochet hook. For the purse: 25g No 8 crochet cotton. Tension13 dtrs x 10½ rows to 4 ins over mesh pattern using 2mm hook. Size mattersTo fit size 10-12 (14); actual measurement: 40 (42) inches. Abbreviationsch: chain Remember these are English crochet instructions where dc is equivalent to US single crochet - see "Terminology" in the side bar. Disclaimer
|
Neck PurseBack and Flap: Work straight until 58th row has been completed. Make a second section for the Front: Borders: 1st row: On wrong side of work, work
in dc, taking in the whole thickness On front section of purse, work the row of slst then on wrong
side of work, 1 row in dc. |
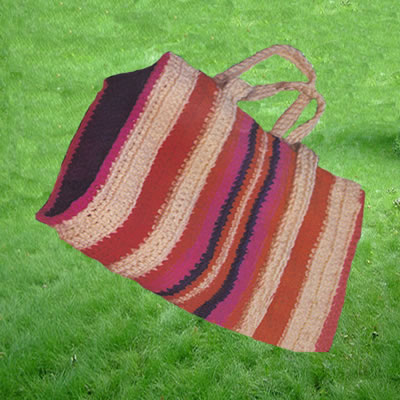
Soft-sided bags pack well into a car for touring or camping - or simply excursions to the beach. So these can make a good alternative as light weight overnight bags, or to contain all those little essentials for trips to the washrooms.
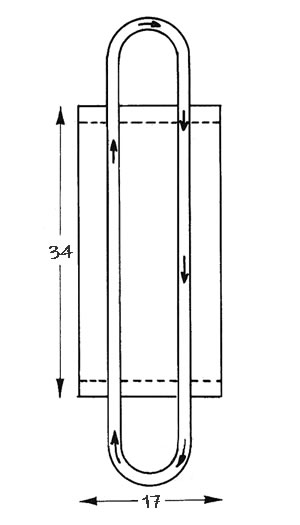
Instructions.Size could be modified by adding stitches or rows, or using a thicker yarn to change the tension - see "a Word on the Wool". Main sectionUsing tan beige colour (G) make 80 chain, plus one chain to turn. Work in dc inserting hook into the back of the loop only. Work in stripes as follows; 6 rows in B (tan) Now reverse the sequence: 1 row in C (red) Fasten off Side GussetsUsing dark blue or purple colour (D) make 30 chain, plus one chain to
turn. Work 8 rows in dc, inserting hook into the back loop only. Work a second gusset in the same way. HandleUsing tan beige colour (B) make 200 chain, plus one chain to turn. Work
4 rows in dc, inserting hook into the back loop only. To Make UpFold under a hem of 5 dc at each end of the bag. A Word on the WoolThe original yarn was a dense 100% acrylic carpet wool, with only 25m
to a 50g ball. It appears to be a chunky yarn designed for use with a
6mm hook - so this bag, using a 4mm hook, is designed to be made very
tight and firm to keep the shape of the bag. (Possibly hard work on the
fingers). I have seen Herdwick used to good effect for this type of bag. You may
have to buy it as an aran weight and use it double for this pattern; of
course you would be fairly limited in colour scheme. Finally, this could be a good way to use up remnants - always provided you can achieve the required tension, or make your own calculations to compensate. The bag is simply a mirror image of one set of stripes, so divide your remnants into 2 equal parts, either by weight or length before you begin - or alternatively - go wild and make an asymmetric pattern! |
Materials
|
Just a really simple striped crochet tee - but I love this top - my weakness for anything seaside related and in these lovely summer colours. Can't you feel that light summer breeze and hear the water softly lapping against the side of your yacht?
Instructions. Instructions for 4 sizes are given between "/". BackUsing 3mm hook and white, make 120/124/128/132
chain, plus 1 ch to turn. From the 26th row, decrease 1 stitch - by missing the first and last
dc - at each end of every 12th row 7 times. Continue until work measures 17 inches. Shape armholes: When work measures 21½ inches, increase 1 stitch at each end of the next row, then increase again when work measure 22¾ inches. When work measure 23½/24/24/24¼ inches, shape shoulder by decreasing at each end of every row as follows: (the first decrease should be on the second row of the blue colour) Decrease 4 dc at each end of the next 1/1/1/3
rows. This leaves 17/17/18/19 dc. Fasten Off. FrontWork as for the Back until work measures 21/21/21¼/21¼
inches, after completing 2 rows in blue colour. Shape the neck by leaving
the centre 16/18/18/18
dc unworked. Work on one side only, and decrease at the neck edge: When work measures 21½ inches and 22¾, increase 1 dc at the
armhole edge as you did on the Back. When work measures 23½/24/24/24¼ inches, on the second row of the blue colour, shape shoulder as for one side of the Back. Then work the other side of the neck to match, reversing all shapings. SleevesUsing 3mm hook and white, make 70/72/74/76 chain, plus 1 ch to turn, and work 6 rows in dc. The continue with striped dc beginning with the blue colour. When work measures 5¾/6/6/6¼ inches, shape armhole: Decrease 4 dc at each end of the next row. Work one row straight, then decrease 1 dc at each end of the next 4 rows. Fasten off. Front neck and shoulder borders:Using the white colour, with right side of front facing, work 17/17/18/19
sl st across one shoulder, then 58/61/61/61 sl st around neck, then 17/17/18/19 sl st across other shoulder. Crochet straight on the next 2 rows, then on the 4th row, work 13/13/14/15
dc, * 2 dc into next stitch, 1 dc,
repeat from * 3 times more, (again
easing round the corner). Work in the same way on the corner at the other
side. Back neck and shoulder borders:Using the white colour, with right side of front facing, work 1 row in sl st over each dc. Making UpCross front shoulder borders over back. |
MaterialsCotton yarn equivalent to 3 or 4ply yarn weight.
3mm crochet hook Tension23½ dc and 28 rows to 4 inches using 3mm hook Size matters10 / 12 / 14
/ 16 Approximate actual measurement: 36/38/40/42 inches. Crochet abbreviations:ch: chain Remember these are English crochet instructions where dc is equivalent to US single crochet - see "Terminology" in the side bar. A Word on the WoolThe original yarn is not one with which I am familiar and I can find no external references to it. Hence I have little idea of the thickness or yardage. Making some assumptions, based on the description, tension, and the other crochet tops, it should be a cotton blend, probably a 4 ply equivalent, with possibly around 130m to 50g. Needless to say - check the tension with a swatch, and don't skimp when purchasing the yarn. Disclaimer
|

A cute seasonal sleeveless sweater.
Co-incidentally I see that Wardrobe Icons have featured "knitted vests" as an "unexpected hero" this week, having "fallen in love with how versatile it is as a layering piece". They illustrate it with 3 shapes including fair-isle patterns with a closer fit and plain with a relaxed fit.
You could replace the Nordic style pattern given here with any fair-isle pattern of your choosing, just repeating it across the width of the sweater, making sure to centre the pattern - for example the Shetland Folklore pattern which is worked over a 10 stitch repeat.
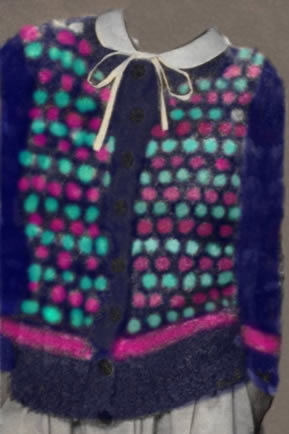
I have a "relaxed fit" example in polka dots, which could easily be knitted plain.
Instructions Note: When working the colour pattern from the chart, strand
the yarns loosely across the back of the work over not more than 3 stitches
at a time, to keep the fabric elastic. BackWith No 12 (2¾mm) needles and main shade (MS), cast on 106 [114, 120, 128] stitches and work in K1/P1 for 2½ inches, ending with a right side row. Next row: Rib 1 [5,
4, 4] *
m1, rib 4; repeat from * to last 1
[5, 4,
4] stitches, m1, rib 1 [5,
4, 4]. Change to No 10 (3¼mm) needles and work in pattern from the chart, joining in and breaking off colours as required, working the first 4 [1, 5, 3] and last 3 [0, 4, 2] stitches on knit rows, and the first 3 [0, 4, 2], and the last 4 [1, 5, 3] stitches on purl row as indicated, and working the 14 stitch repeat pattern 9 [10, 19, 11] times across in between. Continue until back measures 14½ inches, ending with a wrong side row. ** Shape Armholes: Work without further shaping until back measures 22½ [23, 23, 23½] inches, ending with a wrong side row. Shape Shoulders: Leave stitches on a spare needle or stitch holder. FrontWork as for Back up to **. Shape Armholes and Neck: Next row: keeping pattern correct, cast off 6 stitches, and pattern until 60 [64, 68, 73] stitches are on the right hand needle; turn and leave remaining stitches on a spare needle or stitch holder. Continue on first set of stitches only. Decrease 1 stitch at the armhole edge on the next 9 [11, 11, 15] rows, and then on every alternate row, at the same time, decrease 1 stitches at the neck edge on the next row, and every alternate row until 38 [39, 41, 42] stitches remain. Then continue to decrease 1 stitch at the neck edge only on every alternate row until 32 [34, 37, 39] stitches remain. Then decrease 1 stitch at the neck edge only on every following 3rd row until 25 [26, 28, 29] stitches remain. Work without further shaping until front matches back to start of shoulder shaping, ending with a wrong side row. Shape Shoulder: Work one row, and then cast off. With right side facing, slip centre stitch on to a safety pin, and rejoin yarn to the remaining 66 [70, 74, 79], and pattern to end. Work to match the first side, reversing the shaping. Making UpPress lightly using a cool iron and dry cloth - or as instructed on the ball band - omitting the ribbing. Join right shoulder seam. Neckband: With right side facing, No 12 needles and MS, pick up
and knit 72 [76, 78,
82], stitches down left neck, knit stitch from safety pin (mark
this stitch with a coloured thread), pick up and knit 72 [76,
78, 82], stitches up right neck, then
knit 45 [47, 49,
51] stitches from Back, decreasing 3 stitches evenly. 1st row wrong side facing): * p1, k1; repeat from * to last 2 stitches before the marked stitch, p2tog, p1, p2togtbl; ** k1, p1; repeat from ** to end. 2nd row: k1, * k1, p1; repeat from * to last 2 stitches before the marked stitch, p2tog, p1, p2togtbl, k1; ** p1, k1; repeat from ** to end. Repeat the last 2 rows 3 times more, then the 1st row again. Armhole Borders: With right side facing, No 12 needles and MS, pick up and knit 118 [124, 132, 138], stitches round each armhole. Work in k1/p1 rib for 9 rows. Join side seams and armhole borders. |
Materials2 x 50g balls 4 ply in each of the three colours (all sizes). Pair each No 12 (2¾mm), and No 10 (3¼mm) needles. Tension32 stitches x 32 rows to 4 ins (10cm) measured over pattern using 2¾mm needles. Size mattersTo fit chest 32 [34, 36,
38] inches; Abbreviationsk2tog or p2tog: knit or purl 2 stitches together (decrease one stitch). m1: make 1 stitch by picking up horizontal p2togtbl: purl 2 stitches together through back loops. A word on the woolThe original design was in Patons Clansman 4ply. Disclaimer
|
 |
|
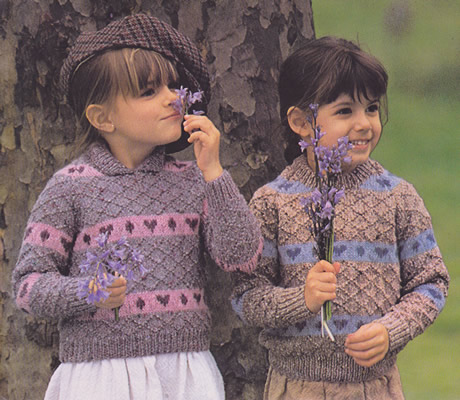
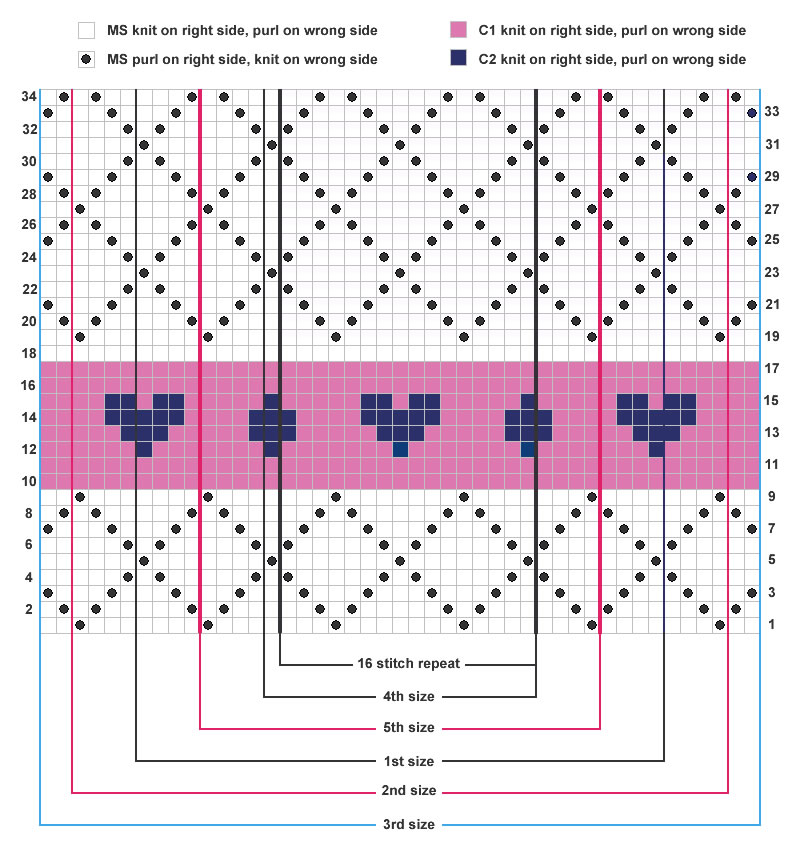
Hearts and flowers in the bluebell season.
Instructions for Crew Neck Version.Instructions for 5 sizes - larger sizes are shown in brackets. ChartsWhen working the colour pattern from the chart, strand yarn not in use
loosely across the wrong side of the work over not more than 3 stitches
at a time in order to keep the fabric elastic. The chart is included with the pattern instructions below, but for a larger version of the chart you can right click >>here<< and choose "save link as" or "save target as" (browser dependent options) to download and save a pdf file. If you want to view chart image full size in the browser then right click on the image below and choose "view image". BackWith No 10 (3¼mm) needles and MS, cast on 61 [65, 71, 77, 81] stitches and work in rib as follows: 1st row (right side): k1, *
p1, k1; repeat from * to end. Repeat these 2 row for 5cm ending with a a first row (wrong side facing
Next row: Rib 8 [4, 8, 10, 5] m1; (rib 15 [8, 11, 19, 10], m1) 3 [7, 5, 3, 7] times, rib to end. (65 [73, 77, 81, 89] sts). Change to No 8 (4mm) needles and work 34 rows in pattern from the chart, working the first and last 8 [12, 14, 0, 4] stitches of each row as indicated for each size, and working the 16 stitch repeat pattern in between.
After completing the first 34 rows, work a further 6 [18, 26, 38, 40] rows in the pattern thus ending with a 6th [18th, 26th, 4th, 6th] pattern row. Keeping the continuity of the pattern, shape raglans by casting off 4 stitches at the beginning of the next 2 rows. 3rd, 4th and 5th
sizes: All sizes: Leave remaining stitches on a spare needle or stitch holder. FrontWork as for Back until 37 [43, 45, 47, 49] stitches remain in raglan shaping, ending with right side facing for next row. Keeping continuity of pattern, divide for neck as follows: Continue on these 12 [14, 15, 15, 16] stitches for the first side, decreasing 1 stitch at the neck edge on every row, and at the same time decreasing 1 stitch at the raglan edge on every alternate row until 6 [8, 8, 8, 7] stitches remain. Work 1 [1, 0,
0, 1] rows. With right side facing, slip centre 11 [13, 13, 15, 15] stitches on a length of yarn or stitch holder, rejoin yarn to remaining stitches, pattern to the last 2 stitches, k2tog. Work to match first side, reversing shapings. SleevesWith No 10 (3¼mm) needles and MS, cast on 31 [31, 39, 39, 39] stitches and work in rib as on back for 5 [5, 6, 6, 6] cm, ending with a 1st row and wrong side facing for next row. Next row: Rib 8 [8, 10, 10, 10] m1; rib 15 [15, 19, 19, 19], m1; rib to end. (33 [33, 41, 41, 41] sts). Change to No 8 (4mm) needles and joining in and breaking off colours as required, and starting with a 19th row, work in pattern as for 1st [1st, 2nd, 2nd, 2nd] size of the Back at the same time shaping sides by increasing 1 stitch at each end of the 3rd [7th, 3rd, 7th, 3rd] and every following 6th [7th, 12th, 14th, 12th] row until there are 49 [49, 53, 53, 57] stitches, taking the increase stitches into the pattern. |
Materials50g balls DK in 3 colours: main shade (MS) plus 2 contrasts: Pair each No 7 (4½mm), No 8 (4mm), and No 10 (3¼mm) needles. Tension23 stitches x 30 rows to 4 ins (10cm) in stocking stitch on No 8 (4mm) needles. Size mattersTo fit chest 22 [24, 26,
28, 30] inches, (56 [61,
66, 71,
76]cm) actual measurement allows 1-2 inches
of ease; Abbreviationsk2tog or p2tog: knit or purl 2 stitches together (decrease one stitch). stocking stitch: one row knit and one row purl, ("stockinette"). m1: make 1 stitch by picking up horizontal sl1: slip one stitch by passing it between the needles without knitting it. A word on the woolThe original yarn was Patons Moorland Tweed/Shetland double knitting. Moorland was 100% wool with a suggested yardage of 137 yds (125m) - although this was not printed on the ball bands at that time. A similar substitute might be Rowan Felted Tweed DK. "Always check your tension" [Good Advice]. Disclaimer
|
|
Continue in pattern until sleeve seam measures: 9½ [11, 12, 14, 15½] inches, (24 [28, 31, 35, 39] cm), ending with the same pattern row as on the Back at the start of the raglan shaping, thus ending with right side facing for next row. Keeping the continuity of the pattern, shape raglans by casting off 4 stitches at the beginning of the next 2 rows. 2nd, 3rd,
4th, and 5th
sizes: All sizes: Leave remaining stitches on a safety pin. Making Up and instructions for crew neckWith wrong side of work facing, block each piece by pinning out round
edges, and omitting ribbing, press parts lightly on wrong side following
instructions (if any) on the ball band. Make Neck Border: Starting with a 2nd row, work in rib as for the Back for 5 [5,
6, 6, 6] cm.
Join remaining raglan and Crew Neck seam. Making Up and instructions for collarWork as for Crew Neck Version but casting off stitches loosely at back of neck, front of neck, and top of sleeves. With wrong side of work facing, block each piece by pinning out round
edges, and omitting ribbing, press parts lightly on wrong side following
instructions (if any) on the ball band. Make collar: 1st row (right side): k2, *
p1, k1; repeat from * to last stitch,
k1. Repeat the last 2 rows once more then the 1st row again. Continue thus until the 2 rows "sl1, rib to last 16 stitches, turn"
have been worked. Continue in rib across all stitches until Collar measures 3cm at the side edge. Using a No 8 (4mm) needle, cast off evenly in rib. Press seams. |
|
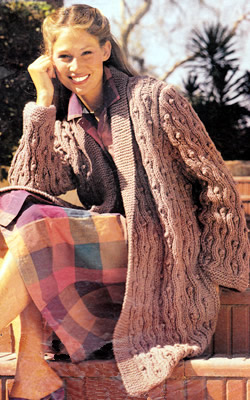
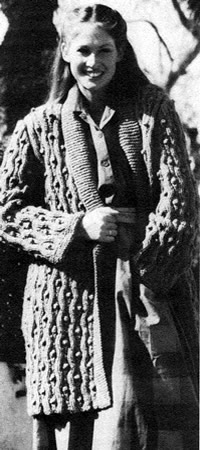
Splendidly cosy knee-length wrap in Irish Knot stitch with garter stitch borders forming a soft shawl collar.
Instructions.Figures in brackets refer to larger sizes; where only one figure is given, this refers to all sizes. Make knot (MK) in pattern as follows: BackWith No 9 needles cast on 98 [104
: 110: 116 : 122]
stitches. With No 3, (6½ mm), needles, cast on 18 stitches and Change to No 2 (7 mm) needles and work in pattern as follows: 1st row (wrong side facing): k9 [6
: 8 : 10 : 7];
* p2, k1, p1, k1, p2, k7; repeat
from * to
last 16 [13 : 15
: 17 : 14] stitches; p2, k1, p1, k1,
p2, k9 [6 : 8
: 10 : 7]. These 12 rows form the pattern. Continue in pattern until Back measures 10 inches (25 cm), ending with right side facing for next row. Change to No 3, (6½ mm), needles, and keeping continuity of pattern, work
Pocket Linings as follows: Repeat the last 2 rows 13 times more, then the first of these 2 rows again, thus ending with right side facing for next row. Next row: Cast off 18 stitches, pattern to last 18 stitches, cast off remaining stitches. Break yarn. With wrong side facing, rejoin yarn to remaining stitches and continue in pattern until Back measures 21½ inches (55 cm). Change to No 4 (6 mm) needles and continue in pattern until Back measures 26½ inches (67 cm), ending with right side facing for next row. Keeping continuity of pattern, shape armholes, by casting off
5 stitches at the beginning of the next 2 rows, then decrease 1 stitch
at each end of the next 5 [7 : 7
: 7 : 9] rows. Now decrease 1 stitch at each end of the next and every alternate Shape shoulders by casting off 7 stitches at the beginning of
the next 4 rows, then 6 [6 : 7
: 8 : 8] stitches at the beginning
of the Left frontWith No 3, (6½ mm), needles, cast on 55 [61
: 63 : 65 : 67]
stitches. These 12 rows form the pattern. Continue in pattern until Front measures 10 inches (25 cm), ending with right side facing for next row. Change to No 3, (6½ mm), needles and keeping continuity of pattern,
shape for Pocket Border as follows: Next row: Cast on 5 stitches, pattern across these stitches, pattern to end. (55 [61, 63, 65, 67] sts). Continue in pattern until 32 rows less than on Back have been worked before start of armhole shaping, ending with right side facing for next row. Keeping continuity of pattern, shape front slope as follows: 1st size: Decrease 1 stitch at the end of the next row, and then at the same edge on every following 3rd row until 44 stitches remain, noting that when Front measures 21½ inches (55 cm), change to No 4 (6 mm) needles. 2nd, 3rd, 4th and 5th sizes: Decrease
1 stitch at the end of the next, and every following alternate row until
- [54, 54,
56, 60] stitches remain, then decrease
1 stitch at the front edge All sizes: Work 1 row, thus ending with right side facing for next row. Shape armhole by casting off 5 stitches at the beginning of the next row. Next row: Work 2tog, pattern to end. Decrease 1 stitch at armhole edge on next 5 [7 : 7 : 7 : 9] rows, then on he following 2 [3 : 3 : 3 : 4] alternate rows, and at the same time decrease 1 stitch at the front edge on every 3rd row from previous decrease until 28 [28 : 29 : 31 : 31] stitches remain. Continue decreasing 1 stitch at the front edge only on every 3rd row
from previous decrease until 20 [20
: 21 : 22 : 22]
stitches remain. Shape shoulder by casting off 7 stitches at the beginning of the
next and following alternate row. Right frontWith No 3, (6½ mm), needles, cast on 5 stitches and leave on a spare
needle. With No 3, (6½ mm), needles, cast on 55 [61
: 63 : 65 : 67]
stitches. These 12 rows form the pattern. Continue in pattern until Front measures 10 inches (25 cm), ending with right side facing for next row. Change to No 3, (6½ mm), needles and keeping continuity of pattern,
shape for Pocket Border as follows: With wrong side facing, rejoin yarn and work 29 rows in pattern. Continue in pattern and complete to correspond with the Left Front, reversing shapings and changing needles as required. SleevesWith No 4 (6 mm) needles, cast on 53 [53,
57, 61, 61]
stitches, and work 7 rows garter stitch (every row: sl1k, knit to end).
Now work in pattern as follows: 1st row (wrong side facing),: k6
[6, 8,
10, 10]; *
p2, k1, p1, k1, p2, k7; repeat from *
to last 13 [13, 15,
17, 17] stitches, p2, k1, p1, k1,
p2, K6 [6, 8,
10, 10]. These 12 rows form the pattern. Continue in pattern, shaping sides by increasing 1 stitch at each
end of the next and every following 18th [14th,
18th, 18th, 12th]
row until there are 69 [71, 73,
77, 81] stitches, taking increase
stitches into the pattern. Shape top by casting off 5 stitches at the beginning of the next
2 Now decrease as before at each end of every row until 21 stitches remain. To Make UpPress parts lightly on wrong side following instructions (if any) on
the ball band. Pocket Borders: With right side facing and No 4 (6 mm) needles,
knit up 23 stitches evenly along side edge of front between cast-off and
cast-on stitches. Join sleeve seams; insert sleeves. Left Front Border and Collar: Shape Collar by increasing 1 stitch at the beginning of the next
and every following 6th row until there are 21 stitches. Right Front Border and Collar: |
Materials
|
|
|
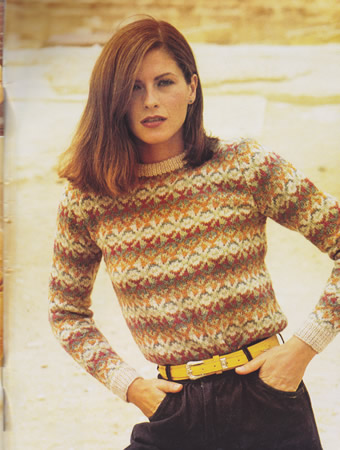
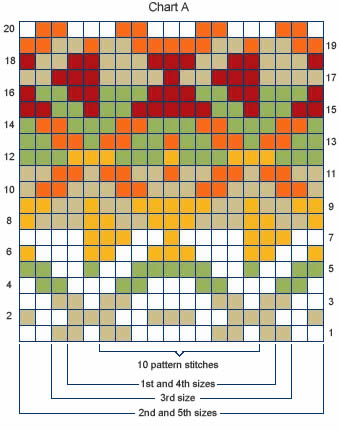
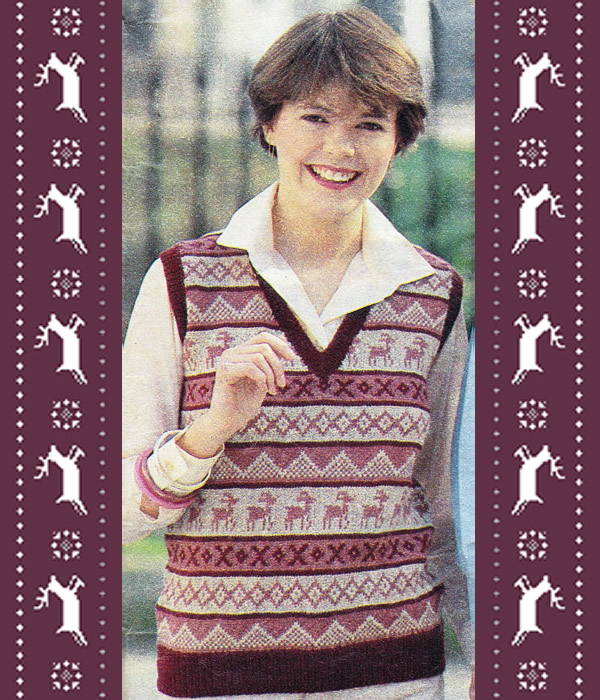
Lovely heathery shetland yarn sweater in a double knitting weight yarn. This is an example of early eighties "folklore style" but retaining classic shaping. [You can see the late seventies / eighties styling in the photo with the sweater worn tucked into pleated/gathered trousers].
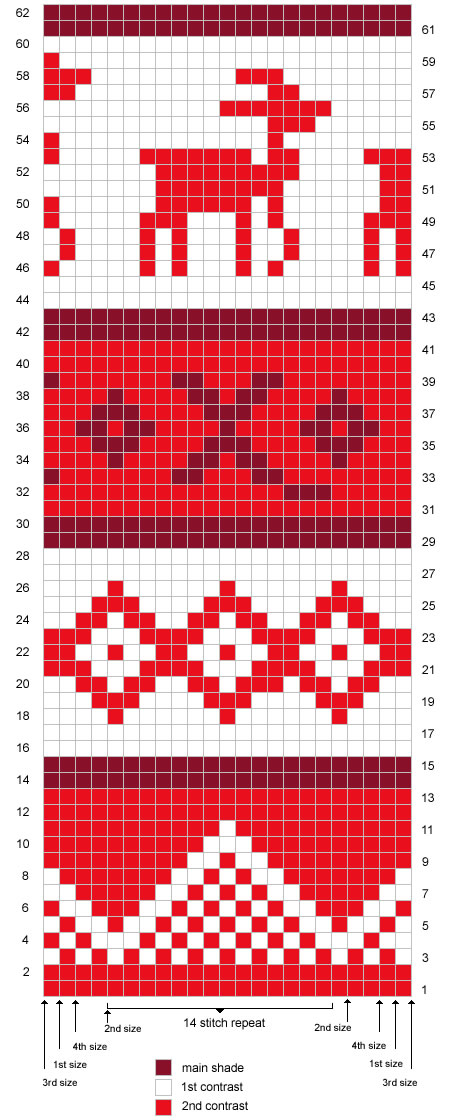
Instructions.Instructions for larger sizes are given in brackets. When working the colour pattern from the chart, strand yarn not in use
loosely across the wrong side of the work over not more than 3 stitches
at a time in order to keep the fabric elastic. Back‡‡ Next row: Rib 8 [9, 9, 11, 11] m1; (rib 18 [19, 20, 21, 22], m1) 5 times, rib to end. (113 [119, 125, 133, 139] sts). Change to No 8 (4mm) needles and joining in and breaking off colours
as required, work in pattern from chart A, repeating the 10 pattern stitches
11 [11, 12,
13, 13] times across, and working
the first
Keeping the continuity of the pattern, shape armholes, by casting
off 3 stitches at the beginning of the next 2 rows. Decrease 1 stitch
at each end of the next 5 rows, then on every alternate row until 89 [95,
101, 107, 113]
stitches remain. Work straight in pattern until Back measures 22½ [23,
23½, 23½, 24]
inches, (57 [58, 60,
60, 61]cm), ending with right side
Shape shoulders by casting off 9 [9,
10, 11, 11]
stitches at the beginning of the next 4 rows, then 8 [10,
10, 10, 12]
stitches at the beginning of the following 2 rows. FrontWork as for Back from ‡‡ to ‡‡. Work straight in pattern until 14 [14,
14, 16, 16]
rows fewer than on Back have been worked before start of shoulder shaping,
thus ending Keeping the continuity of the pattern, shape neck as follows: Continue on these 35 [37, 39,
41, 43] stitches for the first side,
decreasing 1 stitch at the neck edge on the next 9 rows. Work 4 [4, 4, 6, 6] rows. Shape shoulder by casting off 9 [9,
10, 11, 11]
stitches at the beginning of the next and following alternate row. With right side facing, slip centre 17 [19, 21, 23, 25] stitches on a length of yarn, or stitch holder, and rejoin appropriate colour to remaining stitches: k2tog, pattern to end. Complete to correspond with first side, reversing shapings. SleevesWith No 10 (3¼mm) needles and MS, cast on 49 [51,
53, 55, 57]
stitches and work in k1/p1 rib for 2 inches, (5cm), rows on right side
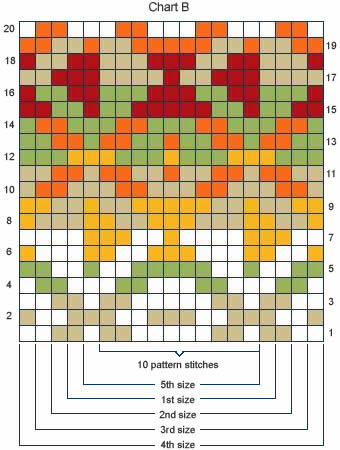
having a k1 at each end, and ending with wrong side facing for next Next row: Rib 6 [6, 7, 6, 7] m1; (rib 12 [13, 13, 14, 14], m1) 3 times; rib to end. (53 [55, 57, 59, 61] sts). Change to No 8 (4mm) needles and joining in and breaking off colours as required, work in pattern from chart B repeating the 10 pattern stitches 5 [5, 5, 5, 6] times across, and working first 1 [2, 3, 4, 0] stitches, and last 2 [3, 4, 5, 1] stitches on knit rows, and first 2 [3, 4, 5, 1] stitches and last 1 [2, 3, 4, 0] stitches on purl rows as indicated, shaping sides by increasing 1 stitch at each end of the 13th and every following 7th [7th, 7th, 7th, 6th] row until there are 75 [77, 81, 83, 87] stitches, taking the increased stitches into the pattern.
Work straight until sleeve seam measures approximately 17½ inches, (44cm), ending with the same pattern row as on Back before the start of the armhole shaping, thus ending with right side facing for next row. Keeping the continuity of the pattern, shape top by casting off
3 stitches at the beginning of the next 2 rows. Now decrease 1 stitch at each end of every row until 27 stitches remain. Cast off. Making UpOmitting ribbing, press parts lightly on wrong side following instructions (if any) on the ball band. Join right shoulder seam. Work in k1/p1 rib for 2 inches, (5cm). Join left shoulder seam and Neck Border. |
Materials50g balls Shetland DK in 6 colours: main shade plus 5 contrasts: Pair each No 8 (4mm) and No 10 (3¼mm) needles. Tension23 stitches x 30 rows to 4 ins (10cm) in stocking stitch on No 8 (4mm) needles. Size mattersTo fit chest 32 [34, 36,
38, 40] inches, (81 [86,
91, 97,
102]cm); Abbreviationsk2tog or p2tog: knit or purl 2 stitches together (decrease one
stitch). A word on the woolThe original design was in Patons Fiona - a yarn I was very fond of both in quality and rich colour range. It was a standard DK; some information given on the web implies it was slightly thicker than that but the tension given here suggests slightly thinner! In the 1970s it was sold in 50g balls: 175 yds/160m meters); 51% wool, 49% acrylic. In my opinion a similar substitute would be Rowan Felted Tweed DK. "Always check your tension" [Good Advice]. Disclaimer
|
This is an adorable romper; the stripes are created by knitting garter stitch ridges sideways using contrast yarn. Pom-pom ties are used as fasteners at the shoulders.
After last months picture of the Andy Pandy puppet, how could I resist making this outfit.
InstructionsThe romper is easy to knit, though - like exam questions - make sure you read the pattern and understand the pictures of the pieces clearly before you start. Pattern stitchesGarter Stitch: every row knitted. Trouser legsThis section is worked sideways in one piece up to the armhole. Dotted lines in picture show the centre sides and the ankle borders. 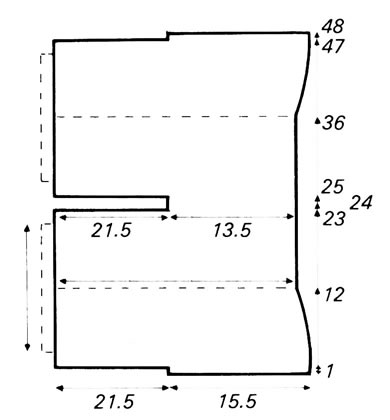
Using 3mm needles and white yarn (A) , cast on 34 sts and knit 3 rows of striped pattern. Next row (wrong side) : Cast on 47 sts and purl across these and to end of row. [81 sts] Continue in striped pattern, shaping waist by decreasing 1 stitch at the beginning of the 9th and every following 10th row until 77 sts remain. Work straight until leg measures 23cm (9 inches) from the beginning,
ending with wrong side facing.
Next row (wrong side) : Cast off 47 sts and purl to end of row. [30 sts] Work straight on these 30 sts for 2 cm (¾ inch) ending with wrong
side facing.
Next row (wrong side) : Cast on 47 sts and purl across these and to end of row. [77 sts] Work straight until section measures 36 cms (14¼ inches) from the
beginning, ending with right side facing. Start shaping the waist again by increasing 1 stitch at the beginning
of the next and every following 10th row until there are 81 sts.
Work straight until section measures 47 cms (18½ inches) from the
beginning, ending with wrong side facing. Next row (wrong side) : Cast off 47 sts and purl to end of row. [34 sts] Work 2 rows stocking stitch in white (A). Ankle BordersWith 2½mm needles and white yarn A, knit up 70 sts along lower edge of leg. Next row: K1; (k2tog) 34 times; k1. [36 sts] Now work in garter stitch for 2 cm (¾ inch). Left FrontWith 3mm needles and white yarn A throughout, cast on 53 sts and work 1 cm (½ inch) in garter stitch. Next row (right side): Knit. Next row: K4, SL 1, k2tog, psso,
knit to the last 6 sts; k2tog, k4. Repeat these last 4 rows until 11 sts remain. Next row: K3, SL 1, k2tog, psso,
k3tog, k2. [7 sts] Cast off. 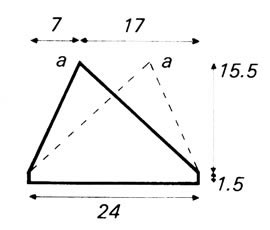 Right BackWork as for Left front. Right FrontWith 3mm needles and white yarn A throughout, cast on 53 sts and work 1 cm (½ inch) in garter stitch. Next row (right side): Knit. Next row: K4, SL 1, k1, psso, knit
to the last 7 sts; k3tog, k4. Rep these last 4 rows until 11 sts remain. Next row: K2, SL 1, k2tog, psso,
k3tog, k3. [7 sts] Cast off. Left BackWork as for Right front. Making UpJoin centre back seam and leg seams. Placing left front over right front and right back over left back, sew
bodice pieces to trousers. Make twisted cords and small pom-poms, and attach to shoulders for fastenings.
|
Materials
|
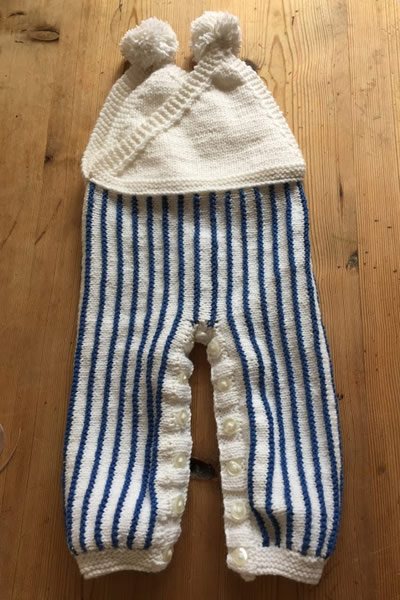
I think it is very awkward to put a small baby into trousers in the conventional way. Many of these vintage baby patterns from the 1980s have leg openings which I think are much more practical, so I adapted this pattern. I chose buttons but you can apply press studs if you think that is safer.
Instead of sewing the inside leg seams I picked up 111 stitches all around each side and knitted a few rows in 3 x 3 rib, working as follows:
Row 1: K3, *P3, K3; repeat from * to end of row.
Row 2: P3, *K3, P3; repeat from * to end of row.
Repeat these last 2 rows once and cast off in rib
For the other side I inserted a button hole row:
Work rows 1 and 2 in rib as before.
Next (buttonhole) row:
K3, (P1, yrn, P2tog), K3, P3; (K1, yfwd, K2tog);*
P3, K3, (P1, yrn, P2tog), K3, P3; (K1, yfwd, K2tog);
repeat from * once, (6 buttonholes worked), then,
P3, (K1, yfwd, K2tog), P3, (centre buttonhole worked), then,
(K1, yfwd, K2tog), P3, K3, (P1, yrn, P2tog), *
K3, P3, (K1, yfwd, K2tog), P3, K3, (P1, yrn, P2tog);
repeat from * once, K3.
Work row 2 again, then row one, and cast off in rib.
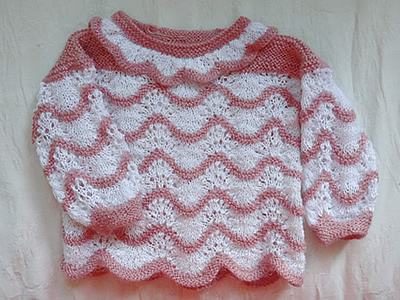
A really pretty top using the ubiquitous but nonetheless charming old shale (or old shell) stitch. Originally it was knitted in fine white cotton bands interspersed with a fine slightly fluffy yarn, giving it a summery feel. However - how charming it would be in red and white for a small person's party outfit at Christmas. I am not sure how I would arrange the colours for a winter version - I favour the dominant red colour for the plain garter stitch - but it might be interesting to have the white as the fluffy bands simulating fur trimming.
The pattern is for an entire outfit with pants, and some cute little cotton sandals (of dubious value...!).
Below we have simply lovely photo from Sandy in Shellharbour, Australia, showing the complete outfit. She has added a of a little pair of bootees of her own design rather than the "sandals" supplied in the pattern.
Such a pretty colour!
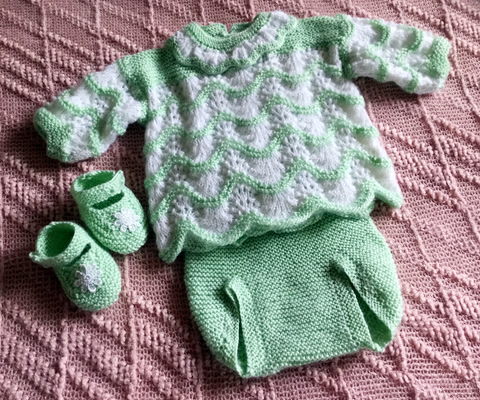
Instructions for Angel TopThe angel top is worked in a combination garter stitch (every row knitted) and a Wave pattern using "old shale" (or shell) stitch. When working the Wave pattern, carry the yarn not in use loosely up the side of the work. Angel Top - main sectionThis section is worked in one piece up to the armhole.
Using 3mm needles and pink yarn (A) , cast on 192 sts and knit one row. Continuing with yarn A begin Wave pattern as follows: 1st row (right side) : Knit. Join in white yarn (B), working 5th - 14th rows in white: 5th row: Sl 1; *
(k2tog) 3 times; (k1, yfwd) 6 times; k1; (k2tog) 3 times; repeat from
* to last stitch; k1. These 14 rows form the pattern, Repeat the pattern 3 (4) times more,
then work the 1st to 3rd rows again. Divide for armhole: Next row (wrong side): K57, increase in the next 2 sts, k74, increase in the next st, and leave these 137 sts on a stitch holder; increase in the next st, knit to end. Continue on these remaining 59 sts to make the Left Back. Work rows 5-14, break yarn B and continue in yarn A only. Next row: Knit Continue in garter stitch with yarn A until work measures 24 (27½) cm, or 9½ (10¾) inches, ending with a right side row. Cast off, placing a marker for the collar on the 26th stitch from the end. With right side facing, rejoin white yarn B to sts on stitch holder and pattern 78 (as 5th row of Wave pattern); turn and leave remaining sts on stitch holder. Continue in pattern on these 78 sts for Front and work rows 6-14. Next row: Knit Continue in garter stitch with yarn A until work measures 20 (23½) cm, or 7¾ (9¼) inches, ending with a right side row. Shape Neck: Next row (wrong side): K27 and leave on a stitch holder; cast off 6 sts; knit to end. Continue on remaining 27 sts for first side: 1st and every alternate row: Knit 2nd row (wrong side): cast off 3
sts, knit to end. Work a few rows on remaining 19 sts until Front matches Left Back to
shoulder.
With right side facing, rejoin white to 59 sts on stitch holder and pattern
59 (as 5th row of Wave pattern). Angel Top - sleevesWith 2½mm needles and yarn A, cast on 30 sts and work 10 rows in
garter stitch. Change to 3mm needles, join in white yarn B and beginning with 5th row of the Wave pattern, work in pattern until sleeve measures approximately 11 (14½) cm, or 4¼ (5¾) inches, ending with a 14th pattern row. Break off yarn B and continue in yarn A only. 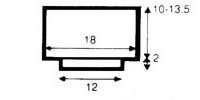 Angel Top - collarWith 3mm needles and yarn A, cast on 120 sts and work 3 rows in garter
stitch. 1st row: Sl 1 , *
k1, yfwd, k4, k2tog, sl 1, k1, psso, K4, yfwd; repeat from *
to last 2 sts, k2. Rep these 2 rows twice more. 7th row: Sl 1 , *
k1, k2tog, k3, k2tog, k3, sl 1, k1, psso; rep from * to last 2 sts, k2.
[93 sts] Angel Top - neck bandWith 3mm needles and yarn A, cast on 60 sts and work 6 rows in garter
stitch. Making Up the Angel TopDo not press. |
Materials
|
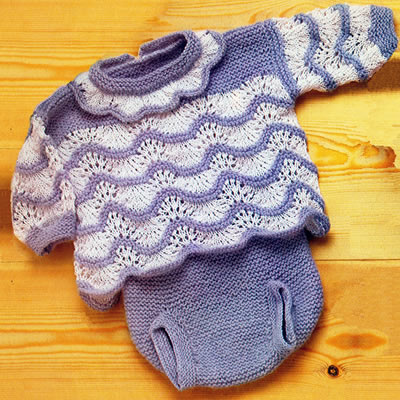
Instructions for PantsThe pants are worked entirely in garter stitch (every row knitted) in one piece, starting at the front waist, working down to the crotch, and then up the back, ending at the back waist. 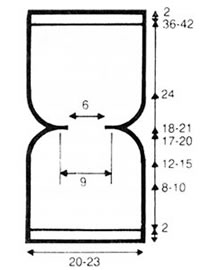 Begin at front and with 2½mm needles cast on 48(56)
sts and work 2cms, or ¾ inch, in k1/p1 rib. Divide for leg openings:Next row: Knit 13(17) and leave on a stitch holder; k22, turn, and leave remaining 13 (17) sts on a stitch holder. Continue on these centre 22 sts and work 9(10)
cms 3½(3¾) inches in garter
stitch,ending with a right side row. With wrong side facing, rejoin yarn to sts on first stitch holder and
knit to end. ** Begin shaping side by decreasing
1 st at the beginning of the next and following 6th(4th)
row. Decrease 1 st at the beginning of the next and following 4th row 2(1)
times. [8(13) sts] Decrease 1 st at the beginning of the next and following 1(2)
alternate rows. [6(10) sts] Cast off 2 sts at the beginning of the next and following 0(1)
alternate rows. [4(6) sts] With right side facing, rejoin yarn to sts on 2nd stitch holder and knit
to end. [13(17) sts] Shape Front SidesWorking right side of pants as left side from ** until 6(8) sts remain, ending at side edge. Continue shaping sides and join all 3 parts to close leg openings: Next row (wrong side): cast off 2
sts, k4(6) (including st left on needle
after cast-off), k22 from centre, then k4(6)
from left side. [30(34) sts] Next 2 rows: Cast off 2 sts, knit
to end. Shape Back2nd SIZE BOTH SIZES 1st SIZE BOTH SIZES Cast off in rib. Making Up the PantsLeg Borders: With right side facing and using set of 4 needles, knit up 46(51) sts round each leg opening and work in rounds. 1st round: Purl Join side seams. |
Materials
|
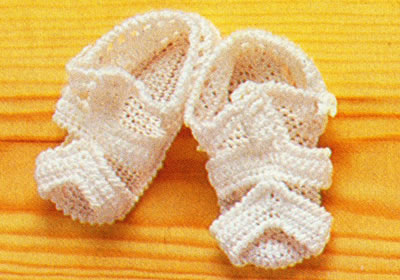
Instructions for SandalsWith 2mm hook make 20 chain foundation row. SOLE1st round: 1 dc in 2nd ch from hook, 1 dc in each of next 17ch, 3 dc in next ch, then back along other side of foundation: 1 ch: 1 dc in each of next 18 ch, 3 dc in next ch, sl st to join. Work 2 more rounds, working 3 dc in stitch at each end of sole as before. 4th round: 1 ch; (1 dc in each of next 19 sts, 3 dc in next st, 1 dc in each of 3 end sts, 3 dc in next st, 1 dc in next st) twice; sl st to join. 5th round: 1 ch; (1 dc in each of next 20 sts, 3 dc in next st, 1 dc in each of 5 end sts, 3 dc in next st, 1 dc in each of next 2 sts) twice; sl st to join. [66 sts] Work 1 round dc on these 66 sts to complete sole and fasten off. With right side facing, mark 33 sts round one end of sole and work back of sandal working back and forth in rows: 1st row: Rejoin yarn. 3 ch; miss
1 st; 1 tr in next st; (1 ch, miss 1 st, 1 tr in next st) 15 times, turn.
Fasten Off. Crab StitchCrab stitch is worked exactly as you do double crochet - but from right to left instead of left to right (assuming you are right handed and normally crochet from left to right). It seems very awkward but just force yourself to do it; push the hook through the stitch to the right of your needle, pull through a loop, then yoh and pull through both loops on hook. It creates a very attractive twisted ribbed edge. There a is you tube extract inserted at end of this item - or go search the web for "crab stitch" for a variety of explanations. TOEMake 18 ch. STRAPS for TOP of SANDALMake 26 ch and work Foundation Row as for Toe. [25 sts] 2nd and 3rd rows: 1 ch, 1 dc in each
stitch to end. Miss 11 sts and rejoin yarn to next stitch 1 ch, 1 dc in each of next 2 stitches. [3 sts] Work 3cms (1¼ inches) in dc on these 3 sts, then continue in crab
stitch round all edges, making a buttonhole at each side of 3 dc strip,
To Make a Buttonhole2 ch, miss 2 rows, 1 dc in next row. ANKLE STRAPMake 17 ch. TO MAKE UPSew Toe and Sandal Straps in place on sole, (see photo). |
Materials
|
* not used in this pattern.
Here is a You Tube item showing how to do crab stitch - a picture painting a thousand words and so on.
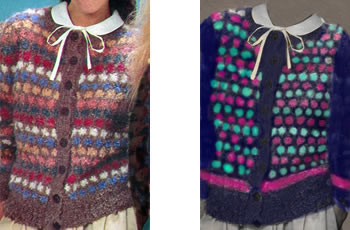
I am very keen on this clever slip stitch method of making a honeycomb pattern. This cardigan is from the 1980s knitted in a bouclé chunky yarn. I thought it makes a good option if (as I do) you love a design in the latest Rowan magazine (56), but want something quicker and easier to knit. I have mocked up a colour scheme to show what it might look like, using 2 contrast spots instead of 6, making the sleeves plain and adding coloured bands; you could also make bracelet length sleeves (also a favourite of mine) but maybe less appropriate in a chunky weight cardigan.
One benefit of the design as it stands is that you could potentially use up left over yarn in the contrast spots - you could even have every set of spotted rows a different colour for a fun design.
Instructions.The pattern is given in 3 sizes; the smallest size first and the 2nd and third sizes in brackets. Where only one number is given it applies to all 3 sizes. BackWith Main (M) wool and No 8 (4mm) needles cast on 56 stitches. Work in k1/p1 rib for 7 cm, 2¾ ins, finishing with a right-side row. Next row: Rib 4 (8, 0), * increase in the next stitch, rib 3 (3, 4); repeat from * to last 0 (0, 4) stitches. For 3rd size increase in next stitch rib 3. [69 (73, 77) sts] Change to No 4 (6 mm) needles. With M, knit one row and purl one row.
Now work in pattern thus: 1st row: with 1st contrast, sl1,
* k3, sl1, repeat from * to end. 7th row: with 2nd contrast, k2, *
sl1, k3, repeat from * , ending last repeat with k2. 13th to 16th rows - with 3rd contrast
work as 1st to 4th rows. 19th to 22nd rows - with 4th contrast
work as 7th to 10th rows. 25th to 28th rows - with 5th contrast
work as 1st to 4th rows. 31st to 34th rows - with 6th contrast
work as 7th to 10th rows. These 36 rows form the pattern, and are repeated throughout. Note: you can carry yarns not in use loosely up the side of the work to avoid too many joins. Continue until work measures 37 cm, 14½ inches, from beginning, finishing with a wrong-side row. Shape Armholes: Keeping pattern correct, cast off 4 stitches at the beginning of the
next 2 rows. Then, decrease one stitch at the beginning of every row until
53 (57, 61)
stitches remain. Left frontWith 4mm needles and M, cast on 27 (31,
31) stitches. Work in k1/p1 Next row: * Rib 3 (4, 4), increase in the next stitch; repeat from * to last 3 (1, 1) stitches; rib 3 (1, 1). [33 (37, 37) sts] Change to No 4 (6 mm) needles. With M, knit one row and purl one row. Continue in pattern as for back and work straight until front is same
length as back to armhole, finishing at side edge, with same patt row.
Shape Armhole: Keeping pattern correct, cast off 4 stitches at the beginning of the
next row. Then, decrease one stitch at the same edge of the next 4 alternate
rows. [25 (29, 29)
sts] Continue without further shaping until work is same length as back to shoulder, finishing at armhole edge. Shape Shoulder: Work one row. Right frontWork as for left front, reversing shaping. Sleeves (both alike)With 4mm needles and M, cast on 32 stitches. Work in Next row: Work in rib, increasing in every 6th stitch. [37 sts] Change to 6mm needles. With M, knit one row and purl one row. Then beginning with the 1st pattern row, continue in main pattern as for the back, still increasing on every 8th row until there are 53 stitches, working new stitches into the pattern as soon as possible. Continue without further shaping until work measures 45cm, 17½ inches,
finishing with the same pattern row as on the back at armhole shaping. Shape Top: To Make UpDo not press. Neckband: With 4mm needles and M, pick up and knit 22 (23,
23) stitches up right neck, knit across stitches
from back increasing 2 stitches evenly, pick up and knit 22 (23,
23) stitches down left neck. [71 (73,
75) sts] Buttonband: With 4 mm needles and M, cast on 7 stitches. Work in rib as for neckband until band is long enough, when slightly stretched, to fit up left front. Cast off in rib. Mark positions for 8 buttons, the first and last to come about 1cm, Buttonhole band: Work as for buttonband, making buttonholes to match marked positions by casting off 3 centre stitches in one row and casting on 3 stitches in next row. Set in sleeves, gathering top edge slightly to fit into armholes. |
Materials
|
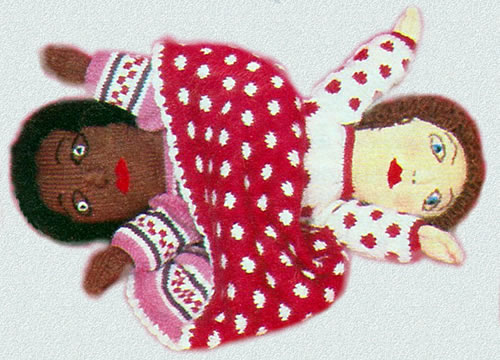
I have a mysterious fascination with this type of doll. I have even gone as far as cutting two moulded porcelain dolls at the soft slip stage and sticking them together to create my own porcelain version. I think that this must have all started by my seeing one in the Worthing Museum when I was a small child even though I cannot precisely recall it. As a child I am not sure I would have been so keen to play with such a doll - I liked realistic dolls rather than novelty items. However, it left a lasting impression on me, and here is knitted version for you to try.
Instructions.This design has two completely different dolls with different dresses - sometimes you even find Red Riding Hood and the Wolf in topsy-turvy form though I find that a bit horrific. However, I quite like the complete negative effect as I made for my bisque doll - one dress in white with red spots, and the other red with white spots - if that appealed then you could easily adapt this pattern by reversing the spot colour dress colours. Doll Body Back
|
Materials
|
My porcelain version of a topsy turvy doll.
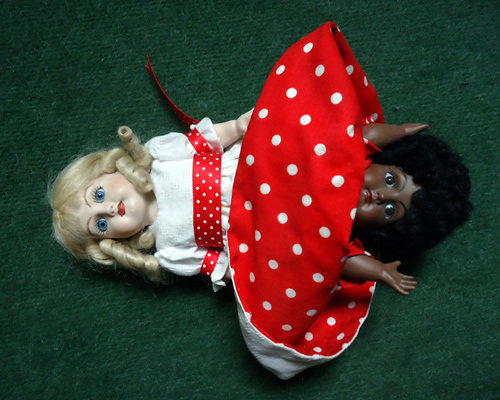

Well - it's so much talked about I could not let it pass without a little commemoration could I?
Just make sure you make them for your own special baby - I am sure the Palace is exploding with little woolly items (and in one of the hottest month's on record...).
This crochet pattern is a staggered shell, which I found a little tricky to follow, so use the detail photo at the end for guidance as to what it should look like.
Instructions.Special pattern stitch: And a reminder of English crochet stitches: Double crochet: draw a loop through next stitch, draw a loop
through both loops on hook. [American single]. Bootees (make 2)Beginning at the sole: make 15(17;20;23)ch loosely. 1st round: Miss 3 ch, 3 tr in next
ch, 1 tr in each of next 1(1;2;2)
ch, 1 htr in next ch, 1 dc in each of next 2 ch, 1 htr in next ch, 1 tr
in each of next 2(3;3;4)
ch, 1 d tr in each of next 3(4;6;8)
ch, 9 dtr in last ch. 2nd round: 3 ch, "inc", 1 tr in next st, "inc", 1 tr in each of next 10(12;15;18) sts, ("inc", 1 tr in next st) 4 times, "inc", 1 tr in each of next 10(12;15;18) sts, ("inc", 1 tr in next st) twice, sl st in 3rd ch at beginning. You now have 46(50;56;62) tr, counting the initial 3 ch as 1 tr. 3rd round: Working into the back loops only (leaves a ridge to mark sole): 3 ch, 1 tr in each tr to end; sl st in 3rd ch at beginning. 4th round: 3 ch, 1 tr in each tr to end; sl st in 3rd ch at beg. Repeat the 4th round 0(0;1;1) time(s). Shape InstepYou are now going to work back and forth across the instep in rows. 1st row: 3 ch, 1 tr in each of next
28(30;33;36)
tr, miss next tr, sl st across next 2 tr. Turn. Repeat the 2nd row 4(4;4;6) times. Next row: Miss 2 sl st, 1 tr in each of next 10 tr, 1 tr in each tr to end; sl st in 3rd ch at beg of 1st row to rejoin the round. You now have 28(32;38;38) tr. Next round: 4 ch, miss 1(1;2;2) tr, 1 tr in next tr, * 1 ch, miss 1 tr, 1 tr in next tr, repeat from * to last 1(1;2;2) sts, miss last 1(1;2;2) sts, sl st in 3rd of 4 ch to join the round. You now have 14(16;18;18) holes. Next round: 1 ch, 1 dc in same place
as sl st, * 1 dc in next 1 ch sp,
1 dc in next tr, repeat from * to
last ch sp, 1 dc in 1 ch sp, 1 dc in same place as first dc, DO NOT
JOIN the round. Turn, and work in rows as follows: First size only: 1st row (wrong side): 1 ch, 2 dc in first dc, * 3 ch, miss 3 dc, (1 dc, 3 ch, 3 tr) in next dc, miss 2 dc, (1 dc, 1 ch, 1 dc) in next dc, repeat from * ending last repeat with 2 dc in last dc instead of (1 dc, 1 ch, 1 dc). 2nd, 3rd and 4th sizes: 1st row (wrong side): 1 ch, 2 dc in first dc, * 3 ch, miss 3 dc, (1 dc, 3 ch, 3 tr) in next dc, miss 2 dc, (1 dc, 1 ch, 1 dc) in next dc *; repeat from * to * (0;1;1) times; 3ch, miss (2;3;3) dc, (1 dc, 3 ch, 3 tr) in next dc, miss (2;3;3) dc, (1 dc, 1 ch, 1 dc) in next dc (3;1;1) times; repeat from * to * (1;2;2) times, ending last repeat with 2 dc in last dc instead of (1 dc, 1 ch, 1 dc). All sizes: You now have 4(5;5;5) patterns. 2nd row: (3 ch, 1 tr) in first dc, * 3 ch, (1 dc, 3 ch, 3 tr) in next 3 ch sp, miss next 3 ch sp, (1 tr, 1 ch, 1 tr) in next 1 ch sp, repeat from * ending last repeat with 2 tr in last dc instead of (1 tr, 1 ch, 1 tr). 3rd row: (3 ch, 1 tr) in first tr, * 3 ch, (1 dc, 3 ch, 3 tr) in next 3 ch sp, miss next 3 ch sp, (1 tr, 1 ch, 1 tr) in next 1 ch sp, repeat from * ending last repeat with 2 tr in top of turning ch instead of (1 tr, 1 ch, 1 tr). Repeat the 3rd row 1(1;3;3) times. Next row: (3 ch, 1 tr) in first tr, * 3 ch, 1 dc in next 3 ch sp, 3 ch, miss 1 sp, (1 tr, 1 ch, 1 tr) in next 1 ch sp, repeat from * ending last repeat with 2 tr in top of turning ch instead of (1 tr, 1 ch, 1 tr). Next row: (3 ch, 2 tr) in first tr, * miss 1 sp, (3 tr, "Picot", 3 tr) in next dc, miss 1 sp, (3 tr, "Picot", 3 tr) in next 1 ch sp, repeat from * to last pattern, miss 1 sp, (3 tr, "Picot", 3 tr) in next dc, miss 1 sp, 3 tr in top of turning ch, "Picot". Fasten off. Make UpUsing a flat seam, join back seam. |
Materials
|
Picture of pattern detail:
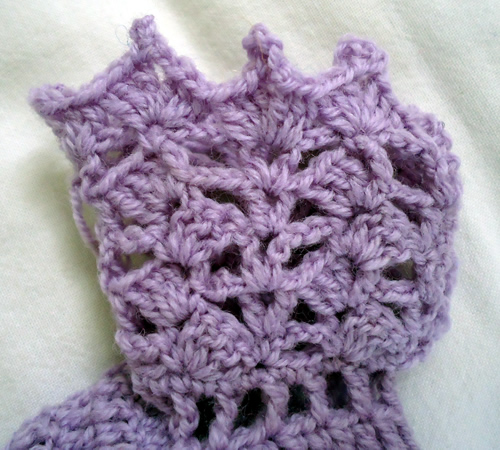
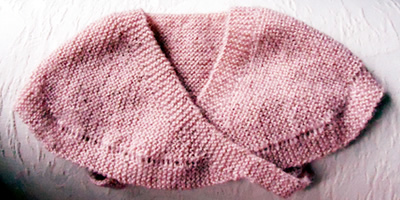
This is so very easy to knit and looks so cute over a (Liberty?) cotton baby frock. No idea how practical it is to keep in place, but it has secure back fastening straps and is perfect as a gift or for that special summer baby occasion.
InstructionsThe shawlette is worked in garter stitch (every row knitted) throughout. You start your knitting at the bottom of the back and work up towards the neck, where you divide and complete each front section separately. It is designed to cross over at the front, and button into place at the back. Using No 12 needles, cast on 50 sts and work in garter stitch for ½ inch (approximately 8-9 rows). Next row(make eyelets): K6; **
wrn, k2tog; repeat from ** to last
6 sts; k6. Start to shape the back as follows: 1st row: K6, wrn; knit to last 6 sts; wrn, k6. Repeat these two rows, (increasing 2 sts on each alternate row), until there are 115 sts. Your work then measures approximately 5¾ inches from the beginning. Now start to shape the right front, working each side of the neck separately. Next row: K6, wrn, k40, turn. Working only on these 47sts: 1st row: Knit. Repeat these two rows, (decreasing 1 stitch on each alternate row), until 15 sts remain. Next row: K6, wrn, k3tog, k6 Repeat the last 2 rows until 6 sts remain (your last decrease row will be "k2tog, k5"). Work strap, buy continuing to knit on these 6sts for 2¼ inches. Next row (make buttonhole): K2, cast
off 2, knit 2. Now pick up the sts left on the spare needle and join yarn to neck edge where you left off. Cast off 23 sts then, start to shape the left front, by knitting to the last 6sts, wrn, k6 [47 sts]. Working only on these 47sts: 1st row: Knit. Repeat these two rows, (decreasing 1 stitch on each alternate row), until 15 sts remain. Next row: K6, s2,k1,pass 2 slipped
sts over; wrn, k6 Repeat the last 2 rows until 6 sts remain (your last decrease row will be "k5, s1,k1,psso"). Work strap, buy continuing to knit on these 6sts for 2¼ inches, and finishing with a buttonhole as for the right front. To Make UpDo not block or press. |
Materials
|
Here's a view showing you the back.
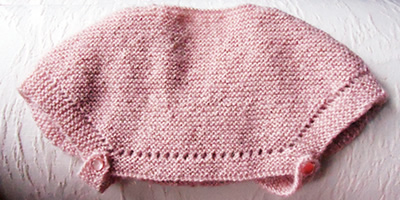
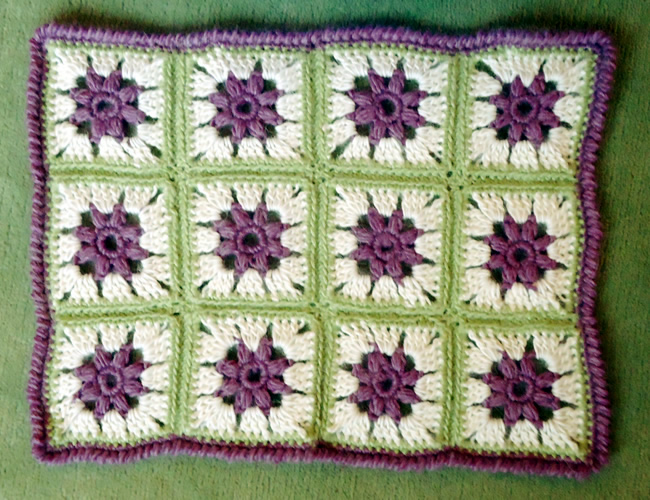
This is small blanket or cot cover made from 12 crochet squares in chunky yarn (so quick to make). It's based the usual granny-square principle, but a very pretty example of it incorporating the central flower motif.
InstructionsThere are a couple of new stitches used in this pattern, as well as basic chain, dc, and treble. There is a "cluster" used in making the central flower, and crab stitch for the edging. Make cluster: Working all into the same stitch, **yoh,
draw through loop **; repeat from
** to **
4 times (9 loops on hook); yoh, draw loop through all loops on hook; yoh,
draw loop through stitch on hook. Crab stitch is worked exactly as you do double crochet - but from right to left instead of left to right. It seems very awkward but just force yourself to do it; push the hook through the stitch to the right of your needle, pull through a loop, then yoh and pull through both loops on hook. It creates a very attractive twisted ribbed edge. There a is you tube extract inserted at end of this item - or go search the web for "crab stitch" for a variety of explanations. Motif (make 12)Starting at the centre of the square: using 7mm hook and first contrast, (plum), make 6ch and join in a ring using a slip stitch. 1st round: 8dc into the ring and
join with a slip stitch to top of first dc. Fasten off. This completes the motif. 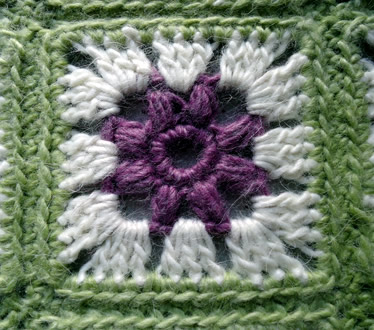 To Make UpMake 12 squares altogether. With 7mm hook and 3rd contrast (lime), join 2 squares together; hold
right sides together and slip stitch through the back loop of each dc,
leaving the front loops exposed as a decorative ridge on the right side
(see photos). Join 3 squares in a row, then join the 4 rows together. Finally, using first contrast (plum) and right side facing, work a row of dc all around the blanket, and work 2 or 3sts into the 4 corner sts, to make it curve properly. Then, keeping the right side facing you, change to a 6mm hook and go back the way you came, working one row of crab stitch right to left. Sew in all ends. Block the blanket by pinning it out and dampening; leave to dry. You can press very lightly with a damp cloth - just hold the iron above the cloth so it heats it but do not press down. You want to leave the texture of the stitches in place, so do not press heavily. |
Materials
|
Here is a You Tube item showing how to do crab stitch,
(a picture painting a thousand words and so on).

The second nordic-style sweater for November in a slightly lighter weight yarn. Like the previous design it has a straight inset sleeve, as well as the bright ("modern") colour combination of the 1980s. The pattern includes instructions for plain leg warmers.
InstructionsThis pattern uses 3 familiar stitch types: Double Rib: repeated sequence of k2, p2 rib. Back:Using No 9 (3¾mm) needles and main shade (O), cast on 86 /
90 / 94 sts work 3½ inches
in double rib. Change to No 7 (4½mm), needles and stocking stitch,
increasing 15 sts evenly across first row [101/ 105/
109 sts]. Continue joining in contrast (R)
for dotted fair-isle stocking stitch pattern as per the lower section
of chart. When the fair-isle motif is complete, change back to No 7 needles and continue in dotted fair-isle until work measures 27½ / 28 / 28½ inches. Shape shoulders: Then cast off 8 sts, (all sizes), knit 6 / 7
/ 8 (7/8/9
sts on right hand needle), and turn leaving the remaining sts unworked
but still on the needle to pick up in a moment, . Return to the sts still on the needle for the neck and left side. Place the centre 43 sts on a stitch holder for the back neck, and then rejoin yarn to the remaining sts and knit 1 row. Then cast off 8 sts, (all sizes) purlwise, purl 6 /
7 / 8 (7/8/9
sts on right hand needle), and turn, knit back 1 row. Front:Using No 9 (3¾mm) needles and main shade (O), cast on 90 /
94 / 98 sts work 3½ inches
in double rib. Change to No 7 (4½mm), needles and continue in dotted
fair-isle stocking stitch pattern as for the back, increasing 15 sts evenly
across first row [105/ 109 / 113
sts]. When work measures 18 inches (same as back to armhole), shape the armholes
by casting off 8 / 9 / 10
sts at beg of next 2 rows [89 / 91
/ 93 sts]. When work measures 25½ / 26
/ 26½ inches, shape neck: When work measures 27½ / 28 / 28½ inches, work shoulder shaping as you did for the back, casting off at armhole edge on every alternate row as follows: 8 sts (twice), 7 / 8 / 9 sts (once). Sleeves:Using No 9 (3¾mm) needles and main shade (O), cast on 54 / 58 / 62 sts work 3½ inches in double rib. Change to No 7 (4½mm), needles and continue in dotted fair-isle, increasing 17 sts evenly across first row [71 / 75 / 79 sts]. Increase 1 st at each end of every 8th row 9 times, [89 / 93 / 97 sts]. When work measures approximately 11½ / 12½ / 13½ inches, . (11 change to No 6 needles and work the fair-isle motifs. Cast off when you have completed the second border pattern, before you start the dotted fair-isle. To Make UpPress parts lightly on wrong side with a damp cloth Stitch one shoulder seam. Using No 9 needles and main shade, pick up
and knit 98 / 102 /
106 sts evenly round neck. Work 1¼
inches in double rib. Stitch second shoulder seam and neck border seam. Sew in sleeves. Stitch side and sleeve seams. |
Materials
|
This is the main chart showing the fair-isle design described in the pattern. It leaves a lot to work out yourself, showing the centre point and allowing you to work our where to start your row for each of the sizes.
Working it out yourself is made more difficult since the main panel pattern
is a 34 stitch repeat, while the border above and below is a 6 stitch pattern repeat like the dotted body pattern.
You can match up your first border with the dots, and use the chart below to see where to start and end your main panel pattern.
Then match your second border spacing it the same as the first one.
This is the chart marked with start and end points for the back showing the 3 sizes, and the 34 stitch repeat. The front has 4 extra stitches up to the amhholes, so start 2 sts further out for the front.
This is a similar chart for the sleeve marking with start and end points for the 3 sizes.
[Editor's note: I worked out and drew the charts myself, and made lots of trivial errors before I was satisfied that they were right. So if you are having difficulty with the charts, or if you think there may be a mistake, please do let me know.]
LegwarmersThe legwarmers are worked in rib throughout. InstructionsUsing No 11 (3mm) needles and main shade, cast on 62sts, and work in
double rib for 4¾ inches. Cast off loosely. [Editor's note: You are working from the ankle upwards; you cast on for the bottom of the item and cast off at the top, so it needs to be loose.] Stitch the seam using a flat seam technique. Work a second legwarmer in the same way. |
Materials
|
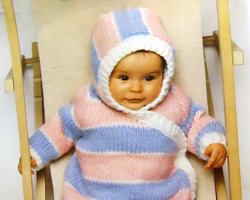
This is a vintage baby-bag pattern probably intended for babies up to 3 months in age. It's very simple to knit and fastened around the edge with easy poppers. It's tempting to knit this in beautiful, soft, lofty yarns - however, it does need to be washable, if not so very hard wearing.
OK - maybe not so many colours - but so cute!
InstructionsThe striped pattern is worked as follows: 1st row: Knit in main shade These 22 rows are repeated to form the striped pattern. BodyThe body is worked in one piece; you start off knitting short, shaped pieces for the back and front separately then join them both onto one needle. The pattern as written should work out that the stripes match up when you join them together - make sure they do - and you may want to use a circular needle for the 86 stitches in chunky yarn. Back: With No 4 (6mm) needles and second contrast (Pink), cast on 25 sts and
purl one row. 1st row(right side): Cast on 3, knit
to end. Change to white yarn for 1 row: Change to blue yarn for 9 rows: Change to white yarn for 1 row: Change to pink yarn and work in sts for 5 rows starting with a purl row. Front: With No 4 (6mm) needles and first contrast (Sky Blue), cast on 23 sts
and purl one row. 1st row(right side): Cast on 3, knit
to end. Change to white yarn for 1 row: Change to pink yarn: [Editor's note: You have ended with right side facing about to start your 6th row in pink yarn.] Right side facing, continuing in pink yarn, knit 41sts from front, and then 45 sts from back (stitches on holder). [86 sts] Continue straight until work measures 20 inches (51cm) - (measure the
back segment), ending with a wrong side row. Right side facing, tie coloured thread or place marker, between the 41st and 42nd sts and between the 84th and 85th sts. Next row (right side facing): Cast
off 4sts, work to end, and increase (cast on) 3 sts. [85sts] [Editor's note: You are now about to start the raglan shaping on the front, having completed 7 rows in colour blue with right side facing to begin 8th row in blue.] Next row(right side facing and keeping striped sequence correct): Cast off 3 sts, k 33 (34sts on needle). Turn, leaving remaining 48sts on a spare needle. 2nd row: Cast off 2 sts, purl to
end. [32sts] Change to white yarn for 1 row: Change to pink yarn for 10 rows: Change to white yarn for 1 row: Change to blue yarn for rest of front: The front should now measure 4¾ins (12cm) from beginning of raglan
shaping, and 2 sts remain. Back raglan shaping: With right side facing, take up 43sts of the back and leave the remaing
5 sts at the end of the row on a holder. Keeping striped sequence correct work as follows: cast off 2 sts at the
beginning of the next 6 rows, and one stitch at the beginning of the next
16 rows. With right side facing, take up the remaining 5 sts on the holder, and
keeping striped sequence correct work as follows: 1st row (right side facing): Cast
off 2 sts, knit to end. Change to white yarn for 1 row: Change to pink yarn for 10 rows: Change to blue yarn to complete: The work should now measure 4¾ins (12cm) from beginning of raglan
shaping, and 2 sts remain. Here's a photo of what it looks like (Figure 1):
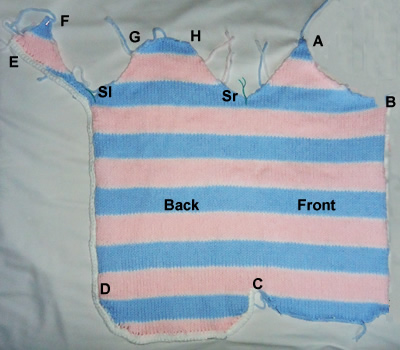
Sleeves:With No 6 (5mm) needles and main shade, cast on 26sts. and work 4 rows in k1/p1 rib, ending with a wrong side row. Change to No 4 (6mm) needles and striped stocking stitch starting with 1 row of main shade (White). Then work in blue as follows: 2nd - 10th row: Stocking stitch in
blue yarn 12th row: Purl one row in white. 13th - 20th row: Stocking stitch
in blue yarn 23rd row: Knit one row in white. Work 7 rows straight in blue. Work measures 7ins (18cm), ending with
right side facing to start raglan shaping. Shape raglan by casting off 3sts at the beginning of the next 2 rows, 1st at each end of every following 3rd row, twice, 6 sts remain. Cast off. HoodWith No 4 (6mm) needles and first contrast, cast on 17 sts and work in
striped pattern starting with 3 rows of the first contrast. Cast on 22sts at the beginning of the next right side row. [39 sts] Continue straight until work measures until work measures 11½ins (29cm), ending with wrong side row, and 2 rows of second contrast. Cast off 22sts at the beginning of the next right side row. [17 sts] Continue straight until work measures until work measures 18ins (46cm), ending with wrong side row, and 2 rows of first contrast. Cast off. Here's a photo showing how the hood looks (Figure 2):
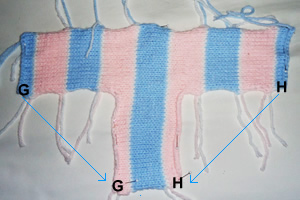
Front and Hood Band:With No 6 (5mm) needles and main shade, cast on 211sts and work 4 rows in k1/p1 rib, arranged as follows: 1st row: K2 *
p1, k1, repeat from * to last stitch;
k1. End with a wrong side row. Next row: Knit and leave sts on a holder. To Make UpSew up sleeve seams, and sew raglan seams together. Sew up hood seams, bringing together points G and H to make the hood
shape as shown in Figure 2 and then sew the back of
the hood to the back neck of the body between points G and H in Figure
1. With No 6 (5mm) hook and main shade work 2 rows dc along edge of sleeping
bag back from E to D and all around to C (refer back to Figure
1), working tightly across the bottom of the back section so that
it is slightly gathered and curls up to form the bottom of the bag. Here's a photo of the bottom section of the back of the bag (Figure 3):
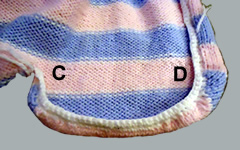
Sew on front and hood band stitch by stitch from C all around to A and then around edge of hood from A to E fitting the edge of the band into the corner by the edge of the hood, at point E. Sew on snap fasteners evenly from C to D to E on right side of work and from A to B to C on wrong side edge of front. Press all seams heartily. (That is: carefully with a damp cloth). Sew on decorative buttons if required. |
Materials
|
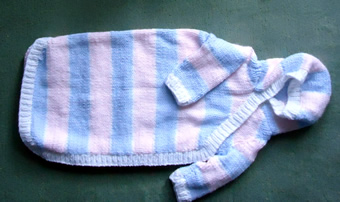
|
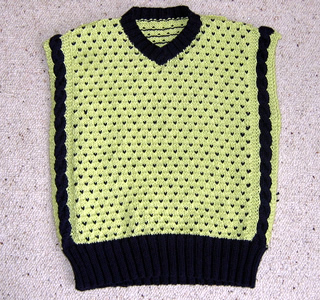
I really liked the look of this vest top from the 1980s. I thought it would suit me, as it is sleeveless, and suitable to team with wide pants (as were popular in the eighties - and I am told are suitable for my current age and shape!).
The original was made in a flecked wool, and I did not notice that it was dotted all over. So having made the discovery of the dots, I like it even more.
The dots add to the complexity when knitting, but the shape is very simple and quick to knit.
Instructions.This pattern is worked in several sections including intarsia techniques, (to insert the vertical colour for the cable stripes); and jaquard (to make the dots). For the cables, and edge stitches, do not strand yarn across wrong side of work, but use separate balls: this will be 2 bobbins for the Navy cables and 2 bobbins for the Citron edge stitches. Twist the colours on wrong side where they meet to avoid a hole. Use your main ball of wool for the centre section in Citron (main
shade), again twisting it where it meets the navy cable bobbin. Here is a picture of the wrong side of the work:
[ Editor's note: Yes this does mean you have to sew in all those ends ]
Back:With No 10 needles and contrast colour, cast on 70 [74, 78, 86, 90, 94, 102, 106, 114] sts and work in K2, P2 rib for 3 [3, 4, 4, 5, 6, 6, 6, 6] cm, (rows on right side having K2) at each end. End with right side facing for next row and increase 1 st at end of last
row (71 [75, 79, 87, 91, 95,
103, 107, 115] sts). These 8 rows form the pattern. Continue in pattern until back measures 34 [37, 41, 43,
46, 48, 49, 51, 51] cm, ending
with right side facing for next row. Front:Work as for back until front measures 26 [29, 33, 35, 37, 39, 39, 41,41] cm, ending with right side facing for next row. Keeping continuity of the pattern, divide for neck as follows: Pattern 33 [35, 37, 41, 43, 45, 49, 51, 55] sts, k2tog, turn and leave remaining sts on a spare needle. Continue on these 34 [36, 38, 42, 44, 46,
50, 52, 56] sts for first side, decrease 1 stitch at neck edge
on every row until 30 [30, 30, 34, 38, 40,
40, 42, 44 ] sts remain, then on every alt row until 23 [24,
25, 29, 30, 32, 35, 36,
39] sts remain. 1st, 2nd, and 3rd sizes: All sizes: To Make UpDo not press. Join right shoulder seam. Left Neck Border:With right side facing, using No 10 needles and Contrast, knit up 30 [30, 30, 34, 38, 38, 42, 42, 42] sts down left side of neck and work 7 [7,9, 9, 9, 9, 11, 11, 11] rows in p2, k2 rib, rows on wrong side having a p2 at each end. Cast off evenly in rib. Right Neck Border:With right side facing, using No 10 needles and Contrast, starting at
centre front, knit up 30 [30, 30, 34, 38, 38,
42, 42, 42] sts to shoulder. Knit across 25 [27, 29, 29,
31, 31, 33, 35, 37] sts from
back of neck increasing 3 [1, 3, 3, 1, 1,
3, 1, 3] sts evenly (58 [58, 62, 66, 70, 70,
78, 78, 82] sts). Join left shoulder, then sew border in position, placing right over left. Press seams. Sew on button at neck. |
MaterialsPure wool double knitting 50g balls: 2 [3, 3, 4, 4, 4,
4, 5, 5] in main shade, and, 1 [1, 2, 2, 2, 2,
2, 3, 3] in contrast. Cable needle. 1 button. Tension22 sts x 30 rows to four inches on 4mm needles in stocking stitch. Size mattersTo fit chest/bust 24 [26, 28, 30, 32, 34,
36, 38,40] inches; length from top of shoulders 13½ [14½,
16, 17, 18, 19, 19½,
20, 20] inches. A Word
|
© Christina Coutts 2007
![]()