Happi robe
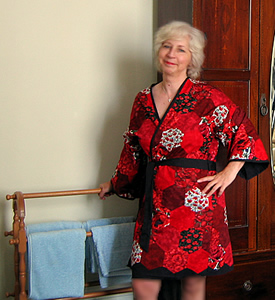
A fun coverall that can be worn as a dressing robe or on the beach. This is a 1970s take on the Japanese design for happi coats, which originated as Japanese over coats traditionally worn by shop keepers. The family crest, shop name or emblem was printed on the back of the coat. Today, happi coats are still used by some shop keepers in Japan, but are also widely used elsewhere for festivals, parties and so on.
I realised while writing these instructions that they are not really for the novice seamstress. You will understand them better if you have used a paper pattern before. Having said that, this is a very simple shape; there is no real tailoring and if you are not a perfectionist, you can obtain a very pleasing result without much skill. If you are a perfectionist, then I expect you will make a high quality item in spite of my sketchy instructions....
InstructionsUsing the dressmakers paper, make a paper pattern from the graphs (Figs 1 and 2) and, using fabric scraps, or fat quarters, cut patches at least approximately 4 inches by 4 inches, according to the patch shapes you have chosen. Lay the patchwork pieces out on a table until there are enough to make a Back, two Fronts, two Sleeves and two Pockets. Remember to evenly distribute the colours so you don't run out of one particular fabric. Join the patches together by hand or (preferably) machine. Make the area of fabric required for each pattern piece.
For the sleeves, make two pieces of patchwork, each 22 inches by 15½ inches. For the back make one piece, 35½ inches by 26 inches, and, for the fronts, two pieces, each 36 inches by 12½ inches. For the pockets make two pieces, each 9 inches by 8½ inches. Pin the pattern pieces to the patchwork, and cut: one back on the fold; two sleeves; two fronts (remember these must be a left and right mirror image of each other); and two pockets. Pin the paper pattern pieces to the lining fabric and cut out the same pieces. Pockets: Place the pocket linings against right sides of pockets, and machine stitch around 3 sides, leaving the top open. Turn the pockets and press, (3 edges are enclosed in the lining). Cut two pocket facings from the facing fabric, each 9 inches by 4 inches. Turn in the short edges of the facings so that they are the same width as the pockets. Place one longer (raw) facing edge to the top raw edge of the pocket and sew in place. Turn facing to inside, tuck raw edge under and stitch. Repeat with the other pocket. Pin pockets to robe fronts in positions indicated on the graph, and top stitch in place. Sewing up: Tack the patchwork fronts to the lining fronts, wrong sides together. Tack and machine stitch the patchwork layer of the back only to the fronts along the shoulder seams and down the side seams, working on the wrong side. Machine the back lining to the shoulder seams, enclosing all the raw edges, and hem down the side seams. Sew the patchwork sleeve seams, with the raw edges on the wrong side, as usual, and then with right side to right side, ease the sleeves into the armholes; pin, tack and sew. Sew sleeve lining seams, wrong side to wrong side, and hem into place. Tack lining to patchwork all around the edges of the garment. Facings: From the facing fabric, cut one belt 78 inches by 5 inches, two belt slots, each 3 inches by 2½ inches, two front facings each 39 by 4 inches, one hem 52 inches by 5 inches, and two cuffs, each 21 inches by 5 inches. |
Materials2½m (112cm width) plain lining fabric. Fabric scraps, or about 10 fat quarters quilt fabric (usually 112cm or 44 inches wide). 2m cotton fabric for facings (or bias binding). Dressmaker's squared paper - 1 inch grid (I found only in centimetre grids on the web - 2ins=5cm) Size mattersOne size fits all. However for my version, I altered the pattern below to make it slightly smaller (to fit me); however, as a wrap, it can be worn over-size. A word on the designI used floral hexagons for my robe. The original was shown with rectangular patches. See "adaptations". |
Adaptations
You can make the robe by cutting the basic design from a plain fabric, which you can use as a conventional lining, or you can apply your patches directly to the lining as a backing, depending on how free form you want to be with your patchwork. You can use any patchwork techniques; I have used a conventional shape, but applied the patches directly on to the backing, overlapping them like roof tiles, and top stitching in place. This method allowed for minor inaccuracies in sizing the patches. I chose the shape of the patch to suit my floral fabric.
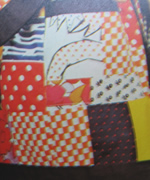 The original robe was a rather pleasing design made of uneven rectangles in geometric and spotted fabrics in 1970s oranges, yellows, and browns. However, I was seduced by the lovely red poppy fabrics in my local quilt shop in Dorking (The Quilt Room) - in consequence I chose a hexagonal shape which I thought better suited the floral effect. I like the effect but also feel that it is a little reminiscent of a table cloth.
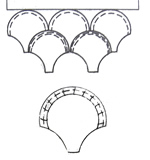 I would like to experiment with the fish-scale (or clam-shell) patch in beautiful pale blues and sea-greens to make a bath robe. There are some lovely "watery" batik fabrics available in packs. You could even introduce silvers, and gauzy effects. The fish-scale design can be used as patches, or as a quilting pattern, and is well-suited to the overlapping appliqué method (to better emulate scales).
Whatever you choose, remember to use big patches, otherwise it will be a 20 year project. You could even cheat and choose a fabric with a patchwork pattern, or indeed just decide to use some fabric that pleases you with no patchwork at all!
I wanted to keep the robe as light weight as possible, but you could put in an interlining and then quilt, for a heavier weight padded robe.
