Roll up for a string shopper
More....
Please note:
Patterns are for
Personal Use Only
You may freely circulate patterns with the Copyright Statement Preserved.
See terms of use.
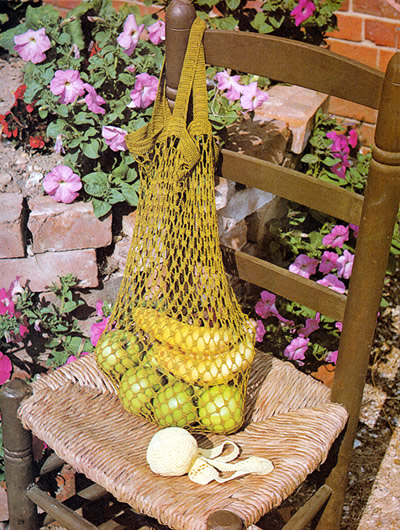
Fun to make, this was a common type of reusable shopping bag before the days of the ubiquitous little nylon fold-up bags. It easily rolls up to keep in a handbag or purse, and is more useful than ever now in eliminating single-use plastics.
Instructions.The bag can be made in either of 2 sizes. Both designs are worked from
the same instructions and the figures in brackets [ ] refer to the
smaller bag where applicable.
Base - first section:Using 1¾mm [1¼mm] hook make 5 chain and join with a ss to
the first ch to form ring. Base - second section:Using 1¾mm [1¼mm] hook, rejoin yarn through elastic band,
3ch to form first tr, work 48 tr over band. Main section 1st round: Place both sections together
and join by working through both sections at the same time, 1dc into sp
before next tr, * 1dc into each of
next 2 sps, 9ch, 1dc into each of next 4 sps, 9ch, 1dc into next sp; repeat
from * to end, omitting 9ch and 1dc at the end of the last repeat, 3ch,
1trtr into first dc. Top band 1st round: 4dc into loop just made,
* 4ch, 4dc into next loop, repeat
from * ending with 4ch, ss into first
dc. Handle (make 2) Using 1¾mm [1¼mm] hook, make 9ch. To make up Damp and pin out to size. |
MaterialsLarge bag: 4 x 20g balls No 10 crochet cotton. Small bag: 2 x 25g balls No 20 crochet cotton. Elastic band or shirring elastic in a circle. TensionLarge bag: 8sts and 4 rows to 1 inch over trebles worked on 1¾ mm crochet hook. Small bag: 11sts and 5 rows to 1 inch over trebles worked on 1¼ mm crochet hook. Size mattersLarge bag: will carry 15lb (7 kilo) Small bag: will carry 6½lb (3 kilo) Abbreviations:ch: chain Remember these are English crochet instructions where dc is equivalent to US single crochet - see "Terminology" in the side bar. A Word on the WoolNos 10 and 20 crochet cotton are fairly standard and easy to obtain. Disclaimer
|
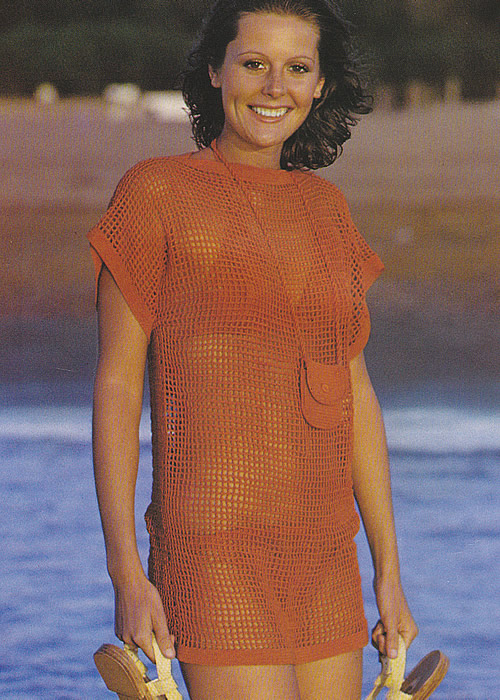
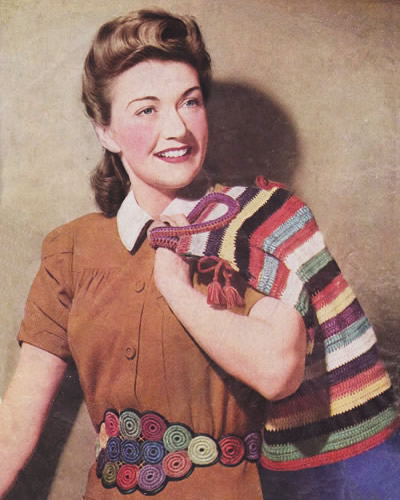
Very practical airy cover-up in a sunny colour. These tops are surprisingly effective as shelter from a hot sun. But always remember, they offer screening against scorching but are not man enough against uv - so never forget to use a good sunscreen lotion, and stay in the shade where you can.
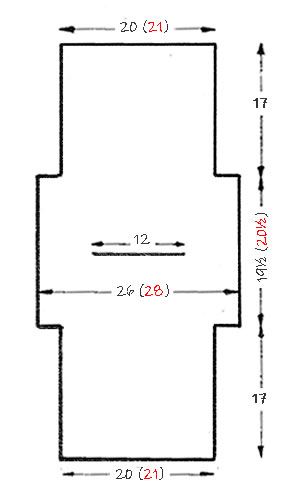
Instructions.Instructions for two sizes as this is intended an "oversized" top - but, with the specified yarn as written, it measures up to 40 inches. However, you can see from the shape and construction method, it would be easy enough to expand, either by adding stitches or experimenting with a slightly less fine thread. Mesh Pattern:Multiple of 3 ch plus 7 ch to turn. Back and FrontThe beach robe is worked in one piece, beginning at the lower front edge.
Work straight. When work measures 26¾(27¼)
inches, using 1 strand of yarn from a separate ball of yarn, make front
neck opening. Now work in mesh pattern across (88(92) dtr and 2 ch spaces. When work measures 9¾(10¼)
inches from neck opening, leave 11(12)
dtr unworked at each end of the row. Work a border of 10 rows in dc at the lower edge of the front and also and around the sleeves. To Make UpPress parts lightly on wrong side under a damp cloth A Word on the WoolThe original yarn was Fil d'Ecosse No 8, now discontinued but sometimes
seen on eBay. This is quite a fine 100% cotton thread probably equivalent
to a 3ply weight in wool. (Make sure you look for "No 8" cotton
- there were other weights for this yarn - the higher the number the thicker
the thread). At the current time of writing: Laughing Hens, Love Crafts, Yeoman Yarns, Yarnoncone |
MaterialsNo 8 crochet cotton. No 14 (2mm) crochet hook. For the purse: 25g No 8 crochet cotton. Tension13 dtrs x 10½ rows to 4 ins over mesh pattern using 2mm hook. Size mattersTo fit size 10-12 (14); actual measurement: 40 (42) inches. Abbreviationsch: chain Remember these are English crochet instructions where dc is equivalent to US single crochet - see "Terminology" in the side bar. Disclaimer
|
Neck PurseBack and Flap: Work straight until 58th row has been completed. Make a second section for the Front: Borders: 1st row: On wrong side of work, work
in dc, taking in the whole thickness On front section of purse, work the row of slst then on wrong
side of work, 1 row in dc. |
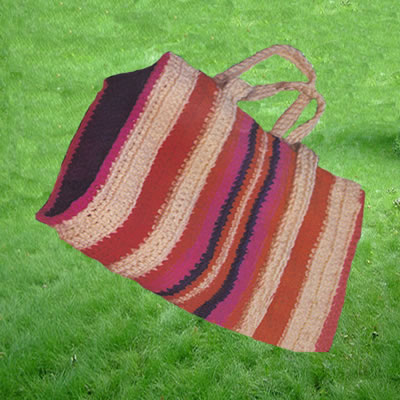
Soft-sided bags pack well into a car for touring or camping - or simply excursions to the beach. So these can make a good alternative as light weight overnight bags, or to contain all those little essentials for trips to the washrooms.
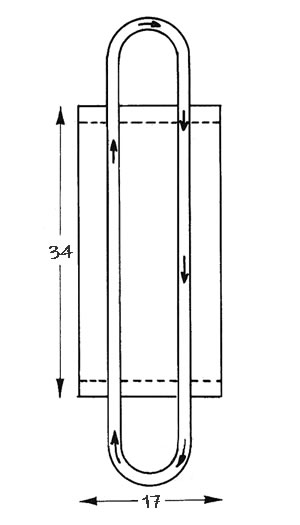
Instructions.Size could be modified by adding stitches or rows, or using a thicker yarn to change the tension - see "a Word on the Wool". Main sectionUsing tan beige colour (G) make 80 chain, plus one chain to turn. Work in dc inserting hook into the back of the loop only. Work in stripes as follows; 6 rows in B (tan) Now reverse the sequence: 1 row in C (red) Fasten off Side GussetsUsing dark blue or purple colour (D) make 30 chain, plus one chain to
turn. Work 8 rows in dc, inserting hook into the back loop only. Work a second gusset in the same way. HandleUsing tan beige colour (B) make 200 chain, plus one chain to turn. Work
4 rows in dc, inserting hook into the back loop only. To Make UpFold under a hem of 5 dc at each end of the bag. A Word on the WoolThe original yarn was a dense 100% acrylic carpet wool, with only 25m
to a 50g ball. It appears to be a chunky yarn designed for use with a
6mm hook - so this bag, using a 4mm hook, is designed to be made very
tight and firm to keep the shape of the bag. (Possibly hard work on the
fingers). I have seen Herdwick used to good effect for this type of bag. You may
have to buy it as an aran weight and use it double for this pattern; of
course you would be fairly limited in colour scheme. Finally, this could be a good way to use up remnants - always provided you can achieve the required tension, or make your own calculations to compensate. The bag is simply a mirror image of one set of stripes, so divide your remnants into 2 equal parts, either by weight or length before you begin - or alternatively - go wild and make an asymmetric pattern! |
Materials
|
Kit bags are yet another thing I have a weakness for; I still have and use a floral one I bought from the Gap at its flagship store in Richmond in the 1980s. I think it stems from when I was a little girl finding my Father's military kit bag in the attic with "Delhi" and "Bombay" stenciled* on it - conjuring all kind of exotic ideas and possibilities. [All us kids also used this kit bag for camping with the Scouts and Guides in those days].
Kit bags are a bit impractical for any activity other than that for which they were designed, but smaller ones can be used more successfully as hand bags. This one seems to be of a more useful size, and you can really make it to any size you feel like. If you use "any thickness" of yarn as suggested then even the size of the base is really up to you. Designed towards the end of WW2, in an era of extreme shortages - where even the manufacture of yarn was restricted never mind the rationing - it is made from "oddments" or "pulled back" wool. The paper the pattern was printed on is flimsy in the extreme and there are sympathetic references everywhere to the inability to source the materials required.
* As well as the destinations, there was also my Father's name, army number, and unit stenciled on his kit bag, and I remember being amazed that he could just recite it without thinking - when in fact his army days were not so very far distant then and of course the only thing you were ever obliged to reveal were "name, rank, and number" - so not so surprising other than to a tiny child who suddenly had a glimmer of an idea that her Father had a life before she existed.
Instructions.The bag is really a free format design and quite simple to make. It's
the details that can make it rather splendid. Base:[Editor's note: Since you are working to a non-specified tension, you might want to do the crochet part first and make the base to fit accordingly.] Cut 2 circles of felt, one 8½ inches, the other 10 inches in diameter.
BorderCut a piece of felt 9 inches wide and 27 inches long; then a strip of
cardboard 26 inches long and 4 inches wide. Crochet topWith double wool, make 140 chain and close to form a ring. [Editor's note:
Or *not* with double wool - as you prefer and depending on the
thickness of the yarn you are using; in fact of you really are using scraps
of different thicknesses you might use some of them double and some not.
In the 1940s, sweaters were generally made in fingering (thin) yarn so
the assumption would have been that this is what you would have had to
work with. 1st round: Make 3 chain to form
first treble, then work 1 chain, 1 treble all round, and link up with
first treble. Repeat 2nd round for about 8 or 9 inches, changing colour as required. Now start decreasing by missing a tr 4 times evenly in round. Divide the work so that you have 36 trebles for back and front with 14
at each side. Work 12 rows of trebles on each of the 36 tr. Turn down each of these 2 (36 treble) top hems and slip a piece of cardboard into each to stiffen before finally stitching. HandlesWith double wool make 70 chain and join to form a circle. [Editor's note: You are essentially using the yarn as stuffing for the handles.] To Make UpStitch crochet top to edge of base on inside of it, making it very firm. Sew handles firmly to stiffened tops. Make a length of crochet chain with a small tassel at each end to thread through open sides at each side of handle. Adaptations
I was sufficiently smitten with this that I actually made one up for myself, with some adaptations of my own. Firstly I did stick with the idea of using oddments I already had, but I used mostly chunky yarns so I did not have to work with the yarn doubled - which can be a bit of a nuisance when doing crochet, even though many old and new patterns seem to suggest it. As I selected my yarns based on colour, some of them were used double to achieve the thickness I wanted. I also changed the stitch - I used a 4mm hook with my chunky yarn, and worked in double crochet (American single crochet) throughout instead of treble crochet in order to achieve a firmer fabric; trebles provide a moderately open fabric, which, even with a lining, was not the effect I wanted. If you want to do that yourself, bear in mind that working with dc is not as quick; however, I find crochet in general works up very quickly (as well as thicker) when compared with knitting. [Editor's note: Worth noting here that although I settled on using chunky yarn, in my opinion, the original fingering (or 4 ply) yarn is about equivalent to an Aran or worsted weight yarn when used double; I say "in my opinion" as opinions do differ on this.] For the base, I used a rather thick leather (about 2mm) which was tough to work but made up surprisingly well. I bought it from leather4craft's selection of offcuts on eBay - but it did prove fairly expensive for all that. You could use a thin leather, or PVC, or recycled leather (which I found very easy to work with in the past) in which case you can treat it much like the felt although easing it may not be quite so easy.
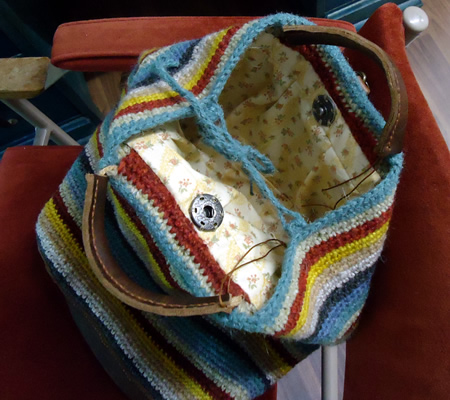

I made the base to be an oval shape to suit the offcut of leather I had. I just took a rectangle about 12 by 8½ inches and rounded the corners (using a dinner plate as a guide), then attached the border in that shape; about ½ inch was used all round for the overlapping seam which gave a circumference fairly close to the original 9 inch circular base. |
MaterialsOddments of wool, any shade or ply. A medium-sized crochet hook. Felt or leather
for the base. TensionDependent on the yarn and hook you use. Size mattersThe base of the bag is designed to be about 8½ inches. Crochet abbreviations:ch: chain Remember these are English crochet instructions where dc is equivalent to US single crochet - see "Terminology" in the side bar. A Word on the WoolI used some tough carpet wools in combination with any chunky yarns I could find in the right colours. I used a relatively smaller hook than usual for chunky in order to keep the fabric firm - and carpet-like. I have seen some crochet work for sale at Woolfest using Herdwick wool which I liked a lot. It was similarly firm, making self- supporting small boxes. [I was less keen to try that out myself as I felt it would be quite tough on the hands.] Disclaimer
|
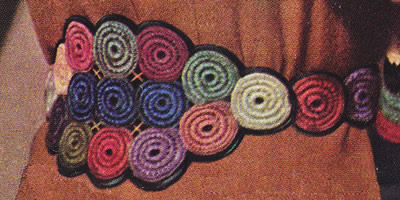
So by now I expect you are thinking "...but hey! - what about that extremely snazzy and attractive belt she is wearing? where can I buy that?".
Well - good news! it's not a purchased item at all - it's a one-of-a-kind hand-crafted item you can make yourself! Here's how:
Instructions. Again the materials are designed to be "make do and mend"
oddments of old pulled-back knitting wool in any ply and any shade, worked
with a medium-sized crochet hook. Each circle is made separately: Now make 6 chain and join into a circle closely. Break foundation and working wool and finish off neatly. [Editor's note: The intention here is to achieve a fairly solid roundel by working your stitches over a core of old yarn - as you might do in stumpwork embroidery or making a corded buttonhole. Obviously you can do as many rounds as you like to achieve the appropriate size.] Arrange the 15 circles for front of belt as shown in photograph, and stitch
to foundation material cut to shape. |
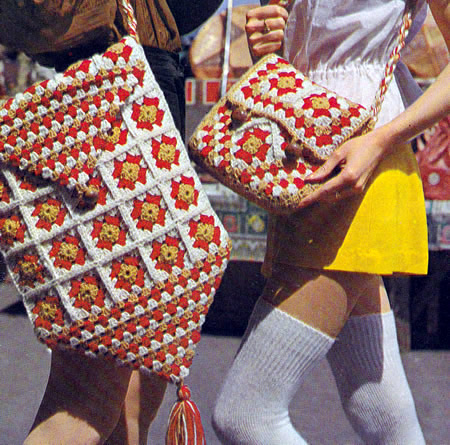
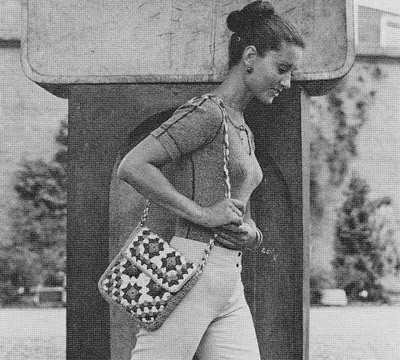
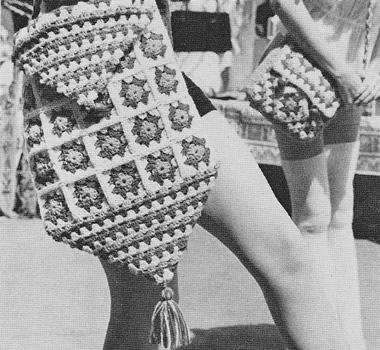
Summer season bags in crochet this time - for beach - or for festivals if you want the full seventies vibe. Easy to make using a single basic granny square motif.
Instructions.The bags are made up by joining a number of the same basic "granny square" motif. If you are feeling adventurous you could make up your own version of the squares to approximately the same size or you could use a variety of colours (in the "granny square" tradition) to use up wool oddments. MotifWith Gold (G) make 4 ch, join into ring with slip stitch (ss). 1st round: in G, 3 ch, 11 tr into
ring. [12 sts]
 HandbagMake 10 motifs. Join remaining motifs in the same way, thus having 5 strips made of 2 motifs each Now make a square by joining 2 strips together using the slip stitch
technique as before. Make another square the same. Handbag - main part[Editor's note: In this section you make diagonal edgings for each side of the square sections of the bag. You end up with another square with the original 4 motifs set "on point" as you can see in the photo.] With right side facing and Gold (G), join yarn to corner ch sp of one
of the squares, and work along first side edge as follows : 2nd row: in Red (R), 3 ch, 2 tr in
1st sp between first 2 groups, 3 tr in 3rd row: in Cream (C), as 2nd row [5 groups]. Alternating colours as before, work 4 more rows, thus ending 3 ch 2 tr
in G worked in sp between 2 groups. [1 group]. Joining yarn to corner ch sp already used, work along 2nd and 3rd sides
of square in the same way, then work along 4th side starting Work the other main part in the same way on the second 4-motif square. Handbag - flap[Editor's note: At this point you might think "flap" is an instruction - but it isn't - it' just the description of the piece you are making next. The instruction is "just keep calm and carry on". Crochet is always more difficult to read from a pattern than it is to actually do it.] With right side facing and G, join yarn to corner ch sp at long side of remaining oblong strip and work as follows: 1st round: in G, 3 ch 2 tr in corner
ch sp, (3 tr in sp between next 2 groups) twice; 3 tr in centre of joining
row; (3 tr in sp between Handbag - gussetWith G, make 10 ch 1st row: 1 tr in 4th ch from hook,
1 tr in each following ch Repeat 2nd row until strip measures 24 inches (61 cm). Handbag - to make upUsing a warm iron and damp cloth, press parts lightly on wrong side.
Make twisted cord from 18 strands of remaining yarn, each strand 100 inches (254 cm) long (or however long you want the shoulder strap to be), and attach to top of gusset at each side of bag. Join lining and place inside bag with seams to inside, turn in raw edges at top and inside flap, and slip hem neatly in position. Sew on buttons.
 Beach bagMake 55 motifs. Beach bag - backJoin 6 strips together, thus having an oblong. 1st row: in G, 3 ch 2 tr in corner
ch sp, * (3 tr in sp between next
2 groups) twice, 3 tr in centre of joining row; repeat from *
ending 3 tr in corner ch sp [16 groups]. Alternating colours as before, work 13 more rows, thus ending 3 ch 2
tr in G, worked in sp between 2 groups. [1 group]. Beach bag - flapWorking along opposite edge of oblong, work as for point. Beach bag - frontJoin 5 strips together, thus making a square. Beach bag - to make upPress as for handbag. Cut lining as for front and back, allowing ½ inch (1 cm) extra for
turnings. Using a flat-stitch seam, join points by catching together tips of each group. Make twisted cord as for handbag and attach to sides. Using 18 strands of remaining yarn, each strand 12 inches (30 cm) long, make tassel and attach to point. Sew on button to match loop. |
Materials
|
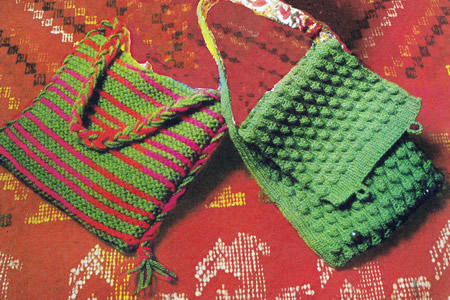
Festival season is well under way so I am posting this a little early - too late for Glastonbury but in time for WOMAD if you are a fast knitter (or knit while you are there..!).and Cropredy.
You can use any stitch for the bag that appeals, taking the pattern as a basic shape. You could try a multicoloured honeycomb pattern, or you could combine stripes of different pattern textures. The simplest shape (on the left) is the type I remember with the tasselled handle continuing all down the sides.
Instructions.Striped bag (left)Using No 3 needles and main colour A, cast on 36 stitches. To make up the striped bagIf you want to line the bag, cut the lining to the size of the bag, allowing
6mm (½ inch) turnings. Cut 6 strands each of A and B into 178cm (70 inch) lengths. Divide the strands into 3 groups and plait together to form a handle, making an overhand knot at each end and leaving the ends to form a tassel. Stitch the plait in position along the side seams of the bag, having a tassel at each lower edge and leaving the remainder to form the handle. Sew on one button or bead to the centre of each side of the top edge
of the bag. Shoulder bag (right)To make this bag you can experiment with any textured pattern. Cast on 62 stitches and start knitting in your chosen pattern.
Continue in pattern until the length is about 3 times the height you want the bag to be, allowing up to 2 inches additional for the bottom of the bag. The bag shown was knitted 76cm (30 inches) long. For the strap, cast on 11 stitches and work 106cm (42") in single rib. Finishing the shoulder bagSew together so that the strap makes a gusset at the sides of the bag. You can optionally line the bag and add a couple of buttons and loops as shown in the Picture. Textured Pattern stitches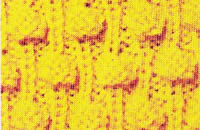 Bobble ribCast on a number of stitches divisible by 6 plus 2. 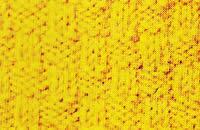 Cane basket stitchCast on a number of sts divisible by 6 plus 2. 1st row (right side): K2, *
P4, K2, repeat from * to end. 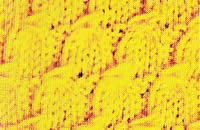 Tassel stitchCast on a number of sts divisible by 6 plus 2. You can find more textured stitches in these links: A different basket stitch and blackberry stitch. 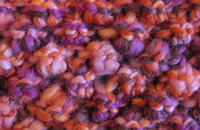 Honeycomb stitch in two colours 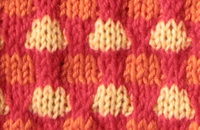 |
Materials
|
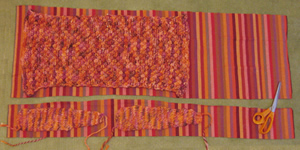
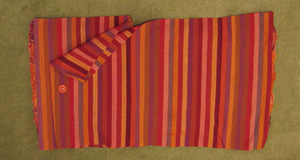
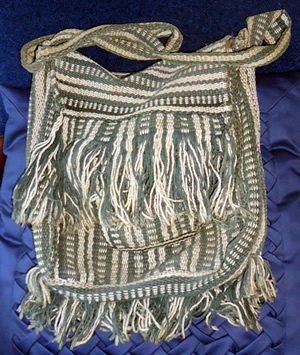
These types of bag were very popular in the 1970s - I used one instead of a school satchel. Probably the striped bag on the left above is the most stylistically similar to the ones I remember - I might choose different colours!
My own bag - now long lost - was woven in a mixture of dark red and blue. Below is a genuine "gap year" cloth bag from the 1970s which made its way backpacking to the far east and back. It is a mail bag style like the knitted version pictured on the right above.
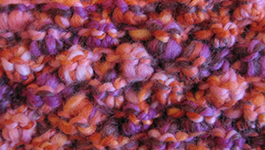
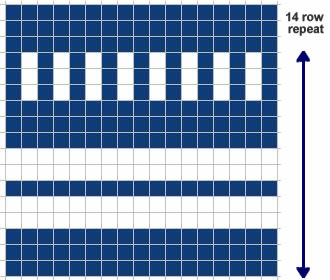
Below is a detail from the picture. The bag is woven of course but you could reproduce this pattern in knitting and easily add lots of tassels.
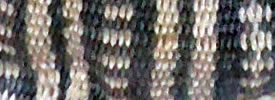
The main bag has the stripes running vertically, and the flap has them horizontal. If you want this effect, as it's not easy to knit vertical stripes while keeping the integrity of the fabric, you could use this chart as written for the flap, and then use it to knit the front and bag in one piece from side to side. If you were feeling really confident you could knit front and back (sideways rectangle) then pick up the stitches from the side of the knitting and knit the flap. So - to do this - before you start - work out your tension and then how large you want the bag to be. Lets say that it's 12 inches high and 10 inches wide. You need to cast on enough stitches to make 24 inches in the width of your knitting. Then knit stocking stitch in pattern for 10 inches and cast off. At the side of the knitting, pick up stitches for the flap. Usually this means picking up 2 stitches for every 3 rows to make a flat fabric without puckering. Then knit in the pattern for up to 12 inches to cover the front of the bag - if you are adding tassels you might want to knit as little as 4-6 inches.
Finally I'll leave you to extemporise on the handle and tassels. You might want to knit a plain handle about 2 inches wide and back it with some kind of webbing - then you would use it as the sides of the bag as you can see our original was made. Or you could just fold the bag without sides and apply a plaited cord handle as for the first bag on the left in these instructions.
You would probably need to use a 4 ply / DK / worsted on a smaller than usual needle to give a solid fabric, and it would be a good idea to line it with something firm.
I'm sure you could also make a simple bag from two woven panels (three for a mail bag) - perhaps made using a fairly crude home-made loom. I am planning to experiment with this in the near future. Watch this space (!).
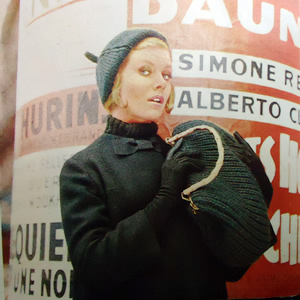
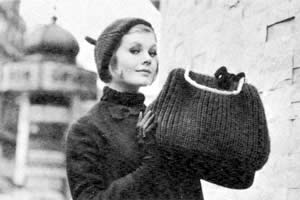
Elegantly modelled on location in the Boulevard des Capucines for Paris in Focus showing "hand knits from Paris: top fashion to knit in bulky wool"
InstructionsThe bag is knitted in a variation on fisherman's rib, or brioche stitch, while the beret is plain. BeretCast on 72 stitches and work 2½ ins. k1, p1 rib, working into the back of every stitch to give a twisted rib. Shape crown as follows: 1st row:
* k8, increase 1 by picking up horizontal
thread lying before next stitch and knitting into back of it; repeat from
* last 8 stitches, k8. [80 sts] 8th row:
(k1, p1, increase 1 by picking up horizontal thread lying before next
stitch and purling into back of it, p13, increase 1 as before, p1) 5 times:
90 stitches 15th row:
(k2togtbl, k13, k2tog, p1) 5 times. 20th row:
(k1, p15) 5 times. Continue decreasing 2 stitches thus in each stocking-stitch panel until
20 stitches remain. Break wool, thread through remaining stitches, draw up and fasten off. Stalk: Cast on 7 stitches and work 4 rows stocking-stitch; cast
off. Making up - beretPress beret lightly on wrong side under a damp cloth, avoiding ribbing.
Bag Sides (make two)Starting at base edge, cast on 60 stitches and work 1 row k1, p1 rib. Change to fancy rib pattern as follows:- Next Row: slip 1 knitwise, *
p1, knit into next stitch but through loop of row below at the same time
slipping stitch above off needle; repeat from *
to last stitch, p1. Repeat this row until piece measures 10 ins. Make another piece the same. Base:Cast on 14 stitches and work in rib pattern exactly as for main part
until piece measures 12 ins, slightly stretched. Making up - bagMake a hem across each piece of main part by folding over narrow piece
at top to wrong side. |
MaterialsBeret: 2 hanks Patons Big Ben Knitting. One pair of number 4 (6mm) needles. Lining material for bag approximately 21 inches square. Cardboard or stiffening for base 12x3½ inches; 9½
inch bag frame. TensionEquivalent to a basic tension of 15 stitches to 4 inches in stocking-stitch on No 4 needles. Size mattersBeret: average size. Abbreviationsk2tog: decrease by knitting 2 sts together. k2togtbl: decrease by knitting 2 sts together through back loops, sometimes called ssk (slip 1 knitwise, slip 1 knitwise, place 2 sts back on left needle and knit 2 slipped sts together through back loops). A Word on the WoolI don't know the size of the Big Ben hanks, but I am guessing they were at least 2oz (around 50g). My experience with chunky weight yarn bags leads me to guess that at least 6 50g balls might be required. Disclaimer
|
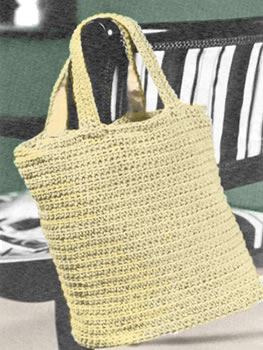
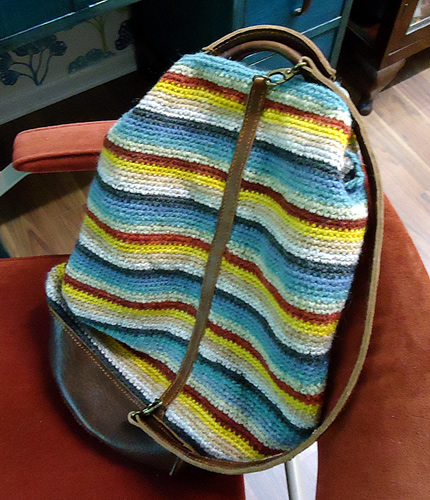
A crochet "holdall" or "tote" made in dishcloth cotton (subsequently re-branded craft cotton). This one is lined and the craft cotton is soft and flexible. You could make it from a coarser type of jute, (I would use a larger hook), and leave it unlined, to use as a vegetable or market bag. I have also seen some excellent bags and bowls made from Herdwick yarn; these are crocheted very tightly to create a rigid fabric so the bags will keep their shape unsupported.
InstructionsThe bag is made in one piece starting at the base, and the straps are then attached separately. Bag Start at the base and make 21 ch. 1st round: Work 3 dc into 2nd ch
from hook; 1 dc in each of next 18 ch; work 3 dc into last ch; then continue
along other side of ch by working 1 dc in next 18 ch; join with slip stitch
to first dc of round. [42 sts] Increase round: (inc1, 8 dc) 8 times. [80 sts] Work in ridge pattern as follows:- 1st round: Work 1 dc in each dc. Repeat last 2 rounds until work measures 11½ ins. from the the first
ridge worked at completion of base. Straps (Make 2)Make 49 ch and work in rows. 1st row: 1 dc in 2nd ch from hook,
1 dc in next 47 ch , I ch , turn. To Make Up:Cut piece of card to fit base. Cut lining, 18 x 24 inches (this lines the depth of bag and allows for gathered top as well). From remainder of material, cut two strips for lining handles, 15 x 2 inches, and for base, draw round the card shape on material and cut out about 1 in. away from pencil outline. Cover one side of card with lining, folding over and sticking surplus
material onto the other side. Join the 2 side edges of lining to make a tube. Top Finish: Fold over top edge of lining to wrong side to make
3½ inch hem, and stitch in position. ¼ inch down from top folded
edge. make 2 rows of stitching, ½ inch apart, for draw-string. Open
seam between the 2 rows and insert tape. Slip lining into bag and stitch into position by catching the 3½ inch hemline behind crochet (about ½ inch down from top of edge of crochet). Catch lining to base. Line handles and stitch on each side of bag. Draw up tape and tie. |
Materials2 x 4oz. hanks Dishcloth Cotton. Crochet abbreviations:ch: = chain Tension3 stitches to 1 inch in width. Size mattersDepth: 11½ inches; Oval base: 9½ x 4½ inches. A Word on the WoolThere are a number of brands sold as "dishcloth cotton" or "craft cotton" but it's a little pot luck with the thickness - you will have to experiment with the tension and how you want the bag to look. You are looking for an Aran weight yarn with a yardage of about 75m to 50g. Lion Brand Cotton is fairly common in the US and would be suitable if you can obtain it (and comes in exciting colours too...). You can literally use balls of string for this kind of bag but I've always found that works out surprisingly expensive. Disclaimer
|

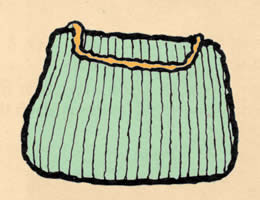
A minimalist 1960s design "carry-all" bag. The sides are meant to be rigid and incorporate cardboard (or plastic) supports. Yet another perfect project bag.
InstructionsCast on 54 stitches. Work in bands of garter stitch (every row knit)
and stocking stitch (knit one row, purl one row) as follows: 1st band:
3 inches in garter stitch (20 rows) Place markers at each end of the last row. [Editor's note: You
are about to knit the base of the bag.] Now work back of bag to match front, ie as 5th to 1st band in this order. Cast off loosely. Side panels(Make two the same) cast on 22sts, and work in bands of garter stitch and stocking stitch as for front. Cast off. Handles(Make two the same) cast on 8sts and work 13 inches in garter stitch. Making upPress pieces lightly on the wrong side. 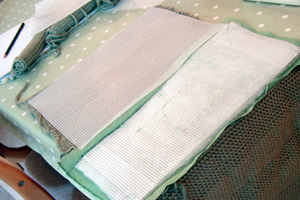 Join lining and place inside the bag with seams inside. Back the handles with petersham ribbon, then sew to top of bag 2½ inches from side seams. Turn in raw edges at top of lining and slip-stitch hem neatly in position. A Word on the Wool.I substituted 100g balls (each 75m/81yards) Debbie Bliss Cashmerino super chunky in Leaf green (colour 16022), knitted on number 5½mm needles, and this took double the stated requirement of the original yarn. I think you would require at least 5 balls of this wool to make the bag as written. I favoured a plain colour but the simplicity of the pattern would probably suit wilder colours. Debbie Bliss Cashmerino is a rather high quality smooth wool (it was on sale). As the size of a bag is not critical, substitute any superchunky with good results (checking your tension). It is suggested to support the sides with cardboard, but it may also be a good idea to use a smaller needle size than normally recommended for the yarn, so that the knitted fabric is firm - note that I did not do this. Adapting the Bag.As I used sale wool, I had only 4 x 100g balls, and in consequence I adapted the bag significantly to make it work. I made fabric handles and a fabric base (6 inches in length and matching the width of the bag). The handles are robust webbing covered in fabric. I sewed the handles
firmly to the plastic canvas side supports - so the handles and the plastic
canvas lining will take all the weight of the bag contents.  I made the base using plastic canvas (7 count) cut to size, and covered with some wadding plus the fabric, and then quilted through all layers, using the canvas as my guide. 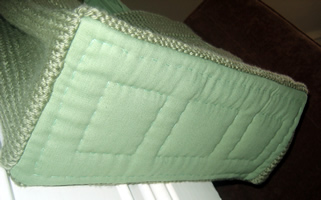 I machine sewed the sides of the bag to the base before hand sewing the knitted pieces up the sides using mattress stitch from the outside of the bag. Finally, in case you are tempted to try this as a felted bag - be warned:
felting garter stitch produces different results from stocking stitch
and your bag may end up a funny shape - or funnier than you intended.... |
MaterialsOriginal pattern calls for 6 x 50g balls of Patons Camelot which was
a bouclé yarn (in colour Corncob). See "a
word on the wool". One pair of number 7 (4½mm) needles. Fabric for lining. Cardboard or plastic canvas to support the sides. TensionOriginal tension 15sts x 21rows to 4 inches (10cm) on No 7 (4½mm) over stocking stitch. [My tension using Debbie Bliss yarn and number 5 (5½mm) needles is 14sts x 20rows to 4 inches over stocking stitch.] Size mattersOriginal bag is approximately 14in by 11in and 6in deep at the sides.
Disclaimer
|
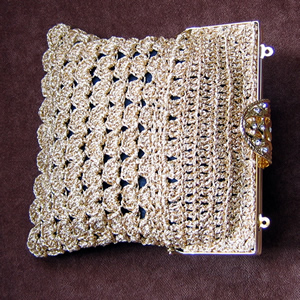
From November 1940:
"This pretty gold mesh bag will rejoice the hearts of those can still enjoy a little social life. Personally we are at this moment sitting in an air-raid shelter!"
One wonders if that was literally true - but I am sure the editorial team spent a lot of their time in shelters in this period of history in the UK.
InstructionsStarting at the top make 37 chain. 1st row: Miss 2 ch; 35tr; turn with
2ch. Now make a second piece exactly the same, and at the end of the final row, make 5ch, and then join the two pieces together by working across the first piece to end of 5ch in slipstitch, then slipstitch across 2nd piece, making a round. Now change to pattern and work backwards and forwards in rows,
1st row: 1ch; 3dc into 3rd of 5 ch; 3dc into first space * miss 2 spaces; 3 dc into next space; repeat from * across all trebles; then 3dc into 3rd of 5 ch; work across the other side as for the first [27 groups]. Slipstitch into the middle of 3dc made on the 5ch. Turn. 2nd row: (1dc, 1tr, 1dc) into middle of each group of 3dc. Turn with a slipstitch to the next treble. 3rd row: 1dc into same treble as
slipstitch, * (1dc, 3tr, 1dc) into next group,
1dc into centre of next group, * repeat from
* to * once. 4th row: (1dc, 5tr, 1dc) into the
middle of each group; turn with a slipstitch into second treble. 6th row: (1dc, 7tr, 1dc) into the
middle of each group; turn with a slipstitch into second treble. Now pinch the two sides of the bag together at the bottom edge and slipstitch
across from one side to the other, taking two outside scallops together,
to join. The scallops that were on the "side" of the bag are
twisted slightly to accomplish this, joining 9 full scallops and avoiding
a half-scallop at the sides of this edge. Making up:Sew in all ends. If your frame has fasteners designed for a cord handle, make a cord or buy a fine chain to form the handle. I made a kumihimo cord, as this is a current interest of mine. |
MaterialsExample shown is made from 2 balls of Twilleys Goldfingering. Bag handles from Bags
of Handles One No. 11 (3mm) crochet hook. Fabric remnant for lining. Crochet abbreviations:ch = chain Remember these are English crochet instructions where dc is equivalent to US single crochet - see "Terminology" in the side bar. TensionNo tension given - my 37 treble worked out to 5 inches when not eased
out on frame. Size mattersFits 5¼ inch width handle. Disclaimer
|
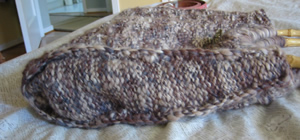
I intended to knit this bag from a pattern where the designer confessed she had been forced to change her mind half way through knitting a hat, and call it a bag. I did not go ahead with my plan, and my pattern is now far removed from that original idea, (except for the handles!). The colours in this wool remind me of the stoney flint beaches on the south coast of England, where I was born and brought up.
InstructionsWith No. 3 needles, cast on 51 stitches, and work 5 rows stocking stitch
starting with a knit row. With right side facing, commence pattern as follows: Row 1: P4, K3, (P5, K3) 5 times, P4
[Editor's note: I chose a textured stitch to best suit the random and nubbly texture of Chunky Print. The muted stone colourway works well, I think, with this basket-weave stitch. If you have a more 'romantic' colourway you may prefer a different pattern. See "blackberry stitch" section below for an alternative four-row pattern to substitute here if you like]. Repeat the six-row pattern 20 times or to desired length, and then the
first 3 rows again. Next row: wrong side facing, Knit to end. Side panels (make 2 the same): Cast on 10sts and work as follows in reverse stocking stitch throughout. Row 1: P10 Continue in reverse st st for 28 more rows. Making up - Cut and construct the lining before sewing the bag
sections together. Construct the lining - do this before attaching the sides to the
bag. Cut the fabric to the width of the bag, using the body section as a guide, and remembering to leave enough for the seams at the edges. Do not cut the fabric to length at this point, unless you are making a simple pocket style bag (see "adapting the pattern"). Press the side panels lightly using a damp cloth. Using the side panels as pattern pieces, cut two fabric side pieces from the fabric you have left over, not forgetting to leave a seam allowance. Fold over the top edge on each piece.
[Editor's note: A lining does not have to be too exact, (the knitting outside is stretchy); it should support the contents of the bag and protect the bag from distorting - I try and make it err just slightly larger than the knitted bag "at rest".] Form the internal pocket section in the lining as follows:
Pin and sew the side panel lining pieces to the main body of the lining.
Inserting the side panels - and completing the bag.
Sew the lining into the bag, slipstitching around the handles and bag mouth. Do not pull your stitches too tight.
Adapting the patternYou may wish to adapt the bag by omitting the sides altogether, either
for simplicity, or to save on wool. Blackberry stitchAn alternative four-row pattern to use in place of the six-row basket weave pattern. [Editor's note: Because of its "one-from-three, three-from-one" nature, this stitch is also know in the Irish tradition as Trinity stitch.]
The four-row pattern is worked over 50 sts using number 2 needles: To complete the main section of the bag, repeat the four-row pattern
26 times or to desired length, and then the first 3 rows again. |
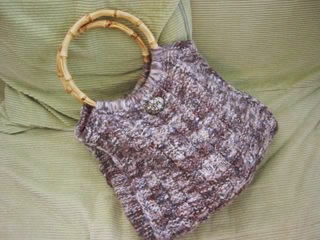
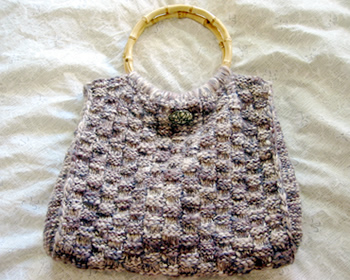
Materials3 x 100g balls (each 100m/109yards) Rowan Chunky Print, colour 078, Pebble Dash, or 081 Shriek. One pair of number 3 needles. Two bamboo-style round handles. Half a metre (or half a yard) of cotton fabric for lining. 1 exotic button oddment (about ¾-1 inch in size.) Tension14sts x 18rows to 4 inches (10cm) on No 3 (6½mm) needles over basket-weave
pattern. CrochetRemember these instructions use UK terms. Double crochet is equivalent to US "single crochet". Size mattersBag is approximately 14in by 12in and 2in deep at the sides. A word on the wool.Chunky Print has been discontinued by Rowan (sadly, as it seemed to have
a pleasing colour range, and knit up quickly and economically). Quilting
fabrics are ideal for the lining; they are inexpensive and come in
a fabulous range of colours. |
Here is my completed Pebbles bag, in the Shriek colourway with blackberry stitch. As a decoration I used a brooch that Alison gave me years ago - the idea being that it was a heart for me to "wear on my sleeve". The lining is an old Kaffe Fassett quilt fabric which turned out to be an improbably good match.

Here is the original Pebbles bag in the Pebble Beach colourway with basket weave stitch. The brooch decoration, like the heart above, tones so well with the wool that it provides a very subtle effect on the bag.
© Christina Coutts 2007
![]()