All-year-round jumper
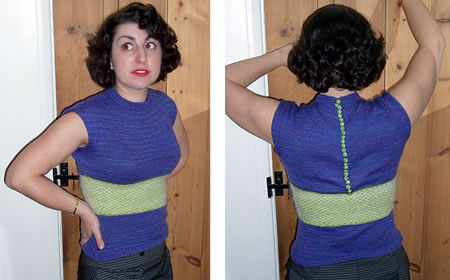
Another beautifully crafted early 1950s recreation by Sara; a neat little design which so suits her figure. Instructions are for one size only, and Sara made hers using Posh Yarns Diana 2ply, which seems to match the tension of the original 3 ply yarn. You might achieve more flexibility in fit and yarn choice if you opt for a standard 4ply instead.
FrontWith No 12 (2¾mm) needles and main shade cast on cast on 120 sts
loosely and work 24 rows in stocking stitch, starting with a knit row.
Make a hem on the next row by knitting 1 stitch from needle together
with 1 stitch from cast-on edge. Change to No.11 needles and work 4 rows stocking stitch, then shape basque as follows: Next row: k33, k2togtbl, k50, k2tog,
k33 Continue decreasing thus on next and every following 6th row until 108
sts. remain. Shape waist as follows: Next row: *k8,
k2tog; repeat from * to last 8 sts,
k8 Begin working the check pattern, introducing the two contrast colours
C1 and C2.
1st row (right side facing): *
k2 C1, k2 C2; repeat from * to end.
Continue in pattern repeating the 4 rows as set above, increasing 1 stitch at each end of the next and every following 6th row. Incorporate the extra sts keeping the chack pattern correct. When work measures 10 inches at centre....
With right side facing, cast on 10 sts at the beginning of the next 2
rows for the sleeves, [150 sts]. Cast off 10, k50; turn and leave remaining sts on a stitch holder. Now decrease 1 stitch at the neck edge on the next 10 rows; then, keep the neck edge straight, but at the same time cast off 5 sts on every alternate row at the armhole edge until all sts are gone. Return to the remaining sts on the stitch holder; slip the centre 30
sts on to a stitch holder, and rejoin the wool to the remaining 60 sts. BackWork as for the front to the end of the check pattern. Work 2 rows in main shade, then divide for back opening. Cast off remaining stitches. Rejoin the wool to the remaining stitches at the centre and work to correspond with the right half of the back. To Make UpPress work on wrong side under a damp cloth. Neck: With right side facing, main shade, and No 12 needles,
pick up and knit 90 sts all round the neck, including 30 sts from the
stitch holder on the front. Join side and under-arm seams; work 2 rows dc round each sleeve edge. Turn back 1 inch of sleeve to form a cuff and catch in position at shoulder and under-arm. [Editor's note: Sara
leaves the sleeves plain after this point - instructions below introduce
additional trim.] Work 3 rows dc down left side of back opening, including neckband, then 3 rows down right side making 24 button loops in 3rd row. Sew on buttons. |
MaterialsOriginal materials called for: 5 ozs Patons Beehive Fingering 3ply in main shade (lipstick red) and 1oz each of grey and white. A pair each Nos 11 and 12 (3mm and 2¾mm) needles. A No 12 (2¾mm) crochet hook. 24 small buttons. Tension 8 sts and 10 rows to an inch. Size mattersOriginal sized for bust 33-34 inch bust; See "adapting the size". Abbreviationsk2tog: decrease by knitting 2 sts together. k2togtbl: decrease by knitting 2 sts together through back loops, sometime called ssk (slip 1 knitwise, slip 1 knitwise, place 2 sts back on left needle and knit 2 slipped sts together through back loops) Crochet abbreviations:ch = chain Remember these are English crochet instructions where dc is equivalent to US single crochet - see "Terminology" in the side bar. A word on the wool.Sara used Posh Yarn Diana 2 ply - about 600 yards for the main colour, and about 90 yards for the green contrast. For the white she used Capricorn Yarns brushed mohair 4 ply. Disclaimer
|
Adapting the size:As with many of these 50s patterns, only one size is given: 33-34 inch bust. The sweater is designed to fit snugly, but probably will not fit most of us. It is designed to be knitted in 3 ply at about 30 sts to 4 inches. You can gain some leeway by changing the yarn - this is a simple shape so it should cope with that - you should check the length you want and adjust the inches you knit accordingly. Sara cleverly converted the pattern to a top down knit on the fly, and this would be ideal to try that that if you are bold enough. |
|
